nginx负载均衡配置实战
一、配置基于域名虚拟主机的web节点
web02和web01做同样的操作,nginx配置文件如下:
[root@web01 conf]# cat nginx.conf
worker_processes  1;
events {
    worker_connections  1024;
}
http {
    include       mime.types;
    default_type  application/octet-stream;
    sendfile        on;
    keepalive_timeout  65;
    log_format  main  '$remote_addr - $remote_user [$time_local] "$request" '
                      '$status $body_bytes_sent "$http_referer" '
                      '"$http_user_agent" "$http_x_forwarded_for"';
    server {
        listen       80;
        server_name  localhost;
        location / {
            root   html;
            index  index.html index.htm;
        }
        error_page   500 502 503 504  /50x.html;
        location = /50x.html {
            root   html;
        }
		access_log logs/access.log main;
    }
}

接下来创建站点目录及对应测试文件并把域名加入到hosts解析并进行测试
二、nginx负载均衡反向代理实践
LB01 nginx配置文件如下:
[root@lb01 conf]# cat nginx.conf
worker_processes  1;
events {
    worker_connections  1024;
}
http {
    include       mime.types;
    default_type  application/octet-stream;
    sendfile        on;
    keepalive_timeout  65;
	upstream www_server_pools   {
        server 192.168.100.107:80   weight=1;
        server 192.168.100.108:80   weight=1;
    }
    server {
        listen       80;
        server_name  www.dmtest.com;
        location / {
        proxy_pass http://www_server_pools;
        }

        }
    }
之后配置hosts解析到代理的IP或VIP上,重新加载服务即可
[root@lb01 conf]# tail -1 /etc/hosts
192.168.100.105		www.dmtest.com
[root@lb01 conf]# systemctl restart nginx
[root@lb01 conf]# curl www.dmtest.com
192.168.100.107
[root@lb01 conf]# curl www.dmtest.com
192.168.100.108
反向代理虚拟主机节点服务器案例
在代理向后端服务器发送的http请求头中加入host字段信息后,若后端服务器配置有多个虚拟主机,他就可以识别代理的是哪个虚拟主机。这是节点服务器多虚拟主机时的关键配置,整个nginx代理配置为:
[root@lb01 conf]# cat nginx.conf
worker_processes  1;
events {
    worker_connections  1024;
}
http {
    include       mime.types;
    default_type  application/octet-stream;
    sendfile        on;
    keepalive_timeout  65;
	upstream www_server_pools   {
        server 192.168.100.107:80   weight=1;
        server 192.168.100.108:80   weight=1;
    }
    server {
        listen       80;
        server_name  www.dmtest.com;
        location / {
        proxy_pass http://www_server_pools;
        proxy_set_header Host $host;    #在代理向后端服务器发送的http请求头中加入host字段信息后,若后端服务器配置有多个虚拟主机,他就可以识别代理的是哪个虚拟主机。这是节点服务器多虚拟主机时的关键配置.
        }

        }
    }
经过反向代理后的节点服务器记录用户IP案例
在反向代理中节点服务器对站点的访问日志的第一个字段记录的并不是客户端的IP,而是反向代理服务器的IP,最后一个字段也是"-",日志如下:
[root@web01 conf]# tail -2 ../logs/access.log
192.168.100.105 - - [14/Sep/2018:13:41:02 +0800] "GET / HTTP/1.0" 200 16 "-" "curl/7.29.0" "-"
192.168.100.105 - - [16/Sep/2018:13:57:45 +0800] "GET / HTTP/1.0" 200 16 "-" "curl/7.29.0" "-"
在反向代理请求后端服务器节点的请求头中增加获取的客户端IP的字段信息,然后节点后端可以通过程序或相关的配置接受X-Forwarded-For传过来的用户真实IP信息。
在LB01上配置如下:
[root@lb01 conf]# cat nginx.conf
worker_processes  1;
events {
    worker_connections  1024;
}
http {
    include       mime.types;
    default_type  application/octet-stream;
    sendfile        on;
    keepalive_timeout  65;
	upstream www_server_pools   {
        server 192.168.100.107:80   weight=1;
        server 192.168.100.108:80   weight=1;
    }
    server {
        listen       80;
        server_name  www.dmtest.com;
        location / {
        proxy_pass http://www_server_pools;
	proxy_set_header X-Forwarded-For $remote_addr;    #在代理向后端服务器发送的http请求头中加入X-Forwarded-For字段信息,用于后端服务器程序、日志等接收记录真实用户的IP,而不是代理服务器上的IP;
        }

        }
    }
注意,节点服务器上需要的让问日志,如果要记录用户的真实IP,还必须进行日志格式配置,这样才能把代理传过来的X-Forwarded_For头信息记录下来,具体配置为:
在web01 上操作
[root@web01 conf]# cat nginx.conf
worker_processes  1;
events {
    worker_connections  1024;
}
http {
    include       mime.types;
    default_type  application/octet-stream;
    sendfile        on;
    keepalive_timeout  65;
    log_format  main  '$remote_addr - $remote_user [$time_local] "$request" '
                      '$status $body_bytes_sent "$http_referer" '
                      '"$http_user_agent" "$http_x_forwarded_for"';
                        #"$http_x_forwarded_for",如果希望在第一行显示,可以替换掉第一行的'$remote_addr变量
    server {
        listen       80;
        server_name  localhost;
        location / {
            root   html;
            index  index.html index.htm;
        }
        error_page   500 502 503 504  /50x.html;
        location = /50x.html {
            root   html;
        }
		access_log logs/access.log main;
    }
}
再次查看站点日志效果如下:
[root@web01 conf]# tail -5 ../logs/access.log
192.168.100.105 - - [16/Sep/2018:14:24:28 +0800] "GET / HTTP/1.0" 200 16 "-" "Mozilla/5.0 (Windows NT 10.0; Win64; x64) AppleWebKit/537.36 (KHTML, like Gecko) Chrome/68.0.3440.106 Safari/537.36" "192.168.100.1"
192.168.100.105 - - [16/Sep/2018:14:24:30 +0800] "GET / HTTP/1.0" 304 0 "-" "Mozilla/5.0 (Windows NT 10.0; Win64; x64) AppleWebKit/537.36 (KHTML, like Gecko) Chrome/68.0.3440.106 Safari/537.36" "192.168.100.1"
192.168.100.105 - - [16/Sep/2018:14:24:30 +0800] "GET / HTTP/1.0" 200 16 "-" "Mozilla/5.0 (Windows NT 10.0; Win64; x64) AppleWebKit/537.36 (KHTML, like Gecko) Chrome/68.0.3440.106 Safari/537.36" "192.168.100.1"
192.168.100.105 - - [16/Sep/2018:14:24:31 +0800] "GET / HTTP/1.0" 200 16 "-" "Mozilla/5.0 (Windows NT 10.0; Win64; x64) AppleWebKit/537.36 (KHTML, like Gecko) Chrome/68.0.3440.106 Safari/537.36" "192.168.100.1"
192.168.100.105 - - [16/Sep/2018:14:24:32 +0800] "GET / HTTP/1.0" 200 16 "-" "Mozilla/5.0 (Windows NT 10.0; Win64; x64) AppleWebKit/537.36 (KHTML, like Gecko) Chrome/68.0.3440.106 Safari/537.36" "192.168.100.1"
nginx反向代理相关重要基础参数如下:
proxy_pass http://blog_server_pools; 用于指定反向代理的服务器池。
proxy_set_header Host $host; 当后端Web服务器上也配置有多个虚拟主机时,需要用该 Header来区分反向代理哪个主机名。
proxy_ set_ header X-Forwarded-For $remote_addr; 如果后端Web服务器上的程序需要获取用户P,从该Heard头获取。
也可以把这些代理参数单独保存在一个文件中,通过include proxy.conf引入进来。
vim proxy.conf
proxy_redirect off;
        proxy_set_header Host $host;
        proxy_set_header X-Real-IP $remote_addr;
        proxy_set_header X-Forwarded-For $proxy_add_x_forwarded_for;
        proxy_connect_timeout 90;
        proxy_send_timeout 90;
        proxy_read_timeout 90;
        proxy_buffer_size 4k;
        proxy_buffers 4 32k;
        proxy_busy_buffers_size 64k; proxy_temp_file_write_size 64k;
在nginx主配置文件中引入
vim nginx.conf
worker_processes  1;
events {
    worker_connections  1024;
}
http {
    include       mime.types;
    default_type  application/octet-stream;
    sendfile        on;
    keepalive_timeout  65;

upstream web_pools {

    server 10.0.0.7:80 weight=5 max_fails=10 fail_timeout=10s;
    server 10.0.0.8:80 weight=5;
    #server 10.0.0.10:80 weight=5  backup;
}
    server {
        listen       80;
        server_name  www.dmtest.com;
        location / {
            root   html;
            index  index.html index.htm;
            proxy_pass http://web_pools;
        }
        include proxy.conf;
    }
}
三、根据URL中的目录地址实现代理转发
说明:通过nginx实现动静分离,即通过nginx反向代理配置规则实现让动态资源和静态资源及其他业务分别由不同的服务器解析,以解决网站性能、安全、用户体验等重要问题。

需求:
当用户请求www.dmtets.com/upload/xx 地址时,实现由upload上传服务器池处理请求。
当用户请求www.dmtest.com/static/xx地址时,实现由静态服务器池处理请求。
除此以外,对于其他访问请求,全部由默认的动态服务器池处理请求。
了解需求后,就可以进行upstream模块服务器池的配置了。static_pools为静态服务器池,有一个服务器,地址为192.168.100.107,端口为80
upstream static_pools {
    server 192.168.100.107:80 weight=1;
}
upload_pools为上传服务器池,有一个服务器,地址为192.168.10.108,端口为80
upstream upload_pools {
    server 192.168.100.108:80 weight=1;
}
default_pools 为默认的服务器池,即动态服务器池,有一个服务器,地址为192.168.100.109,端口为80
upstream default_pools {
    server 192.168.100.109:80 weight=1;
}
下面利用location或if语句把不同的URI(路径)请求,分给不同的服务器池处理,具体配置如下:
方案1:以location方案实现
将符合static的请求交给静态服务器池static_pools,配置如下:
location /static/ {
    proxy_pass http://static_pools;
    include proxy.conf
}
将符合upload的请求交给上传服务器池upload_pools,配置如下:
location /upload/ {
    proxy_pass http://upload_pools;
    include proxy.conf
}
不符合上述规则的请求,默认全部交给动态服务器池default_pools,配置如下:
location / {
    proxy_pass http://default_pools;
    include proxy.conf
}
方案2:以if语句实现
if ($request_uri ~* "^/static/(.*)$")
{
	proxy_pass http://static_pools/$1;
}

if ($request_uri ~* "^/upload/(.*)$")
{
	proxy_pass http://upload_pools/$1;
}

location / {
	proxy_pass http://default_polls;
	include proxy.conf;
}
方案1,nginx反向代理完整配置如下:
[root@lb01 conf]# cat nginx.conf
worker_processes  1;
events {
    worker_connections  1024;
}
http {
    include       mime.types;
    default_type  application/octet-stream;
    sendfile        on;
    keepalive_timeout  65;
	upstream static_pools   {
        server 192.168.100.107:80   weight=1;
    }

	upstream upload_pools   {
        server 192.168.100.108:80   weight=1;
    }

	upstream default_pools   {
        server 192.168.100.109:80   weight=1;
    }

    server {
        listen       80;
        server_name  www.dmtest.com;
        location / {
        proxy_pass http://default_pools;
		include proxy_pass;
        }

        location /static/ {
        proxy_pass http://static_pools;
		include proxy_pass;
        }

        location /upload/ {
        proxy_pass http://upload_pools;
		include proxy_pass;
        }

        }
    }
方案二完整配置如下:
[root@lb01 conf]# cat nginx.conf
worker_processes  1;
events {
    worker_connections  1024;
}
http {
    include       mime.types;
    default_type  application/octet-stream;
    sendfile        on;
    keepalive_timeout  65;
	upstream static_pools   {
        server 192.168.100.107:80   weight=1;
    }

	upstream upload_pools   {
        server 192.168.100.108:80   weight=1;
    }

	upstream default_pools   {
        server 192.168.100.109:80   weight=1;
    }

    server {
        listen       80;
        server_name  www.dmtest.com;
		if ($request_uri ~* "^/static/(.*)$")
		{
			proxy_pass http://static_pools/$1;
			include proxy.conf;
		}

		if ($request_uri ~* "^/upload/(.*)$")
		{
			proxy_pass http://upload_pools/$1;
			include proxy.conf;
		}

		location / {
			proxy_pass http://default_polls;
			include proxy.conf;
		}
    }
}
proxy.conf配置如下:
vim proxy.conf
proxy_redirect off;
        proxy_set_header Host $host;
        proxy_set_header X-Real-IP $remote_addr;
        proxy_set_header X-Forwarded-For $proxy_add_x_forwarded_for;
        proxy_connect_timeout 90;
        proxy_send_timeout 90;
        proxy_read_timeout 90;
        proxy_buffer_size 4k;
        proxy_buffers 4 32k;
        proxy_busy_buffers_size 64k; proxy_temp_file_write_size 64k;
在3台web服务器上做测试配置
web01 为static静态服务,地址端口为:192.168.100.107:80,配置如下:
cd /application/nginx/html/
mkdir static
echo static_pools >sttic/index.html
curl http://www.dmtest.com/static/index.html
web02 为upload上传服务,地址端口为:192.168.100.108:80,配置如下:
cd /application/nginx/html/
mkdir upload
echo upload_pools >sttic/index.html
curl http://www.dmtest.com/upload/index.html
web03 为动态服务器节点,地址端口为:192.168.100.109:80,配置如下:
cd /application/nginx/html/
mkdir default
echo default_pools >sttic/index.html
curl http://www.dmtest.com/deault/index.html
四、根据客户端的设备(user_agent)转发实践
根据客户端的设备(user_agent)转发实践需求
根据计算机客户端浏览器的不同设置对应的匹配规则如下:
location / {
	if ($http_user_agent ~* "MSIE")
	#如果请求的浏览器为IE(MSIE),则让请求有static_pools池处理;
	{
		proxy_pass http://static_pools;
	}

	if ($http_user_agent ~* "Chrome")
	#如果请求的为谷歌浏览器(Chrome),则让请求有upload_pools池处理;
	{
		proxy_pass http://upload_pools;
	}

	proxy_pass http://default_pools;
	#其他客户端,有default_pools处理;
	include proxy.conf;
}
完整的配置文件如下:
[root@lb01 conf]# cat nginx.conf
worker_processes  1;
events {
    worker_connections  1024;
}
http {
    include       mime.types;
    default_type  application/octet-stream;
    sendfile        on;
    keepalive_timeout  65;
	upstream static_pools   {
        server 192.168.100.107:80   weight=1;
    }

	upstream upload_pools   {
        server 192.168.100.108:80   weight=1;
    }

	upstream default_pools   {
        server 192.168.100.109:80   weight=1;
    }

    server {
        listen       80;
        server_name  www.dmtest.com;
		location / {
		if ($http_user_agent ~* "MSIE")
		#如果请求的浏览器为IE(MSIE),则让请求有static_pools池处理;
		{
			proxy_pass http://static_pools;
		}

		if ($http_user_agent ~* "Chrome")
		#如果请求的为谷歌浏览器(Chrome),则让请求有upload_pools池处理;
		{
			proxy_pass http://upload_pools;
		}

		proxy_pass http://default_pools;
		#其他客户端,有default_pools处理;
		include proxy.conf;
		}
		access_log off;
    }
}
除了针对浏览器外,上述"$http_user_agent"变量也可以针对移动端,比如安卓、苹果、Ipad设备进行匹配,去请求指定的服务器,具体配置如下:
location / {
	if ($http_user_agent ~* "android")

	{
		proxy_pass http://android_pools;	#这个是Android服务器池,需要提前定义upstream
	}

	if ($http_user_agent ~* "iphone")		#这个是IPhone服务器池,需要提前定义upstream
	{
		proxy_pass http://iphone_pools;
	}

	proxy_pass http://pc_pools;
	include extra/proxy.conf;
}
五、根据文件扩展名实现代理转发
除了根据URI路径及user_agent转发外,还可以实现根据文件扩展名进行转发
相关server配置
location方法的匹配规则如下:
location ~ .*.(gif|jpg|jpeg|png|bmp|swf|css|js)$ {
    prooxy_pass http://static_pools;
    include proxy.conf;
}
下面是if语句方法的匹配规则:
if ($request_uri ~* ".*.(php|php5)$")
{
    proxy_pass http://php_server_pools;
}

if ($request_uri ~* ".*.(jsp|jsp*|do|do*)$")
{
    proxy_pass http://java_server_pools;
}
根据扩展名转发的应用场景
可以根据扩展名实现资源动静分离访问,如图片、视频等请求静态服务器池,PHP、JSP等请求动态服务器池,示例如下:
location ~ .*.(gif|jpg|jpeg|png|bmp|swf|css|js)$ {
    prooxy_pass http://static_pools;
    include proxy.conf;
}
location ~ .*.(php|php3|php5)$ {
	proxy_pass http://dynameic_pools;
	include proxy.conf;
}
六、nginx负载均衡检测检点状态
淘宝技术团队开发了一个 Tengine( Nginx的分支)模块 nginx_upstream_check_module,用于提供主动式后端服务器健康检査。通过它可以检测后端 realserver的健康状态,如果后端 realserver不可用,则所有的请求就不会转发到该节点上。
Tengine原生支持这个模块,而 Nginx则需要通过打补丁的方式将该模块添加到Nginx中。补丁下载地址:https:/github.com/yaoweibin/nginx_upstream_check_module下面介绍如何使用这个模块。
upstream_check_module介绍:
该模块可以为Tengine提供主动式后端服务器健康检查的功能。

该模块在Tengine-1.4.0版本以前没有默认开启,它可以在配置编译选项的时候开启:./configure--with-http_upstream_check_module

upstream_check_module官方文档
http://tengine.taobao.org/document_cn/http_upstream_check_cn.html

upstream_check_module下载地址
https://github.com/yaoweibin/nginx_upstream_check_module
给nginx打上补丁的安装
[root@lb01 ~]# cd /home/dm/tools/
wget https://github.com/yaoweibin/nginx_upstream_check_module/archive/master.zip
[root@lb01 tools]# unzip master.zip

[root@lb01 tools]# cd nginx-1.8.1/

[root@lb01 nginx-1.8.1]# yum install -y patch

[root@lb01 nginx-1.8.1]# patch -p1 < ../nginx_upstream_check_module-master/check_1.7.2+.patch
patching file src/http/modules/ngx_http_upstream_ip_hash_module.c
patching file src/http/modules/ngx_http_upstream_least_conn_module.c
patching file src/http/ngx_http_upstream_round_robin.c
Hunk #1 succeeded at 9 with fuzz 2.
Hunk #2 FAILED at 88.
Hunk #3 FAILED at 142.
Hunk #4 FAILED at 199.
Hunk #5 FAILED at 305.
Hunk #6 FAILED at 345.
Hunk #7 succeeded at 418 (offset 16 lines).
Hunk #8 succeeded at 516 (offset 9 lines).
5 out of 8 hunks FAILED -- saving rejects to file src/http/ngx_http_upstream_round_robin.c.rej
patching file src/http/ngx_http_upstream_round_robin.h
Hunk #1 succeeded at 31 (offset 1 line).
[root@lb01 nginx-1.8.1]# ./configure --user=www --group=www --prefix=/application/nginx-1.8.1 --with-http_stub_status_module --with-http_ssl_module --with-http_stub_status_module --add-module=../nginx_upstream_check_module-master/

[root@lb01 nginx-1.8.1]# make

[root@lb01 nginx-1.8.1]# mv /application/nginx/sbin/nginx{,.ori}

[root@lb01 nginx-1.8.1]# cp ./objs/nginx /application/nginx/sbin/

[root@lb01 nginx-1.8.1]# /application/nginx/sbin/nginx -t
nginx: the configuration file /application/nginx-1.8.1/conf/nginx.conf syntax is ok
nginx: configuration file /application/nginx-1.8.1/conf/nginx.conf test is successful

[root@lb01 nginx-1.8.1]# /application/nginx/sbin/nginx -V
nginx version: nginx/1.8.1
built by gcc 4.8.5 20150623 (Red Hat 4.8.5-28) (GCC)
built with OpenSSL 1.0.2k-fips  26 Jan 2017
TLS SNI support enabled
configure arguments: --user=www --group=www --prefix=/application/nginx-1.8.1 --with-http_stub_status_module --with-http_ssl_module --with-http_stub_status_module --add-module=../nginx_upstream_check_module-master/
patch参数说明:
-p0 选项要从当前目录查找目的文件(夹)
-p1 选项要忽略掉第一层目录,从当前目录开始查找。

在这里以实例说明:
old/modules/pcitable
如果使用参数-p0,那就表示从当前目录找一个叫做old的文件夹,在它下面寻找modules下的pcitable文件来执行patch操作。
如果使用参数-p1,那就表示忽略第一层目录(即不管old),从当前目录寻找modules的文件夹,在它下面找pcitable。这样的前提是当前目录必须为modules所在的目录。
upstream_check_module语法
Syntax: checkinterval=milliseconds [fall=count] [rise=count] [timeout=milliseconds][default_down=true|false] [type=tcp|http|ssl_hello|mysql|ajp] [port=check_port]
Default: 如果没有配置参数,默认值是:interval=30000 fall=5rise=2 timeout=1000 default_down=true type=tcp
Context: upstream
指令后面的参数意义是:
interval:向后端发送的健康检查包的间隔。单位是毫秒。
fall(fall_count): 如果连续失败次数达到fall_count,服务器就被认为是down。
rise(rise_count): 如果连续成功次数达到rise_count,服务器就被认为是up。
timeout: 后端健康请求的超时时间。单位是毫秒。
default_down: 设定初始时服务器的状态,如果是true,就说明默认是down的,如果是false,就是up的。默认值是true,也就是一开始服务器认为是不可用,要等健康检查包达到一定成功次数以后才会被认为是健康的。
type:健康检查包的类型,现在支持以下多种类型
tcp:简单的tcp连接,如果连接成功,就说明后端正常。
ssl_hello:发送一个初始的SSL hello包并接受服务器的SSL hello包。
http:发送HTTP请求,通过后端的回复包的状态来判断后端是否存活。
mysql: 向mysql服务器连接,通过接收服务器的greeting包来判断后端是否存活。
ajp:向后端发送AJP协议的Cping包,通过接收Cpong包来判断后端是否存活。
port: 指定后端服务器的检查端口。你可以指定不同于真实服务的后端服务器的端口,比如后端提供的是443端口的应用,你可以去检查80端口的状态来判断后端健康状况。默认是0,表示跟后端server提供真实服务的端口一样。该选项出现于Tengine-1.4.0。
配置nginx健康检查如下:
[root@lb01 conf]# cat nginx.conf
worker_processes 1;
events {
worker_connections 1024;
}
http {
include mime.types;
default_type application/octet-stream;
sendfile on;
keepalive_timeout 65;
upstream www_server_pools {
server 192.168.100.107:80 weight=1;
server 192.168.100.108:80 weight=1;
check interval=3000 rise=2 fall=5 timeout=1000 type=http;
check_http_send "HEAD /HTTP/1.0
";
check_http_expect_alive http_2xxhttp_3xx;
}
server {
listen 80;
server_name www.dmtest.com;
location / {
proxy_pass http://www_server_pools;
proxy_set_header X-Forwarded-For $remote_addr;
}
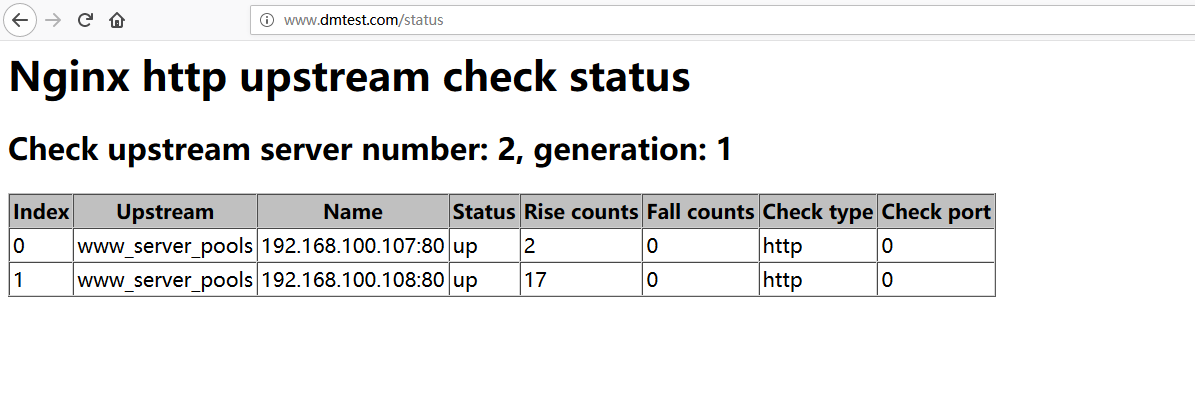
location /status {
check_status;
access_log off;
allow SOME.IP.ADD.RESS;
deny all;
}
}
}
上面的配置意思是对www_server_pools这个负载均衡条目中的所有节点,每隔3秒监测一次请求2次正常则标记realserver状态为up,如果检测5次都失败,则标记realserver的状态为down,超时时间为1秒,检查的协议是HTTP。
结果如下图:
七、proxy_next_upstream参数补充
当nginx接收后端服务器proxy_next_upstream参数定义的状态码时,会将这个请求转发给正常工作的后端服务器,例如500、502、503、504,此参数可以提升用户的访问体验,具体配置如下:
server {
	listen 80;
	server_name www.dmtest.com
	location / {
	proxy_pass http://www_server_pools;
	proxy_next_upstream error timeout invalid_header http_500 http_502 http_503 http_504;
	include proxy.conf;
	}
}