转自:http://blog.csdn.net/pizi0475/article/details/50396277
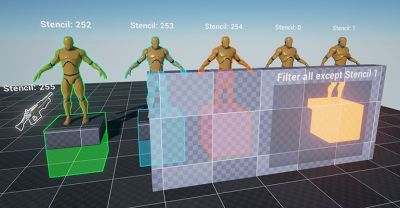
随着近来虚幻引擎4的一些变化,渲染多种颜色的轮廓线已经可以实现了!通过自定义模板,类似自定义深度的缓冲区——但允许网格作为整数值来渲染。它提供了一个0~255范围,可以在网格上定义不同颜色的轮廓线,甚至可以多个功能混用,例如下图使用不同模板索引的描边效果。
原始自定义深度
去年制作的原始轮廓线材质是基于在自定义模板可用之前的自定义深度。也就是说,在作为一个单通道深度值绘制到缓冲区后,不能决定网格的类型。原始效果用到的指令很少,所以若你的游戏不需要多种颜色,可以考虑使用旧的特效。
新特效依旧使用自定义深度来决定遮蔽(可选的),通过在后期处理中修改FillAlpha参数来添加一个模糊的覆盖颜色来调整。可以不勾选材质实例中的FillOcclusion选项来关闭该遮蔽。

开启自定义模板
自定义模板缺省是不开启的,可以依次点击Window> Project Settings > Rendering > Post Process > CustomDepth-stencil Pass ,将其设为Enabled with Stencil来启用自定义模板。
在本例中,一些网格在自定义模板视图中不可见,他们的模板值为0(缺省),不包含在缓冲区中。

为了让它们在视图中可见,依次查看Lit > Buffer Visualizer > Custom Stencil。
你可以通过渲染目录下网格的编辑菜单,来启用自定义深度或改变模板索引。

若你使用C++,为了方便起见,可以在游戏头文件(比如:survivalGame.h)中对它们进行宏定义。
/* Stencil index mapping to PP_OutlineColored */
#define STENCIL_FRIENDLY_OUTLINE 252;
#define STENCIL_NEUTRAL_OUTLINE 253;
#define STENCIL_ENEMY_OUTLINE 254;
#define STENCIL_ITEMHIGHLIGHT 255;
在C++中直接启用自定义深度并设置顺序。
GetMesh()->SetRenderCustomDepth(true);
GetMesh()->CustomDepthStencilValue = STENCIL_ENEMY_OUTLINE; // or simply assign an int32 within 1-255 range.
设置后期处理
你需要放置一个Post ProcessVolume来启用轮廓线。确保设置为Unbound,这样就可以不管相机是否在体积内。在选中PostProcess Volume状态下,点击Settings > Blendables 并添加PPI_OutlineColored作为第一个入口。
原文链接:http://www.tomlooman.com/multi-color-outline-post-process-in-unreal-engine-4/
原文作者:Tom
代码参考:http://www.tomlooman.com/soft-outlines-in-ue4/

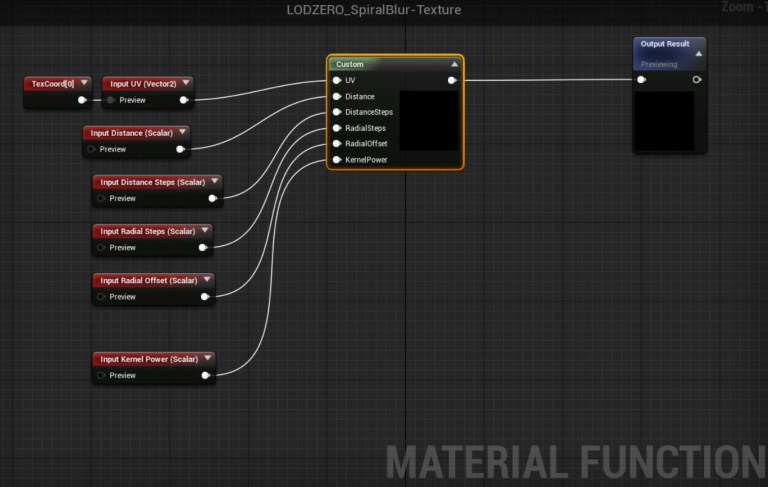
float3 CurColor=0;
float2 NewUV = UV;
int i=0;
float StepSize = Distance / (int) DistanceSteps;
float CurDistance=0;
float2 CurOffset=0;
float SubOffset = 0;
float TwoPi = 6.283185;
float accumdist=0;

if (DistanceSteps < 1)
{
  return Texture2DSample(CustomDepthTexture,CustomDepthTextureSampler,UV);
}
else
{
  while (i < (int) DistanceSteps)
  {
    CurDistance += StepSize;
    for (int j = 0; j < (int) RadialSteps; j++)
    {
      SubOffset +=1;
      CurOffset.x = cos(TwoPi*(SubOffset / RadialSteps));
      CurOffset.y = sin(TwoPi*(SubOffset / RadialSteps));
      NewUV.x = UV.x + CurOffset.x * CurDistance;
      NewUV.y = UV.y + CurOffset.y * CurDistance;
      float distpow = pow(CurDistance, KernelPower);
      CurColor += ceil(Texture2DSample(CustomDepthTexture,CustomDepthTextureSampler,NewUV))*distpow;
      accumdist += distpow;
    }
    SubOffset +=RadialOffset;
    i++;
  }
  CurColor = CurColor;
  CurColor /=accumdist;
  return CurColor;
}