1.1 操作概述
在“kafka生产环境部署”和“生产环境使用ca生成msp和tls”两篇文章的搭建的环境基础上,实现组织及节点的动态添加功能。
视频教程:https://study.163.com/course/introduction/1210196297.htm
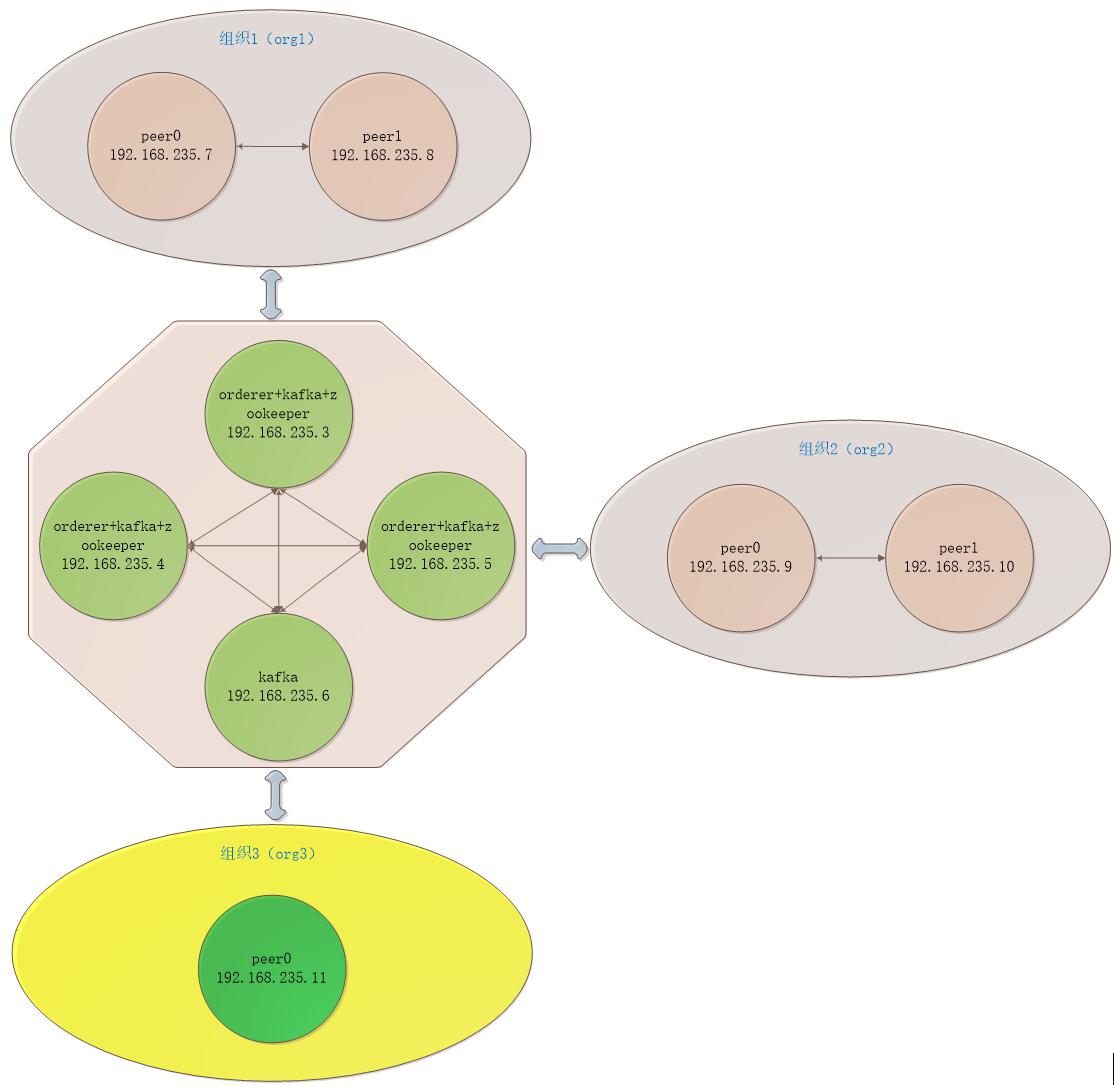
1.2 网络拓扑
1.3 新组织配置
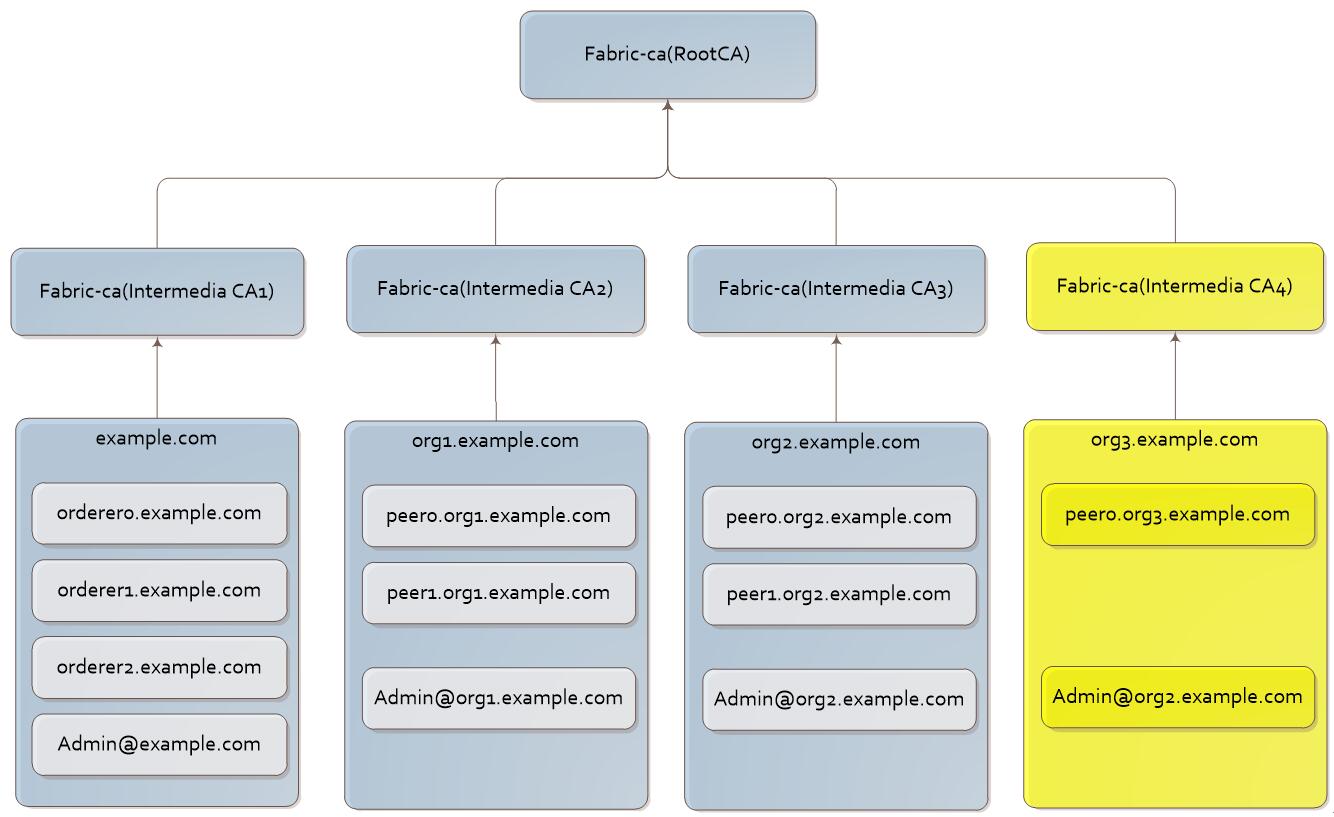
1.3.1 生成新组织证书
切换到192.168.235.6服务器上进行CA服务启动及生成证书操作。
1. CA服务启动
1) IntermediaCA4启动
① 初始化CA服务
# fabric-ca-server init -b admin4:adminpw4 -u http://admin:adminpw@localhost:7054 --home ./intermediaca4
# vi ./intermediaca4/fabric-ca-server-config.yaml
修改
version: 1.4.0
port: 7058
② 启动CA服务
【命令行启动】
# fabric-ca-server start -b admin4:adminpw4 -u http://admin:adminpw@localhost:7054 --home ./intermediaca4 --cfg.affiliations.allowremove --cfg.identities.allowremove
【docker启动】
拷贝文件docker-intermediaca4.yml到ca-server目录
# docker-compose -f docker-intermediaca4.yaml up -d
2) IntermediaCAtls4启动
1) 初始化CA服务
# fabric-ca-server init -b admin4:adminpw4 -u http://admin:adminpw@localhost:7054 --home ./intermediacatls4
# vi ./intermediacatls4/fabric-ca-server-config.yaml
修改
version: 1.4.0
port: 8058
2) 启动CA服务
【命令行启动】
# fabric-ca-server start -b admin4:adminpw4 -u http://admin:adminpw@localhost:7054 --home ./intermediacatls4 --cfg.affiliations.allowremove --cfg.identities.allowremove
【docker启动】
拷贝文件docker-intermediaca4.yml到ca-server目录
# docker-compose -f docker-intermediacatls4.yaml up -d
2. IntermediaCA4生成证书
1) 生成org3.example.com的msp
① 登记org3.example.com
# fabric-ca-client enroll --csr.cn=org3.example.com --csr.hosts=['org3.example.com'] -M ./crypto-config/peerOrganizations/org3.example.com/msp -u http://admin4:adminpw4@localhost:7058 --home ./fabric-ca-client
# vi ./fabric-ca-client/crypto-config/peerOrganizations/org3.example.com/msp/config.yaml
输入:
NodeOUs:
Enable: true
ClientOUIdentifier:
Certificate: intermediatecerts/localhost-7058.pem
OrganizationalUnitIdentifier: client
PeerOUIdentifier:
Certificate: intermediatecerts/localhost-7058.pem
OrganizationalUnitIdentifier: peer
② 添加联盟成员
# fabric-ca-client affiliation list -M ./crypto-config/peerOrganizations/org3.example.com/msp -u http://admin4:adminpw4@localhost:7058 --home ./fabric-ca-client
# fabric-ca-client affiliation remove --force org1 -M ./crypto-config/peerOrganizations/org3.example.com/msp -u http://admin4:adminpw4@localhost:7058 --home ./fabric-ca-client
# fabric-ca-client affiliation remove --force org3 -M ./crypto-config/peerOrganizations/org3.example.com/msp -u http://admin4:adminpw4@localhost:7058 --home ./fabric-ca-client
# fabric-ca-client affiliation add com -M ./crypto-config/peerOrganizations/org3.example.com/msp -u http://admin4:adminpw4@localhost:7058 --home ./fabric-ca-client
# fabric-ca-client affiliation add com.example -M ./crypto-config/peerOrganizations/org3.example.com/msp -u http://admin4:adminpw4@localhost:7058 --home ./fabric-ca-client
# fabric-ca-client affiliation add com.example.org3 -M ./crypto-config/peerOrganizations/org3.example.com/msp -u http://admin4:adminpw4@localhost:7058 --home ./fabric-ca-client
2) 生成Admin@example.com的msp
1) 注册Admin@example.com
# fabric-ca-client register --id.name Admin@org3.example.com --id.type client --id.affiliation "com.example.org3" --id.attrs '"hf.Registrar.Roles=client,orderer,peer,user","hf.Registrar.DelegateRoles=client,orderer,peer,user",hf.Registrar.Attributes=*,hf.GenCRL=true,hf.Revoker=true,hf.AffiliationMgr=true,hf.IntermediateCA=true,role=admin:ecert' --id.secret=123456 --csr.cn=org3.example.com --csr.hosts=['org3.example.com'] -M ./crypto-config/peerOrganizations/org3.example.com/msp -u http://admin4:adminpw4@localhost:7058 --home ./fabric-ca-client
2) 登记Admin@example.com
# fabric-ca-client enroll -u http://Admin@org3.example.com:123456@localhost:7058 --csr.cn=org3.example.com --csr.hosts=['org3.example.com'] -M ./crypto-config/peerOrganizations/org3.example.com/users/Admin@org3.example.com/msp --home ./fabric-ca-client
3) 生成msp
# mkdir ./fabric-ca-client/crypto-config/peerOrganizations/org3.example.com/users/Admin@org3.example.com/msp/admincerts
# cp ./fabric-ca-client/crypto-config/peerOrganizations/org3.example.com/users/Admin@org3.example.com/msp/signcerts/cert.pem ./fabric-ca-client/crypto-config/peerOrganizations/org3.example.com/users/Admin@org3.example.com/msp/admincerts
# mkdir ./fabric-ca-client/crypto-config/peerOrganizations/org3.example.com/msp/admincerts
# cp ./fabric-ca-client/crypto-config/peerOrganizations/org3.example.com/users/Admin@org3.example.com/msp/signcerts/cert.pem ./fabric-ca-client/crypto-config/peerOrganizations/org3.example.com/msp/admincerts
3) 生成peer0.org3.example.com的msp
1) 注册peer0.org3.example.com
# fabric-ca-client register --id.name peer0.org3.example.com --id.type peer --id.affiliation "com.example.org3" --id.attrs '"role=peer",ecert=true' --id.secret=123456 --csr.cn=peer0.org3.example.com --csr.hosts=['peer0.org3.example.com'] -M ./crypto-config/peerOrganizations/org3.example.com/msp -u http://admin4:adminpw4@localhost:7058 --home ./fabric-ca-client
2) 登记peer0.org3.example.com
# fabric-ca-client enroll -u http://peer0.org3.example.com:123456@localhost:7058 --csr.cn=peer0.org3.example.com --csr.hosts=['peer0.org3.example.com'] -M ./crypto-config/peerOrganizations/org3.example.com/peers/peer0.org3.example.com/msp --home ./fabric-ca-client
3) 生成msp
# mkdir ./fabric-ca-client/crypto-config/peerOrganizations/org3.example.com/peers/peer0.org3.example.com/msp/admincerts
# cp ./fabric-ca-client/crypto-config/peerOrganizations/org3.example.com/users/Admin@org3.example.com/msp/signcerts/cert.pem ./fabric-ca-client/crypto-config/peerOrganizations/org3.example.com/peers/peer0.org3.example.com/msp/admincerts
3. IntermediaCAtls4生成证书
1) 生成org3.example.com的tls
① 登记org3.example.com
# fabric-ca-client enroll --csr.cn=org3.example.com --csr.hosts=['org3.example.com'] -M ./crypto-config/peerOrganizations/org3.example.com/tlstmp -u http://admin4:adminpw4@localhost:8057 --home ./fabric-ca-client
② 添加联盟成员
# fabric-ca-client affiliation list -M ./crypto-config/peerOrganizations/org3.example.com/tlstmp -u http://admin4:adminpw4@localhost:8057 --home ./fabric-ca-client
# fabric-ca-client affiliation remove --force org1 -M ./crypto-config/peerOrganizations/org3.example.com/tlstmp -u http://admin4:adminpw4@localhost:8057 --home ./fabric-ca-client
# fabric-ca-client affiliation remove --force org3 -M ./crypto-config/peerOrganizations/org3.example.com/tlstmp -u http://admin4:adminpw4@localhost:8057 --home ./fabric-ca-client
# fabric-ca-client affiliation add com -M ./crypto-config/peerOrganizations/org3.example.com/tlstmp -u http://admin4:adminpw4@localhost:8057 --home ./fabric-ca-client
# fabric-ca-client affiliation add com.example -M ./crypto-config/peerOrganizations/org3.example.com/tlstmp -u http://admin4:adminpw4@localhost:8057 --home ./fabric-ca-client
# fabric-ca-client affiliation add com.example.org3 -M ./crypto-config/peerOrganizations/org3.example.com/tlstmp -u http://admin4:adminpw4@localhost:8057 --home ./fabric-ca-client
2) 生成Admin@example.com的tls
1) 注册Admin@example.com
# fabric-ca-client register --id.name Admin@org3.example.com --id.type client --id.affiliation "com.example.org3" --id.attrs '"hf.Registrar.Roles=client,orderer,peer,user","hf.Registrar.DelegateRoles=client,orderer,peer,user",hf.Registrar.Attributes=*,hf.GenCRL=true,hf.Revoker=true,hf.AffiliationMgr=true,hf.IntermediateCA=true,role=admin:ecert' --id.secret=123456 --csr.cn=org3.example.com --csr.hosts=['org3.example.com'] -M ./crypto-config/peerOrganizations/org3.example.com/tlstmp -u http://admin4:adminpw4@localhost:8057 --home ./fabric-ca-client
2) 登记Admin@example.com
# fabric-ca-client enroll -d --enrollment.profile tls -u http://Admin@org3.example.com:123456@localhost:8057 --csr.cn=org3.example.com --csr.hosts=['org3.example.com'] -M ./crypto-config/peerOrganizations/org3.example.com/users/Admin@org3.example.com/tlstmp --home ./fabric-ca-client
1) 生成tls
# mkdir ./fabric-ca-client/crypto-config/peerOrganizations/org3.example.com/users/Admin@org3.example.com/tls
# cp ./intermediacatls4/ca-chain.pem ./fabric-ca-client/crypto-config/peerOrganizations/org3.example.com/users/Admin@org3.example.com/tls/ca.crt
# cp ./fabric-ca-client/crypto-config/peerOrganizations/org3.example.com/users/Admin@org3.example.com/tlstmp/signcerts/cert.pem ./fabric-ca-client/crypto-config/peerOrganizations/org3.example.com/users/Admin@org3.example.com/tls/client.crt
# cp ./fabric-ca-client/crypto-config/peerOrganizations/org3.example.com/users/Admin@org3.example.com/tlstmp/keystore/xxxxxxx_sk ./fabric-ca-client/crypto-config/peerOrganizations/org3.example.com/users/Admin@org3.example.com/tls/client.key
# rm -rf ./fabric-ca-client/crypto-config/peerOrganizations/org3.example.com/users/Admin@org3.example.com/tlstmp
3) 生成peer0.org3.example.com的tls
1) 注册peer0.org3.example.com
# fabric-ca-client register --id.name peer0.org3.example.com --id.type peer --id.affiliation "com.example.org3" --id.attrs '"role=peer",ecert=true' --id.secret=123456 --csr.cn=peer0.org3.example.com --csr.hosts=['peer0.org3.example.com'] -M ./crypto-config/peerOrganizations/org3.example.com/tlstmp -u http://admin4:adminpw4@localhost:8057 --home ./fabric-ca-client
2) 登记peer0.org3.example.com
# fabric-ca-client enroll -d --enrollment.profile tls -u http://peer0.org3.example.com:123456@localhost:8057 --csr.cn=peer0.org3.example.com --csr.hosts=['peer0.org3.example.com'] -M ./crypto-config/peerOrganizations/org3.example.com/peers/peer0.org3.example.com/tlstmp --home ./fabric-ca-client
3) 生成tls
# mkdir ./fabric-ca-client/crypto-config/peerOrganizations/org3.example.com/peers/peer0.org3.example.com/tls
# cp ./intermediacatls4/ca-chain.pem ./fabric-ca-client/crypto-config/peerOrganizations/org3.example.com/peers/peer0.org3.example.com/tls/ca.crt
# cp ./fabric-ca-client/crypto-config/peerOrganizations/org3.example.com/peers/peer0.org3.example.com/tlstmp/signcerts/cert.pem ./fabric-ca-client/crypto-config/peerOrganizations/org3.example.com/peers/peer0.org3.example.com/tls/server.crt
# cp ./fabric-ca-client/crypto-config/peerOrganizations/org3.example.com/peers/peer0.org3.example.com/tlstmp/keystore/xxxxxxx_sk ./fabric-ca-client/crypto-config/peerOrganizations/org3.example.com/peers/peer0.org3.example.com/tls/server.key
# rm -rf ./fabric-ca-client/crypto-config/peerOrganizations/org3.example.com/peers/peer0.org3.example.com/tlstmp
1.3.2 生成新组织配置
切换到192.168.235.7服务器下进行操作。
1. 证书生成的org3.example.com目录拷贝到/crypto-config/peerOrganizations目录下。
2. 在configtx.yaml配置文件中加上org3组织信息,并拷贝到kafkapeer目录下。
3. 将org3的配置以 json 格式输出
# cd $GOPATH/src/github.com/hyperledger/fabric/kafkapeer
# docker-compose -f docker-compose-peer.yaml up -d
# ./bin/configtxgen -printOrg Org3MSP -profile ./configtx.yaml > ./channel-artifacts/org3.json
4. 安装jq工具
jq 是 Linux 下命令行处理 JSON 的工具,可以对 JSON 进行过滤、格式化、修改等等操作
# yum install epel-release
# yum install jq
5. 获取当前 channel 的配置
# docker exec -it cli bash
# ORDERER_CA=/opt/gopath/src/github.com/hyperledger/fabric/peer/crypto/ordererOrganizations/example.com/orderers/orderer0.example.com/msp/tlsintermediatecerts/tls-localhost-8055.pem
# peer channel fetch config config_block.pb -o orderer0.example.com:7050 -c mychannel --tls --cafile $ORDERER_CA
# exit
# docker cp xxxxxxxx:/opt/gopath/src/github.com/hyperledger/fabric/peer/config_block.pb /opt/gopath/src/github.com/hyperledger/fabric/kafkapeer
6. 修改原配置文件,新增 org3 配置
# ./bin/configtxlator proto_decode --input config_block.pb --type common.Block | jq .data.data[0].payload.data.config > config.json
7. 修改 config.json,新增 org3
# jq -s '.[0] * {"channel_group":{"groups":{"Application":{"groups": {"Org3MSP":.[1]}}}}}' config.json ./channel-artifacts/org3.json > modified_config.json
8. 将 config.json 和 modified_config.json 转为 protobuf 格式
# ./bin/configtxlator proto_encode --input config.json --type common.Config > original_config.pb
# ./bin/configtxlator proto_encode --input modified_config.json --type common.Config > modified_config.pb
9. 根据 config.pb 和 modified_config.pb 计算出 org3_update.pb
# ./bin/configtxlator compute_update --channel_id mychannel --original original_config.pb --updated modified_config.pb > config_update.pb
10. 解码 config_update.pb 为 json,然后用 jq 修改,然后在编码为 protobuf 格式,最终输出 org3_update_in_envelope.pb
# ./bin/configtxlator proto_decode --input config_update.pb --type common.ConfigUpdate > config_update.json
# echo '{"payload":{"header":{"channel_header":{"channel_id":"mychannel", "type":2}},"data":{"config_update":'$(cat config_update.json)'}}}' | jq . > config_update_in_envelope.json
# ./bin/configtxlator proto_encode --input config_update_in_envelope.json --type common.Envelope > org3_update_in_envelope.pb
# docker cp /opt/gopath/src/github.com/hyperledger/fabric/kafkapeer/org3_update_in_envelope.pb xxxxxxxx:/opt/gopath/src/github.com/hyperledger/fabric/peer/
1.3.3 提交新组织配置
1. 为 Org3 新配置签名
# docker exec -it cli bash
# CORE_PEER_LOCALMSPID="Org1MSP"
# CORE_PEER_TLS_ROOTCERT_FILE=/opt/gopath/src/github.com/hyperledger/fabric/peer/crypto/peerOrganizations/org1.example.com/peers/peer0.org1.example.com/tls/ca.crt
# CORE_PEER_MSPCONFIGPATH=/opt/gopath/src/github.com/hyperledger/fabric/peer/crypto/peerOrganizations/org1.example.com/users/Admin@org1.example.com/msp
# CORE_PEER_ADDRESS=peer0.org1.example.com:7051
# peer channel signconfigtx -f org3_update_in_envelope.pb
# CORE_PEER_LOCALMSPID="Org2MSP"
# CORE_PEER_TLS_ROOTCERT_FILE=/opt/gopath/src/github.com/hyperledger/fabric/peer/crypto/peerOrganizations/org2.example.com/peers/peer0.org2.example.com/tls/ca.crt
# CORE_PEER_MSPCONFIGPATH=/opt/gopath/src/github.com/hyperledger/fabric/peer/crypto/peerOrganizations/org2.example.com/users/Admin@org2.example.com/msp
# CORE_PEER_ADDRESS=peer0.org2.example.com:7051
# peer channel signconfigtx -f org3_update_in_envelope.pb
2. 提交签名后的配置交易至 orderer
# ORDERER_CA=/opt/gopath/src/github.com/hyperledger/fabric/peer/crypto/ordererOrganizations/example.com/orderers/orderer0.example.com/msp/tlsintermediatecerts/tls-localhost-8055.pem
# peer channel update -f org3_update_in_envelope.pb -c mychannel -o orderer0.example.com:7050 --tls --cafile $ORDERER_CA
1.4 新组织启动
切换到192.168.235.11服务器上操作。
1. 配置docker-compose-peer.yaml文件,拷贝到kafkapeer目录下。
2. 服务器(192.168.235.11)启动
# cd $GOPATH/src/github.com/hyperledger/fabric/kafkapeer
# docker-compose -f docker-compose-peer.yaml up -d
3. 获取当前 channel 的配置
# docker exec -it cli bash
# ORDERER_CA=/opt/gopath/src/github.com/hyperledger/fabric/peer/crypto/ordererOrganizations/example.com/orderers/orderer0.example.com/msp/tlsintermediatecerts/tls-localhost-8055.pem
# peer channel fetch 0 mychannel.block -o orderer0.example.com:7050 -c mychannel --tls --cafile $ORDERER_CA
4. 将 Org 所有 Peer 加入 channel
# peer channel join -b mychannel.block
5. 升级chaincode和背书策略
# peer chaincode install -n mycc -p github.com/hyperledger/fabric/kafkapeer/chaincode/go/example02/ -v 2.0
6. 为 Org1 的 peer0升级chaincode到2.0
切换到192.168.235.7服务器上
# peer chaincode install -n mycc -p github.com/hyperledger/fabric/kafkapeer/chaincode/go/example02/ -v 2.0
# ORDERER_CA=/opt/gopath/src/github.com/hyperledger/fabric/peer/crypto/ordererOrganizations/example.com/orderers/orderer0.example.com/msp/tlsintermediatecerts/tls-localhost-8055.pem
# peer chaincode upgrade -o orderer0.example.com:7050 --tls --cafile $ORDERER_CA -C mychannel -n mycc -v 2.0 -c '{"Args":["init","a","200","b","400"]}' -P "OR ('Org1MSP.peer','Org2MSP.peer','Org3MSP.peer')"
7. 为 Org2 的 peer0升级chaincode到2.0
切换到192.168.235.9服务器上
# peer chaincode install -n mycc -p github.com/hyperledger/fabric/kafkapeer/chaincode/go/example02/ -v 2.0
1.5 新组织验证
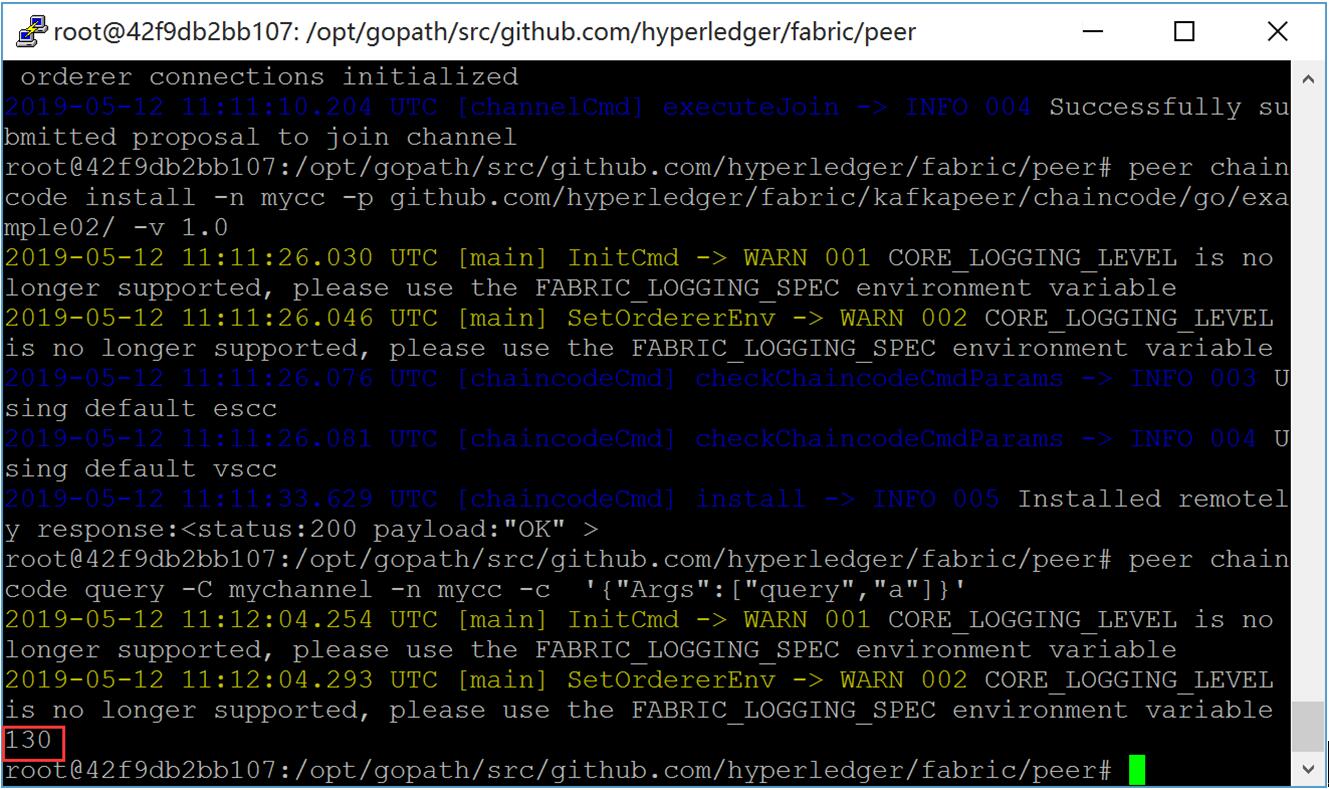
切换到192.168.235.11服务上,在Peer上查询a值。
1) Peer上查询a,显示130
# peer chaincode query -C mychannel -n mycc -c '{"Args":["query","a"]}'
2) Peer上进行a向b转20交易
# ORDERER_CA=/opt/gopath/src/github.com/hyperledger/fabric/peer/crypto/ordererOrganizations/example.com/orderers/orderer0.example.com/msp/tlsintermediatecerts/tls-localhost-8055.pem
# peer chaincode invoke --tls --cafile $ORDERER_CA -C mychannel -n mycc -c '{"Args":["invoke","a","b","20"]}'
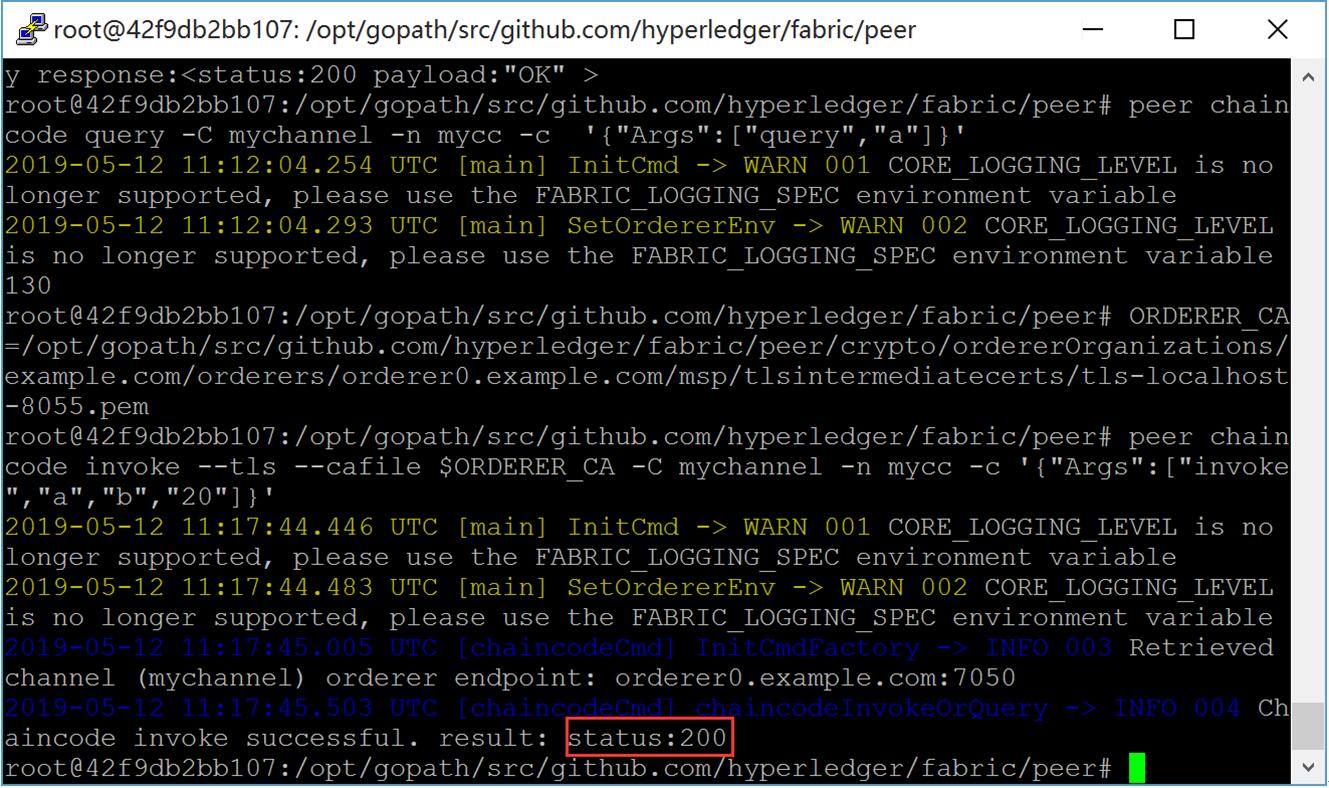
3) Peer上查询b,显示110
# peer chaincode query -C mychannel -n mycc -c '{"Args":["query","a"]}'

视频教程:https://study.163.com/course/introduction/1210196297.htm