一、内容回顾
1、webpack(前端中工作,项目上线之前对整个前端项目优化)
- entry:整个项目的程序入口(main.js或index.js);
- output:输出的出口;
- loader:加载器,对es6代码的解析,babel-loader(官网:https://www.babeljs.cn/)是浏览器支持es6, css-loader解析css文件,style-loader 将css代码添加一个style标签插入header标签中,url-loader等等;
- plugins:有很多,比如html-webpack-plugin,丑陋等等;
二、vue项目中常见问题
我们已经学过如何使用脚手架创建一个vue项目,接下来我们介绍一下vue项目中的常见问题。
1、使用vue-cli脚手架和webpack模板生成一个项目(以项目名为luffy-project为例),步骤如下:
vue init webpack luffy-project  // 创建项目(使用单页面应用就安装vue-router,其他选no)
cd luffy-project            // 进入项目所在目录
npm run dev      // 启动项目
2、警告:property or methods "xxx" not defined
出现这个的警告信息,一般是因为你在template中使用了某些数据属性或者方法,但js中没有定义。
3、错误:module not found
出现这个信息表示模块找不到,一般我们使用的模块有两种,一种是npm社区下载的模块(如vue),使用时直接导入(如import Vue from 'vue')即可,这种一般不会出错;另一种是我们自己写的模块,错误往往容易出现在这里,不是名字写错,就是路径不对。
注意:还有就是出现了不是自己写的某个模块出现错误,这时可以尝试把node_modules文件夹删除,再使用下面命令下载项目依赖的包:
npm install // 下载项目依赖的包,生成node_modules文件夹
三、axios
axios相当于jquery的ajax,官网:https://www.kancloud.cn/yunye/axios/234845
将axios挂载到vue的原型上,那么在各个组件中都能使用,因为面向对象(继承),如下:
Axios 是一个基于 promise(es6的语法,参考网址:http://es6.ruanyifeng.com/#docs/promise) 的 HTTP 库,可以用在浏览器和 node.js 中。
// 下载到项目中
npm install axios -S
// 使用方式如下:
// 执行GET请求:
// 为给定 ID 的 user 创建请求
axios.get('/user?ID=12345')
      .then(function (response) {
        console.log(response);
     })
      .catch(function (error) {
        console.log(error);
     });

// 可选地,上面的请求可以这样做
axios.get('/user', {
    params: {
      ID: 12345
    }
  })
  .then(function (response) {
     console.log(response);
  })
  .catch(function (error) {
     console.log(error);
  });
// 执行post请求
axios.post('/user', {
     firstName: 'Fred',
     lastName: 'Flintstone'
  })
  .then(function (response) {
     console.log(response);
  })
  .catch(function (error) {
     console.log(error);
  });
1、在项目中引用
因为很多模块都要用axios(与后端交互的一项技术),所以我们可以将axios挂载在Vue的原型上,这样,因为面向对象的继承特点,各个子组件都可以使用。挂载方式如下:
// main.js中
import Axios from 'axios'   // npm下载的直接引入axios
Vue.prototype.$https = Axios   // 将axios对象挂载到Vue原型上
注意:一定不要使用Vue.use(),基于Vue的才需要Vue.use(),axios是一个基于es6的知识点,与vue没有关系,不依赖vue,只是vue开发者不想使用jquery库,所以使用axios向后台发请求。
我们可以指定将被用在各个请求的配置默认值,全局的axios默认值有如下几个:
  axios.defaults.baseURL = 'https://api.example.com';
  axios.defaults.headers.common['Authorization'] = AUTH_TOKEN;
  // Axios默认发送数据格式是json,要想发送其他格式要设置请求头content_type,如下
  axios.defaults.headers.post['Content-Type'] = 'application/x-www.form-urlencoded';
2、项目示例 - 路飞学城官网的免费课程组件相关代码
  // main.js
  import Vue from 'vue'
  import App from './App'
  import router from './router'
  import Axios from 'axios'
  Vue.prototype.$https = Axios;
  // 设置公共的url
  Axios.defaults.baseURL = 'https://www.luffycity.com/api/v1/';
  Vue.config.productionTip = false;

  /* eslint-disable no-new */
  new Vue({
      el: '#app',
      router,
      components: { App },
      template: '<App/>'
  })
  // course.vue
  <template>
  <div>
    <div class="categoryList">
      <span @click="clickHandler(index, item.id)"
    :class="{active:index===currentIndex}"
    v-for="(item,index) in categoryList" :key="item.id">
    {{ item.name }}
      </span>
    </div>
    <div class="course">
      <ul>
        <li v-for="(course) in courseList" :key="course.id">
          <h3>{{ course.name }}</h3>
        </li>
      </ul>
    </div>
  </div>
  </template>

  <script>
  export default {
    name:'Course',
    data(){
      return {
        categoryList:[],   // 分类列表
        currentIndex:0,
        courseList:[],   // 课程列表
        categoryId:0     // 默认全部课程id
      }
    },
    methods:{
      // 先在methods中声明函数-获取课程分类列表的函数
      getCategoryList(){
        this.$https.get('course_sub/category/list/')
          .then((res) => {
            console.log(res);
            let data = res.data;
            if (data.error_no === 0){
              this.categoryList = data.data;
              let obj = {
                id:0,
                name:'全部',
                category:0
              };
              this.categoryList.unshift(obj)
            }

          })
          .catch((err) => {
            console.log(err);
          })
      },
      // 获取课程列表
      getCourseList(){
        this.$https.get(`courses/?sub_category=${this.categoryId}`)
          .then((res)=>{
            var data = res.data;
            this.courseList = data.data;
          })
          .catch((err)=>{
            console.log(err)
          })
      },

      clickHandler(index, categoryId){
        this.currentIndex = index;   // 分类列表点击对应分类变色
        this.categoryId = categoryId;
        this.getCourseList();  // 发送请求
      }
    },
    created(){
      // 组件创建完成调用函数-使用axios向接口请求课程列表数据
      this.getCategoryList()
    }
  }
  </script>

  <style scoped>
  .active{
    color: red;
  }
  </style>
四、vuex
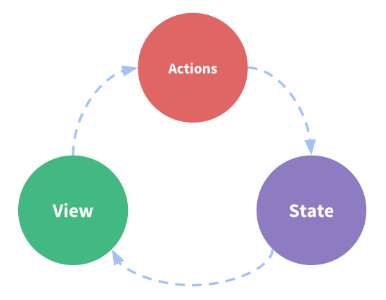
单向数据流概念的简单表示,如下图:
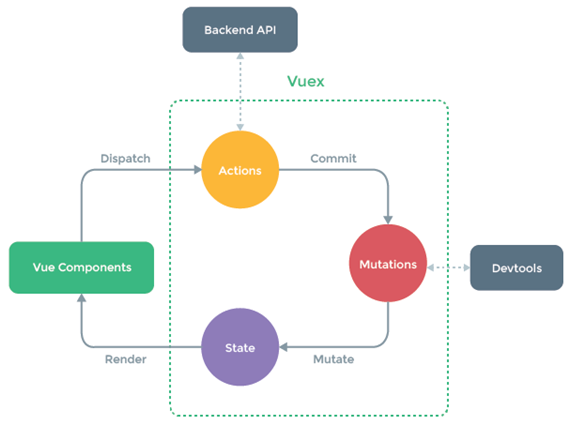
vuex(相当于一个store)有五大将:state、mutations、actions、getters、modules,前三个重要。
各个组件可以通过computed监听vuex中的state中的数据属性,修改state中属性的唯一方法是提交mutations(同步)中的方法,actions中的方法都是异步的。
1、将vuex下载到项目中:
>>> npm install vuex -S
2、组件使用store中的值:
1)使用Vuex的Store方法创建一个store实例对象
  import Vuex from 'vuex'
  Vue.use(Vuex);  // 模块化开发要Vue.use()
  const store = new Vuex.Store({
          state:{
                num: 1
          },
          mutations:{
                // 同步方法
          },
          actions:{
                // 异步方法
          }
  })
2)将store挂载到Vue实例下
  new Vue({
       el: '#app',
       router,
       store,   // store实例挂载到Vue实例,各个组件都能通过this.$store使用
       components: { App },
       template: '<App/>'
  })
3)在各组件中通过computed使用store的state中定义的数据属性
  // Home组件中使用
    <template>
          <div>
            <h1>我是首页{{ myNum }}</h1>
            <Son></Son>
          </div>
    </template>

    <script>
    import Son from './Son'
    export default {
          name: 'Home',
          components:{Son},
          computed:{
            myNum:function () {
                  return this.$store.state.num;
            }
          }
    }
    </script>

    <style scoped></style>
  // Son组件(是Home组件的子组件)中使用
    <template>
          <div>
            <h1>我是Son组件的{{ mySonNum }}</h1>
          </div>
    </template>

    <script>
    export default {
          name: 'Son',
          computed:{
            mySonNum:function () {
                  return this.$store.state.num;
            }
          }
    }
    </script>

    <style scoped></style>
3、组件修改store中的值
1)创建store实例对象,并挂在store到Vue实例
  import Vuex from 'vuex'
  Vue.use(Vuex);  // 模块化开发要Vue.use()
  const store = new Vuex.Store({
          state:{
            num: 1
          },
          // mutations中定义同步方法,默认传递一个state
          mutations:{
            setMutaNum(state, val){
                  state.num += val;
            },
            setMutaAsyncNum(state, val){
                  state.num += val;
            }
          },
          // actions中定义异步方法
          actions:{
            // 方法都默认传递一个context,就是store
            setActionNum(context, val){
                  context.commit('setMutaNum', val);
            },

            setActionAsyncNum(context, val){
                  setTimeout(()=>{
                context.commit('setMutaAsyncNum', val)
                  },1000)
            }

          }
  })

  new Vue({
          el: '#app',
          router,
          store,
          components: { App },
          template: '<App/>'
  })
2)在Son组件中触发actions方法修改store中的值(同步和异步)
  <template>
      <div>
            <h1>我是Son组件的{{ mySonNum }}</h1>
            <button @click="addNum">同步修改</button>
            <button @click="addAsyncNum">异步修改</button>
      </div>
  </template>

  <script>
    export default {
          name: 'Son',
          methods:{
            addNum(){
                  // 不要直接修改state中的状态,要通过commit方法提交
                  // commit()第一个参数是触发store的mutations中的方法名
                  // 第二个参数给触发的方法传递的值
                  this.$store.dispatch('setActionNum', 2)
                },
            addAsyncNum(){
                  this.$store.dispatch('setActionAsyncNum', 3)
            }
          },
          computed:{
            mySonNum:function () {
                  return this.$store.state.num;
            }
          }
    }
  </script>

  <style scoped></style>
4、vuex的actions中使用axios请求数据
1)课程详情组件CourseDetail.vue代码如下:
  <template>
          <div>
            <div class="">
                  <h2>我是课程详情组件</h2>
              <p v-for="value in courseDesc">{{ value }}</p>
            </div>
          </div>
  </template>

  <script>
      export default {
            name:'CourseDetail',
            created(){
              // https://www.luffycity.com/api/v1/course/3
              console.log(this.$route.params.courseid);
              // 组件创建则向触发发送axios请求
              this.$store.dispatch('course_top', this.$route.params.courseid)
            },
            computed:{
              // 获取store中的数据,数据是由axios请求而来的
              courseDesc(){
                return this.$store.state.courseDesc
              }
            }
      }
  </script>

  <style scoped>
      .active{
            color: red;
      }
  </style>
2)创建store实例对象,代码如下:
  import Vuex from 'vuex'
  Vue.use(Vuex);
  const store = new Vuex.Store({
         state:{
            num: 1,
            courseDesc:null
          },
          mutations:{
            course_top(state, data){
                  state.courseDesc = data
            }
          },
          actions:{
            course_top(context, courseId){
            // 异步:发送axios请求
                  Axios.get(`course/${courseId}/top/`)
                .then((res)=>{
                      let data = res.data.data;
                      context.commit('course_top', data)
                })
                .catch((err)=>{
                      console.log(err)
                })
            }
          }
  })
五、补充知识点
1、v-for一定要加key
演示如下代码(分别在有key和没有key的情况下点击按钮):


<!DOCTYPE html>
<html lang="en">
<head>
    <meta charset="UTF-8">
    <title>v-for中的key</title>
    <style>
        .userList {
            border: 1px solid red;
            margin: 20px 0;
            padding: 10px 10px;
        }
    </style>
</head>
<body>
<div id="app"></div>
<script type="text/javascript" src="vue.js"></script>
<script type="text/javascript" src="lodash.js"></script>
<script type="text/javascript">

    Vue.component('my-com', {
        template: `
            <div class = 'userList'>

               <div class = 'content'>
                  <h3>{{obj.name}}</h3>
                  <p>{{obj.content}}</p>
               </div>
               <div class="control">
                  <input  placeholder="请输入你的名字" />
               </div>
            </div>

         `,
        props: {
            obj: Object
        }
    });
    var App = {
        data() {
            return {
                datas: [
                    {id: 1, name: '张三', content: '我是张三'},
                    {id: 2, name: '李四', content: '我是李四'},
                    {id: 3, name: '王五', content: '我是王五'},
                ]
            }
        },
        template: `
            <div>
               <button @click = 'shuffle1'>shuffle</button>
               <my-com v-for = '(obj,index) in datas' :obj = 'obj' :key = 'obj.id'></my-com>
            </div>
         `,
        methods: {
            shuffle1() {
                console.log(_.shuffle());
                this.datas = _.shuffle(this.datas);
            }
        }
    }

    new Vue({
        el: '#app',
        data: {},
        components: {
            App
        },
        template: `<App />`
    });
</script>

</body>
</html>
2、js中数组的splice方法
  var arr = ['alex', 'wusir', 'egon', 'sylar']

  // arr.splice(开始位置索引, 删除个数, 插入元素)

  arr.splice(1, 2)
  // 索引从1开始,删除2个,返回删除元素列表,即['wusir', 'egon']
  // 原数组arr为  ['alex', 'sylar']

  arr.splice(0, 0, '张三', '李四')
  // 索引从0开始,删除0个元素,即不删除任何元素,返回[]数组,
  // arr变为['张三', '李四', 'alex', 'sylar']
总结:可以做增删改操作。
3、Vue模块化开发中,如何注册全局组件
假设已经定义了一个组件Header.vue并抛出,在全局的main.js下按如下方式写:
  import Header from '@/components/Header/Header'
  Vue.component(Header.name, Header);
这样,Header组件就是全局组件了,在任意组件中直接使用即可。