Swagger作用:
自动生成javaAPI,避免开发过程中接口文档更新不及时。
Swagger 一.导入依赖:
导入依赖
<!--swagger包-->
<dependency>
    <groupId>io.springfox</groupId>
    <artifactId>springfox-swagger2</artifactId>
    <version>2.2.2</version>
</dependency>
<dependency>
    <groupId>io.springfox</groupId>
    <artifactId>springfox-swagger-ui</artifactId>
    <version>2.2.2</version>
</dependency>
<!--swagger包结束-->
|
Swagger 二.Swagger首页的配置:
创建一个SwaggerConfig类,通过@Configuration托管给spring,然后通过@EnableSwagger2 注解开启Swagger,Config类大部分都是固定的,没什么改变的需要:
代码:
package com.zy100.config;

import org.springframework.context.annotation.Bean;
import org.springframework.context.annotation.Configuration;
import springfox.documentation.builders.ApiInfoBuilder;
import springfox.documentation.builders.PathSelectors;
import springfox.documentation.builders.RequestHandlerSelectors;
import springfox.documentation.service.ApiInfo;
import springfox.documentation.spi.DocumentationType;
import springfox.documentation.spring.web.plugins.Docket;
import springfox.documentation.swagger2.annotations.EnableSwagger2;

/**
 * @author 赵振宇
 * @date 2019/10/29 0029
 * @time 14:51
 * @desc Swagger配置类,该类里面的应该是固定的,主要用来设置文档的主题信息,比如文档的大标题,副标题,公司名
 * 等
 */
@Configuration//托管spring
@EnableSwagger2//开启swagger功能
public class SwaggerConfig {
    /**
     * 创建API应用
     * apiInfo() 增加API相关信息
     * 通过select()函数返回一个ApiSelectorBuilder实例,用来控制哪些接口暴露给Swagger来展现,
     * 本例采用指定扫描的包路径来定义指定要建立API的目录。
     *
     * @return
     */
    @Bean
    public Docket createRestApi(){
        //版本类型是swagger2
        return new Docket(DocumentationType.SWAGGER_2)
                //通过调用自定义方法apiInfo,获得文档的主要信息
                .apiInfo(apiInfo())
                .select()
                .apis(RequestHandlerSelectors.basePackage("com.zy100.controller"))//扫描该包下面的API注解
                .paths(PathSelectors.any())
                .build();
    }
    /**
     * 创建该API的基本信息(这些基本信息会展现在文档页面中)
     * 访问地址:http://项目实际地址/swagger-ui.html
     * @return
     */
    private ApiInfo apiInfo() {
        return new ApiInfoBuilder()
                .title("使用Swagger2 构建RESTful APIS - zy") //接口管理文档首页显示
                .description("zy - Swagger使用演示")//API的描述
                .termsOfServiceUrl("www.footmark.top")//网站url等
                .version("1.0")
                .build();
    }
}
|
Swagger 三.Swagger的Controller示例
在需要生成接口文档的Controller中加上@API注解,类中需要生成接口的方法上加上@ApiOperation注解:
代码:
package com.zy100.controller;

import io.swagger.annotations.Api;
import io.swagger.annotations.ApiImplicitParam;
import io.swagger.annotations.ApiImplicitParams;
import io.swagger.annotations.ApiOperation;
import org.springframework.web.bind.annotation.*;

import java.util.Date;
import java.util.HashMap;
import java.util.Map;

/**
 * @author 赵振宇
 * @date 2019/10/29 0029
 * @time 15:00
 * @desc 配合swagger创建一个Controller,演示方便不再创建service层
 */
@RestController
@Api("用户模块API文档")//注解api说明该类需要生成api文档
public class UserController {
    /**
     * 该类中
     * @param map 类似于一个user对象
     * key就是对象的属性
     * value就是对象的属性值
     *   ------------------------
     * 属性 id name birthday
     * @return
     *
     */
    //正常业务整添加是对象,前台传JSON对象,在此使用map代替
    @PostMapping("/user")//如果使用swagger自动生成接口文档,一定要加上请求类型,不然会导致swagger把所有请求都会生成一下
    @ApiOperation("添加用户")
    @ApiImplicitParams({
            @ApiImplicitParam(name = "map",//参数名字
                    value = "这是一个添加的对象",//参数的描述
                    required = true,//是否必须传参数,true是
                    paramType = "body")//参数类型 body代表json
    })
    public Map add(@RequestBody Map map){
        return map;
    }
    //根据id删除数据。
    @DeleteMapping("/user/{id}")
    @ApiOperation("删除用户")//API中说明的该类的作用
    @ApiImplicitParams({
            @ApiImplicitParam(name = "id",//参数名字
                    value = "用户id",//参数的描述
                    required = true,//是否必须传参数,true是
                    paramType = "path",//参数类型 path代表路径参数
                    dataType = "int")//参数类型 int
    })
    public String deltete(@PathVariable int id){
        return "{code:200,msg:删除"+id+"成功}";
    }
    //根据传入的对象信息进行更新
    @PutMapping("/user")
    @ApiOperation("更新用户")//API中说明的该类的作用
    @ApiImplicitParams({
            @ApiImplicitParam(name = "map",//参数名字
                    value = "更新的用户",//参数的描述
                    required = true,//是否必须传参数,true是
                    paramType = "body",//参数类型 body
                    dataType = "map")//参数类型 int
    })
    public Map update(@RequestBody Map map){
        return map;
    }
    @GetMapping("/user/{id}")
    @ApiOperation("查询永不用户")//API中说明的该类的作用
    @ApiImplicitParams({
            @ApiImplicitParam(name = "id",//参数名字
                    value = "查询的用户id",//参数的描述
                    required = true,//是否必须传参数,true是
                    paramType = "path",//参数类型 body
                    dataType = "int")//参数类型 int
    })
    public Map getOne(@PathVariable int id){
        Map<String,Object> map = new HashMap<>();
        map.put("id",id);
        map.put("name","张三");
        map.put("birthday",new Date());
        return map;
    }
}
|
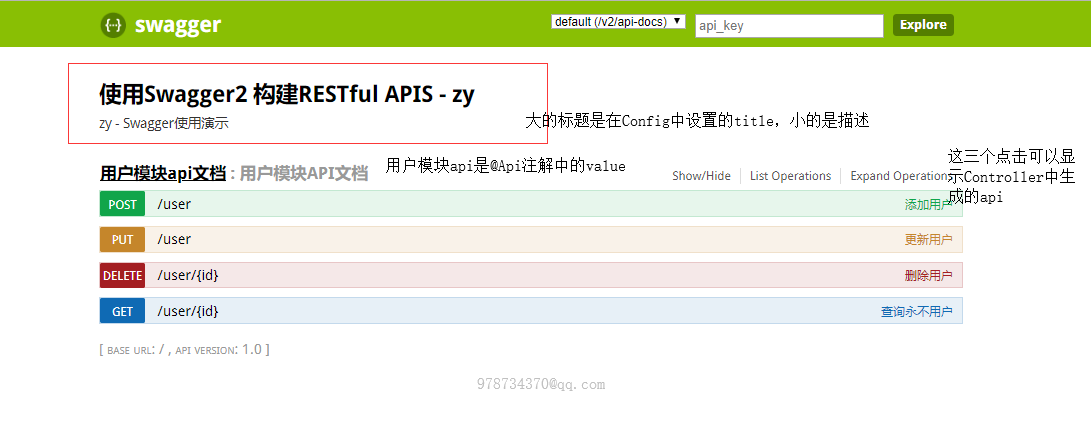
Swagger 四.测试
运行启动类主方法,访问:http://localhost:8080/swagger-ui.html
可以看到效果