根据商品列表的索引值来控制小图的切换,但是由于大图不能直接索引,所以可以通过对小图的索引值间接索引来控制大图的切换;
在利用鼠标进入以及移动实现放大镜的效果。
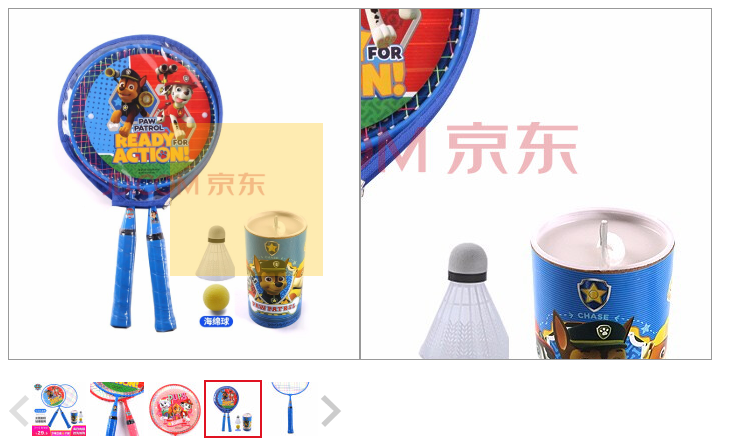
效果图:

html以及css代码:
 1 <!DOCTYPE html>
 2 <html lang="en">
 3 <head>
 4     <meta charset="UTF-8">
 5     <title>Title</title>
 6     <style>
 7         .small_img
 8         {
 9             width: 350px;
10             height: 350px;
11             border: 1px solid #999999;
12             position: relative;
13         }
14         .mask
15         {
16             width: 153px;
17             height: 153px;
18             background-color: rgba(255,192,0,0.3);
19             position: absolute;
20         }
21         .big_img{
22             width: 350px;
23             height: 350px;
24             position: absolute;
25             left:360px;
26             top:8px;
27             border: 1px solid #999999;
28         }
29         .leftBn
30         {
31             position: relative;
32             left:0;
33             width: 22px;
34             height: 32px;
35             background: url("img/prev.png");
36             float: left;
37             top:15px;
38         }
39         .rightBn
40         {
41             position: relative;
42             width: 22px;
43             height: 32px;
44             background: url("img/sprite.png") -78px 0;
45             float: left;
46             top:15px;
47         }
48         .iconCon
49         {
50             margin-top: 20px;
51             width: 350px;
52             height: 58px;
53         }
54         .iconList
55         {
56             width: 290px;
57             height: 58px;
58             float: left;
59             position: relative;
60             overflow: hidden;
61         }
62         .iconImgList
63         {
64             width: 348px;
65             font-size: 0;
66             height: 58px;
67             position: absolute;
68         }
69         .iconImgList img
70         {
71             border: 2px solid transparent;
72         }
73     </style>
74 </head>
75 <body>
76     <div>
77         <div class="small_img">
78             <div class="mask"></div>
79         </div>
80         <div class="big_img"></div>
81         <div class="iconCon">
82             <div class="leftBn"></div>
83             <div class="iconList">
84                 <div class="iconImgList">
85                 </div>
86             </div>
87             <div class="rightBn"></div>
88         </div>
89     </div>
90 </body>
91 </html>
js代码:
获取元素,对要操作的元素添加事件,设置当前图片的索引
 1 let smallImg,bigImg,mask,iconImgList,leftBn,rightBn;
 2         let firstP,lastP,pre;
 3         //将商品图片放入一个数组
 4         let list=["1_icon.jpg","2_icon.jpg","3_icon.jpg","4_icon.jpg","5_icon.jpg","6_icon.jpg"];
 5         init();
 6         function init() {
 7             //获取小图片的容器
 8             smallImg=document.querySelector(".small_img");
 9             //在小图片上移动的方块
10             mask=document.querySelector(".mask");
11             //获取大图片的容器
12             bigImg=document.querySelector(".big_img");
13             //获取下方商品列表的容器
14             iconImgList=document.querySelector(".iconImgList");
15             //获取切换商品列表的左右按钮
16             leftBn=document.querySelector(".leftBn");
17             rightBn=document.querySelector(".rightBn");
18             //遍历图片,拿到当前图片
19             for(let i=0;i<list.length;i++){
20                 let img=new Image();
21                 img.src="./img/"+list[i];
22                 iconImgList.appendChild(img);
23                 if(i===0){
24                     selectImg(img);
25                 }
26             }
27             setImage("./img/"+list[0].replace("_icon",""));
28             firstP=0;
29             lastP=4;
30             //给小图片添加鼠标事件
31             smallImg.addEventListener("mousemove",mouseHandler);
32             smallImg.addEventListener("mouseleave",mouseLeaveHandler);
33             smallImg.addEventListener("mouseenter",mouseLeaveHandler);
34             iconImgList.addEventListener("mouseover",imgSelectHandler);
35             //给左右按钮添加点击事件
36             leftBn.addEventListener("click",clickHandler);
37             rightBn.addEventListener("click",clickHandler);
38         }
设置当前选中的图片以及实现放大镜的效果,使放大镜随着鼠标移动。
 1 function imgSelectHandler(e) {
 2             //判断当前事件源是不是商品列表中选中的图片
 3             if(e.target===iconImgList) return;
 4             selectImg(e.target);
 5             setImage(e.target.src.replace("_icon",""));
 6
 7         }
 8
 9         function setImage(src) {
10             //设置当前选中的图片
11             if(smallImg.children.length===1){
12                 let img=new Image();
13                 img.src=src;
14                 img.style.width="350px";
15                 img.style.height="350px";
16                 img.style.position="absolute";
17                 smallImg.insertBefore(img,smallImg.firstElementChild);
18             }else{
19                 smallImg.firstElementChild.src=src;
20             }
21             bigImg.style.backgroundImage=`url(${src})`;
22         }
23         function mouseLeaveHandler(e) {
24             //鼠标进入大图显示,离开隐藏
25             if(e.type==="mouseenter"){
26                 bigImg.style.display="block";
27             }else if(e.type==="mouseleave"){
28                 bigImg.style.display="none";
29             }
30         }
31         function mouseHandler(e) {
32             //设置当前方块移动的距离
33             mask.style.left=e.x-mask.offsetWidth/2+"px";
34             mask.style.top=e.y-mask.offsetHeight/2+"px";
35             //实现小方块移动时的边界限定
36             if(mask.offsetLeft<0){
37                 mask.style.left="0px";
38             }
39             if(mask.offsetTop<0){
40                 mask.style.top="0px";
41             }
42             if(mask.offsetLeft+mask.offsetWidth>smallImg.offsetWidth){
43
44                 mask.style.left=smallImg.offsetWidth-mask.offsetWidth+"px";
45             }
46             if(mask.offsetTop+mask.offsetHeight>smallImg.offsetHeight){
47                 mask.style.top=smallImg.offsetHeight-mask.offsetHeight+"px";
48             }
49             bigImg.style.backgroundPositionX=-mask.offsetLeft*(800/350)+"px";
50             bigImg.style.backgroundPositionY=-mask.offsetTop*(800/350)+"px";
51         }
点击左右按钮,切换下面的商品列表
 1 function clickHandler(e) {
 2             //点击左边按钮,图片依次换一张
 3             if(this===leftBn){
 4                 if(firstP-1<0) return;
 5                 firstP--;
 6                 lastP--;
 7                 iconImgList.style.left=-firstP*58+"px";
 8             }else if(this===rightBn){
 9                 if(lastP+1>list.length-1) return;
10                 lastP++;
11                 firstP++;
12                 iconImgList.style.left=-(lastP-4)*58+"px";
13             }
14         }
15         function selectImg(elem) {
16             if(pre){
17                 pre.style.border="2px solid transparent";
18             }
19             pre=elem;
20             pre.style.border="2px solid #e01222";
21         }
完整js代码:
  1 <script>
  2         let smallImg,bigImg,mask,iconImgList,leftBn,rightBn;
  3         let firstP,lastP,pre;
  4         //将商品图片放入一个数组
  5         let list=["1_icon.jpg","2_icon.jpg","3_icon.jpg","4_icon.jpg","5_icon.jpg","6_icon.jpg"];
  6         init();
  7         function init() {
  8             //获取小图片的容器
  9             smallImg=document.querySelector(".small_img");
 10             //在小图片上移动的方块
 11             mask=document.querySelector(".mask");
 12             //获取大图片的容器
 13             bigImg=document.querySelector(".big_img");
 14             //获取下方商品列表的容器
 15             iconImgList=document.querySelector(".iconImgList");
 16             //获取切换商品列表的左右按钮
 17             leftBn=document.querySelector(".leftBn");
 18             rightBn=document.querySelector(".rightBn");
 19             //遍历图片,拿到当前图片
 20             for(let i=0;i<list.length;i++){
 21                 let img=new Image();
 22                 img.src="./img/"+list[i];
 23                 iconImgList.appendChild(img);
 24                 if(i===0){
 25                     selectImg(img);
 26                 }
 27             }
 28             setImage("./img/"+list[0].replace("_icon",""));
 29             firstP=0;
 30             lastP=4;
 31             //给小图片添加鼠标事件
 32             smallImg.addEventListener("mousemove",mouseHandler);
 33             smallImg.addEventListener("mouseleave",mouseLeaveHandler);
 34             smallImg.addEventListener("mouseenter",mouseLeaveHandler);
 35             iconImgList.addEventListener("mouseover",imgSelectHandler);
 36             //给左右按钮添加点击事件
 37             leftBn.addEventListener("click",clickHandler);
 38             rightBn.addEventListener("click",clickHandler);
 39         }
 40
 41         function imgSelectHandler(e) {
 42             //判断当前事件源是不是商品列表中选中的图片
 43             if(e.target===iconImgList) return;
 44             selectImg(e.target);
 45             setImage(e.target.src.replace("_icon",""));
 46
 47         }
 48
 49         function setImage(src) {
 50             //设置当前选中的图片
 51             if(smallImg.children.length===1){
 52                 let img=new Image();
 53                 img.src=src;
 54                 img.style.width="350px";
 55                 img.style.height="350px";
 56                 img.style.position="absolute";
 57                 smallImg.insertBefore(img,smallImg.firstElementChild);
 58             }else{
 59                 smallImg.firstElementChild.src=src;
 60             }
 61             bigImg.style.backgroundImage=`url(${src})`;
 62         }
 63         function mouseLeaveHandler(e) {
 64             //鼠标进入大图显示,离开隐藏
 65             if(e.type==="mouseenter"){
 66                 bigImg.style.display="block";
 67             }else if(e.type==="mouseleave"){
 68                 bigImg.style.display="none";
 69             }
 70         }
 71         function mouseHandler(e) {
 72             //设置当前方块移动的距离
 73             mask.style.left=e.x-mask.offsetWidth/2+"px";
 74             mask.style.top=e.y-mask.offsetHeight/2+"px";
 75             //实现小方块移动时的边界限定
 76             if(mask.offsetLeft<0){
 77                 mask.style.left="0px";
 78             }
 79             if(mask.offsetTop<0){
 80                 mask.style.top="0px";
 81             }
 82             if(mask.offsetLeft+mask.offsetWidth>smallImg.offsetWidth){
 83
 84                 mask.style.left=smallImg.offsetWidth-mask.offsetWidth+"px";
 85             }
 86             if(mask.offsetTop+mask.offsetHeight>smallImg.offsetHeight){
 87                 mask.style.top=smallImg.offsetHeight-mask.offsetHeight+"px";
 88             }
 89             bigImg.style.backgroundPositionX=-mask.offsetLeft*(800/350)+"px";
 90             bigImg.style.backgroundPositionY=-mask.offsetTop*(800/350)+"px";
 91         }
 92
 93         function clickHandler(e) {
 94             //点击左边按钮,图片依次换一张
 95             if(this===leftBn){
 96                 if(firstP-1<0) return;
 97                 firstP--;
 98                 lastP--;
 99                 iconImgList.style.left=-firstP*58+"px";
100             }else if(this===rightBn){
101                 if(lastP+1>list.length-1) return;
102                 lastP++;
103                 firstP++;
104                 iconImgList.style.left=-(lastP-4)*58+"px";
105             }
106         }
107         function selectImg(elem) {
108             if(pre){
109                 pre.style.border="2px solid transparent";
110             }
111             pre=elem;
112             pre.style.border="2px solid #e01222";
113         }
114     </script>
总结:利用对一个事件源绑定多个事件以及事件对象的样式操作,对图片的显示和隐藏来实现放大镜效果。
如有错误,请及时指点!!!!!