一、EventAggregator简介
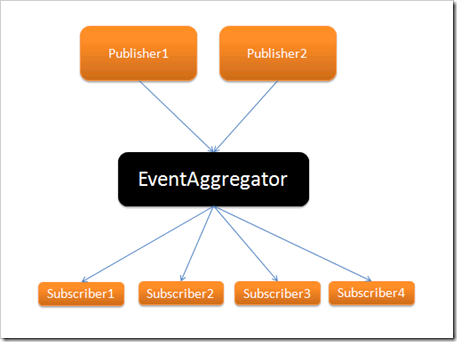
EventAggregator是Prism中专门处理ViewModel与ViewModel之间事件传递的类对象,它提供了针对事件的发布方法和订阅方法,所以可以非常方便的来管理事件。下面的图就是其实现的一个比较简便的说明:
二、EventAggregator单页传递数据
首先,新建一个WPF项目,然后安装好Prism,这里我们可以通过程序包管理器控制台安装,待到都安装好以后,我们就可以开始使用了。
其次,创建一个GetInputMessages的类,继承自CompositePresentationEvent<string>方法,由于我们传递的都是String类型的数据,所以这里我采用String类型。这个类不提供任何实现,只需要继承就好了:
using System;
using System.Collections.Generic;
using System.Linq;
using System.Text;
using Microsoft.Practices.Prism.Events;

namespace EventAggregatorPratice
{
    /// <summary>
    /// 自定义的事件,一定要继承自CompositePresentationEvent类,或者继承EventBase,不做任何实现,相当于一个标志,给这个事件一个名字
    /// </summary>
    public class GetInputMessages:CompositePresentationEvent<string>
    {
    }
}
然后,创建EventAggregatorRepository类,这个类主要存储eventAggregator对象并保证其唯一:

using System;
using System.Collections.Generic;
using System.Linq;
using System.Text;
using Microsoft.Practices.Prism.Events;

namespace EventAggregatorPratice
{
    public class EventAggregatorRepository
    {
        public EventAggregatorRepository()
        {
            eventAggregator = new EventAggregator();
        }

        public IEventAggregator eventAggregator;
        public static EventAggregatorRepository eventRepository = null;

        //单例,保持内存唯一实例
        public static EventAggregatorRepository GetInstance()
        {
            if (eventRepository == null)
            {
                eventRepository = new EventAggregatorRepository();
            }
            return eventRepository;
        }
    }
}
最后则是创建EventAggregatorWindow.xaml窗体,然后编写窗体代码:
前台的XAML代码如下:
<Window x:Class="EventAggregatorPratice.MainWindow"
        xmlns="http://schemas.microsoft.com/winfx/2006/xaml/presentation"
        xmlns:x="http://schemas.microsoft.com/winfx/2006/xaml"
        Title="测试Event Aggregator的使用方法" Height="365" Width="471" WindowStartupLocation="CenterScreen" >
    <Grid>
        <Button Content="获取输入" Height="23" HorizontalAlignment="Right" Margin="0,291,53,0" Name="button1" VerticalAlignment="Top" Width="75" Click="button1_Click" />
        <GroupBox Header="用户信息" Height="273" HorizontalAlignment="Left" Margin="12,12,0,0" Name="groupBox1" VerticalAlignment="Top" Width="425">
            <Grid>
                <Label Content="用户昵称:" Height="28" HorizontalAlignment="Left" Margin="19,18,0,0" Name="label1" VerticalAlignment="Top" />
                <Label Content="用户性别:" Height="28" HorizontalAlignment="Left" Margin="19,52,0,0" Name="label2" VerticalAlignment="Top" />
                <Label Content="用户住址:" Height="28" HorizontalAlignment="Left" Margin="19,86,0,0" Name="label3" VerticalAlignment="Top" />
                <Label Content="用户年龄:" Height="28" HorizontalAlignment="Left" Margin="205,18,0,0" Name="label4" VerticalAlignment="Top" />
                <Label Content="用户电话:" Height="28" HorizontalAlignment="Left" Margin="205,52,0,0" Name="label5" VerticalAlignment="Top" />
                <TextBox Height="23" HorizontalAlignment="Left" Margin="79,20,0,0" Name="txtNick" VerticalAlignment="Top" Width="109" TabIndex="1" />
                <TextBox Height="23" HorizontalAlignment="Left" Margin="269,54,0,0" Name="txtTel" VerticalAlignment="Top" Width="109" TabIndex="4" />
                <TextBox Height="23" HorizontalAlignment="Left" Margin="79,54,0,0" Name="txtSex" VerticalAlignment="Top" Width="109" TabIndex="3" />
                <TextBox Height="23" HorizontalAlignment="Left" Margin="269,20,0,0" Name="txtAge" VerticalAlignment="Top" Width="109" TabIndex="2" />
                <TextBox Height="23" HorizontalAlignment="Left" Margin="79,88,0,0" Name="txtAddress" VerticalAlignment="Top" Width="299" />
                <Border BorderBrush="Black" BorderThickness="1" Height="1" HorizontalAlignment="Left" Margin="6,117,0,0" Name="border1" VerticalAlignment="Top" Width="401" />
                <Label Content="获取输入:" Height="28" HorizontalAlignment="Left" Margin="19,124,0,0" Name="label6" VerticalAlignment="Top" />
                <TextBlock Height="124" HorizontalAlignment="Left" Margin="79,124,0,0" Name="txtResult" Text="" VerticalAlignment="Top" Width="299" Background="#FFF2F2F2" />
            </Grid>
        </GroupBox>
    </Grid>
</Window>
后台的代码如下:
using System.Windows;
using Microsoft.Practices.Prism.Events;
using System.Text;
using System;

namespace EventAggregatorPratice
{
    /// <summary>
    /// MainWindow.xaml 的交互逻辑
    /// </summary>
    public partial class MainWindow : Window
    {
        public MainWindow()
        {
            InitializeComponent();
            //订阅事件,一旦有事件引发,将会在这里接住
            SetSubscribe();
        }

        public void SetPublish(string messageData)
        {
            EventAggregatorRepository
                .GetInstance()
                .eventAggregator
                .GetEvent<GetInputMessages>()
                .Publish(messageData);
        }

        public void SetSubscribe()
        {
            EventAggregatorRepository
                .GetInstance()
                .eventAggregator
                .GetEvent<GetInputMessages>()
                .Subscribe(ReceiveMessage,ThreadOption.UIThread,true);
        }

        public void ReceiveMessage(string messageData)
        {
            this.txtResult.Text = messageData;
        }

        private void button1_Click(object sender, RoutedEventArgs e)
        {
            //抛出事件
            StringBuilder strBuilder = new StringBuilder();
            strBuilder.Append("用户昵称:").Append(txtNick.Text).Append(Environment.NewLine);
            strBuilder.Append("用户年龄:").Append(txtAge.Text).Append(Environment.NewLine);
            strBuilder.Append("用户性别:").Append(txtSex.Text).Append(Environment.NewLine);
            strBuilder.Append("用户电话:").Append(txtTel.Text).Append(Environment.NewLine);
            strBuilder.Append("用户住址:").Append(txtAddress.Text).Append(Environment.NewLine);
            SetPublish(strBuilder.ToString());
        }
    }
}
在这里,我来做一下解释:
首先,程序先通过SetSubscribe方法来订阅事件,一旦有事件抛出的时候,SetSubscribe便会利用其ReceiveMessage回调方法处理接收到的事件。
其次,当我们点击按钮的时候,一个SetPublish事件就被抛出了,并且会被SetSubscribe事件接住。效果如图:
