IdentityService4简介
一套为应用程序构建身份认证和访问控制解决方案/框架,包括单点登录,身份认证,授权和API访问控制。
前文
今天介绍ClientCredentials认证类型,适用于服务器与服务器之间身份验证,一般用于定时程序。
开始
我们需要的东西:
Api:负责提供数据,被保护进程
IdentityService4:负责提供身份认证等功能
客户端:负责在认证之后调用Api执行某些操作
IdentityService4初始化
IdentityService4(简称is4)有两种初始化方式:
1 使用命令行安装is4模板
1)安装模板命令:dotnet new -i IdentityServer4.Templates
2)安装完成之后执行dotnet new命令如下图所示多出了一些模板
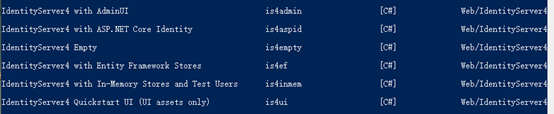
3)使用dotnet cli创建一个is4empty模板,is4项目初始化完成
注:也可以使用其他已经配置好的模板
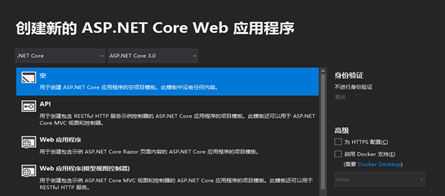
2 创建空.net core项目进行配置
1) 选择好要创建的文件夹之后选择创建空模板:
2) 使用nuget添加is4的包
install-package IdentityService4
注:is4会顺带装上serilog
3) 创建一个Config.cs文件,文件内包含三个静态字段
public static IEnumerable<IdentityResource> Ids
定义身份资源
public static IEnumerable<ApiResource> Apis
定义Api资源
public static IEnumerable<Client> Clients
定义客户端
4) 定义我们的Api资源:
public static IEnumerable<ApiResource> Apis =>
new ApiResource[]
{
new ApiResource("api1","My Api")
};
其中api1为我们定义的资源名,后面客户端请求的时候需要用到,而My Api好像是显示名称基本用不到。
5) 定义客户端:
public static IEnumerable<Client> Clients =>
new Client[]
{
new Client(){
ClientId="client",
AllowedGrantTypes=GrantTypes.ClientCredentials,
ClientSecrets={
new Secret("secret".Sha256())
},
AllowedScopes={ "api1"}
}
};
ClientId:客户端的Id可以理解为用户名
AllowedGrantTypes:指定认证的类型,这里为ClientCredentials类型
ClientSecrets:可以片面理解为密码
AllowedScopes:这个客户端可以请求到哪些资源
6) 对is4进行配置
我们需要在ConfigureServices对is4进行注入,很简单只需要将config里面的三个字段注入到指定方法即可:
var builder = services.AddIdentityServer()
.AddInMemoryIdentityResources(Config.Ids)
.AddInMemoryApiResources(Config.Apis)
.AddInMemoryClients(Config.Clients);
7) 添加中间件
我们目前只需要错误页中间件和is4中间件即可
if (Environment.IsDevelopment())
{
app.UseDeveloperExceptionPage();
}
app.UseIdentityServer();
至此为止我们is4已经配置完成,可以启动项目,访问http://localhost:5000/.well-known/openid-configuration,如果页面显示一大堆json那么证明我们成功了。
Api
1) 创建Api项目过程不在赘述,项目创建完成之后,在launchSettings.json 文件中将Api的启动端口设置5001,避免与is4项目冲突。
2) 添加依赖包:
程序依赖于Microsoft.AspNetCore.Authentication.JwtBearer按照添加is4包的方式添加。
3) 创建控制器
因为用于测试所以我们Home下只存在一个Index方法,并且在Index方法中打印出所有的Claims信息。
整个home应该是这样的:
[Route("api/[controller]")]
[ApiController]
[Authorize] //加上认证特性
public class IdentityController : ControllerBase{
[HttpGet]
public IActionResult Get()
{
return new JsonResult(from c in User.Claims select new { c.Type, c.Value });
}
}
4) ConfigureServices与Configure
首先需要定义一个名叫Bearer的Jwt认证方案
services.AddAuthentication("Bearer")
.AddJwtBearer("Bearer", options =>
{
options.Authority = "http://localhost:5000";
options.RequireHttpsMetadata = false;
options.Audience = "api1";
});
Authority:规定jwt必须由http://localhost:5000发放
RequireHttpsMetadata:规定权限地址是否需要https,因为项目还没有使用https所以为false
Audience:请求的资源名称。 这个我感觉我理解的有问题,请各位指正
Configure中添加中间件:
app.UseAuthentication();
app.UseAuthorization();
至此我们已经写好了Api,只差最后的客户端。
客户端
ClientCredentials模式一般用于服务器与服务器之间身份验证所以我们创建一个控制台进行模拟。首先我们需要安装IdentityModel包,然后当我们需要访问Api时需要做一下操作:
1)请求发现文档
var client = new HttpClient();
var disco=await
client.GetDiscoveryDocumentAsync("http://localhost:5000");
返回值为一个类,类的属性存储对应处理方法的地址
2)获取一个token
var tokenResponse = await
client.RequestClientCredentialsTokenAsync(
new ClientCredentialsTokenRequest() {
Address=disco.TokenEndpoint,
ClientId= "client",
ClientSecret= "secret",
Scope= "api1"
});
注:需要设置id(账号),secret(密码),scope(要请求的资源名称),其返回值时一个token
3)给httpclient设置头
client.SetBearerToken(tokenResponse.AccessToken);
4)请求Api,打印出返回的值
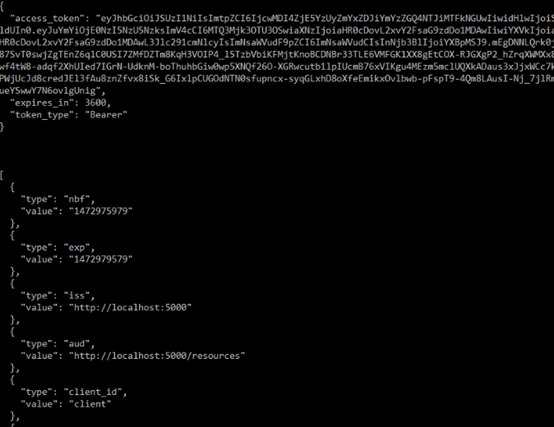
var response = await
client.GetAsync("http://localhost:5001/api/Identity");
var content = await response.Content.ReadAsStringAsync();
Console.WriteLine(JArray.Parse(content));
5) 打印结果:
总结
is4中配置时设定的clientid,ClientSecrets,资源名称等,要与客户端请求/api验证对应起来
is4中config的三个字段要定义完整
各个程序记得按顺序写好中间件
发现文档中有所有的地址
客户端请求时要记得设置http头
本文仅用于个人笔记,如果有错误请各位指正,谢谢!