一般数据类展示内容,大多采用树状结构展示内容。类似效果如下:
关注微信公众号,查看效果

![]()
左侧是导航分类,可以进行新建,对单项导航分享和删除。单击导航,在右侧查询出当前导航下所有目录结构,可以新建目录。新增类型分为三种,目录可以无限嵌套,当然也可以设置层级。
页面整体布局
页面分为左右两个部分。左侧列表,通过路由跳转显示右侧内容。左侧列表分为上下两块,顶部是添加按钮,下面是导航列表。
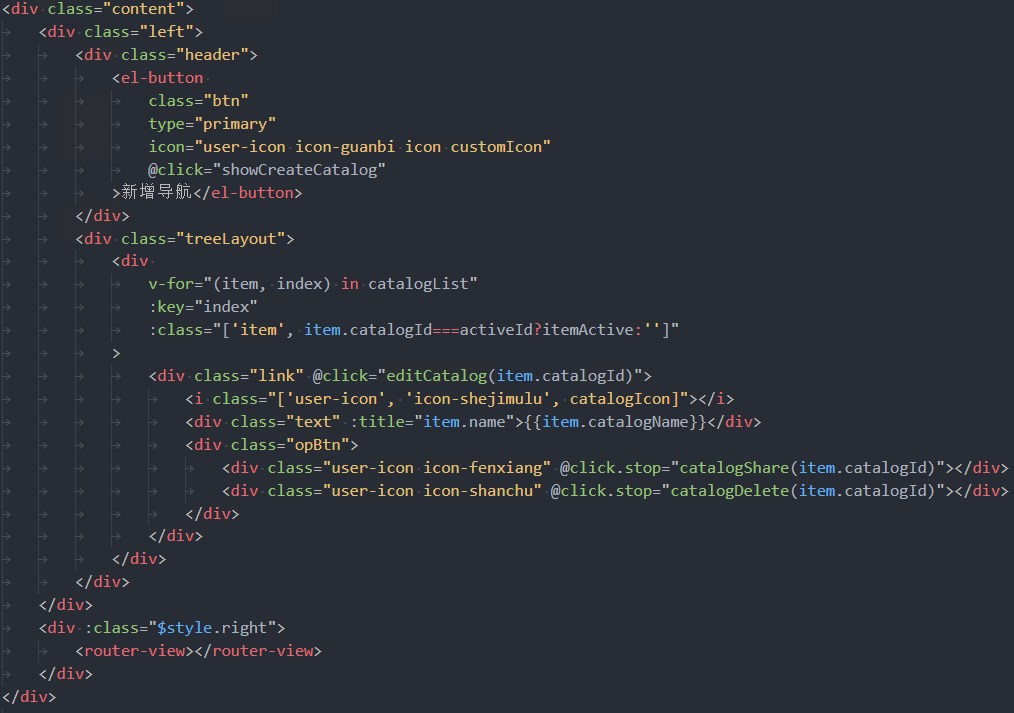
less样式。
import "../../theme/variables.less";


.main {
    position: relative;
    height: 100%;
    overflow: hidden;
    .content {
        border: 1px solid #dcdcdc;
        position: relative;
        height: 100%;
        background: #f1f2f7;
        display: flex;
        border-radius: @borderRadius;
        .left {
            width: 240px;
            background: #fff;
            border-right: 1px solid rgba(220, 220, 220, 1);
            padding: 15px 10px;
            display: flex;
            flex-direction: column;
            overflow: auto;
            .header {
                width: 100%;
                margin-bottom: 20px;
                display: flex;
                justify-content: center;
                align-items: center;
                .btn {
                    width: 136px;
                    margin: 0 6px;
                    :global {
                        .icon {
                            margin-right: 14px;
                        }
                        .customIcon {
                            display: inline-block;
                            transform: rotate(45deg);
                        }
                    }
                }
            }
            .treeLayout {
                flex: 1;
                .item {
                    width: 100%;
                    height: 32px;
                    line-height: 32px;
                    margin-bottom: 11px;
                    position: relative;
                    .link {
                        display: flex;
                        align-items: center;
                        font-size: 14px;
                        font-family: Microsoft YaHei;
                        font-weight: 400;
                        color: rgba(51, 51, 51, 1);
                        padding-left: 21px;
                        cursor: pointer;
                        .catalogIcon {
                            font-size: 12px;
                        }
                        .text {
                            display: inline-block;
                            flex: 1;
                            margin-left: 12px;
                        }
                        .opBtn {
                            width: 46px;
                            display: flex;
                            align-items: center;
                            justify-content: space-between;
                        }
                        .operateIcon {
                            display: none;
                        }
                        &:hover {
                            color: #00a4ff;
                            .opBtn {
                                color: rgba(51, 51, 51, 1);
                            }
                            .operateIcon {
                                display: block;
                            }
                        }
                    }
                    .iconBtns {
                        position: absolute;
                        top: 28px;
                        right: 24px;
                        width: 112px;
                        background: rgba(255, 255, 255, 1);
                        box-shadow: 0px 0px 6px 0px rgba(0, 0, 0, 0.13);
                        border-radius: 4px;
                        z-index: 10;
                        .icon {
                            width: 100%;
                            height: 40px;
                            border-radius: 2px;
                            display: flex;
                            align-items: center;
                            justify-content: center;
                            font-size: 12px;
                            font-family: Microsoft YaHei;
                            font-weight: 400;
                            color: rgba(51, 51, 51, 1);
                            cursor: pointer;
                            .iconName {
                                margin-left: 18px;
                            }
                            &:hover {
                                background: #e7e8e9;
                            }
                        }
                    }
                }
                .itemActive {
                    .link {
                        color: #00a4ff;
                        .opBtn {
                            color: rgba(51, 51, 51, 1);
                        }
                        .operateIcon {
                            display: block;
                        }
                    }
                }
            }
        }
        .right {
            flex: 1;
            width: 100%;
            overflow: hidden;
        }
    }
}
这里的导航列表,新增导航,和删除都是调用相关接口。目录树组件
页面右侧就是树状结构列表,通过路由跳转携带catalogId参数,接口查询出列表数据,后端返回的数据就是有层级的树状结构。
我认为的写一个组件,单指这里的目录树组件,组件中只需要构造出页面布局,任何的交互逻辑都不涉及,只将相关事件抛出即可。这就需要先明确好数据结构,来写样式布局了。
数据结构,有id,name,父级id,子节点数组,类型catalogType:1是目录,2是场景,3是外链场景 ... 如下:

![]()

树状结构会涉及到递归,这里为了处理方便,组件中分为两层。组件目录结构如下:
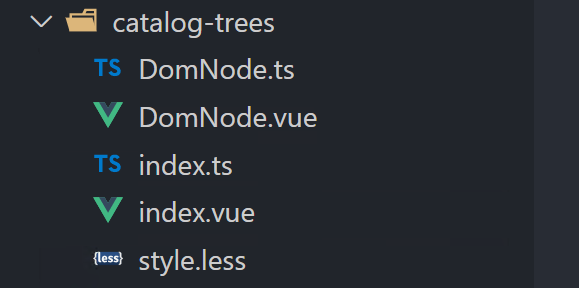
![]()

index就是对外暴露的窗口,主要目录树的布局样式是在DomNode中。先明确一下布局,目录树中单个一行,需要一个展开收起的图标,当前行类型的图标,这里业务上分三种类型,就需要以此判断显示不同图标。每项最后还会有四个操作按钮。
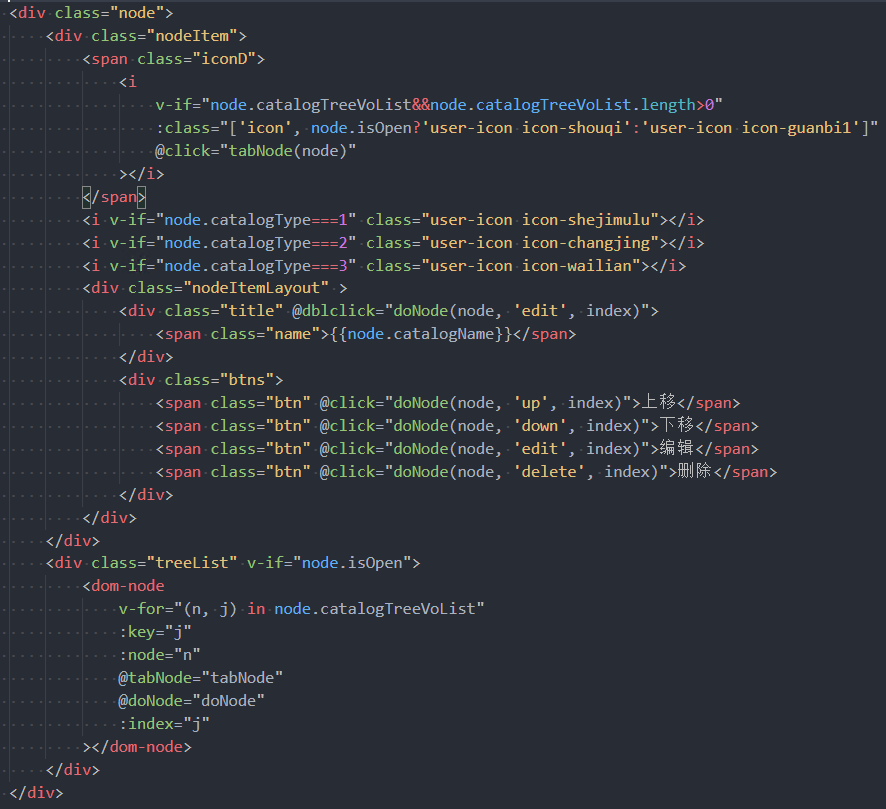
![]()

这里把事件简化了,只分了两个事件,一个是展开收起,一个是一系列编辑操作,传个type参数作为区分。
tabNode(node: ITree) {
    this.$emit("tabNode", node);
},


// 操作
doNode(node: ITree, type: string, index: number) {
    this.$emit("doNode", node, type, index);
},
index文件中引用DomNode,相关的接收的参数和抛出去的事件,和DomNode一致。
// index布局
<div class="treeLayout">
    <DomNode
        v-for="(item, index) in trees"
        :key="index"
        :node="item"
        @tabNode="tabNode"
        @doNode="doNode"
        :index="index"
    ></DomNode>
</div>


// 接收的参数
props: {
    trees: {
        type: Array as () => ITree[],
        default: [],
    },
    activeId: {
        type: String,
        default: "",
    },
},
页面右侧实现引用catalogTree组件。
<catalog-tree
  :trees="treeList"
  @tabNode="tabNode"
  @doNode="doNode"
></catalog-tree>
前文已经提过,目录数据是后端返回的,那么treeList就是后端返回值res.data。但操作tabNode和doNode这两个方法,需要将treeList数组转换成map对象。
因为需要自定义添加一些字段,这些字段只作为前端交互操作逻辑使用,所以后端返回值中不会携带。
需要给每一项数据添加isOpen字段,用来判断展开收起状态。level字段,用来实现上移下移操作。
先来构造这个catalogMap,定义个方法setCatalogMap,需要的参数有存放结果的treeMap,原数据treeList数组。
setCatalogMap,很简单的一个递归。
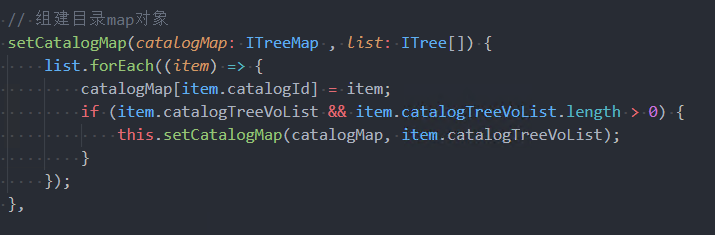
![]()

拿到map对象,就可以实现tabNode和doNode这两个方法。
// 切换状态
tabNode(node: ITree) {
    if (node.isOpen) {
        this.treeMap[node.catalogId].isOpen = false;
    } else {
        this.treeMap[node.catalogId].isOpen = true;
    }
},


// 编辑等一系列操作,按照类型区分
doNode(node: ITree, type: string, index: number) {
    switch (type) {
        case "up":
            // 上移
            this.doUp(node, index);
            break;
        case "down":
            // 下移
            this.doDown(node, index);
            break;
        case "edit":
            // 编辑
            this.doEdit(node.catalogId);
            break;
        case "delete":
            // 删除
            this.doDelete(node);
            break;
    }
},
有认真看的话,会发现,并没有在哪里定义isOpen属性,怎么就在tabNode方法中使用了。因为我还没有写。
拿到map对象,循环做个判断,用来保持isOpen状态。
Object.keys(treeMap).forEach((key) => {
    const item = treeMap[key];
    if (this.treeMap[key]) {
        item.isOpen = this.treeMap[key].isOpen;
    } else {
        item.isOpen = true;
    }
});
doNode中的四个方法,编辑和删除就是调个接口,主要是上移下移操作,前端实现数据的排序,最后将最新的数据返回给后端保存,doSaveSort方法调接口保存。
上代码,好好琢磨琢磨。
doUp(node: ICatalogModel, index: number) {
    if (index === 0) {
        return;
    }
    const parentId: string = node.catalogParent as string;
    const parentItem: ICatalogModel = this.treeMap[parentId];


    let dataList: ICatalogModel[] = [];
    // 如果为空则是顶级
    if (parentItem) {
        if (parentItem.catalogTreeVoList) {
            dataList = parentItem.catalogTreeVoList;
        }
    } else {
        dataList = this.treeList;
    }
    const item = dataList[index];
    dataList.splice(index, 1);
    dataList.splice(index - 1, 0, item);
    this.doSaveSort(dataList);
},


doDown(node: ICatalogModel, index: number) {
    const parentId: string = node.catalogParent as string;
    const parentItem: ICatalogModel = this.treeMap[parentId];
    // 如果为空则是顶级
    let dataList: ICatalogModel[] = [];
    if (parentItem) {
        if (parentItem.catalogTreeVoList) {
            // 最后一个不能下移
            if (parentItem.catalogTreeVoList.length === (index + 1)) {
                return;
            } else {
                dataList = parentItem.catalogTreeVoList;
            }
        }
    } else {
        // 一级最后一个不能下移
        if ( this.treeList.length === (index + 1)) {
            return;
        }
        dataList = this.treeList;
    }
    const item = dataList[index];
    dataList.splice(index, 1);
    dataList.splice(index + 1, 0, item);
    this.doSaveSort(dataList);
},
总结树状结构列表,首先需要明确数据结构,必备的字段id,name,父级id,children数组,根据数据结构,使用递归构建布局。