前面几节的网络骨架, 如VGGNet和ResNet等, 虽从各个角度出发提升了物体检测性能, 但究其根本是为ImageNet的图像分类任务而设计的。 而图像分类与物体检测两个任务天然存在着落差, 分类任务侧重全图的特征提取, 深层的特征图分辨率很低; 而物体检测需要定位出物体位置, 特征图分辨率不宜过小, 因此造成了以下两种缺陷:
·大物体难以定位: 对于FPN等网络, 大物体对应在较深的特征图上检测, 由于网络较深时下采样率较大, 物体的边缘难以精确预测, 增加了回归边界的难度。
·小物体难以检测: 对于传统网络, 由于下采样率大造成小物体在较深的特征图上几乎不可见; FPN虽从较浅的特征图来检测小物体, 但浅层的语义信息较弱, 且融合深层特征时使用的上采样操作也会增加物体检测的难度。
针对以上问题, 旷视科技提出了专为物体检测设计的DetNet结构,引入了空洞卷积, 使得模型兼具较大感受野与较高分辨率, 同时避免了3.6节中FPN的多次上采样, 实现了较好的检测效果。
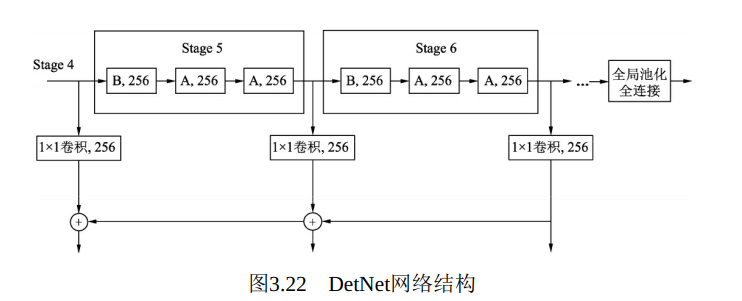
DetNet的网络结构如图3.22所示, 仍然选择性能优越的ResNet-50作为基础结构, 并保持前4个stage与ResNet-50相同, 具体的结构细节有以下3点:
·引入了一个新的Stage 6, 用于物体检测。 Stage 5与Stage 6使用了DetNet提出的Bottleneck结构, 最大的特点是利用空洞数为2的3×3卷积取代了步长为2的3×3卷积.
·Stage 5与Stage 6的每一个Bottleneck输出的特征图尺寸都为原图的, 通道数都为256, 而传统的Backbone通常是特征图尺寸递减, 通道数递增.
·在组成特征金字塔时, 由于特征图大小完全相同, 因此可以直接从右向左传递相加, 避免了上一节的上采样操作。 为了进一步融合各通道的特征, 需要对每一个阶段的输出进行1×1卷积后再与后一Stage传回的特征相加。
DetNet这种精心设计的结构, 在增加感受野的同时, 获得了较大的特征图尺寸, 有利于物体的定位。 与此同时, 由于各Stage的特征图尺寸相同, 避免了上一节的上采样, 既一定程度上降低了计算量, 又有利于小物体的检测。
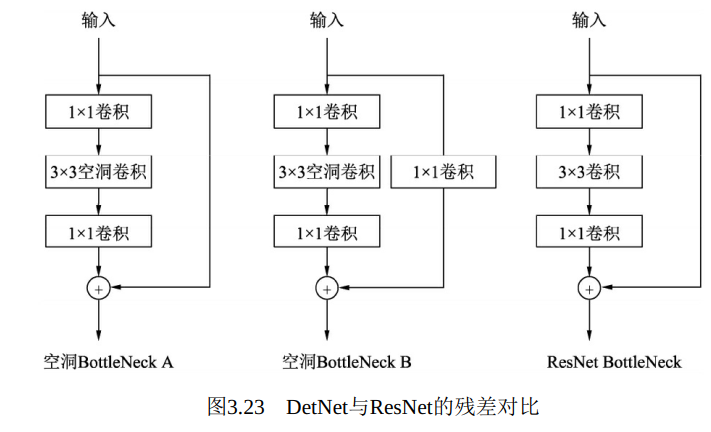
DetNet中Bottleneck的细节如图3.23所示, 左侧的两个Bottleneck A与Bottleneck B分别对应图3.22的A与B, 右侧的为原始的ResNet残差结构。 DetNet与ResNet两者的基本思想都是卷积堆叠层与恒等映射的相加, 区别在于DetNet使用了空洞数为2的3×3卷积, 这样使得特征图尺寸保持不变, 而ResNet是使用了步长为2的3×3卷积。 B相比于A, 在恒等映射部分增加了一个1×1卷积, 这样做可以区分开不同的Stage, 并且实验发现这种做法对于特征金字塔式的检测非常重要
.
使用PyTorch来实现DetNet的两个Bottleneck结构A和B, 新建一个detnet_bott-leneck.py文件, 代码如下:


 1 import torch
 2 from torch import  nn
 3
 4 class DetBottleneck(nn.Module):
 5
 6     # 初始化时extra为False时为Bottleneck A, 为True时则为Bottleneck B
 7     def __init__(self, inplaces, planes, stride=1, extra=False):
 8
 9         super(DetBottleneck, self).__init__()
10         # 构建连续3个卷积层的Bottleneck
11         self.bottleneck = nn.Sequential(
12                 nn.Conv2d(inplaces, planes, 1, bias =False),
13                 nn.BatchNorm2d(planes),
14                 nn.ReLU(inplace=True),
15                 nn.Conv2d(planes, planes, kernel_size=3, stride=1, padding=2, dilation=2, bias=False),
16                 nn.BatchNorm2d(planes),
17                 nn.ReLU(inplace=True),
18                 nn.Conv2d(planes, planes, 1, bias=False),
19                 nn.BatchNorm2d(planes)
20         )
21
22         self.relu = nn.ReLU(inplace=True)
23         self.extra = extra
24
25         # Bottleneck B的1×1卷积
26         if self.extra:
27             self.extra_conv = nn.Sequential(
28                 nn.Conv2d(inplaces, planes, 1, bias=False),
29                 nn.BatchNorm2d(planes)
30             )
31
32     def forward(self, x):
33         # 对于Bottleneck B来讲, 需要对恒等映射增加卷积处理, 与ResNet类似
34         if self.extra:
35             indentity = self.extra_conv(x)
36         else:
37             indentity = x
38         out = self.bottleneck(x)
39         out += indentity
40         out = self.relu(out)
41
42         return out
 1 import torch
 2 from detnet_bottleneck import DetBottleneck
 3
 4 bottleneck_b = DetBottleneck(1024, 256, 1, True).cuda()
 5 print(bottleneck_b)
 6 >> DetBottleneck(
 7   (bottleneck): Sequential(
 8     (0): Conv2d(1024, 256, kernel_size=(1, 1), stride=(1, 1), bias=False)
 9     (1): BatchNorm2d(256, eps=1e-05, momentum=0.1, affine=True, track_running_stats=True)
10     (2): ReLU(inplace=True)
11     (3): Conv2d(256, 256, kernel_size=(3, 3), stride=(1, 1), padding=(2, 2), dilation=(2, 2), bias=False)
12     (4): BatchNorm2d(256, eps=1e-05, momentum=0.1, affine=True, track_running_stats=True)
13     (5): ReLU(inplace=True)
14     (6): Conv2d(256, 256, kernel_size=(1, 1), stride=(1, 1), bias=False)
15     (7): BatchNorm2d(256, eps=1e-05, momentum=0.1, affine=True, track_running_stats=True)
16   )
17   (relu): ReLU(inplace=True)
18   (extra_conv): Sequential(
19     (0): Conv2d(1024, 256, kernel_size=(1, 1), stride=(1, 1), bias=False)
20     (1): BatchNorm2d(256, eps=1e-05, momentum=0.1, affine=True, track_running_stats=True)
21   )
22 )
23
24 bottleneck_a1 = DetBottleneck(256,256).cuda()
25 print(bottleneck_a1)
26 >>
27 DetBottleneck(
28   (bottleneck): Sequential(
29     (0): Conv2d(256, 256, kernel_size=(1, 1), stride=(1, 1), bias=False)
30     (1): BatchNorm2d(256, eps=1e-05, momentum=0.1, affine=True, track_running_stats=True)
31     (2): ReLU(inplace=True)
32     (3): Conv2d(256, 256, kernel_size=(3, 3), stride=(1, 1), padding=(2, 2), dilation=(2, 2), bias=False)
33     (4): BatchNorm2d(256, eps=1e-05, momentum=0.1, affine=True, track_running_stats=True)
34     (5): ReLU(inplace=True)
35     (6): Conv2d(256, 256, kernel_size=(1, 1), stride=(1, 1), bias=False)
36     (7): BatchNorm2d(256, eps=1e-05, momentum=0.1, affine=True, track_running_stats=True)
37   )
38   (relu): ReLU(inplace=True)
39 )
40
41
42 bottleneck_a2 = DetBottleneck(256, 256).cuda()
43 print(bottleneck_a2)
44 >> DetBottleneck(
45   (bottleneck): Sequential(
46     (0): Conv2d(256, 256, kernel_size=(1, 1), stride=(1, 1), bias=False)
47     (1): BatchNorm2d(256, eps=1e-05, momentum=0.1, affine=True, track_running_stats=True)
48     (2): ReLU(inplace=True)
49     (3): Conv2d(256, 256, kernel_size=(3, 3), stride=(1, 1), padding=(2, 2), dilation=(2, 2), bias=False)
50     (4): BatchNorm2d(256, eps=1e-05, momentum=0.1, affine=True, track_running_stats=True)
51     (5): ReLU(inplace=True)
52     (6): Conv2d(256, 256, kernel_size=(1, 1), stride=(1, 1), bias=False)
53     (7): BatchNorm2d(256, eps=1e-05, momentum=0.1, affine=True, track_running_stats=True)
54   )
55   (relu): ReLU(inplace=True)
56 )
57
58 input = torch.randn(1, 1024, 14, 14).cuda()
59
60 # 将input作为某一层的特征图, 依次传入Bottleneck B、 A1与A2三个模块
61 output1 = bottleneck_b(input)
62 output2 = bottleneck_a1(output1)
63 output3 = bottleneck_a2(output2)
64
65 # 三个Bottleneck输出的特征图大小完全相同
66 print(output1.shape)
67 >> torch.Size([1, 256, 14, 14])
68 print(output2.shape)
69 >> torch.Size([1, 256, 14, 14])
70 print(output3.shape)
71 >> torch.Size([1, 256, 14, 14])