
目标:
在STM32F429 Disco开发板上用FreeRTOS双线程点亮双闪led。
准备:
0. STM32F429i-DISCO
1. keil ARMMDK 5.13
2. STM32CubeMX 4.8
步骤:
1. 建立工程
keil - project - new project
2. 保存在硬盘上, 给工程起名字

3. 保存工程
同时弹出了器件选择界面, 选STM32F429ZITx
4. 上面界面点OK后出来了运行环境配置界面

展开CMSIS:RTOS and enable :Keil RTX :
Validation Output 区域显示了依赖组件, 点Resolve,然后OK
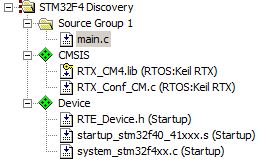
现在,需求的组件被添加进了工程(startup , RTX config, CMSIS系统文件)
5. GPIO和时钟配置。
打开cube
选好器件


配置时钟

然后生成代码
我要的是时钟的初始化和gpio的初始化


/** System Clock Configuration
*/
void SystemClock_Config(void)
{

  RCC_OscInitTypeDef RCC_OscInitStruct;
  RCC_ClkInitTypeDef RCC_ClkInitStruct;

  __PWR_CLK_ENABLE();

  __HAL_PWR_VOLTAGESCALING_CONFIG(PWR_REGULATOR_VOLTAGE_SCALE1);

  RCC_OscInitStruct.OscillatorType = RCC_OSCILLATORTYPE_HSE;
  RCC_OscInitStruct.HSEState = RCC_HSE_ON;
  RCC_OscInitStruct.PLL.PLLState = RCC_PLL_ON;
  RCC_OscInitStruct.PLL.PLLSource = RCC_PLLSOURCE_HSE;
  RCC_OscInitStruct.PLL.PLLM = 8;
  RCC_OscInitStruct.PLL.PLLN = 336;
  RCC_OscInitStruct.PLL.PLLP = RCC_PLLP_DIV2;
  RCC_OscInitStruct.PLL.PLLQ = 4;
  HAL_RCC_OscConfig(&RCC_OscInitStruct);

  RCC_ClkInitStruct.ClockType = RCC_CLOCKTYPE_SYSCLK|RCC_CLOCKTYPE_PCLK1
                              |RCC_CLOCKTYPE_PCLK2;
  RCC_ClkInitStruct.SYSCLKSource = RCC_SYSCLKSOURCE_PLLCLK;
  RCC_ClkInitStruct.AHBCLKDivider = RCC_SYSCLK_DIV1;
  RCC_ClkInitStruct.APB1CLKDivider = RCC_HCLK_DIV4;
  RCC_ClkInitStruct.APB2CLKDivider = RCC_HCLK_DIV2;
  HAL_RCC_ClockConfig(&RCC_ClkInitStruct, FLASH_LATENCY_5);

  HAL_SYSTICK_Config(HAL_RCC_GetHCLKFreq()/1000);

  HAL_SYSTICK_CLKSourceConfig(SYSTICK_CLKSOURCE_HCLK);

}
/** Configure pins as
        * Analog
        * Input
        * Output
        * EVENT_OUT
        * EXTI
*/
void MX_GPIO_Init(void)
{

  GPIO_InitTypeDef GPIO_InitStruct;

  /* GPIO Ports Clock Enable */
  __GPIOH_CLK_ENABLE();
  __GPIOG_CLK_ENABLE();

  /*Configure GPIO pins : PG13 PG14 */
  GPIO_InitStruct.Pin = GPIO_PIN_13|GPIO_PIN_14;
  GPIO_InitStruct.Mode = GPIO_MODE_OUTPUT_PP;
  GPIO_InitStruct.Pull = GPIO_NOPULL;
  GPIO_InitStruct.Speed = GPIO_SPEED_LOW;
  HAL_GPIO_Init(GPIOG, &GPIO_InitStruct);

}
把这两段代码加进main.c,并调用
6. 配置FreeRtos的时钟
打开RTX_Conf_CM.c文件, 文件下面有个configuration标签, 在这里配置168M时钟和上面匹配

8. 添加main函数
右键Source group 1, 选Add New Item to Group

Select User Code Template and click on “CMSIS-RTOS ‘main’ function”. Click Add.
9. Edit the main program code. First add the CMSIS-RTOS RTX header. Right-click on a blank line at the beginning of the file main.c and from popup menu select Insert ‘#include files’. Include the header file cmsis_os.h.
10. Hal驱动

11. 写应用代码
添加LED.h, LED.H
/*------------------------------------------------------------------------
 * File LED.h
 *----------------------------------------------------------------------*/
void Init_BlinkyThread ( void ); // Initialize thread
/*------------------------------------------------------------------------
 * File LED.c
 *----------------------------------------------------------------------*/
#include "stm32f4xx.h" // Device header
#include "cmsis_os.h" // RTOS:Keil RTX header
#include "LED.h"
#include "stm32f4xx_hal.h"

// Prototype function
void LEDG_blink(void const *argument);
void LEDR_blink(void const *argument);


// Define blinky thread
osThreadDef (LEDG_blink, osPriorityNormal, 1, 0);
osThreadDef (LEDR_blink, osPriorityNormal, 1, 0);


void LEDG_blink(void const *argument) {
    for (;;) {
        HAL_GPIO_WritePin(GPIOG, GPIO_PIN_13, GPIO_PIN_SET);
        osDelay (500); // Delay 500 ms
        HAL_GPIO_WritePin(GPIOG, GPIO_PIN_13, GPIO_PIN_RESET);
        osDelay (500); // Delay 500 ms
    }
}
void LEDR_blink(void const *argument) {
    for (;;) {
        HAL_GPIO_WritePin(GPIOG, GPIO_PIN_14, GPIO_PIN_SET);
        osDelay (300); // Delay 500 ms
        HAL_GPIO_WritePin(GPIOG, GPIO_PIN_14, GPIO_PIN_RESET);
        osDelay (300); // Delay 500 ms
    }
}

void Init_BlinkyThread (void) {
    osThreadCreate (osThread(LEDR_blink), NULL); // Create thread
    osThreadCreate (osThread(LEDG_blink), NULL); // Create thread
}
12. 在main.c里面调用
/*
 * main: initialize and start the system
 */
int main (void) {
    SystemClock_Config();
    MX_GPIO_Init();
    osKernelInitialize (); // Initialize CMSIS-RTOS

    // create 'thread' functions that start executing,
    // example: tid_name = osThreadCreate (osThread(name), NULL);
    Init_BlinkyThread (); // Start Blinky thread
    //osThreadCreate (osThread(blink_LED), NULL); // Create thread
    osKernelStart (); // Start thread execution

    while (1);
}