tkinter的三种布局管理器(将标签显示在父容器上)
可参考:
https://blog.csdn.net/qq_42711815/article/details/89287239?utm_medium=distribute.pc_relevant.none-task-blog-BlogCommendFromMachineLearnPai2-4.channel_param&depth_1-utm_source=distribute.pc_relevant.none-task-blog-BlogCommendFromMachineLearnPai2-4.channel_param
https://blog.csdn.net/qq_15181569/article/details/93749774
pack组件、grid组件、place组件
pack
pack 按照组件的创建顺序将子组件添加到父组件中, 按照垂直或者水平的方向自然排布。 如果不指定任何选项, 默认在父组件中自顶向下垂直添加组件。
pack 是代码量最少, 最简单的一种, 可以用于快速生成界面。
标签实例.pack()lable1.pack(padx=10,pady=10,side=LEFT)
参数:
fill控件填充,默认和其父窗口一样宽,也可以使用fill=X(大写)表示整行
PACK可以在四个方面控制控件边距:内边距, 外边距, 水平边距, 垂直边距
ipadx –指定水平方向上的内边距
ipady –指定垂直方向上的内边距
padx –指定水平方向上的外边距
pady –指定垂直方向上的外边距
side –指定组件的放置位置 left: 左 right: 右 top: 上 bottom: 下
padx=amount - add padding in x direction
pady=amount - add padding in y direction
ipadx=amount - add internal padding in x direction
ipady=amount - add internal padding in y direction
side=TOP or BOTTOM or LEFT or RIGHT - where to add this widget.
fill=NONE or X or Y or BOTH - fill widget if widget grows
label实例.pack(fill=X,Y,BOTH)
x:水平方向填充 y:竖直方向填充 both:水平和竖直方向填充 none:不填充
#创建窗口
windows =tk.Tk()
windows.geometry('600x600')
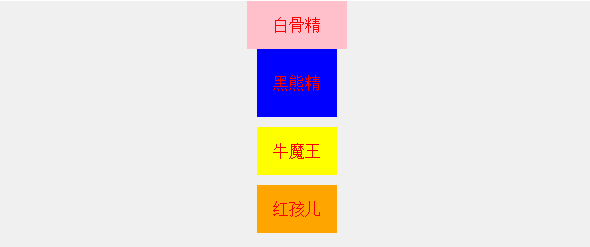
label1=tk.Label(windows,text='白骨精',bg='pink',font='宋体',fg='red',bd=15,cursor='plus')
label2=tk.Label(windows,text='黑熊精',bg='blue',font='宋体',fg='red',bd=15,cursor='plus')
label3=tk.Label(windows,text='牛魔王',bg='yellow',font='宋体',fg='red',bd=15,cursor='plus')
label1.pack(fill=Y)
label2.pack(fill=X)
label3.pack(fill=BOTH)
labeln.pack()
#显示窗口
windows.mainloop()

label实例.pack(ipadx=,ipady=,padx=,pady=) 参考:https://blog.csdn.net/liuxu0703/article/details/54428405
#创建窗口
windows =tk.Tk()
windows.geometry('600x600')
label1=tk.Label(windows,text='白骨精',bg='pink',font='宋体',fg='red',bd=15,cursor='plus')
label2=tk.Label(windows,text='黑熊精',bg='blue',font='宋体',fg='red',bd=15,cursor='plus')
label3=tk.Label(windows,text='牛魔王',bg='yellow',font='宋体',fg='red',bd=15,cursor='plus')
label4=tk.Label(windows,text='红孩儿',bg='orange',font='宋体',fg='red',bd=15,cursor='plus')

label1.pack(ipadx=10)#内边距宽度10
label2.pack(ipady=10)#内边距高度10
label3.pack(pady=10)#外边距高度10
label4.pack()
#显示窗口
windows.mainloop()
label实例.pack(side,expend,fill)(主要应用于button中)
expend: yes:扩展整个空白区 no:不扩展
import tkinter as tk

#初始化化一个窗口
windows=tk.Tk()
#windows.geometry('800x800')
windows['bg']='orange'
windows.title('初始化的窗口')
tk.Button(windows,text='A').pack(side='left',expand='yes',fill='y')
tk.Button(windows,text='B').pack(side='top',expand='yes',fill='x')
tk.Button(windows,text='C').pack(side='right',expand='yes',fill='none')
tk.Button(windows,text='D').pack(side='bottom',expand='yes',fill='both')
tk.Button(windows,text='n').pack(expand='yes',fill='none')
windows.mainloop()

case1:利用for循环进行按钮排布
#for 循环在pack中的小应用
import tkinter as tk
windows=tk.Tk()
data=['中国风','日漫风','韩流','港台风']
for i in data:
    tk.Button(windows,text=i).pack(side='left',expand='yes',fill='y')
windows.mainloop()

case1:拓展
这里使用了frame,在父窗口分别建立了两个矩形区域,而避免放置时出现左右并排的情况
#for 循环宽体text内容,进行排布
import tkinter as  tk
windows=tk.Tk()
f1=tk.Frame(windows)
#frame是一个矩形区域
f1.pack()
f2=tk.Frame(windows)
f2.pack()
data=['七星鲁王宫','云顶天宫','秦岭神树','西沙海底墓']
for txt in data:
    tk.Button(f1,text=txt).pack(side='left',padx='15')

for  i in range(18):
    tk.Button(f2,width=5,height=10,bg='black'if i%2==0 else 'white').pack(side='left')
windows.mainloop()

grid
(参考url:https://blog.csdn.net/qq_15181569/article/details/93749774)
grid 表格布局, 采用表格结构组织组件。 子组件的位置由行和列的单元格来确定, 并且可以跨行和跨列, 从而实现复杂的布局。
使用 grid 排列组件,只要告诉它你想要组件放置的位置(行 / 列,row 选项指定行,column 选项指定列)。此外你并不用提前指出网格(grid 分布给组件的位置称为网格)的尺寸,因为管理器会自动计算
这里的colum和row可以理解为excel的行与列
注意行号必须是整数
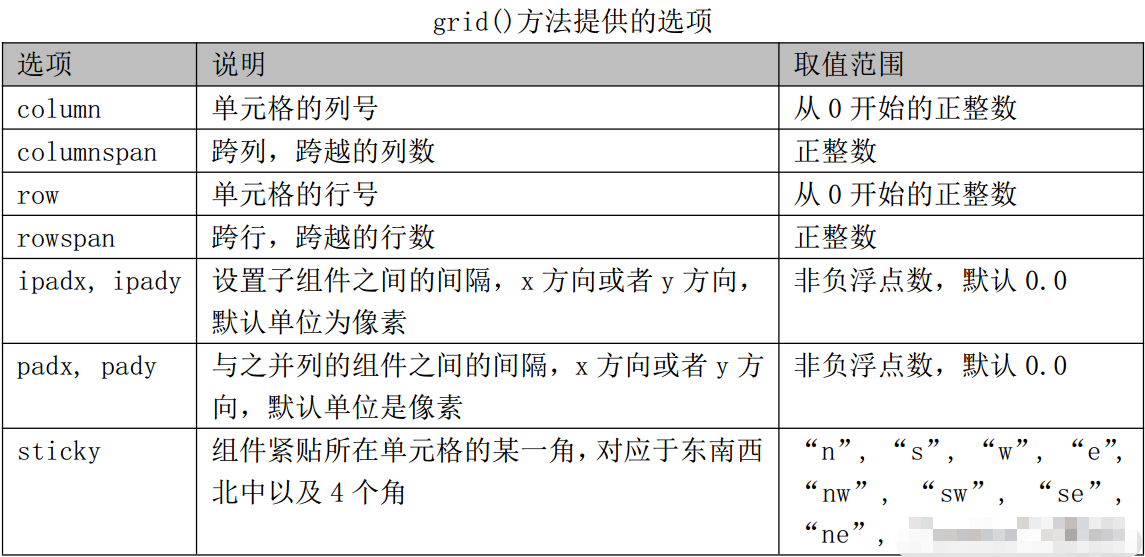
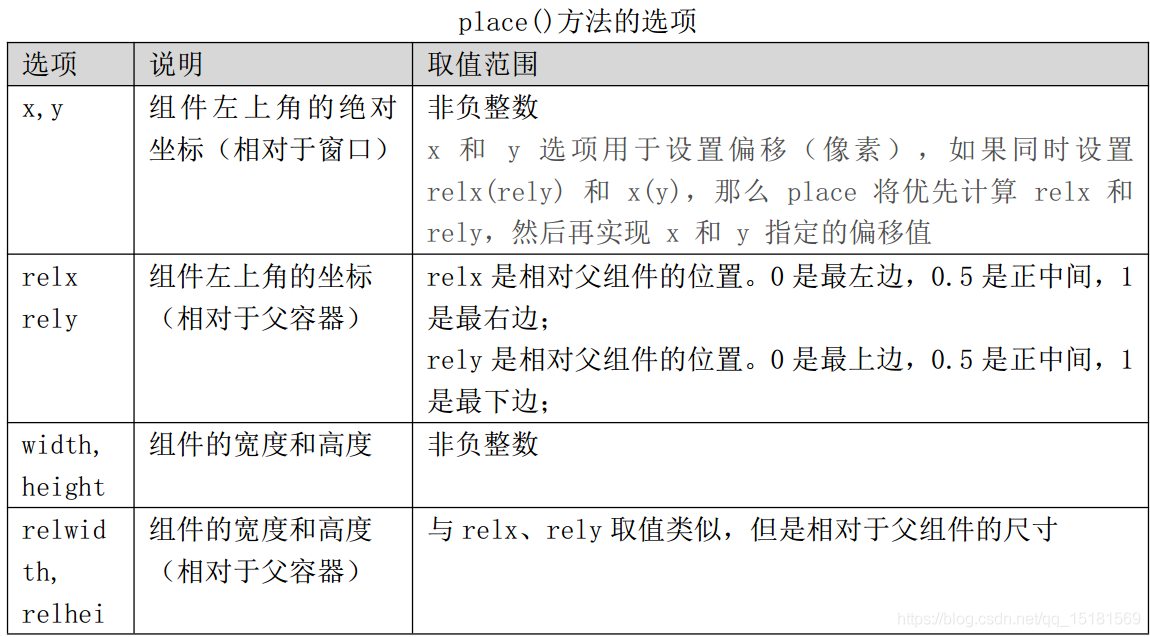
1.应用(sticky=‘’)
#grid排列组件
#初始化一个窗口
windows=tk.Tk()
windows.title('grid使用')
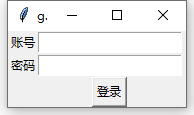
Label(windows,text='账号').grid(row=0,column=0)
Entry(windows).grid(row=0,column=1)
Label(windows,text='密码').grid(row=1,column=0)
Entry(windows).grid(row=1,column=1)
Button(windows,text='登录').grid(row=2,column=1,sticky='s')
windows.mainloop()
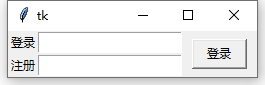
2.应用('rowspan=跨行实现居中的显示效果','padx= 可以扩展模块组之间的距离' 'ipadx=可以扩展按钮大小’)
import tkinter as tk
from tkinter import *
windows =tk.Tk()
Label(windows,text='登录').grid(row=0,column=0)
Entry(windows).grid(row=0,column=1)
Label(windows,text='注册').grid(row=1,column=0)
Entry(windows).grid(row=1,column=1)
Button(text='登录').grid(row=0,rowspan=2,column=2,padx=10,ipadx=10)
windows.mainloop()
place
place 布局管理器可以通过坐标精确控制组件的位置, 适用于一些布局更加灵活的场景

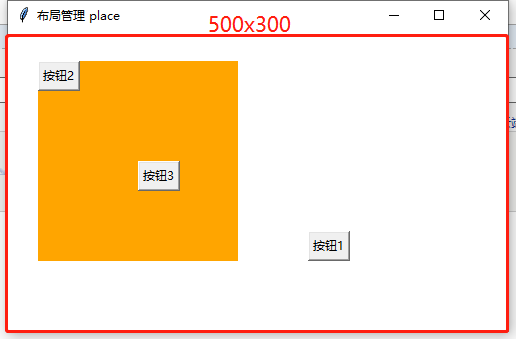
#示例代码:
from tkinter import *
root = Tk();root.geometry("500x300")
root.title("布局管理 place");root["bg"]="white"
f1 = Frame(root,width=200,height=200,bg="orange")
f1.place(x=30,y=30)
Button(root,text="按钮1").place(relx=0,rely=0,
x=300,y=200)
Button(f1,text="按钮2").place(relx=0,rely=0)
Button(f1,text="按钮3").place(relx=0.5,rely=0.5)
root.mainloop()
布局显示空间
一、按钮1的place空间显示
x=300,y=200相对于父组件root起始点坐标为(300,200)
relx=0,rely=0相对于此时父组件的最左上角
按钮1的空间
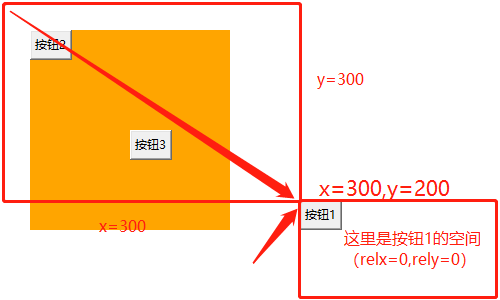
当按钮中的relx和rely变化时,按钮位置也可能因此变化
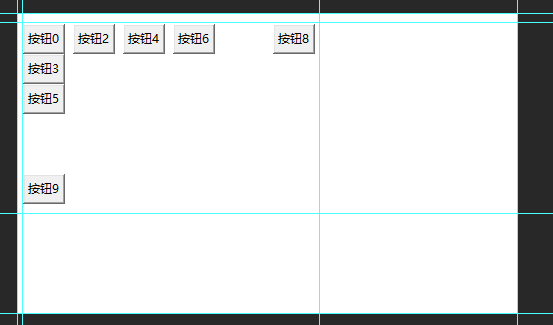
Button(root,text="按钮0").place(relx=0,rely=0,
x=5,y=10)
Button(root,text="按钮2").place(relx=0.1,rely=0,
x=5,y=10)
Button(root,text="按钮4").place(relx=0.2,rely=0,
x=5,y=10)
Button(root,text="按钮3").place(relx=0,rely=0.1,
x=5,y=10)
Button(root,text="按钮5").place(relx=0,rely=0.2,
x=5,y=10)
Button(root,text="按钮6").place(relx=0.3,rely=0,
x=5,y=10)
Button(root,text="按钮8").place(relx=0.5,rely=0,
x=5,y=10)
Button(root,text="按钮9").place(relx=0,rely=0.5,
x=5,y=10)
Button(root,text="按钮10").place(relx=1,rely=0,
x=5,y=10)
Button(root,text="按钮11").place(relx=0,rely=1,
x=5,y=10)
root.mainloop()
二、父组件是root(窗口)组件,
按钮10,11由于relx=1or rely=1已经超出边界
按钮8,9在窗口的变化时,始终处于正中间