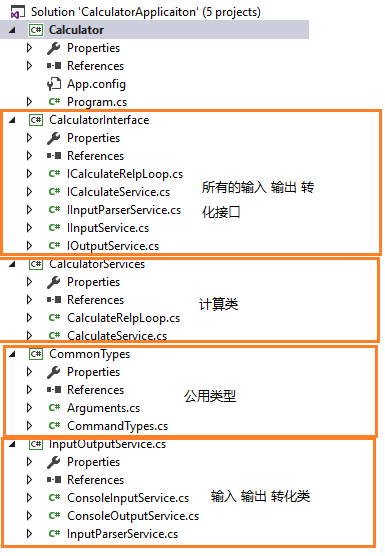
这篇博客将通过一个控制台程序简单了解下PRISM下Unity依赖注入容器的使用。我已经创建了一个例子,通过一个控制台程序进行加减乘除运算,项目当中将输入输出等都用接口封装后,结构如下:
当前代码可以点击这里下载。
运行效果如下:
下面将引入Unity类库,使用Unity来生成需要的对象实例。
先查看一下CalculateRelpLoop类,
public class CalculateRelpLoop : ICalculateRelpLoop
{
    ICalculateService _calculateService;

    IInputParserService _inputParserService;

    IInputService _inputService;

    IOutputService _outputService;

    public CalculateRelpLoop()
    {
        _calculateService = new CalculateService();

        _inputParserService = new InputParserService();

        _outputService = new ConsoleOutputService();

        _inputService = new ConsoleInputService();
    }
    public void Run()
    {
        while(true)
        {
            try
            {
                string input = _inputService.ReadCommand();

                Arguments args = _inputService.ReadArguments();

                CommandType commandType = _inputParserService.CommandParser(input);

                string result = _calculateService.Execute(commandType, args).ToString();

                _outputService.WriteMessage(result);
            }
            catch
            {
                _outputService.WriteMessage("Mistake!");
            }
        }
    }
}
主工程中调用Program.cs
        static void Main(string[] args)
        {
            ICalculateRelpLoop loop = new CalculateRelpLoop();

            loop.Run();
        }
我们手动的创建这些类,然后调用其中的方法,这时候我们可以借助于Unity类来做,在主工程中引用Microsoft.Practices.Unity.dll, 对这两个类进行一些调整。
修改后的CalculateRelpLoop类,
public class CalculateRelpLoop : ICalculateRelpLoop
{
    ICalculateService _calculateService;

    IInputParserService _inputParserService;

    IInputService _inputService;

    IOutputService _outputService;

    public CalculateRelpLoop(ICalculateService calculateService,
        IInputParserService inputParserService,
        IInputService inputService,
        IOutputService outputService)
    {
        _calculateService = calculateService;

        _inputParserService = inputParserService;

        _outputService = outputService;

        _inputService = inputService;
    }
    public void Run()
    {
        while(true)
        {
            try
            {
                string input = _inputService.ReadCommand();

                Arguments args = _inputService.ReadArguments();

                CommandType commandType = _inputParserService.CommandParser(input);

                string result = _calculateService.Execute(commandType, args).ToString();

                _outputService.WriteMessage(result);
            }
            catch
            {
                _outputService.WriteMessage("Mistake!");
            }
        }
    }
}
Program.cs
static void Main(string[] args)
{
    UnityContainer container = new UnityContainer();

    container.RegisterType<ICalculateRelpLoop, CalculateRelpLoop>();
    container.RegisterType<ICalculateService, CalculateService>();
    container.RegisterType<IInputParserService, InputParserService>();
    container.RegisterType<IOutputService, ConsoleOutputService>();
    container.RegisterType<IInputService, ConsoleInputService>();

    ICalculateRelpLoop loop = container.Resolve<CalculateRelpLoop>();

    loop.Run();
}
在Main方法中将需要实例化的类都先注册进来,container.RegisterType<ICalculateRelpLoop, CalculateRelpLoop>(); 需要使用时,可以通过
container.Resolve<CalculateRelpLoop>()实例化出相应的对象引用。这样一个类的实例化,销毁等都交给了Unity来帮助我们完成。这样代码更加清爽整洁。PRISM默认提供了Unity依赖注入容器,当然我们也可以使用其他自己熟悉的依赖注入容器来代替。
另外Unity除了可以使用代码来注册类,还可以使用配置文件的方式。
感谢您的阅读,代码点击这里下载。