分享最近写的一个图片放大镜的特效,原理很简单,仅供参考:
在一个div里,分为两个作用域,一个用于显示缩略图(放小图的,这里我们叫做A),一个用于显示放大后的图(放大图的,这里我们叫做B);
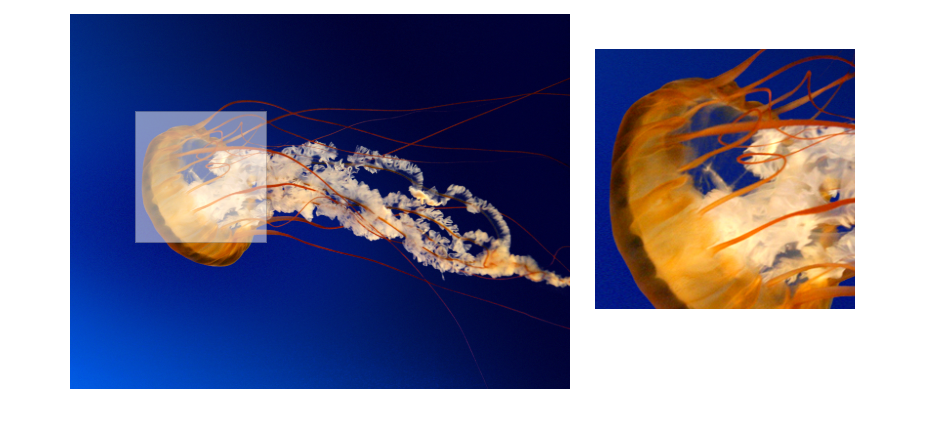
在A里,有一个缩略图(A1)和一个悬浮遮挡层(A2),在B里,是一个放大的图(B1);
这里我们需要注意的是A2/A1=B1/B,意思是在两个作用域里小框跟大框的比例是相等的,这是等比放大的原理。
剩下的就不多描述,基本就是控制div的显示与隐藏,各个div与图片的大小视实际情况而定。
ps:需要导入jquery,剩下的自己补充下图片路径就能看到效果了
<div>
	<div class="imageItem">
		<img src="#">
		<div class="image-hover"></div>
	</div>
	<div class="enlargeItem">
		<img src="#">
	</div>
</div>
<script>
enLarge($(".imageItem"),$(".enlargeItem"));
</script>
/* 放大特效选择区域 */
.imageItem{
	position: relative;
	 100%;
	height: auto;
	margin-bottom: 15px;
	font-size: 0;
	z-index: 1;
	text-indent: 0;
	cursor: pointer;
}
img{
	position: relative;
	 100%;
	z-index: 10;
	text-indent: 0;
	visibility: visible;
	overflow: hidden;
}

.image-hover{
	position: absolute;
	top: 0;
	left: 0;
	 130px;
	height: 130px;
	overflow: hidden;
	background-color: #fff;
	border: 1px solid #aaa;
	opacity: 0.5;
	z-index: 10;
	visibility: hidden;
	/* transition: all ease-in;
    -webkit-transition: all ease-in; */
}

.enlargeItem{
	position: absolute;
	 260px;
	height: 260px;
	z-index: 20;
	top: 50px;
	right: -270px;
	overflow: hidden;
	display: none;
}
.enlargeItem img{
	position: absolute;
	 1000px;
	height: auto;
}
 1 function enLarge(outarea,enlargearea){//(作用域A,作用域B)
 2         outarea.on("mouseover", function(e) {//悬浮在作用域上
 3             e.stopPropagation();
 4             $(this).parent().find(".image-hover").css({"visibility":"visible"});
 5         })
 6         outarea.on("mouseleave", function(e) {//鼠标离开作用域关闭放大
 7             e.stopPropagation();
 8             bigW = enlargearea.hide();
 9             $(this).parent().find(".image-hover").css({"visibility":"hidden"});
10         })
11         outarea.on("mousemove",function(e){//鼠标在作用域上移动开启放大
12                     e.stopPropagation();
13                     bigW = enlargearea.show();
14                     var picT,picL,bigT,bigL;
15                     var picW = $(this).width(),
16                         picH = $(this).height(),
17                         bigW = enlargearea.find("img").width();
18                         enlargearea.find("img").css("height",bigW/(picW/picH));
19                         bigH = bigW/(picW/picH);
20                     //获取鼠标相对图片的坐标
21                     var xx = e.pageX-$(this).offset().left;
22                     var yy = e.pageY-$(this).offset().top;
23
24                     if(xx<=65){
25                         picL = 0;
26                         bigL = 0;
27                     }else if(xx>=(picW-65)){
28                         picL = picW-130;
29                         bigL = -(picL/picW*bigW);
30                     }else if(65<xx<(picW-65)){
31                         picL = xx-65;
32                         bigL = -(picL/picW*bigW);
33                     }
34
35                     if(yy<=65){
36                         picT = 0;
37                         bigT = 0;
38                     }else if(yy>=(picH-65)){
39                         picT = picH-130;
40                         bigT = -(picT/picH*bigH);
41                     }else if(65<yy<(picH-65)){
42                         picT = yy-65;
43                         bigT = -(picT/picH*bigH);
44                     }
45                     $(this).parent().find(".image-hover").css({"top":picT,"left":picL});
46                     enlargearea.find("img").css({top: bigT,left:bigL});
47                 })
48     }
以下是实际效果图: