上文我们阐述了Netty的Reactor模型。在Reactor模型的第二阶段,Netty会处理各种io事件。对于客户端的各种请求就是在这个阶段去处理的。本文便来分析一个新的连接是如何被处理的。
代码的入口就从read方法开始。这里的unsafe的类型是NioMessageUnsafe,在服务端启动时就确定下来了。
if ((readyOps & (SelectionKey.OP_READ | SelectionKey.OP_ACCEPT)) != 0 || readyOps == 0) {
                unsafe.read();
                if (!ch.isOpen()) {
                    // Connection already closed - no need to handle write.
                    return;
                }
            }
我们省去部分代码,read方法逻辑非常简单。就是一个读出加处理的过程
public void read() {
            assert eventLoop().inEventLoop();
            final ChannelConfig config = config();
            final ChannelPipeline pipeline = pipeline();
            final RecvByteBufAllocator.Handle allocHandle = unsafe().recvBufAllocHandle();
            allocHandle.reset(config);

            boolean closed = false;
            Throwable exception = null;
                do {
                    //读取消息
                    int localRead = doReadMessages(readBuf);
                    if (localRead == 0) {
                        break;
                    }
                    if (localRead < 0) {
                        closed = true;
                        break;
                    }
                    allocHandle.incMessagesRead(localRead);
                } while (allocHandle.continueReading());

            int size = readBuf.size();
            for (int i = 0; i < size; i ++) {
                readPending = false;
                //循环处理消息
                pipeline.fireChannelRead(readBuf.get(i));
            }
            readBuf.clear();
            allocHandle.readComplete();
            //触发读取完毕事件
            pipeline.fireChannelReadComplete();
    }
1.读取消息
protected int doReadMessages(List<Object> buf) throws Exception {
        SocketChannel ch = javaChannel().accept();

        try {
            if (ch != null) {
                buf.add(new NioSocketChannel(this, ch));
                return 1;
            }
        } catch (Throwable t) {
            logger.warn("Failed to create a new channel from an accepted socket.", t);

            try {
                ch.close();
            } catch (Throwable t2) {
                logger.warn("Failed to close a socket.", t2);
            }
        }

        return 0;
    }
在doReadMessages首先accept一个新连接,由于在一阶段的时候已经有io事件产生了,所以这里不会等待而是立即接受一个新连接并用SocketChannel表示。
接着又构造出了一个NioSocketChannel将java的channel封装成netty自己的channel并添加到list中,我们点进去看看。
public NioSocketChannel(Channel parent, SocketChannel socket) {
        super(parent, socket);
        config = new NioSocketChannelConfig(this, socket.socket());
    }
protected AbstractNioByteChannel(Channel parent, SelectableChannel ch) {
        super(parent, ch, SelectionKey.OP_READ);
    }
protected AbstractNioChannel(Channel parent, SelectableChannel ch, int readInterestOp) {
        super(parent);
        this.ch = ch;
        this.readInterestOp = readInterestOp;
        try {
            ch.configureBlocking(false);
        } catch (IOException e) {
            try {
                ch.close();
            } catch (IOException e2) {
                if (logger.isWarnEnabled()) {
                    logger.warn(
                            "Failed to close a partially initialized socket.", e2);
                }
            }

            throw new ChannelException("Failed to enter non-blocking mode.", e);
        }
    }
protected AbstractChannel(Channel parent) {
        this.parent = parent;
        id = newId();
        unsafe = newUnsafe();
        pipeline = newChannelPipeline();
    }
最终我们到了AbstractChannel的类中,发现NioSocketChannel的建立会创建unsafe和pipeline。这里我们看下具体类型
unsafe的具体类型是由子类io.netty.channel.socket.nio.NioSocketChannel#newUnsafe决定的
protected AbstractNioUnsafe newUnsafe() {
        return new NioSocketChannelUnsafe();
    }
pipeline则是默认的DefaultChannelPipeline
protected DefaultChannelPipeline(Channel channel) {
        this.channel = ObjectUtil.checkNotNull(channel, "channel");
        succeededFuture = new SucceededChannelFuture(channel, null);
        voidPromise =  new VoidChannelPromise(channel, true);

        tail = new TailContext(this);
        head = new HeadContext(this);

        head.next = tail;
        tail.prev = head;
    }
这里我们便引出了pipeline的概念,看上述代码便知pipeline的数据结构是一个双向链表。我们也可以把它想象成一个责任链或者更直白点就是流水线。任何连接请求都会通过pipeline处理最终返回到客户端。
现在显得连接已经封装成channel并添加到list中了,现在我们再看下消息处理
int size = readBuf.size();
                for (int i = 0; i < size; i ++) {
                    readPending = false;
                    pipeline.fireChannelRead(readBuf.get(i));
                }
2.消息处理
static void invokeChannelRead(final AbstractChannelHandlerContext next, Object msg) {
        final Object m = next.pipeline.touch(ObjectUtil.checkNotNull(msg, "msg"), next);
        EventExecutor executor = next.executor();
        if (executor.inEventLoop()) {
            next.invokeChannelRead(m);
        } else {
            executor.execute(new Runnable() {
                @Override
                public void run() {
                    next.invokeChannelRead(m);
                }
            });
        }
    }
消息处理实际就是pipeline链式执行handle的过程。那么对于服务端的channel,他在接受新连接的时候先执行那个handle呢。服务端处理新连接的pipeline中,已经自动添加了一个pipeline处理器 ServerBootstrapAcceptor
所以我们先看下ServerBootstrapAcceptor的channelRead方法
public void channelRead(ChannelHandlerContext ctx, Object msg) {
            //1.泛型转换新连接创建的channel
            final Channel child = (Channel) msg;
            //2.设置channel的handler
            child.pipeline().addLast(childHandler);

            for (Entry<ChannelOption<?>, Object> e: childOptions) {
                try {
                    if (!child.config().setOption((ChannelOption<Object>) e.getKey(), e.getValue())) {
                        logger.warn("Unknown channel option: " + e);
                    }
                } catch (Throwable t) {
                    logger.warn("Failed to set a channel option: " + child, t);
                }
            }
            for (Entry<AttributeKey<?>, Object> e: childAttrs) {
                child.attr((AttributeKey<Object>) e.getKey()).set(e.getValue());
            }
            try {
                //channel绑定到一个raector线程上
                childGroup.register(child).addListener(new ChannelFutureListener() {
                    @Override
                    public void operationComplete(ChannelFuture future) throws Exception {
                        if (!future.isSuccess()) {
                            forceClose(child, future.cause());
                        }
                    }
                });
            } catch (Throwable t) {
                forceClose(child, t);
            }
        }
1.将刚刚创建的channel泛型转换出来
2.调用用户代码的childHandler属性,注意,这里只是添加了一个ChannelInitializer,相应的初始化还未运行,

3.注册该channel,将该channel绑定到一个reactor线程,后续关于这个channel的事件,任务都是由该reactor线程处理。
现在我们点进注册的代码
public ChannelFuture register(Channel channel) {
        return next().register(channel);
    }
public EventLoop next() {
        return (EventLoop) super.next();
    }
next方法返回的是一个reactor线程,我们看下netty是如何挑选线程的。点击super.next
public EventExecutor next() {
        return chooser.next();
    }
这里出现一个chooser代表的是一个选择策略,下面直接上代码了
chooser = chooserFactory.newChooser(children);
public EventExecutorChooser newChooser(EventExecutor[] executors) {
        if (isPowerOfTwo(executors.length)) {
            return new PowerOfTowEventExecutorChooser(executors);
        } else {
            return new GenericEventExecutorChooser(executors);
        }
    }
netty根据线程数量的奇偶性 会选择出不同的选择策略。两者唯一的区别就是一个是与运算,一个是取余
private static final class PowerOfTowEventExecutorChooser implements EventExecutorChooser {
        private final AtomicInteger idx = new AtomicInteger();
        private final EventExecutor[] executors;

        PowerOfTowEventExecutorChooser(EventExecutor[] executors) {
            this.executors = executors;
        }

        @Override
        public EventExecutor next() {
            return executors[idx.getAndIncrement() & executors.length - 1];
        }
    }

    private static final class GenericEventExecutorChooser implements EventExecutorChooser {
        private final AtomicInteger idx = new AtomicInteger();
        private final EventExecutor[] executors;

        GenericEventExecutorChooser(EventExecutor[] executors) {
            this.executors = executors;
        }

        @Override
        public EventExecutor next() {
            return executors[Math.abs(idx.getAndIncrement() % executors.length)];
        }
    }
在我们确定一个reactor线程之后,我们便开始了注册的流程
io.netty.channel.SingleThreadEventLoop#register(io.netty.channel.Channel)
public ChannelFuture register(Channel channel) {
        return register(new DefaultChannelPromise(channel, this));
    }
io.netty.channel.AbstractChannel.AbstractUnsafe#register
public final void register(EventLoop eventLoop, final ChannelPromise promise) {
            AbstractChannel.this.eventLoop = eventLoop;

            if (eventLoop.inEventLoop()) {
                register0(promise);
            } else {
                try {
                    eventLoop.execute(new Runnable() {
                        @Override
                        public void run() {
                            register0(promise);
                        }
                    });
                } catch (Throwable t) {
                    logger.warn(
                            "Force-closing a channel whose registration task was not accepted by an event loop: {}",
                            AbstractChannel.this, t);
                    closeForcibly();
                    closeFuture.setClosed();
                    safeSetFailure(promise, t);
                }
            }
        }
注册的核心代码便是register0了
private void register0(ChannelPromise promise) {
            try {
                // check if the channel is still open as it could be closed in the mean time when the register
                // call was outside of the eventLoop
                if (!promise.setUncancellable() || !ensureOpen(promise)) {
                    return;
                }
                boolean firstRegistration = neverRegistered;
                doRegister();
                neverRegistered = false;
                registered = true;
                pipeline.invokeHandlerAddedIfNeeded();

                safeSetSuccess(promise);
                pipeline.fireChannelRegistered();
                if (isActive()) {
                    if (firstRegistration) {
                        pipeline.fireChannelActive();
                    } else if (config().isAutoRead()) {
                        beginRead();
                    }
                }
            } catch (Throwable t) {
                // Close the channel directly to avoid FD leak.
                closeForcibly();
                closeFuture.setClosed();
                safeSetFailure(promise, t);
            }
        }
- doRegister之前在服务端分析时有过讲解,这里真正的吧channel与reactor线程绑定在一起
- pipeline.invokeHandlerAddedIfNeeded();
为channel添加Handler,这里将添加handler任务包装成Task
private final class PendingHandlerAddedTask extends PendingHandlerCallback {

        PendingHandlerAddedTask(AbstractChannelHandlerContext ctx) {
            super(ctx);
        }

        @Override
        public void run() {
            callHandlerAdded0(ctx);
        }

        @Override
        void execute() {
            EventExecutor executor = ctx.executor();
            if (executor.inEventLoop()) {
                callHandlerAdded0(ctx);
            } else {
                try {
                    executor.execute(this);
                } catch (RejectedExecutionException e) {
                    if (logger.isWarnEnabled()) {
                        logger.warn(
                                "Can't invoke handlerAdded() as the EventExecutor {} rejected it, removing handler {}.",
                                executor, ctx.name(), e);
                    }
                    remove0(ctx);
                    ctx.setRemoved();
                }
            }
        }
    }
最终调用io.netty.channel.ChannelInitializer#handlerAdded
private void callHandlerAdded0(final AbstractChannelHandlerContext ctx) {
            ctx.handler().handlerAdded(ctx);
            ctx.setAddComplete();
    }
public void handlerAdded(ChannelHandlerContext ctx) throws Exception {
        if (ctx.channel().isRegistered()) {
            initChannel(ctx);
        }
    }
这也就是我们的用户代码
- pipeline.fireChannelRegistered(); channel注册完之后的回调
- pipeline.fireChannelActive() channel激活的回调
到这里其实已经接近尾声了。但是我们的channel目前还是无法使用的。因为他并没有注册他感兴趣的事件。他现在是一个没有梦想的channel。所以我们看下channel激活的具体逻辑
private void invokeChannelActive() {
        if (invokeHandler()) {
            try {
                ((ChannelInboundHandler) handler()).channelActive(this);
            } catch (Throwable t) {
                notifyHandlerException(t);
            }
        } else {
            fireChannelActive();
        }
    }
public void channelActive(ChannelHandlerContext ctx) throws Exception {
            ctx.fireChannelActive();

            readIfIsAutoRead();
        }
private void readIfIsAutoRead() {
            if (channel.config().isAutoRead()) {
                channel.read();
            }
        }
public Channel read() {
        pipeline.read();
        return this;
    }
public final ChannelPipeline read() {
        tail.read();
        return this;
    }
.......
protected void doBeginRead() throws Exception {
        // Channel.read() or ChannelHandlerContext.read() was called
        final SelectionKey selectionKey = this.selectionKey;
        if (!selectionKey.isValid()) {
            return;
        }

        readPending = true;

        final int interestOps = selectionKey.interestOps();
        if ((interestOps & readInterestOp) == 0) {
            selectionKey.interestOps(interestOps | readInterestOp);
        }
    }
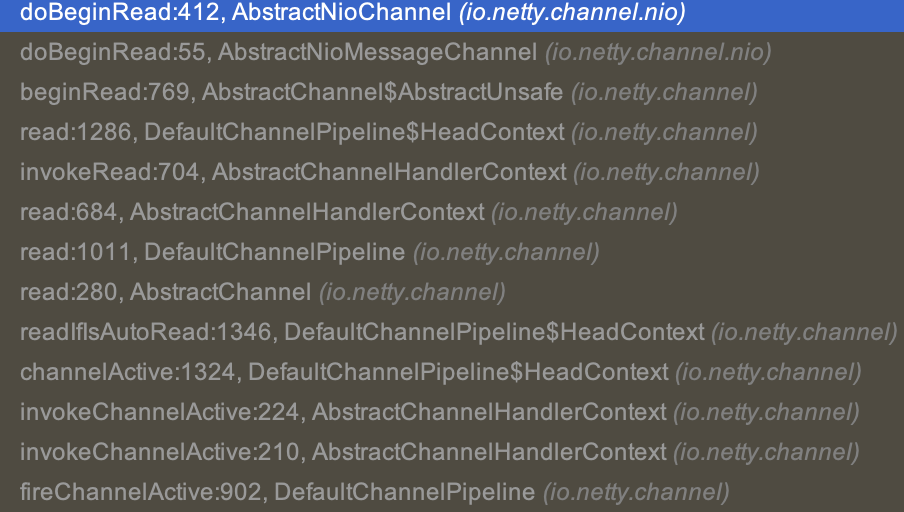
最终在io.netty.channel.nio.AbstractNioChannel#doBeginRead中设置selectionKey对读事件感兴趣。
以上便是netty对新连接的处理
参考
https://www.jianshu.com/p/0242b1d4dd21 【netty源码分析之新连接接入全解析】