[C#/.NET]Entity Framework(EF) Code First 多对多关系的实体增,删,改,查操作全程详细示例
本文我们来学习一下在Entity Framework中使用Context删除多对多关系的实体是如何来实现的。我们将以一个具体的控制台小实例来了解和学习整个实现Entity Framework 多对多关系的实体删除的操作过程。
你将学习到
-
怎样创建一个引用Entity Framework的项目;
-
怎样配置Entity Framework的数据库连接;
-
怎样去掉Entity Framework Code First 生成的表名的复数;
-
怎样通过EntityTypeConfiguartion<T>配置实体的Fluent API ;
-
怎样配置Entity Framework的实体多对多的关系映射;
-
Entity Framework数据初始化;
-
怎样使用包管理工具控制台来生成和更新数据库;
-
怎么删除Entity Framework中的多对多关系的数据。
本示例开发环境
-
操作系统:Windows 10
-
开发工具及版本:Visual Studio 2015 Update 1
-
.NET Framework版本:.NET Framework 4.6
-
程序输出方式:控制台应用程序
第一步、创建项目并引用程序包
1.1 创建项目
首先,我们创建一个控制台应用程序,取名为:EFRemoveManyToManyDemo,如下图:

1.2 引用程序包
接着打开程序包管理工具,安装必须的EntityFramework引用包,如下:

第二步、创建实体类并配置数据库连接
2.1 创建实体类
安装好Entity Framework包之后 ,我们先创建本示例需要的两个实体对应的类:User和Role(都放在Model的文件夹下),如下:
User.cs
 1 using System;
 2 using System.Collections.Generic;
 3
 4 namespace EFRemoveManyToManyDemo.Model
 5 {
 6     public class User
 7     {
 8         public User()
 9         {
10             Roles = new HashSet<Role>();
11         }
12         public int Id { get; set; }
13         public string FirstName { get; set; }
14         public string LastName { get; set; }
15         public DateTime? CreatedOn { get; set; }
16         public virtual ICollection<Role> Roles { get; set; }//多对多关系中两边都要写上ICollection
17     }
18 }
Role.cs
 1 using System.Collections.Generic;
 2
 3 namespace EFRemoveManyToManyDemo.Model
 4 {
 5     public class Role
 6     {
 7         public Role()
 8         {
 9             this.Users = new HashSet<User>();!!依赖注入中的构造器注入
10         }
11         public int Id { get; set; }
12         public string Name { get; set; }
13
14         public virtual ICollection<User> Users { get; set; }
15         //多对多关系中两边都要写上ICollection
16     }
17 }
2.2 配置Fluent API
为了配置Fluent API,新建一个Mapping文件夹,再分别创建User的配置文件UserConfigurationMapping和Role的配置文件RoleConfigurationMapping,如下:
UserConfiguration.cs
using EFRemoveManyToManyDemo.Model;
using System.Data.Entity.ModelConfiguration;

namespace EFRemoveManyToManyDemo.Mapping
{
    public class UserConfigurationMapping : EntityTypeConfiguration<User>
    {
        public UserConfigurationMapping()
        {
            Property(x => x.FirstName).HasMaxLength(50).IsRequired();
            Property(x => x.LastName).HasMaxLength(50).IsRequired();
        }
    }
}
RoleConfigurationMapping.cs
 1 using EFRemoveManyToManyDemo.Model;
 2 using System.Data.Entity.ModelConfiguration;
 3
 4 namespace EFRemoveManyToManyDemo.Mapping
 5 {
 6     public class RoleConfigurationMapping : EntityTypeConfiguration<Role>
 7     {
 8         public RoleConfigurationMapping()
 9         {
10             HasKey(x => x.Id);
11             Property(x => x.Name).HasMaxLength(50).IsRequired();
12             HasMany(x => x.Users)
13                 .WithMany(x => x.Roles)
14                 .Map(m =>
15                 {
16                     m.MapLeftKey("RoleId");
17                     m.MapRightKey("UserId");
18                     m.ToTable("LNK_User_Role");
19                 });
20         }
21     }
22 }
2.3 创建Context类
接下来,我们再创建一个名为:ManyToManyRemoveContext的类,该类继承至DbContext类,用于管理数据库的连接上下文和数据库初始化等的一些配置和操作,如下:
using EFRemoveManyToManyDemo.Mapping;
using System.Data.Entity;
using System.Data.Entity.ModelConfiguration.Conventions;

namespace EFRemoveManyToManyDemo
{
    public class ManyToManyRemoveContext : DbContext
    {
        public ManyToManyRemoveContext() : base("ManyToManyRemoveContext")
        {

        }
    }
}
2.4 配置连接字符串
再在App.config配置文件中添加本地的数据库连接字符串,大致如下(具体的请根据你的实际数据连接参数来):
<?xml version="1.0" encoding="utf-8"?>
<configuration>
  <configSections>
    <!-- For more information on Entity Framework configuration, visit http://go.microsoft.com/fwlink/?LinkID=237468 -->
    <section name="entityFramework" type="System.Data.Entity.Internal.ConfigFile.EntityFrameworkSection, EntityFramework, Version=6.0.0.0, Culture=neutral, PublicKeyToken=b77a5c561934e089" requirePermission="false" />
  </configSections>
  <startup>
    <supportedRuntime version="v4.0" sku=".NETFramework,Version=v4.6" />
  </startup>
  <connectionStrings>
    <add name="ManyToManyRemoveContext" connectionString="server=你的数据库服务器地址;database=ManyToManyRemoveDemo;uid=你的数据库登录名;pwd=密码" providerName="System.Data.SqlClient"/>
  </connectionStrings>
  <entityFramework>
    <defaultConnectionFactory type="System.Data.Entity.Infrastructure.LocalDbConnectionFactory, EntityFramework">
      <parameters>
        <parameter value="mssqllocaldb" />
      </parameters>
    </defaultConnectionFactory>
    <providers>
      <provider invariantName="System.Data.SqlClient" type="System.Data.Entity.SqlServer.SqlProviderServices, EntityFramework.SqlServer" />
    </providers>
  </entityFramework>
</configuration>
2.5 重写Context
为了将我们刚才写的Fluent API应用到对应的实体上,所以我们需要重写(override)DbContext的OnModelCreating方法,如下:
protected override void OnModelCreating(DbModelBuilder modelBuilder)
        {
            base.OnModelCreating(modelBuilder);
            modelBuilder.Conventions.Remove<PluralizingTableNameConvention>();

            modelBuilder.Configurations.Add(new UserConfigurationMapping());
            modelBuilder.Configurations.Add(new RoleConfigurationMapping());
        }
其中
modelBuilder.Conventions.Remove<PluralizingTableNameConvention>();
是将Entity Framework Code First在实体类生成对应表时去掉表名的复数用的。简单地说就是,默认情况下,Entity Framework Code First在由实体类生成对应表时的表名是复数形式的,比如本例的User和Role类,如果没有这句配置,在生成表名的时候将会是Users和Roles这两个表名,反之,则是User和Role这两个表名。
好了,下面贴出完整的ManyToManyRemoveContext.cs文件的代码:
 1 using EFRemoveManyToManyDemo.Mapping;
 2 using EFRemoveManyToManyDemo.Model;
 3 using System.Data.Entity;
 4 using System.Data.Entity.ModelConfiguration.Conventions;
 5
 6 namespace EFRemoveManyToManyDemo
 7 {
 8     public class ManyToManyRemoveContext : DbContext
 9     {
10         public ManyToManyRemoveContext() : base("ManyToManyRemoveContext")
11         {
12
13         }
14
15         protected override void OnModelCreating(DbModelBuilder modelBuilder)
16         {
17             base.OnModelCreating(modelBuilder);
18             modelBuilder.Conventions.Remove<PluralizingTableNameConvention>();
19
20             modelBuilder.Configurations.Add(new UserConfigurationMapping());
21             modelBuilder.Configurations.Add(new RoleConfigurationMapping());
22         }
23
24         public DbSet<User> Users { get; set; }
25         public DbSet<Role> Roles { get; set; }
26     }
27 }
本文写到这里,关于Entity Framework的引用,实体类的声明和Fluent API配置以及与数据库连接等操作都已完成了。接下来我们要做的是利用Entity Framework所实体生成到配置好的数据库中。
第三步、应用Migration生成数据库
在接下来的过程中,我们会用到包管理控制台(Package Manager Console)和三个命令:
3.1 Enable-Migrations
命令使用方式如下图:

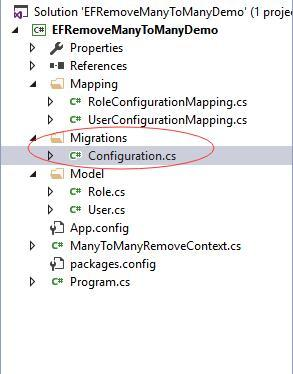
运行以上命令后,Entity Framework会自动在我们的项目中创建一个名为Migrations的文件夹,同时生成一个Configuartion.cs的配置文件。这时的项目结构大致是这样的:
生成好Configuration.cs的文件我们再作数据的初始化,如下:
namespace EFRemoveManyToManyDemo.Migrations
{
    using Model;
    using System;
    using System.Collections.Generic;
    using System.Data.Entity.Migrations;
    using System.Linq;
    internal sealed class Configuration : DbMigrationsConfiguration<ManyToManyRemoveContext>
    {
        public Configuration()
        {
            AutomaticMigrationsEnabled = false;
        }

        protected override void Seed(ManyToManyRemoveContext context)
        {
            var roles = new List<Role> {
                new Role{ Id=1,Name="超级管理员" },
                new Role{ Id=2,Name="管理员" },
                new Role{ Id=3,Name="一般用户" }
            };

            var users = new List<User> {
                new User {Id=1,FirstName="Kobe",LastName="Bryant",CreatedOn=DateTime.Now,Roles=roles },
                 new User {Id=2,FirstName="Chris",LastName="Paul",CreatedOn=DateTime.Now,Roles=roles.Where(x=>x.Id==2).ToList() },
                 new User {Id=3,FirstName="Jerimy",LastName="Lin",CreatedOn=DateTime.Now,Roles=roles.Take(2).ToList() }
            };
        }
    }
}
完成第一个命令和数据初始化配置后,我们进行第二个命令。
3.2 Add-Migration Init -Verbose
执行此命令后,会在Migrations的文件夹中自动生成一个形如:时间戳_Init.cs的数据迁移文件,如本例生成的是201512040507219_Init.cs这样一个文件名,其中Init是我们指定的本次数据迁移的版本名称,文件中的内容如下:
 1 namespace EFRemoveManyToManyDemo.Migrations
 2 {
 3     using System;
 4     using System.Data.Entity.Migrations;
 5
 6     public partial class Init : DbMigration
 7     {
 8         public override void Up()
 9         {
10             CreateTable(
11                 "dbo.Role",
12                 c => new
13                     {
14                         Id = c.Int(nullable: false, identity: true),
15                         Name = c.String(nullable: false, maxLength: 50),
16                     })
17                 .PrimaryKey(t => t.Id);
18
19             CreateTable(
20                 "dbo.User",
21                 c => new
22                     {
23                         Id = c.Int(nullable: false, identity: true),
24                         FirstName = c.String(nullable: false, maxLength: 50),
25                         LastName = c.String(nullable: false, maxLength: 50),
26                         CreatedOn = c.DateTime(),
27                     })
28                 .PrimaryKey(t => t.Id);
29
30             CreateTable(
31                 "dbo.LNK_User_Role",
32                 c => new
33                     {
34                         RoleId = c.Int(nullable: false),
35                         UserId = c.Int(nullable: false),
36                     })
37                 .PrimaryKey(t => new { t.RoleId, t.UserId })
38                 .ForeignKey("dbo.Role", t => t.RoleId, cascadeDelete: true)
39                 .ForeignKey("dbo.User", t => t.UserId, cascadeDelete: true)
40                 .Index(t => t.RoleId)
41                 .Index(t => t.UserId);
42
43         }
44
45         public override void Down()
46         {
47             DropForeignKey("dbo.LNK_User_Role", "UserId", "dbo.User");
48             DropForeignKey("dbo.LNK_User_Role", "RoleId", "dbo.Role");
49             DropIndex("dbo.LNK_User_Role", new[] { "UserId" });
50             DropIndex("dbo.LNK_User_Role", new[] { "RoleId" });
51             DropTable("dbo.LNK_User_Role");
52             DropTable("dbo.User");
53             DropTable("dbo.Role");
54         }
55     }
56 }
我们可以通过这个文件中的内容看到,有Up()和Down()这两个方法,Up()方法要执行的其实就是本次数据迁移要对数据进行的操作,而Down()方法则是在以后我们如果要退回到此版本应该执行的操作。
经过以上两个命令,如你迫不及待地要去数据库管理工具中查看有一个名叫:ManyToManyRemoveDemo的数据库是否已生成,那么很遗憾地告诉你,还没有。这时,我们还得执行最后一个命令来生成数据库和实体对应的表。
3.3 Update-Database -Verbose
执行以上命令,我们这时再打开数据库管理工具。没错ManyToManyRemoveDemo就在那里。再查看表是否成功生成呢,再检查一下表中是否有我们初始化的数据呢,没错,这些都是可以有的。怎么样,惊喜吧,欢呼吧,我们做到了!!!

但还没完,请先回复平静,这还只是一个开始。Entity Framework还可以做得更多,我们需要学习的也还有很多,编程的道路从来就不是一步到位的,得有个过程。一步一步往下看吧。
第四步、增、删、改、查操作
4.1 查询数据示例
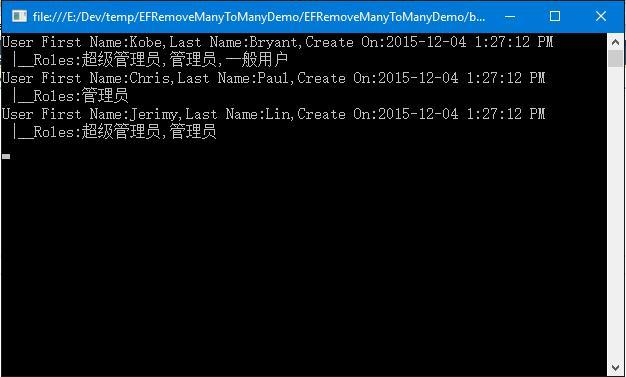
打开我们项目的Program.cs文件。首先,我们来查询(Query)一下数据库中的数据,如下:
 1 static void Main(string[] args)
 2         {
 3             Query();
 4             ReadKey();
 5         }
 6
 7         static void Query()
 8         {
 9             using (var cxt = new ManyToManyRemoveContext())
10             {
11                 var users = cxt.Users.ToList();
12                 users.ForEach(x =>
13                 {
14                     WriteLine("User First Name:{0},Last Name:{1},Create On:{2}
 |__Roles:{3}", x.FirstName, x.LastName, x.CreatedOn, string.Join(",", x.Roles.Select(r => r.Name)));
15                 });
16             }
17         }
运行结果如图:
4.2 更新数据示例
再来更新一条数据库中的数据怎么样,如下:
 1  static void Main(string[] args)
 2         {
 3             Update();
 4             Query();
 5             ReadKey();
 6         }
 7
 8 static void Query()
 9         {
10             using (var cxt = new ManyToManyRemoveContext())
11             {
12                 var users = cxt.Users.ToList();
13                 users.ForEach(x =>
14                 {
15                     WriteLine("User First Name:{0},Last Name:{1},Create On:{2}
 |__Roles:{3}", x.FirstName, x.LastName, x.CreatedOn, string.Join(",", x.Roles.Select(r => r.Name)));
16                 });
17             }
18         }
19
20 static void Update()
21         {
22             using (var cxt = new ManyToManyRemoveContext())
23             {
24                 var user = cxt.Users.FirstOrDefault(x=>x.Id==3);
25                 user.FirstName = "ShuHao";
26                 cxt.SaveChanges();
27             }
28         }
运行结果如我们所料,如图:

4.3 删除数据示例
Id为3的User的FirstName已经从数据库更新了。同样的,我们要完成删除操作也比较简,如下:
1  static void Remove()
2         {
3             using (var cxt = new ManyToManyRemoveContext())
4             {
5                 var user = cxt.Users.FirstOrDefault(x=>x.Id==2);
6                 cxt.Users.Remove(user);
7                 cxt.SaveChanges();
8             }
9         }
4.4 新增数据示例
就不再贴图了。最后是添加操作,向User表添加一个用户并分配一个Id为1的角色,代码如下:
 1 static void Add()
 2         {
 3             List<Role> roles;
 4             using (var cxt = new ManyToManyRemoveContext())
 5             {
 6                 roles = cxt.Roles.ToList();
 7                 cxt.Users.Add(new User
 8                 {
 9                     Id = 4,
10                     FirstName = "Console",
11                     LastName = "App",
12                     CreatedOn = DateTime.Now,
13                     Roles = roles.Where(x => x.Id == 1).ToList()
14                 });
15             }
16         }
4.5 删除多对多数据的示例
好了,以上是对User(用户实体)进行简单的增、删、改、查的操作,那么我们要实现多对多的删除操作呢?也就是删除用户的同时删除其对应的角色,实现的代码如下:
 1 static void RemoveManyToMany()
 2         {
 3             using (var cxt = new ManyToManyRemoveContext())
 4             {
 5                 var user = cxt.Users.FirstOrDefault(x => x.Id == 1);
 6                 var roles = new List<Role>();
 7                 roles.AddRange(user.Roles.Select(x => x));
 8                 foreach (var role in roles)
 9                 {
10                     user.Roles.Remove(role);
11                 }
12                 cxt.Users.Remove(user);
13                 cxt.SaveChanges();
14             }
15         }
运行结果如图:

完整示例代码及下载地址
好了,最后把Program.cs这个测试文件贴上来,供参考:
 1 using EFRemoveManyToManyDemo.Model;
 2 using System;
 3 using System.Collections.Generic;
 4 using System.Linq;
 5 using static System.Console;
 6
 7 namespace EFRemoveManyToManyDemo
 8 {
 9     public class Program
10     {
11         static void Main(string[] args)
12         {
13             //Update();
14             WriteLine("Before many to many removed");
15             Query();
16             RemoveManyToMany();
17             WriteLine("After many to many removed");
18             Query();
19             ReadKey();
20         }
21
22         static void Query()
23         {
24             using (var cxt = new ManyToManyRemoveContext())
25             {
26                 var users = cxt.Users.ToList();
27                 users.ForEach(x =>
28                 {
29                     WriteLine("User First Name:{0},Last Name:{1},Create On:{2}
 |__Roles:{3}", x.FirstName, x.LastName, x.CreatedOn, string.Join(",", x.Roles.Select(r => r.Name)));
30                 });
31             }
32         }
33
34         static void Add()
35         {
36             List<Role> roles;
37             using (var cxt = new ManyToManyRemoveContext())
38             {
39                 roles = cxt.Roles.ToList();
40                 cxt.Users.Add(new User
41                 {
42                     Id = 4,
43                     FirstName = "Console",
44                     LastName = "App",
45                     CreatedOn = DateTime.Now,
46                     Roles = roles.Where(x => x.Id == 1).ToList()
47                 });
48             }
49         }
50
51         static void Update()
52         {
53             using (var cxt = new ManyToManyRemoveContext())
54             {
55                 var user = cxt.Users.FirstOrDefault(x => x.Id == 3);
56                 user.FirstName = "ShuHao";
57                 cxt.SaveChanges();
58             }
59         }
60
61         static void Remove()
62         {
63             using (var cxt = new ManyToManyRemoveContext())
64             {
65                 var user = cxt.Users.FirstOrDefault(x => x.Id == 2);
66                 cxt.Users.Remove(user);
67                 cxt.SaveChanges();
68             }
69         }
70
71         static void RemoveManyToMany()
72         {
73             using (var cxt = new ManyToManyRemoveContext())
74             {
75                 var user = cxt.Users.FirstOrDefault(x => x.Id == 1);
76                 var roles = new List<Role>();
77                 roles.AddRange(user.Roles.Select(x => x));
78                 foreach (var role in roles)
79                 {
80                     user.Roles.Remove(role);
81                 }
82                 cxt.Users.Remove(user);
83                 cxt.SaveChanges();
84             }
85         }
86     }
87 }