要共享文件的主机都是Linux系统时推荐在客户端部署NFS 服务来共享文件。
NFS(网络文件系统)服务可以将远程Linux 系统上的文件共享资源挂载到本地主机的目录上,从而使得本地主机(Linux 客户端)基于TCP/IP 协议,像使用本地主机上的资源那样读写远程Linux 系统上的共享文件。
安装NFS服务
[root@localhost etc]# yum install nfs-utils
Loaded plugins: fastestmirror, langpacks
Loading mirror speeds from cached hostfile
 * base: mirrors.huaweicloud.com
 * extras: mirrors.ustc.edu.cn
 * updates: mirrors.huaweicloud.com
... ...
Running transaction
  Updating   : 1:nfs-utils-1.3.0-0.66.el7_8.x86_64                                                  1/2
  Cleanup    : 1:nfs-utils-1.3.0-0.48.el7.x86_64                                                    2/2
  Verifying  : 1:nfs-utils-1.3.0-0.66.el7_8.x86_64                                                  1/2
  Verifying  : 1:nfs-utils-1.3.0-0.48.el7.x86_64                                                    2/2

Updated:
  nfs-utils.x86_64 1:1.3.0-0.66.el7_8

Complete!
1)为了检验NFS 服务配置的效果,我们需要使用两台Linux 主机(一台充当NFS服务器,一台充当NFS 客户端)。
记得清空NFS 服务器上面iptables 防火墙的默认策略,以免默认的防火墙策略禁止正常的NFS 共享服务。
[root@localhost etc]# iptables -F
[root@localhost etc]# service iptables save
iptables: Saving firewall rules to /etc/sysconfig/iptables:[  OK  ]
服务器端配置:
2)第 2 步:在NFS 服务器上建立用于NFS 文件共享的目录,并设置足够的权限确保其他人也有写入权限。
[root@localhost ~]# mkdir /nfsfile
[root@localhost ~]# chmod -Rf 777 /nfsfile
[root@localhost ~]# echo "hello" > /nfsfile/hi.txt
3)第 3 步:NFS 服务程序的配置文件为/etc/exports,默认情况下里面没有任何内容。我们可以按照“共享目录的路径允许访问的NFS 客户端(共享权限参数)”的格式,定义要共享的目录与相应的权限。
例如,如果想要把/nfsfile 目录共享给192.168.10.0/24 网段内的所有主机,让这些主机都拥有读写权限,在将数据写入到NFS 服务器的硬盘中后才会结束操作,最大限度保证数据不丢失,
以及把来访客户端root 管理员映射为本地的匿名用户等,则可以按照下面命令中的格式,将上表中的参数写到NFS 服务程序的配置文件中。
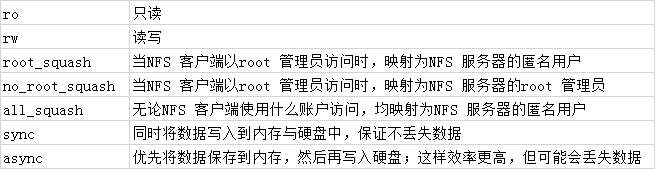
注意,NFS 客户端地址与权限之间没有空格。
[root@localhost ~]# vim /etc/exports
/nfsfile 10.10.64.*(rw,sync,root_squash)
4)启动和启用NFS 服务程序。由于在使用NFS 服务进行文件共享之前,需要使用RPC(Remote Procedure Call,远程过程调用)服务将NFS 服务器的IP 地址和端口号等信息发送给客户端。
因此,在启动NFS 服务之前,还需要顺带重启并启用rpcbind 服务程序,并将这两个服务一并加入开机启动项中。
[root@localhost ~]# systemctl restart rpcbind
[root@localhost ~]# systemctl enable rpcbind
[root@localhost ~]# systemctl start nfs-server
[root@localhost ~]# systemctl enable nfs-server
Created symlink from /etc/systemd/system/multi-user.target.wants/nfs-server.service to /usr/lib/systemd/system/nfs-server.service.
客户端配置
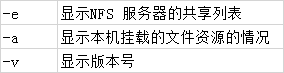
showmount 命令(以及必要的参数,见表)查询NFS 服务器的远程共享信息,其输出格式为“共享的目录名称允许使用客户端地址”。
[root@localhost ~]# showmount -e 10.10.64.109
Export list for 10.10.64.109:
/nfsfile 10.10.64.*
然后在 NFS 客户端创建一个挂载目录。使用mount 命令并结合-t 参数,指定要挂载的文件系统的类型,并在命令后面写上服务器的IP 地址、服务器上的共享目录以及要挂载到本地系统(即客户端)的目录。
[root@localhost ~]# mkdir /nfsfile
[root@localhost ~]# mount -t nfs 10.10.64.109:/nfsfile/ /nfsfile/
挂载成功后就应该能够顺利地看到在执行前面的操作时写入的文件内容了。如果希望NFS 文件共享服务能一直有效,则需要将其写入到fstab 文件中:
[root@localhost ~]# cat /nfsfile/hi.txt
hello
[root@localhost ~]# vim /etc/fstab
#
# /etc/fstab
# Created by anaconda on Wed May 4 19:26:23 2017
#
# Accessible filesystems, by reference, are maintained under '/dev/disk'
# See man pages fstab(5), findfs(8), mount(8) and/or blkid(8) for more info
#
/dev/mapper/rhel-root / xfs defaults 1 1
UUID=812b1f7c-8b5b-43da-8c06-b9999e0fe48b /boot xfs defaults 1 2
/dev/mapper /rhel-swap swap swap defaults 0 0
/dev/cdrom /media/cdrom iso9660 defaults 0 0
192.168.10.10:/nfsfile /nfsfile nfs defaults 0 0