网上已经有太多的有关如何配置eclipse+NDK了,本人就不再重复这些了,只是想记录下自己开始写第一个NDK程序的整个流程(保证可执行),共自己和大家分享。
首先安装一个能够支持Native代码的eclipse插件Sequoyah,然后在eclipse中的“窗口-首选项-Android”中多出来了一个“本机开发”选项,在“NDK Location”选择你的android-ndk的路径。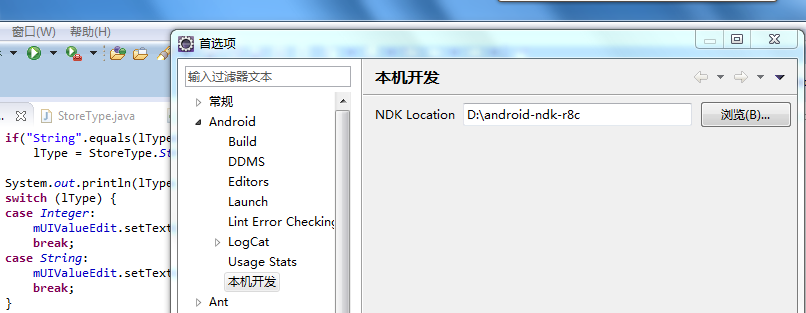 有了Sequoyah插件进行Android
Native开发就简单多了。下面根据自己的第一个Android Native程序开发过程,做一个记录。
有了Sequoyah插件进行Android
Native开发就简单多了。下面根据自己的第一个Android Native程序开发过程,做一个记录。
1. 创建Android应用程序MyFirstNativeStore,过程省去。
2. 创建用来保存int和String类型的
public enum StoreType {
Integer, String
}和Store类,该类使用到Native函数,利用本地语言进行保存和读取操作。
|
1
2
3
4
5
6
7
8
9
10
11
12
13
14
|
package
com.yemeishu.myfirstnativestore.store;public
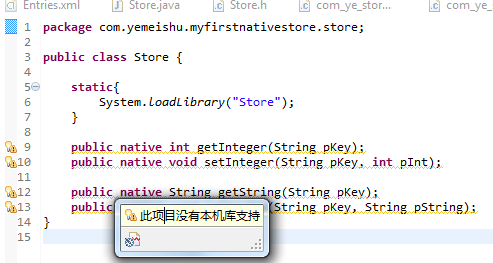
class Store { static{ System.loadLibrary("MyFirstNativeStore"); } public
native int
getInteger(String pKey); public
native void
setInteger(String pKey, int
pInt); public
native String getString(String pKey); public
native void
setString(String pKey, String pString);} |
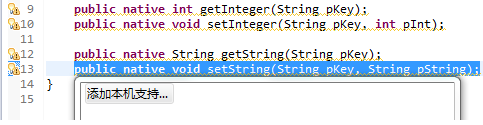
其中在eclipse中会提示“此项目没有本机库支持”
这时候可以点开左边的提示,选择“加上本机支持”:
之后会在出现添加本机支持有关的参数名称(如NDK所在路径、生成的lib**.so文件名称等等)
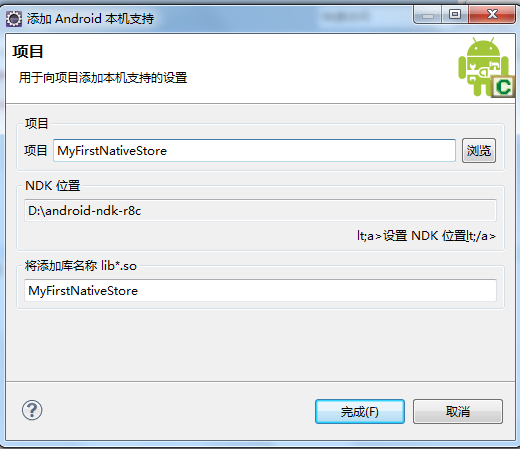
添加完成之后,在项目中多了一个“jni”文件夹,该文件夹这时候多出了两个文件,如本程序中多了“MyFirstNativeStore.cpp”和“Android.mk”,有了这两个文件,我们不用自己手动编写麻烦的“Android.mk”文件了。这两个文件的含义也不用多说了。
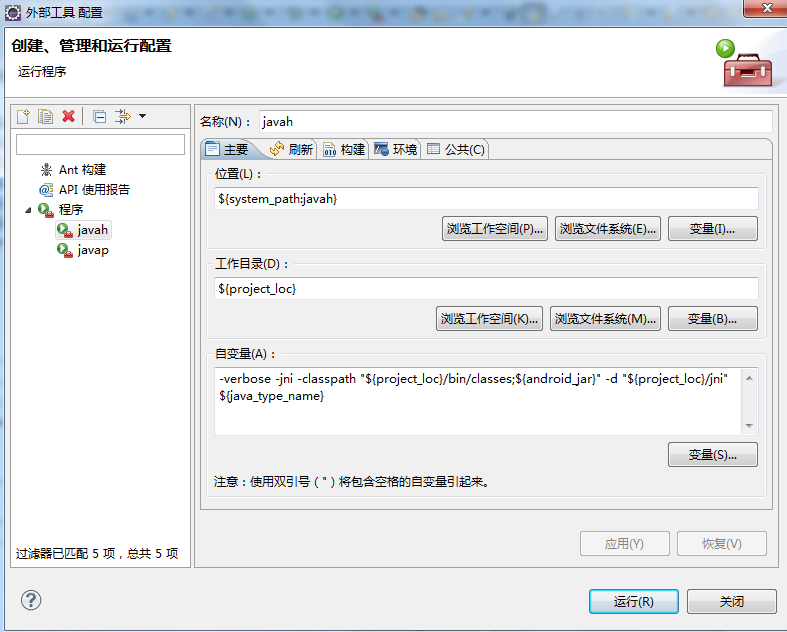
2. 利用javah编译生成头文件,首先在eclipse中“运行-外部工具-外部工具配置”选项中配置javah工具:
3. 执行外部工具javah,执行完之后,刷新本工程,会在jni文件夹下自动生成头文件“com_yemeishu_myfirstnativestore_store_Store.h”(包名+java类名)。
4. 完成一些基本类配置之后,我们来设计android显示层,显示需要导入的store数据和读取store数据,设计界面
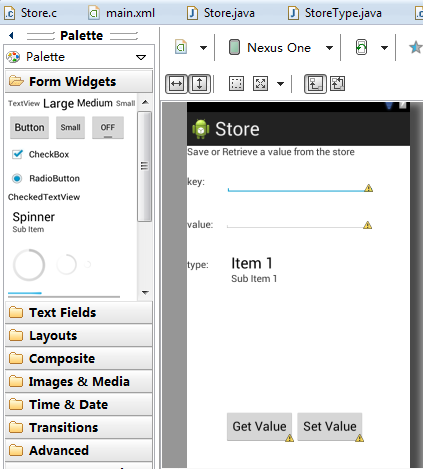
xml代码如下:
<RelativeLayout xmlns:android="http://schemas.android.com/apk/res/android"
    xmlns:tools="http://schemas.android.com/tools"
    android:layout_width="match_parent"
    android:layout_height="match_parent"
    tools:context=".StoreActivity" >

     <TextView
        android:id="@+id/textView1"
        android:layout_width="wrap_content"
        android:layout_height="wrap_content"
        android:layout_alignParentLeft="true"
        android:layout_alignParentRight="true"
        android:layout_alignParentTop="true"
        android:text="@string/sor" />

    <TextView
        android:id="@+id/textView2"
        android:layout_width="wrap_content"
        android:layout_height="wrap_content"
        android:layout_alignParentLeft="true"
        android:layout_below="@+id/textView1"
        android:layout_marginTop="25dp"
        android:text="@string/key" />

    <EditText
        android:id="@+id/uiKeyEdit"
        android:layout_width="wrap_content"
        android:layout_height="wrap_content"
        android:layout_alignBaseline="@+id/textView2"
        android:layout_alignBottom="@+id/textView2"
        android:layout_marginLeft="30dp"
        android:layout_toRightOf="@+id/textView2"
        android:ems="10" >

        <requestFocus />
    </EditText>

    <TextView
        android:id="@+id/textView3"
        android:layout_width="wrap_content"
        android:layout_height="wrap_content"
        android:layout_alignParentLeft="true"
        android:layout_below="@+id/uiKeyEdit"
        android:layout_marginTop="44dp"
        android:text="@string/value" />

    <EditText
        android:id="@+id/uiValueEdit"
        android:layout_width="wrap_content"
        android:layout_height="wrap_content"
        android:layout_alignBottom="@+id/textView3"
        android:layout_centerHorizontal="true"
        android:ems="10" />

    <TextView
        android:id="@+id/textView4"
        android:layout_width="wrap_content"
        android:layout_height="wrap_content"
        android:layout_alignParentLeft="true"
        android:layout_below="@+id/textView3"
        android:layout_marginTop="40dp"
        android:text="@string/Spinner" />

    <Spinner
        android:id="@+id/uiTypeSpinner"
        android:layout_width="wrap_content"
        android:layout_height="wrap_content"
        android:layout_alignLeft="@+id/uiKeyEdit"
        android:layout_below="@+id/uiValueEdit"
        android:layout_marginTop="25dp"
        android:entries="@array/sor_labels" />

    <Button
        android:id="@+id/setValue"
        android:layout_width="wrap_content"
        android:layout_height="wrap_content"
        android:layout_alignBaseline="@+id/getValue"
        android:layout_alignBottom="@+id/getValue"
        android:layout_toRightOf="@+id/getValue"
        android:text="Set Value" />

    <Button
        android:id="@+id/getValue"
        android:layout_width="wrap_content"
        android:layout_height="wrap_content"
        android:layout_alignLeft="@+id/uiValueEdit"
        android:layout_alignParentBottom="true"
        android:layout_marginBottom="35dp"
        android:text="Get Value" />
</RelativeLayout>
在StoreActivity类中 直接获取控件资源,设置两个按钮的按键事件函数onSetValue()和onGetValue。
private EditText mUIKeyEdit, mUIValueEdit;
	private Spinner mUITypeSpinner;
	private Button mUIGetButton, mUISetButton;
	private Store mStore;

	@Override
	protected void onCreate(Bundle savedInstanceState) {
		super.onCreate(savedInstanceState);
		setContentView(R.layout.main);

		mUIKeyEdit = (EditText) findViewById(R.id.uiKeyEdit);
		mUIValueEdit = (EditText) findViewById(R.id.uiValueEdit);
		mUITypeSpinner = (Spinner) findViewById(R.id.uiTypeSpinner);

		mUIGetButton = (Button) findViewById(R.id.getValue);
		mUISetButton = (Button) findViewById(R.id.setValue);

		mStore = new Store();

		mUIGetButton.setOnClickListener(new OnClickListener() {

			@Override
			public void onClick(View v) {
				// TODO 自动生成的方法存根
				onGetValue();
			}
		});

		mUISetButton.setOnClickListener(new OnClickListener() {

			@Override
			public void onClick(View v) {
				// TODO 自动生成的方法存根
				onSetValue();
			}
		});
两个函数代码如下:
private void onGetValue() {
		String lKey = mUIKeyEdit.getText().toString();
		String lType1 = (String) mUITypeSpinner.getSelectedItem();

		StoreType lType = StoreType.Integer;
		if("String".equals(lType1))
			lType = StoreType.String;

		System.out.println(lType.toString());
		switch (lType) {
		case Integer:
			mUIValueEdit.setText(Integer.toString(mStore.getInteger(lKey)));
			break;
		case String:
			mUIValueEdit.setText(mStore.getString(lKey));
			break;
		}
	}

	private void onSetValue() {
		String lKey = mUIKeyEdit.getText().toString();
		String lValue = mUIValueEdit.getText().toString();

		System.out.println(lKey.toString() + " " + lValue.toString());
		Log.i("1", lKey.toString() + " " + lValue.toString());


		System.out.println(mUITypeSpinner.getSelectedItem().toString());

		String lType1 = (String) mUITypeSpinner.getSelectedItem();

		StoreType lType = StoreType.Integer;
		if("String".equals(lType1))
			lType = StoreType.String;

		System.out.println(mUITypeSpinner.getSelectedItem().toString());
		try {
			switch (lType) {
			case Integer:
				mStore.setInteger(lKey, Integer.parseInt(lValue));
				break;
			case String:
				mStore.setString(lKey, lValue);
				break;
			}
		} catch (NumberFormatException eNumberFormatException) {
			displayError("Incorrect value.");
		}
	}
	private void displayError(String pError) {
		Toast.makeText(getApplicationContext(), pError, Toast.LENGTH_LONG)
		.show();
			}
5. 完成了界面设计了,java层基本完成,现在把注意力放在jni文件夹下,读取和保存Store类型的数据的Native层实现了。
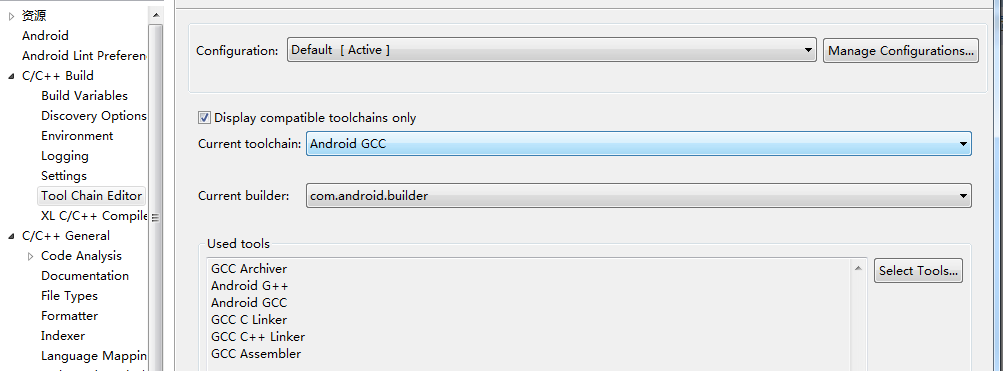
5.1 在文件夹下jni由于没配置好c++编译器和NDK命令等,所以自动生成的.cpp和.h等文件出现错误,所以先进行配置,首先在工程属性中,在“C/C++ Build”下的“Tool Chain Editor”选择GCC等工具。
"C/C++ Build的Builder Settings"中配置"Build command:"直接输入ndk-build。

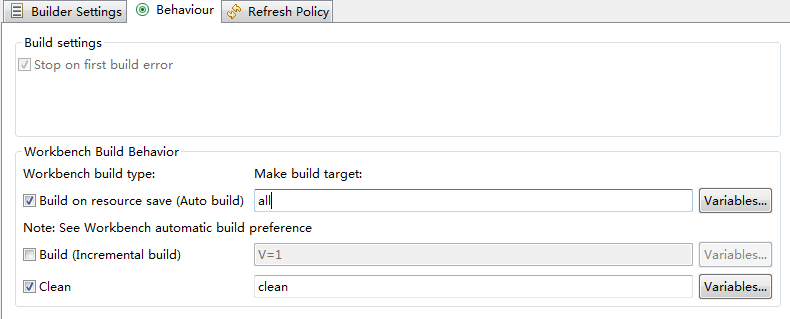
在“Behaviour”中设置
5.2 首先在jni文件夹下创建Store.h文件,主要创建一些保存Store类型、Store数组等枚举、结构体等信息,直接上代码(你肯定能看得懂):
#include "jni.h"
#include <stdint.h>
#define STORE_MAX_CAPACITY 16

typedef enum {
	StoreType_Integer, StoreType_String
} StoreType;

typedef union {
	int32_t mInteger;
	char* mString;
} StoreValue;

typedef struct {
	char* mKey;
	StoreType mType;
	StoreValue mValue;
} StoreEntry;

typedef struct {
	StoreEntry mEntries[STORE_MAX_CAPACITY];
	int32_t mLength;
} Store;

int32_t isEntryValid(JNIEnv* pEnv, StoreEntry* pEntry, StoreType pType);

StoreEntry* allocateEntry(JNIEnv* pEnv, Store* pStore, jstring pKey);

StoreEntry* findEntry(JNIEnv* pEnv, Store* pStore, jstring pKey,
		int32_t* pError);

void releaseEntryValue(JNIEnv* pEnv, StoreEntry* pEntry);
这里还定义了一些操作Store类型信息的操作函数,如findEntry()查找保存在pStore链表中的Store数据,并返回StoreEntry结构数据,即数据的key、数据类型(int和string类型)和数据值。具体实现函数在jni文件夹下创建Store.c类中实现,代码如下:
#include "Store.h"
#include <string.h>
#include <stdlib.h>
#include <jni.h>

int32_t isEntryValid(JNIEnv* pEnv, StoreEntry* pEntry, StoreType pType) {
	if ((pEntry != NULL) && (pEntry->mType == pType)) {
		return 1;
	}
	return 0;
}

StoreEntry* findEntry(JNIEnv* pEnv, Store* pStore, jstring pKey,
		int32_t* pError) {
	StoreEntry* lEntry = pStore->mEntries;
	StoreEntry* lEntryEnd = lEntry + pStore->mLength;
	const char* lKeyTmp = (*pEnv)->GetStringUTFChars(pEnv, pKey, NULL);
	if (lKeyTmp == NULL) {
		if (pError != NULL) {
			*pError = 1;
		}
		return NULL;
	}
	while ((lEntry < lEntryEnd) && (strcmp(lEntry->mKey, lKeyTmp) != 0)) {
		++lEntry;
	}
	(*pEnv)->ReleaseStringUTFChars(pEnv, pKey, lKeyTmp);
	return (lEntry == lEntryEnd) ? NULL : lEntry;
}

StoreEntry* allocateEntry(JNIEnv* pEnv, Store* pStore, jstring pKey) {
	int32_t lError = 0;
	StoreEntry* lEntry = findEntry(pEnv, pStore, pKey, &lError);
	if (lEntry != NULL) {
		releaseEntryValue(pEnv, lEntry);
	} else if (!lError) {
		if (pStore->mLength >= STORE_MAX_CAPACITY) {
			return NULL;
		}
		lEntry = pStore->mEntries + pStore->mLength;
		const char* lKeyTmp = (*pEnv)->GetStringUTFChars(pEnv, pKey, NULL);
		if (lKeyTmp == NULL) {
			return NULL;
		}
		lEntry->mKey = (char*) malloc(strlen(lKeyTmp));
		strcpy(lEntry->mKey, lKeyTmp);
		(*pEnv)->ReleaseStringUTFChars(pEnv, pKey, lKeyTmp);
		++pStore->mLength;
	}
	return lEntry;
}

void releaseEntryValue(JNIEnv* pEnv, StoreEntry* pEntry) {
	int i;
	switch (pEntry->mType) {
	case StoreType_String:
		free(pEntry->mValue.mString);
		break;
	}
}
5.3 完成了基本Store操作之后,现在开始完成连接java和Native桥梁的“MyFirstNativeStore.cpp”(还记得吧?),在该类中直接实现由javah外部工具生成的“com_yemeishu_myfirstnativestore_store_Store.h”的头文件定义的四个函数,“com_yemeishu_myfirstnativestore_store_Store.h”中的四个函数定义如下显示
/*
 * Class:     com_yemeishu_myfirstnativestore_store_Store
 * Method:    getInteger
 * Signature: (Ljava/lang/String;)I
 */
JNIEXPORT jint JNICALL Java_com_yemeishu_myfirstnativestore_store_Store_getInteger
  (JNIEnv *, jobject, jstring);

/*
 * Class:     com_yemeishu_myfirstnativestore_store_Store
 * Method:    setInteger
 * Signature: (Ljava/lang/String;I)V
 */
JNIEXPORT void JNICALL Java_com_yemeishu_myfirstnativestore_store_Store_setInteger
  (JNIEnv *, jobject, jstring, jint);

/*
 * Class:     com_yemeishu_myfirstnativestore_store_Store
 * Method:    getString
 * Signature: (Ljava/lang/String;)Ljava/lang/String;
 */
JNIEXPORT jstring JNICALL Java_com_yemeishu_myfirstnativestore_store_Store_getString
  (JNIEnv *, jobject, jstring);

/*
 * Class:     com_yemeishu_myfirstnativestore_store_Store
 * Method:    setString
 * Signature: (Ljava/lang/String;Ljava/lang/String;)V
 */
JNIEXPORT void JNICALL Java_com_yemeishu_myfirstnativestore_store_Store_setString
  (JNIEnv *, jobject, jstring, jstring);
具体实现函数代码如下
#include <string.h>
#include <jni.h>
#include "Store.h"
#include <stdint.h>
#include <stdlib.h>
#include <string.h>
#include "com_yemeishu_myfirstnativestore_store_Store.h"

static Store gStore = { {}, 0 };
/*
 * Class:     com_yemeishu_myfirstnativestore_store_Store
 * Method:    getInteger
 * Signature: (Ljava/lang/String;)I
 */
JNIEXPORT jint JNICALL Java_com_yemeishu_myfirstnativestore_store_Store_getInteger(
		JNIEnv* pEnv, jobject pThis, jstring pKey) {
	StoreEntry* lEntry = findEntry(pEnv, &gStore, pKey, NULL);

	if (isEntryValid(pEnv, lEntry, StoreType_Integer)) {
		return lEntry->mValue.mInteger;
	} else {
		return 0.0f;
	}

}

/*
 * Class:     com_yemeishu_myfirstnativestore_store_Store
 * Method:    setInteger
 * Signature: (Ljava/lang/String;I)V
 */
JNIEXPORT void JNICALL Java_com_yemeishu_myfirstnativestore_store_Store_setInteger
(JNIEnv* pEnv, jobject pThis, jstring pKey, jint pInteger) {
	StoreEntry* lEntry = allocateEntry(pEnv, &gStore, pKey);
	if (lEntry != NULL) {
		lEntry->mType = StoreType_Integer;
		lEntry->mValue.mInteger = pInteger;
	}
}
/*
 * Class:     com_yemeishu_myfirstnativestore_store_Store
 * Method:    getString
 * Signature: (Ljava/lang/String;)Ljava/lang/String;
 */

JNIEXPORT jstring JNICALL Java_com_yemeishu_myfirstnativestore_store_Store_getString(
		JNIEnv* pEnv, jobject pThis, jstring pKey) {
	StoreEntry* lEntry = findEntry(pEnv, &gStore, pKey, NULL );
	if (isEntryValid(pEnv, lEntry, StoreType_String)) {
		return (*pEnv)->NewStringUTF(pEnv, lEntry->mValue.mString);
	} else {
		return NULL ;
	}
}

/*
 * Class:     com_yemeishu_myfirstnativestore_store_Store
 * Method:    setString
 * Signature: (Ljava/lang/String;Ljava/lang/String;)V
 */
JNIEXPORT void JNICALL Java_com_yemeishu_myfirstnativestore_store_Store_setString(
		JNIEnv* pEnv, jobject pThis, jstring pKey, jstring pString) {
	const char* lStringTmp = (*pEnv)->GetStringUTFChars(pEnv, pString, NULL );
	if (lStringTmp == NULL ) {
		return;
	}
	StoreEntry* lEntry = allocateEntry(pEnv, &gStore, pKey);
	if (lEntry != NULL ) {
		lEntry->mType = StoreType_String;
		jsize lStringLength = (*pEnv)->GetStringUTFLength(pEnv, pString);
		lEntry->mValue.mString = (char*) malloc(
				sizeof(char) * (lStringLength + 1));
		strcpy(lEntry->mValue.mString, lStringTmp);
	}
	(*pEnv)->ReleaseStringUTFChars(pEnv, pString, lStringTmp);
}
5.4 最后修改下自动生成的Android.mk文件,将Store.c也包含进去
LOCAL_PATH := $(call my-dir)

include $(CLEAR_VARS)

LOCAL_MODULE    := MyFirstNativeStore
### Add all source file names to be included in lib separated by a whitespace
LOCAL_SRC_FILES := MyFirstNativeStore.c Store.c

include $(BUILD_SHARED_LIBRARY)
6. 编译、执行。结果省去。
利用NDK进行Android编程,主要流程为:
一、编写Android程序,创建需要利用Native编写的实现函数类(包含native关键字的函数,和static{System.loadLibrary("xxx")})。
二、利用javah外部工具生成包含Native函数的头文件(头文件名为:包名+函数名称)。
三、通过“本机开发”(eclipse插件Sequoyah)自动生成Android.mk文件和实现Native函数的.c或者.cpp文件,实现函数功能。
四、利用Android提供的“Android GCC”或者“Cygwin GCC”或者“MinGW GCC”等工具和NDK-build编译Native函数,生成lib***.so(windows下)库文件。
五、完成实现java与Native的函数调用和回调、结果返回等。
7. 最后提供源码程序:MyFirstNativeStore 和插件sequoyah(org.eclipse.sequoyah.feature.2.0.0.I20110609-0753)
转自:http://www.cnblogs.com/yemeishu/archive/2012/12/24/NDK%E5%BC%80%E5%8F%91.html