上一篇我们讲了如何定义菜单按钮
https://www.cnblogs.com/xiaoyulong/p/10115053.html
这一篇我们讲如何定义自己的窗口。
定义窗口我们需要继承 EditorWindow 类,这个类在 using UnityEditor 命名空间下。
创建窗口有两个方法可以使用:
1、EditorWindow.GetWindow():创建出来的窗口可通过鼠标动态的延伸窗口。
参数:Type t:窗口类型,注意是一定要继承自 EditorWindow。
bool utility:窗口是否浮动,如果是就不能内嵌到unity其他窗口中去,如果不是就能嵌入其他窗口。(可以省略,默认为内嵌入式)
string title:窗口的标题,如果为空的话就采用类的名称来当标题。(可以省略,默认类的名称)
bool focus:是否可以获得焦点,如果再次点击会给窗口一个焦点。
2、EditorWindow.GetWindowWithRect():创建出来的窗口的大小是固定的,无法改变。
参数:Type t:窗口类型,注意是一定要继承自 EditorWindow。
Rect rect:窗口的大小。
bool utility:窗口是否浮动,如果是就不能内嵌到unity其他窗口中去,如果不是就能嵌入其他窗口。(可以省略,默认为内嵌入式)
string title:窗口的标题,如果为空的话就采用类的名称来当标题。(可以省略,默认类的名称)
bool focus:是否可以获得焦点,如果再次点击会给窗口一个焦点。
代码如下:
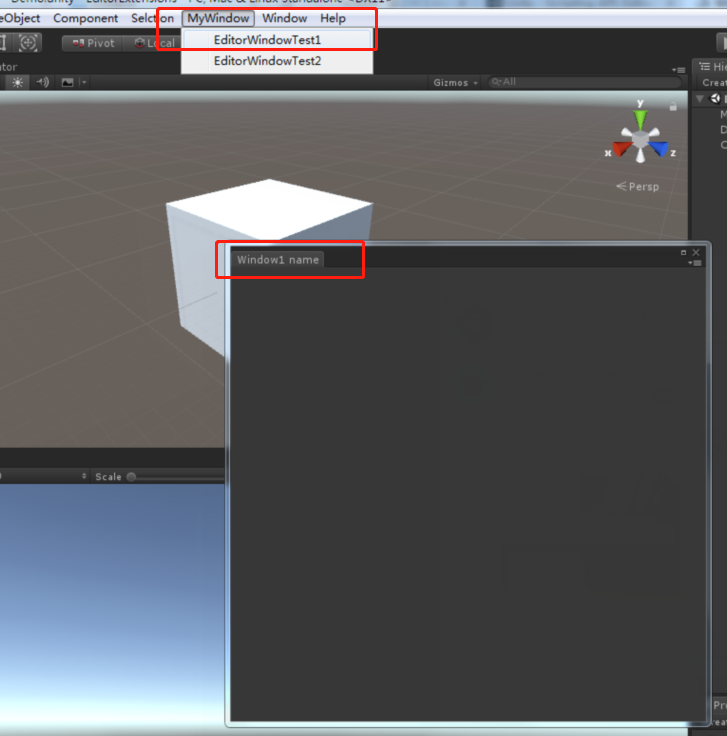
 1 using UnityEditor;
 2 using UnityEngine;
 3
 4 public class EditorWindowTest : EditorWindow
 5 {
 6     [MenuItem("MyWindow/EditorWindowTest1")]
 7     private static void AddWindow1()
 8     {
 9         EditorWindowTest myWindow = (EditorWindowTest)EditorWindow.GetWindow(typeof(EditorWindowTest), false, "Window1 name", true);//创建窗口
10         myWindow.Show();
11     }
12
13     [MenuItem("MyWindow/EditorWindowTest2")]
14     private static void AddWindow2()
15     {
16         Rect _rect = new Rect(0, 0, 500, 500);
17         EditorWindowTest window = (EditorWindowTest)EditorWindow.GetWindowWithRect(typeof(EditorWindowTest), _rect, true, "Window2 name");
18         window.Show();
19     }
20 }
效果图:

窗口创建出来了,我们可以使用 GUI 和 GUILayout 控件,还可以使用编辑器专用控件 EditorGUI 和 EditorGUILayout 在 OnGUI() 回调函数中给窗口添加内容,下面就用一个小例子给大家演示下,并介绍下窗口支持的回调函数
代码:
using UnityEditor;
using UnityEngine;

public class MyEditor : EditorWindow
{
    [MenuItem("MyWindow/window")]
    private static void AddWindow()
    {
        Rect wr = new Rect(0, 0, 500, 500);
        MyEditor window = (MyEditor)EditorWindow.GetWindowWithRect(typeof(MyEditor), wr, true, "widow name");
        window.Show();
    }
    //输入文字的内容
    private string text;
    //选择贴图的对象
    private Texture texture;

    //绘制窗口时调用
    private void OnGUI()
    {
        //输入框控件
        text = EditorGUILayout.TextField("输入文字:", text);
        if (GUILayout.Button("打开通知", GUILayout.Width(200)))
        {
            //打开一个通知栏
            this.ShowNotification(new GUIContent("This is a Notification"));
        }
        if (GUILayout.Button("关闭通知", GUILayout.Width(200)))
        {
            //关闭通知栏
            this.RemoveNotification();
        }
        //文本框显示鼠标在窗口的位置
        EditorGUILayout.LabelField("鼠标在窗口的位置", Event.current.mousePosition.ToString());
        //选择贴图
        texture = EditorGUILayout.ObjectField("添加贴图", texture, typeof(Texture), true) as Texture;
        if (GUILayout.Button("关闭窗口", GUILayout.Width(200)))
        {
            //关闭窗口
            this.Close();
        }
    }

    private void Awake()
    {
        Debug.Log("Awake");
    }
    private void Update()
    {
        Debug.Log("Update");
    }
    private void OnEnable()
    {
        Debug.Log("OnEnable");
    }
    private void OnDisable()
    {
        Debug.Log("OnDisable");
    }
    private void OnFocus()
    {
        Debug.Log("当窗口获得焦点时调用一次");
    }
    private void OnLostFocus()
    {
        Debug.Log("当窗口丢失焦点时调用一次");
    }
    private void OnHierarchyChange()
    {
        Debug.Log("当Hierarchy视图中的任何对象发生改变时调用一次");
    }
    private void OnProjectChange()
    {
        Debug.Log("当Project视图中的资源发生改变时调用一次");
    }
    private void OnInspectorUpdate()
    {
        Debug.Log("窗口面板的更新");
        //这里开启窗口的重绘,不然窗口信息不会刷新
        this.Repaint();
    }
    private void OnSelectionChange()
    {
        //当窗口处于开启状态,并且在Hierarchy视图中选择某游戏对象时调用
        foreach (Transform t in Selection.transforms)
        {
            //有可能是多选,这里开启一个循环打印选中游戏对象的名称
            Debug.Log("OnSelectionChange" + t.name);
        }
    }
    private void OnDestroy()
    {
        Debug.Log("当窗口关闭时调用");
    }
}
效果图:

最后介绍两个API:
fousedWindow(静态属性):键盘操作的窗口的焦点。键盘在对哪个窗口进行输入或者其他操作,这个静态变量就是那个窗口。
mouseOverWindow(静态属性):鼠标操作的窗口的焦点。鼠标悬停在哪个Window,这个静态变量就是那个窗口。
除了上面介绍的方法以外,Unity还提供了向导式的编辑窗口 ScriptableWizard,就是提供了一个简单的窗口模块,支持我们快速开发
创建函数介绍:
public static T DisplayWizard<T>(string title)
public static T DisplayWizard<T>(string title, string createButtonName)
public static T DisplayWizard<T>(string title, string createButtonName, string otherButtonName)
public static ScriptableWizard DisplayWizard(string title, Type klass, string createButtonName)
函数参数详解:
string title:窗口标题名称
string createButtonName:Create按钮名称
string otherButtonName: 其他按钮名称
Type klass:实现类类型
属性介绍:
createButtonName:修改 create button 的名称
otherButtonName: 设置 otherButtonName 的名称
helpString:允许您设置向导的帮助文本。
errorString:允许您设置向导的错误文本。
isValid:允许您启用和禁用向导创建按钮,以便用户不能点击。
回调函数介绍:
OnWizardUpdate:当向导被打开或只要用户在向导改变了某些东西时就会被自动的调用。
OnWizardCreate:当用户在创建按钮上点击是调用。
OnWizardOtherButton:当用户在其他按钮点击时,此函数会被调用
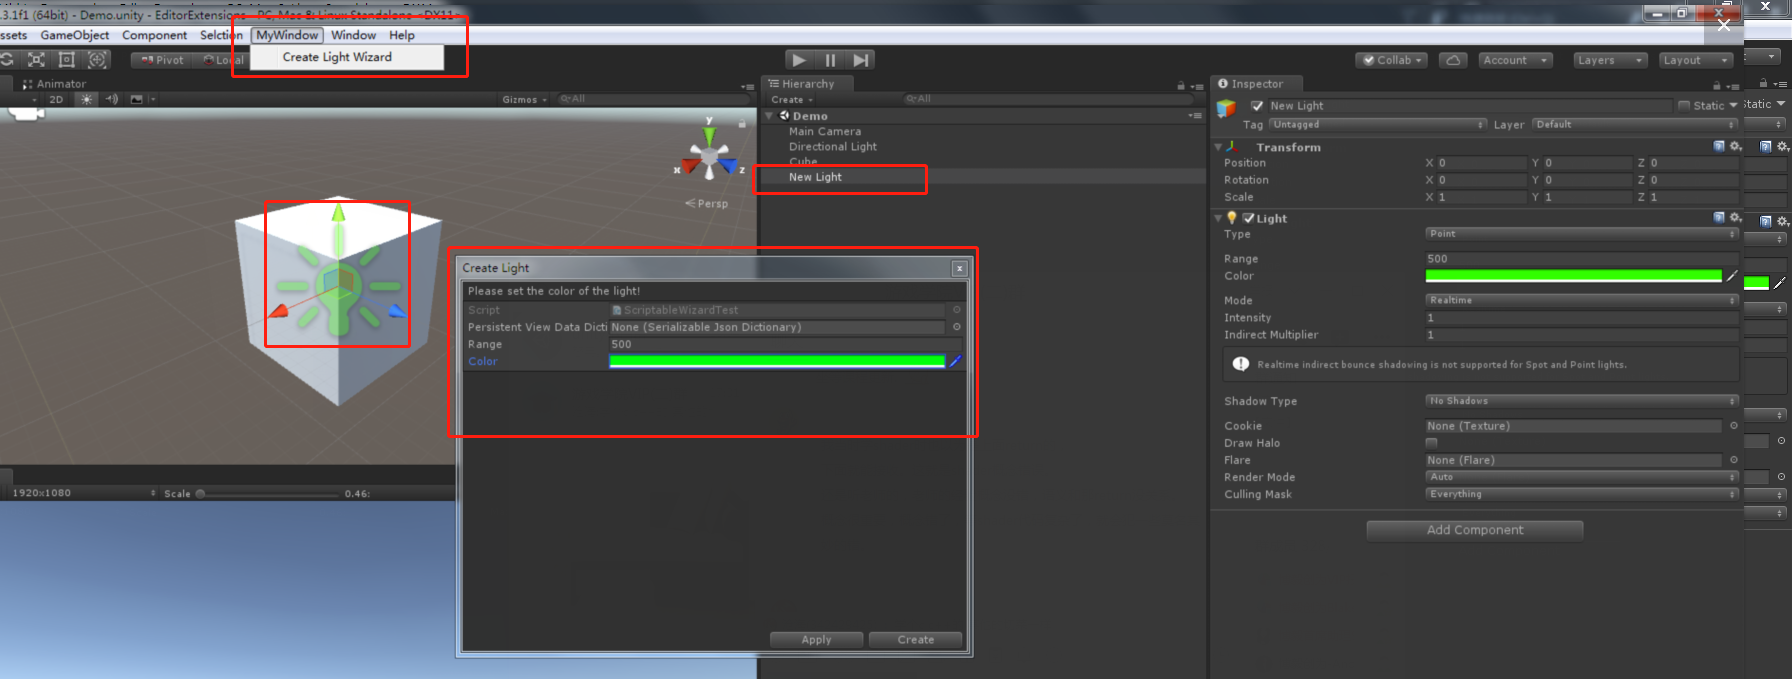
案例:
代码:
 1 using UnityEditor;
 2 using UnityEngine;
 3
 4 public class ScriptableWizardTest : ScriptableWizard
 5 {
 6     #region --变量定义
 7     public float range = 500;
 8     public Color color = Color.red;
 9     #endregion
10
11     #region --自定义函数
12     [MenuItem("MyWindow/Create Light Wizard")]
13     static void CreateWizard()
14     {
15         ScriptableWizard.DisplayWizard<ScriptableWizardTest>("Create Light", "Create", "Apply");
16     }
17     void OnWizardCreate()
18     {
19         GameObject go = new GameObject("New Light");
20         Light lt = go.AddComponent<Light>();
21         lt.range = range;
22         lt.color = color;
23     }
24     void OnWizardUpdate()
25     {
26         helpString = "Please set the color of the light!";
27     }
28     void OnWizardOtherButton()
29     {
30         if (Selection.activeTransform != null)
31         {
32             Light lt = Selection.activeTransform.GetComponent<Light>();
33
34             if (lt != null)
35             {
36                 lt.color = Color.red;
37             }
38         }
39     }
40     #endregion
41 }
效果图: