1.为什么需要使用Context
在react中,数据传递一般使用props传递数据,维持单向数据流,这样可以让组件之间的关系变得简单且可预测,但是单项数据流在某些场景中并不适用,看一个官方给出的例子:
有三个组件APP, Toolbar ,ThemedButton,关系如图:(为了方便大家理解(偷懒),这个例子我会全文通用。)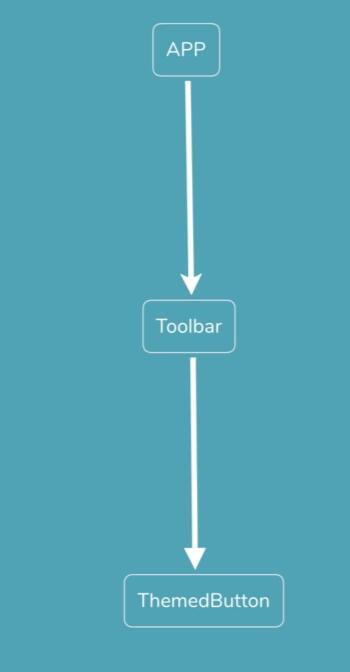
APP存放着主题相关的参数theme,需要传递组件ThemedButton, 如果考虑使用props,那么代码就长这样:
class App extends react.Component {
  render() {
    return <Toolbar theme="dark" />; // 1. 将theme传递给
  }
}

function Toolbar(props) {
  // Toolbar 组件接受一个额外的“theme”属性,然后传递给 ThemedButton 组件。
  return (
    <div>
      <ThemedButton theme={props.theme} /> // 2. 继续往下传递给Button
    </div>
  );
}

class ThemedButton extends React.Component {
  render() {
    return <Button theme={this.props.theme} />; // 最终获取到参数
  }
}
可以看到,实际上需要参数的是组件ThemedButton,但是却必须通过Toolbar作为中介传递。不妨再引申思考一下:
- 如果ThemedButton并非末级子节点,那么参数必须继续向下传递
- 如果App中,还有除了<ThemedButton>以外的组件,也需要theme参数,那么也必须按照这种形式逐层传递
那么数据结构图大概如图所示:
结构图placeholder:层层传递,显然,这样做太!繁!琐!了!接下来,就要介绍今天的主角--Context
2. Context的用法介绍
Context 提供了一种在组件之间共享此类值的方式,而不必显式地通过组件树的逐层传递 props。
上面是官方对于context的介绍,简单来说,就是可以把context当做是特定一个组件树内共享的store,用来做数据传递。
为什么这里要加粗强调组件树呢?因为它是基于树形结构共享的数据:在某个节点开启提供context后,所有后代节点compoent都可以获取到共享的数据。
语言描述略显抽象,直接上代码:
1. 基本使用
以下介绍的是在react 16.x以前的传统写法
class App extends React.Component {
// 核心代码1: 首先在提供context的组件(即provider)里 使用`getChildContext`定义要共享给后代组件的数据,同时使用`childContextTypes`做类型声明
  static childContextTypes = {
        theme: PropTypes.string
  };

  getChildContext () {
    return {
      theme: 'dark'
    }
  }

  render() {
    return <Toolbar />; //  无需再将theme通过props传递
  }
}

function Toolbar(props) {
  return (
    <div>
      <ThemedButton />  // Toolbar 组件不再接受一个额外的“theme”属性
    </div>
  );
}

// 核心代码2: 然后在需要使用context数据(即consumer)的节点,用`contextTypes`声明需要读取的context属性,否则读不到text
class ThemedButton extends React.Component {
    static contextTypes = {
        theme: PropTypes.string
    }

    render() {
        return <h2>{this.context.theme}</h2>; // 直接从context获取到参数 为了直观 这里改用<h2>直接显示出来
    }
}
这个结构图就不画了,显然,就是把theme从层层传递的props中解放出来了。
在代码中我们提到了provider和consumer,这里简单解释下:
context使用的生产者provider- 消费者consumer模式,
- 把提供context的叫做provider,比如例子中的APP,
- 把使用context的称为consumer,对应例子中的ThemedButton。
2. 更新context
如果我们在APP组件提供了一个切换主题的按钮,那就需要context能够更新并且通知到相应的consumer。
由于context本身提供了相关功能:
- getChildContext方法在每次state和props改变时会被调用;
- 一旦provider改变了context,所有的后代组件中的consumer都会重新渲染。
所以通常的方式是:将context的数据保存在Provide的state属性中,每次通过setState更新对应的属性时。
class App extends React.Component {
  static childContextTypes = {
        theme: PropTypes.string
  };

  constructor(props) {
    super(props);
    this.state = {theme:'dark'};
  }

  getChildContext () {
    return {
      theme: this.state.theme // 核心代码,将`context`的值保存在`state`
    }
  }

  render() {
    return <Toolbar />;
  }
}
但是官方文档同时提到了这种方法是有隐患的,下一节进行详细解析。
资源搜索网站大全 https://www.renrenfan.com.cn 广州VI设计公司https://www.houdianzi.com
3. 当context遇到shouldComponentUpdate
再次强调,以下介绍的是在react 16.x以前的版本,关于context新的api会在后面介绍
官方文档提到:
The problem is, if a context value provided by component changes, descendants that use that value won’t update if an intermediate parent returns false from shouldComponentUpdate.
(皇家翻译上场) 拿前面的例子来说,我们在第二节通过使用context,将theme的传递方式由原本的
APP->Toolbar->ThemedButton 通过props层层传递变成: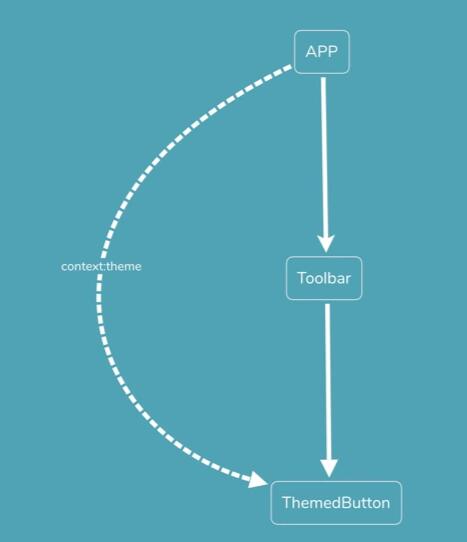
但是组件本身的层级关系依然是APP->Toolbar->ThemedButton。如果我们在中间层Toolbar()
的生命周期shouldComponent返回false会怎么样呢?接下来我们针对Toolbar做一些改动
// 旧写法
function Toolbar(props) {
  return (
    <div>
      <ThemedButton />
    </div>
  );
}

// 新写法 使用PureComponent render内容一样,
// PS:PureComponent内置的shouldComponentUpdate对state和props做了浅比较,这里为了省事直接使用
//如果不熟悉PureComponent可以直接用React.Component,然后补上shouldComponentUpdate里的 浅比较判断
class Toolbar extends React.PureComponent {
    render(){
        return (
            <div>
                <ThemedButton />
            </div>
        );
    }
}
这里为了省事,我们直接使用了PureComponent,接下来会发现:
每次APP更新theme的值时,ThemedButton无法再取到变更后的theme
新的结构图是这样的(注意红线表示来自toolbar的抵抗):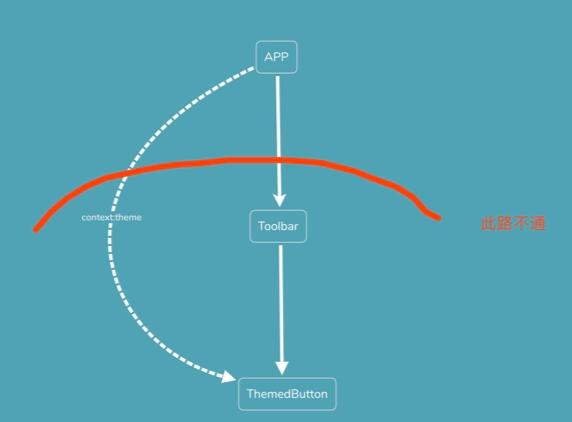
现在问题来了:
由于Toolbar组件是PureComponent,无法重写shouldComponentUpdate,这就意味着位于Toolbar之后的后代节点都无法获取到context的更新!
-
第一种思路:首先,我们先看看问题的根源之一,是context更新之后,后代节点无法及时获取到更新,那么如果context不发生更,那就不存在这个问题了.【我个人觉得这个思路有点类似于,解决不了问题,可以考虑解决提出问题的人】,也就意味着:
- 设定为不可变对象immutable
- 后代组件应该仅在constructor函数中获取一次context。
- 第二种思路,我们不在context中保存具体的状态值,而是只利用它做个依赖注入。绕开SCU(shouldComponentUpdate),从根本上解决问题。 例如,可以通过发布订阅模型创建一个自我管理的ThemeManage类来解决问题。具体实现如下:
// 核心代码
class ThemeManager {
  constructor(theme) {
    this.theme = theme
    this.subscriptions = []
  }

  // 变更颜色时 提示相关的订阅者
  setColor(theme) {
    this.theme = theme
    this.subscriptions.forEach(f => f())
  }


  // 订阅者接收到响应 触发对应的callbck保证自己的及时更新
  subscribe(f) {
    this.subscriptions.push(f)
  }
}

class App extends React.Component {
  static childContextTypes = {
      themeManager: PropTypes.object // 本次通过context传递一个theme对象
  };

  constructor(props) {
    super(props);
    this.themeManager = new ThemeManager('dark') // 核心代码
  }

  getChildContext () {
    return {theme: this.themeManager} // 核心代码
  }

  render() {
    return <Toolbar />;
  }
}

// Toolbar依然是个PureComponent
class Toolbar extends React.PureComponent {
    render(){
        return (
            <div>
                <ThemedButton />
            </div>
        );
    }
}

class ThemedButton extends React.Component {
    constructor(){
        super();
        this.state = {
            theme: theme:this.context.themeManager.theme
        }
    }
  componentDidMount() {
    this.context.themeManager.subscribe(() => this.setState({
        theme: this.context.themeManager.theme  // 核心代码 保证theme的更新
    }))
  }

  render() {
    return <Button theme={this.state.theme} />; // 核心代码
  }
}
OK,回头看看我们都干了些什么:
- 我们现在不再利用context传递 theme值,而是传递一个themeManager注入对象,这个对象的特点是内置了状态更新和消息通知的功能。
- 消费组件ThemedButton订阅theme的变化,并且利用setState作为回调函数,保证theme值的及时更新。
从而完美绕开了context的传递问题。其实,它同样符合我们第一个解决方案:通过context传递的对象,只被接受一次,并且后续都没有更新(都是同一个themeManager对象,更新是通过themeManager内部的自我管理实现的。)
4. 16.x后的新API
讲完基本用法,接着聊聊context在16.x版本之后的API。
先说一个好消息!使用新API后
每当 Provider(提供者) 的 value 属性发生变化时,所有作为 Provider(提供者) 后代的 consumer(使用者) 组件 都将重新渲染。 从Provider 到其后代使用者的传播不受 shouldComponentUpdate 方法的约束,因此即使祖先组件退出更新,也会更新 consumer(使用者)
换句话说 如果使用context的新API,第三节可以跳过不看。(所以我把那一段写前面去了)
在传统版本,使用getChildContext和childContextTypes来使用context,而在16.x版本之后,前面的例子可以改写成这样:
-
首先使用createContext创建一个context,该方法返回一个对象,包含Provider(生产者)和Consumer(消费者)两个组件:
const themeContext = React.createContext('light'); // 这里light是默认值 后续使用时可以改变 -
使用Provider组件,指定context需要作用的组件树范围
class App extends React.Component { render() { // 使用一个 Provider 来将当前的 theme 传递给以下的组件树。 // 无论多深,任何组件都能读取这个值。 // 在这个例子中,我们将 “dark” 作为当前的值传递下去。 return ( <ThemeContext.Provider value="dark"> <Toolbar /> </ThemeContext.Provider> ); } } // 中间的组件再也不必指明往下传递 theme 了。 function Toolbar(props) { return ( <ThemedButton /> ); } -
后代组件根据需要,指定contextType需要作用的组件树范围
class ThemedButton extends React.Component {
  // 指定 contextType 读取当前的 theme context。
  // React 会往上找到最近的 theme Provider,然后使用它的值。
  // 在这个例子中,当前的 theme 值为 “dark”。
  static contextType = ThemeContext;
  render() {
    return <Button theme={this.context} />;
  }
}

// 除了写static contextType = ThemeContext 也可以这样写:
ThemedButton.contextType = ThemeContext;
当然,也可以通过Consumer组件指定消费者
class ThemedButton extends React.Component { static contextType = ThemeContext; render() { // Consumer的children必须是一个函数,传递的等于组件树中层这个 context 最接近的 Provider 的对应属性 <ThemeContext.Consumer> { theme =><Button theme={theme} />; // 核心代码 } </ThemeContext.Consumer> } }这两种方式的主要区别是如果需要传递多个可能同名的context时(例如这个例子中Toolbar组件也通过context传递一个theme属性,而ThemedButton需要的是从APP来的theme),只能用Consumer来写
5. 注意事项和其他
对于context的使用,需要注意的主要是以下2点:
- 减少不必要使用context,因为react重视函数式编程,讲究复用,而使用了context的组件,复用性大大降低
- 传统版本的react,尤其要注意context在自己的可控范围内,其实最大的问题也就是前面说的SUC的问题
- 前面说到context的值变更时,Consumer会受到相应的通知,因此要注意某些隐含非预期的变化,例如:
// bad 示例, 因为每次render时{something: 'something'}都指向一个新对象(引用类型的值是老问题,不赘述了)
class App extends React.Component {
  render() {
    return (
      <Provider value={this.state.value}>
        <Toolbar />
      </Provider>
    );
  }
}

// good 示例 使用固定的变量存储值 当然可以选择除了state以外的其他变量
class App extends React.Component {
  constructor(props) {
    super(props);
    this.state = {
      value: {something: 'something'},
    };
  }
  render() {
    return (
      <Provider value={this.state.value}>
        <Toolbar />
      </Provider>
    );
  }
}