import sys
import time

from threading import Thread

from PyQt5.QtWidgets import QApplication,QMainWindow
from submit import Ui_MainWindow

def click_success():
    t1 = Thread(target=sleep_30s)
    t1.start()
    print('30秒过去了')
    time.sleep(2)

def sleep_30s():
    time.sleep(5)
    print('休息5秒')

def click_print():
    print('启动成功')


if __name__=="__main__":
    app = QApplication(sys.argv)
    MainWindow = QMainWindow()
    ui = Ui_MainWindow()
    ui.setupUi(MainWindow)
    MainWindow.show()
    # 每一个功能一个线程
    ui.pushButton1.clicked.connect(click_success)
    ui.pushButton2.clicked.connect(click_print)
    sys.exit(app.exec_())
<?xml version="1.0" encoding="UTF-8"?>
<ui version="4.0">
 <class>MainWindow</class>
 <widget class="QMainWindow" name="MainWindow">
  <property name="geometry">
   <rect>
    <x>0</x>
    <y>0</y>
    <width>745</width>
    <height>476</height>
   </rect>
  </property>
  <property name="windowTitle">
   <string>MainWindow</string>
  </property>
  <property name="styleSheet">
   <string notr="true"/>
  </property>
  <property name="unifiedTitleAndToolBarOnMac">
   <bool>false</bool>
  </property>
  <widget class="QWidget" name="centralwidget">
   <layout class="QVBoxLayout" name="verticalLayout">
    <item>
     <layout class="QHBoxLayout" name="horizontalLayout">
      <property name="leftMargin">
       <number>0</number>
      </property>
      <property name="rightMargin">
       <number>0</number>
      </property>
      <item>
       <widget class="QDateEdit" name="startDateEdit">
        <property name="sizePolicy">
         <sizepolicy hsizetype="Minimum" vsizetype="Fixed">
          <horstretch>2</horstretch>
          <verstretch>0</verstretch>
         </sizepolicy>
        </property>
        <property name="dateTime">
         <datetime>
          <hour>0</hour>
          <minute>0</minute>
          <second>10</second>
          <year>2019</year>
          <month>1</month>
          <day>1</day>
         </datetime>
        </property>
       </widget>
      </item>
      <item>
       <widget class="QLabel" name="label">
        <property name="sizePolicy">
         <sizepolicy hsizetype="Minimum" vsizetype="Preferred">
          <horstretch>1</horstretch>
          <verstretch>0</verstretch>
         </sizepolicy>
        </property>
        <property name="text">
         <string>--</string>
        </property>
        <property name="alignment">
         <set>Qt::AlignCenter</set>
        </property>
       </widget>
      </item>
      <item>
       <widget class="QDateEdit" name="endDateEdit">
        <property name="sizePolicy">
         <sizepolicy hsizetype="Minimum" vsizetype="Fixed">
          <horstretch>2</horstretch>
          <verstretch>0</verstretch>
         </sizepolicy>
        </property>
        <property name="dateTime">
         <datetime>
          <hour>0</hour>
          <minute>0</minute>
          <second>0</second>
          <year>2019</year>
          <month>1</month>
          <day>14</day>
         </datetime>
        </property>
       </widget>
      </item>
     </layout>
    </item>
    <item>
     <layout class="QHBoxLayout" name="horizontalLayout_2">
      <item>
       <widget class="QPushButton" name="crawl">
        <property name="sizePolicy">
         <sizepolicy hsizetype="Minimum" vsizetype="Fixed">
          <horstretch>0</horstretch>
          <verstretch>0</verstretch>
         </sizepolicy>
        </property>
        <property name="text">
         <string>数据爬取</string>
        </property>
        <property name="myclass" stdset="0">
         <string>bar2btn</string>
        </property>
       </widget>
      </item>
      <item>
       <widget class="QPushButton" name="exportToExcel">
        <property name="text">
         <string>导入Excel</string>
        </property>
        <property name="myclass" stdset="0">
         <string>bar2btn</string>
        </property>
       </widget>
      </item>
      <item>
       <widget class="QPushButton" name="exportToDB">
        <property name="text">
         <string>导入数据库</string>
        </property>
        <property name="myclass" stdset="0">
         <string>bar2btn</string>
        </property>
       </widget>
      </item>
      <item>
       <widget class="QPushButton" name="analyze">
        <property name="text">
         <string>分析数据</string>
        </property>
        <property name="myclass" stdset="0">
         <string>bar2btn</string>
        </property>
       </widget>
      </item>
     </layout>
    </item>
    <item>
     <widget class="QTextEdit" name="textBrowser">
      <property name="acceptRichText">
       <bool>true</bool>
      </property>
      <property name="placeholderText">
       <string>你好,白月黑羽</string>
      </property>
     </widget>
    </item>
   </layout>
  </widget>
  <widget class="QMenuBar" name="menubar">
   <property name="geometry">
    <rect>
     <x>0</x>
     <y>0</y>
     <width>745</width>
     <height>23</height>
    </rect>
   </property>
  </widget>
  <widget class="QStatusBar" name="statusbar"/>
 </widget>
 <resources/>
 <connections/>
</ui>
传参
from functools import partial
ui.pushButton.clicked.connect(partial(convert, ui))
将ui文件转化成Python代码
pyuic5 -o xxx.py xxx.ui
在pycharm中配置pyuic5

program:    E:pythonenvpython37Scriptspyuic5.exe   #pyuic5的路径
arguments:  $FileName$ -o $FileNameWithoutExtension$.py -x  #照填
working directory:    $FileDir$
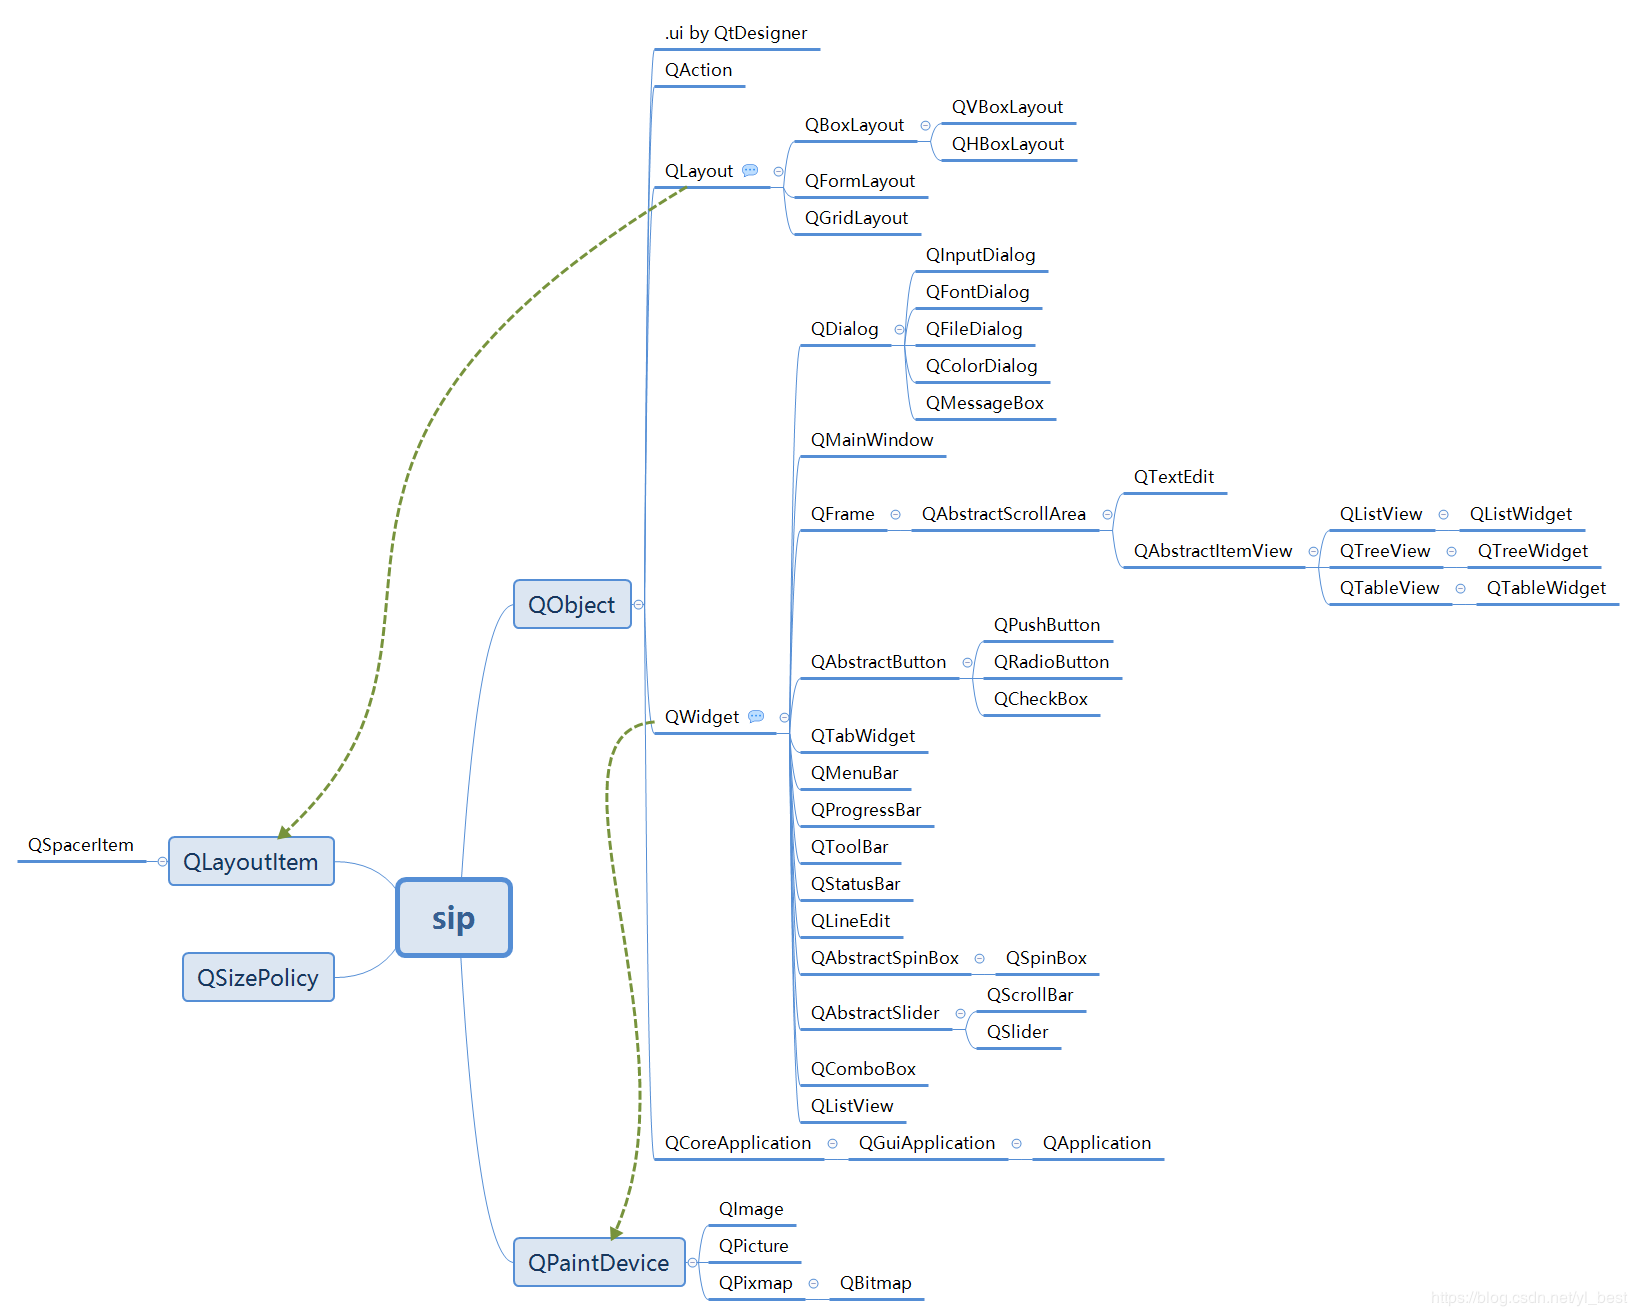
控件介绍和总结


主窗口类型

有三种窗口

QMainWindow

QWiget

QDialog


QMainWindow:可以包含菜单栏,工具栏和标题栏,是

最常见的窗口显示形式。

QDialog:是对话窗口的基类。没有菜单栏,工具栏,状态栏

QWiget:不确定窗口的用途,就用QWidget。

## QT中常用的控价

### 1、Qlabel控件

setAlignment()     设置文本的对齐方式

setIndent()           设置文本的缩进

text()                     获取文本

setBuddy()          设置伙伴关系

setText()              设置文本内容

selectedText()    返回所选择的字符

setWordWrap()  设置是否运行换行

#### QLabel常用的信号

1.当鼠标划过Qlabel控件时触发:linkHovered

2.当鼠标单击Qlabel控件时触发:linkActivated


#### QLabel与伙伴控件


### 2、QLineEdit控件与回显模式

基本功能:输入单行的文本

#### EchoMode(回显模式)

4种回显模式

1、Normal

2、NoEcho

3、Password

4、PasswordEchoOnEdit


#### QLineEdit控件的输入(校验器)

如限制只能输入整数,浮点数或者满足一定条件的字符串

#### 用掩码限制QLineEdit控件的输入

```pyth
用掩码限制QLineEdit控件的输入

A    ASCII字母字符是必须输入的(A-Z、a-z)
a    ASCII字母字符是允许输入的,但不是必需的(A-Z、a-z)
N    ASCII字母字符是必须输入的(A-Z、a-z、0-9)
n    ASII字母字符是允许输入的,但不是必需的(A-Z、a-z、0-9)
X    任何字符都是必须输入的
x    任何字符都是允许输入的,但不是必需的
9    ASCII数字字符是必须输入的(0-9)
0    ASCII数字字符是允许输入的,但不是必需的(0-9)
D    ASCII数字字符是必须输入的(1-9)
d    ASCII数字字符是允许输入的,但不是必需的(1-9)
#    ASCI数字字符或加减符号是允许输入的,但不是必需的
H    十六进制格式字符是必须输入的(A-F、a-f、0-9)
h    十六进制格式字符是允许输入的,但不是必需的(A-F、a-f、0-9)
B    二进制格式字符是必须输入的(0,1)
b    二进制格式字符是允许输入的,但不是必需的(0,1)
>    所有的字母字符都大写
<    所有的字母字符都小写
!    关闭大小写转换
    使用""转义上面列出的字符
```

#### QLineEdit综合案例

### 3、QTextEdit控件

QLineEdit控件只支持单行输入,QTextEdit支持多行输入

1.setPlainText() #设置文本

2.setHtml()   #设置html格式

3.toPlainText() #

4.toHtml

### 4、按键控件

1.QPushButton

2.AToolButton

3.QRadioButton

4.QCheckBox

父类都是QAbstractButton
#### 单选控件 QReadioButton
一个布局中只能又一个单选框被选中
方法toggled相当于选中和取消选中。现在QPushButton的toggle的方法类似,按下不会弹起

#### 复选框控件 QCheckBox
三种状态:
1、为选中0
2、半选中1
3、选中2
stateChanged 是状态变化,点击时触发
setTristate 是半选中状态
ischecked() 是查看是否选中:True 、False
ischeckState() 查看选中的状态:0、1、2
setchecked(True) 设置是否选择
setcheckState()  设置选择的状态
#自己编写的QT主界面,使用类的方式 import sys, math from functools import partial import time from PyQt5.QtWidgets import QDesktopWidget, QMainWindow, QApplication, QPushButton, QHBoxLayout, QVBoxLayout, QGridLayout,QFormLayout, QWidget, QToolTip, QLabel, QLineEdit, QTextEdit, QRadioButton, QCheckBox, QComboBox, QSlider, QSpinBox, QDialog, QMessageBox, QFontDialog, QColorDialog, QFileDialog from PyQt5.QtGui import QIcon, QFont, QPalette, QPixmap, QIntValidator, QDoubleValidator, QRegExpValidator, QPainter, QColor, QPen from PyQt5.QtCore import Qt, QRect, QRegExp, QDir class Ui_MainWin(QMainWindow): def __init__(self): super().__init__() #设置主窗口的标题 self.setWindowTitle('窗口的标题') #设置窗口的尺寸 self.resize(400, 300) #窗口出现的位置 #1.自定义出现在中心位置 self.center() #2.设置位置为(800,300) # self.move(800,300) #设置状态栏 # self.status_hurdle() #窗口的setWindowIcon方法用于设置窗口的图标和应用程序的图标,在苹果机不可用 #QAplication中的setWindowIcon方法用户设置主窗口的图标和应用程序的图标 self.setWindowIcon(QIcon('images/cartoon1.ico')) #设置按键 # self.button_model() # QLabel控件 # self.qlabel() #QLabel与伙伴控件 # self.qlabel_partner() #QLineEdit回显模式 # self.qline_edit() #QLineEedit校验器 # self.qline_edit_validator() #QlineEedit掩码 # self.qline_edit_mask() #QlineEdit总的应用 # self.qline_edit_demo() #QTextEdit控件的使用 # self.qtext_edit() #QPushButton的综合使用 # self.qpush_button_demo() #单选框 # self.qradio_button() #复选框 # self.qcheck_box() #下拉列表的控件 # self.qcombobox() #滑动控件 # self.qslider_demo() #计数器控件 # self.qspinbox_demo() #对话框,QDialog控件 # self.qdialog_demo() #消息对话框,QMessageBox # self.qmessagebox_demo() #字体对话框 # self.qfontdialog_demo() #颜色对话框 # self.qcolordialog_demo() #文件对话框QFileDialog # self.qfiledialog() #绘制文本 self.text = "Python从菜鸟到高手" #设置窗口在屏幕的中心 def center(self): #获取屏幕坐标系 screen = QDesktopWidget().screenGeometry() #获取窗口的坐标系 size = self.geometry() newLeft = (screen.width()-size.width())/2 newTop = (screen.height()-size.height())/2 self.move(newLeft, newTop) def status_hurdle(self): # 设置状态栏 self.status = self.statusBar() self.status.showMessage('只存在5秒的消息', 5000) #设置按键 def button_model(self): # 设置按键 self.button1 = QPushButton("退出") # 给按键绑定提示信息 QToolTip.setFont(QFont("SanSerif", 12)) self.button1.setToolTip('<b>按下就退出了</b>') # 将信号与槽绑定 self.button1.clicked.connect(self.onClick_Button) # 添加布局 layout = QHBoxLayout(self) layout.addWidget(self.button1) # 总的组件,添加的所有组件全部都要放在这个里面 mainFrame = QWidget() # 把布局添加总的组件内 mainFrame.setLayout(layout) # 最后把总的组件放在整个窗口上 self.setCentralWidget(mainFrame) ''' # 创建按键的第二种方式 self.button2 = QPushButton(mainFrame) self.button2.setText('按键的第二种方式') self.button2.clicked.connect(self.onClick_Button) self.button2.move(25, 52) # 最后把总的组件放在整个窗口上 self.setCentralWidget(mainFrame) ''' # 按键单击事件的方法(自定义槽) def onClick_Button(self): sender = self.sender() print(sender.text() + '按键被按下') app = QApplication.instance() # 退出 app.quit() def qlabel(self): ''' 这个label组件不需要加入总的组件中去,直接可以调用 :return: ''' label1 = QLabel(self) label2 = QLabel(self) label3 = QLabel(self) label4 = QLabel(self) label1.setText("<font color=yellow>这是一个文本标签.</font>") #开启背景颜色 label1.setAutoFillBackground(True) palette = QPalette() #调色板 palette.setColor(QPalette.Window, Qt.blue) #选中蓝色 label1.setPalette(palette) #设置背景颜色 label1.setAlignment(Qt.AlignCenter) #中心对齐 label1.setGeometry(QRect(230, 242, 151, 20)) label2.setText("<a href='#'>欢迎使用Python GUI程序</a>") label2.setGeometry(QRect(210, 210, 151, 20)) label3.setAlignment(Qt.AlignCenter) label3.setToolTip("这是一个图片标签") label3.setPixmap(QPixmap("./images/python.jpg")) label3.setGeometry(QRect(0, 0, 200, 200)) #如果设置为True,用浏览器打开网页,如果设置False,如果调用了槽,就执行槽,二选择一 label4.setOpenExternalLinks(True) label4.setText("<a href='https://www.baidu.com'>百度首页</a>") label4.setAlignment(Qt.AlignRight) label4.setToolTip('这是一个超链接') #加入垂直布局中 vbox = QVBoxLayout() vbox.addWidget(label1) vbox.addWidget(label2) vbox.addWidget(label3) vbox.addWidget(label4) #绑定槽 label2.linkHovered.connect(self.linkHovered) label4.linkActivated.connect(self.linkCilcked) # 加入layout中 self.setLayout(vbox) def linkHovered(self): print('当鼠标滑动过label2标签时,触发事件') def linkCilcked(self): print("当鼠标单击label4标签时,触发事件") #Qlabel与伙伴控件 def qlabel_partner(self): nameLabel = QLabel('&Nmae', self) nameLineEdit = QLineEdit(self) #设置伙伴控件 nameLabel.setBuddy(nameLineEdit) passwordLabel = QLabel('&Password', self) passwordLineEdit = QLineEdit(self) #设置伙伴控件 passwordLabel.setBuddy(passwordLineEdit) btnOK = QPushButton('&OK') btnCancel = QPushButton('&Cancel') #栅格布局 mainLayout = QGridLayout(self) mainLayout.addWidget(nameLabel, 0, 0) mainLayout.addWidget(nameLineEdit, 0, 1, 1, 1) mainLayout.addWidget(passwordLabel, 1, 0) mainLayout.addWidget(passwordLineEdit, 1, 1, 1, 1) mainLayout.addWidget(btnOK, 2, 0, 1, 1) mainLayout.addWidget(btnCancel, 2, 1, 1, 1) mainLayout.setGeometry(QRect(0, 0, 300, 300)) mainFrame = QWidget() # 把布局添加总的组件内 mainFrame.setLayout(mainLayout) # 最后把总的组件放在整个窗口上 self.setCentralWidget(mainFrame) #QLineEdit回显模式 def qline_edit(self): line_edit1 = QLineEdit() line_edit2 = QLineEdit() line_edit3 = QLineEdit() line_edit4 = QLineEdit() #form布局 formLayout = QFormLayout() formLayout.addRow("Normal", line_edit1) formLayout.addRow("NoEcho", line_edit2) formLayout.addRow("Password", line_edit3) formLayout.addRow("PasswordEchoOnEdit", line_edit4) #palcehodertext line_edit1.setPlaceholderText("Normal") line_edit2.setPlaceholderText("NoEcho") line_edit3.setPlaceholderText("Password") line_edit4.setPlaceholderText("PasswordEchoOnEdit") # QLineEdit的四种模式 line_edit1.setEchoMode(QLineEdit.Normal) line_edit2.setEchoMode(QLineEdit.NoEcho) line_edit3.setEchoMode(QLineEdit.Password) line_edit4.setEchoMode(QLineEdit.PasswordEchoOnEdit) #设置出现的位置和大小 formLayout.setGeometry(QRect(0, 0, 300, 300)) mainFrame = QWidget() # 把布局添加总的组件内 mainFrame.setLayout(formLayout) # 最后把总的组件放在整个窗口上 self.setCentralWidget(mainFrame) #QLineEdit校验器 def qline_edit_validator(self): line_edit1 = QLineEdit() line_edit2 = QLineEdit() line_edit3 = QLineEdit() #创建form类表单 formlayout = QFormLayout() formlayout.addRow('整数类型', line_edit1) formlayout.addRow('浮点类型', line_edit2) formlayout.addRow('数字和字母', line_edit3) #palceholderText line_edit1.setPlaceholderText('整型') line_edit2.setPlaceholderText('浮点型') line_edit3.setPlaceholderText('字母和数字') #整数校验器[1,99] intvalidator = QIntValidator(self) intvalidator.setRange(1, 99) #浮点校验器[-360,360],精度,小数点后2位 douleValidator = QDoubleValidator(self) douleValidator.setRange(-360, 360) douleValidator.setNotation(QDoubleValidator.StandardNotation) #设置精度,小数点2位 douleValidator.setDecimals(2) #字符串和数字 reg = QRegExp("[a-zA-Z0-9]+$") validator = QRegExpValidator(self) validator.setRegExp(reg) #设置校验器 line_edit1.setValidator(intvalidator) line_edit2.setValidator(douleValidator) line_edit3.setValidator(validator) mainFrame = QWidget() # 把布局添加总的组件内 mainFrame.setLayout(formlayout) # 最后把总的组件放在整个窗口上 self.setCentralWidget(mainFrame) #QLineEdit掩码 def qline_edit_mask(self): line_edit1 = QLineEdit() line_edit2 = QLineEdit() line_edit3 = QLineEdit() line_edit4 = QLineEdit() #192.168.21.45 line_edit1.setInputMask('0000.0000.000.0000;_') #mask line_edit2.setInputMask('HH:HH:HH:HH;_') #日期 line_edit3.setInputMask('0000-00-00') #字母全部为大写 line_edit4.setInputMask('>AAAA-AAAA-AAAA-AAAA;#') # form布局 formlayout = QFormLayout() formlayout.addRow('IP', line_edit1) formlayout.addRow('MASK', line_edit2) formlayout.addRow('日期', line_edit3) formlayout.addRow('许可证', line_edit4) mainFrame = QWidget() # 把布局添加总的组件内 mainFrame.setLayout(formlayout) # 最后把总的组件放在整个窗口上 self.setCentralWidget(mainFrame) #QLineEdit 综合模式 def qline_edit_demo(self): #校验器 line_edit1 = QLineEdit(self) line_edit1.setValidator(QIntValidator()) line_edit1.setMaxLength(4) #不超过9999 line_edit1.setAlignment(Qt.AlignRight) #有对齐 line_edit1.setFont(QFont('Arial', 20)) #设置字体 #掩码 line_edit2 = QLineEdit(self) line_edit2.setInputMask('99_9999_999999;#') line_edit3 = QLineEdit(self) line_edit3.setValidator(QDoubleValidator(0.99,99.99,2)) line_edit4 = QLineEdit(self) line_edit4.textChanged.connect(self.textChanged) #内容改变的时候触发 line_edit5 = QLineEdit(self) line_edit5.setEchoMode(QLineEdit.Password) line_edit5.editingFinished.connect(self.enterPress) #按下Enter键时触发 line_edit6 = QLineEdit('Hello PyQt5') line_edit6.setReadOnly(True) #设置为只读模式 formlayout = QFormLayout() formlayout.addRow('整数校验', line_edit1) formlayout.addRow('浮点数校验', line_edit2) formlayout.addRow('Input Mask', line_edit3) formlayout.addRow('文本变化', line_edit4) formlayout.addRow('密码', line_edit5) formlayout.addRow('只读', line_edit6) mainFrame = QWidget() # 把布局添加总的组件内 mainFrame.setLayout(formlayout) # 最后把总的组件放在整个窗口上 self.setCentralWidget(mainFrame) def textChanged(self, text): print('输入的内容:' + text) def enterPress(self): print('已输入值') #QTextEdit控件 def qtext_edit(self): self.text_edit1 = QTextEdit(self) button1 = QPushButton('显示文本') button2 = QPushButton('显示HTML') button3 = QPushButton('获取文本') button4 = QPushButton('获取HTML') layout = QVBoxLayout() layout.addWidget(self.text_edit1) layout.addWidget(button1) layout.addWidget(button2) layout.addWidget(button3) layout.addWidget(button4) button1.clicked.connect(self.onclick_buttontext) button2.clicked.connect(self.onclick_buttonhtml) button3.clicked.connect(self.onclick_buttongotext) button4.clicked.connect(self.onclick_buttongohtml) mainFrame = QWidget() # 把布局添加总的组件内 mainFrame.setLayout(layout) # 最后把总的组件放在整个窗口上 self.setCentralWidget(mainFrame) def onclick_buttontext(self): self.text_edit1.setPlainText('Hello World, 世界 ') def onclick_buttonhtml(self): self.text_edit1.setHtml('<font color=blue size-5>Hello World, 世界</font> ') def onclick_buttongotext(self): print(self.text_edit1.toPlainText()) def onclick_buttongohtml(self): print(self.text_edit1.toHtml()) #qpushbutton的综合应用 def qpush_button_demo(self): layout = QVBoxLayout() self.button_demo1 = QPushButton('第一个按键') self.button_demo1.setText('First Button1') #第一个按键文本不生效 #下面两个是使按键按下不会弹起和qreadiobutton类似 self.button_demo1.setCheckable(True) self.button_demo1.toggle() #槽带参数的第二种方法 # self.button_demo1.clicked.connect(lambda: self.whichBUtton(self.button_demo1)) #槽带参数的第一种方法 self.button_demo1.clicked.connect(partial(self.whichButton, self.button_demo1)) #按键绑定第二个槽 self.button_demo1.clicked.connect(self.buttonState) layout.addWidget(self.button_demo1) self.button_demo2 = QPushButton('图像按键') self.button_demo2.setIcon(QIcon(QPixmap('images/right3.png'))) self.button_demo2.clicked.connect(lambda: self.whichButton(self.button_demo2)) layout.addWidget(self.button_demo2) self.button_demo3 = QPushButton('不可用按键') #状态为False表示不可点击 self.button_demo3.setEnabled(False) layout.addWidget(self.button_demo3) self.button_demo4 = QPushButton('&MyButton') #单按Enter点击的是默认按键 self.button_demo4.setDefault(True) self.button_demo4.clicked.connect(lambda: self.whichButton(self.button_demo4)) layout.addWidget(self.button_demo4) mainFrame = QWidget() # 把布局添加总的组件内 mainFrame.setLayout(layout) # 最后把总的组件放在整个窗口上 self.setCentralWidget(mainFrame) def whichButton(self, btn): print('被单击的按钮是<' + btn.text() + '>') def buttonState(self): if self.button_demo1.isChecked(): print('按钮1已经被选中') else: print('按钮1未被选中') #单选框,QRadioButton def qradio_button(self): #一个布局中只能又一被选中 layout = QHBoxLayout() radio_button1 = QRadioButton('单选按钮1') radio_button1.setCheckable(True) radio_button1.toggled.connect(self.qradio_buttonstate) layout.addWidget(radio_button1) radio_button2 = QRadioButton('单选按钮2') radio_button2.toggled.connect(self.qradio_buttonstate) layout.addWidget(radio_button2) mainFrame = QWidget() # 把布局添加总的组件内 mainFrame.setLayout(layout) # 最后把总的组件放在整个窗口上 self.setCentralWidget(mainFrame) #单选按钮信号绑定的槽 def qradio_buttonstate(self): #信号的发送者,相当于按键本身 radiobutton = self.sender() if radiobutton.isChecked() == True: print('<' + radiobutton.text() + '> 被选中') else: print('<' + radiobutton.text() + '> 被取消选中状态' ) #复选框 def qcheck_box(self): layout = QHBoxLayout() self.check_box1 = QCheckBox('复选框1') #设置为选中的状态 self.check_box1.setChecked(True) #改变选中状态的时候触发这个方法 self.check_box1.stateChanged.connect(partial(self.check_boxstate, self.check_box1)) layout.addWidget(self.check_box1) self.check_box2 = QCheckBox('复选框2') self.check_box2.stateChanged.connect(partial(self.check_boxstate, self.check_box2)) layout.addWidget(self.check_box2) self.check_box3 = QCheckBox('半选中') self.check_box3.stateChanged.connect(partial(self.check_boxstate, self.check_box3)) #设置复选框状态可以为是半选的状态 self.check_box3.setTristate(True) self.check_box3.setCheckState(Qt.PartiallyChecked) layout.addWidget(self.check_box3) mainFrame = QWidget() # 把布局添加总的组件内 mainFrame.setLayout(layout) # 最后把总的组件放在整个窗口上 self.setCentralWidget(mainFrame) #复选框绑定的槽 def check_boxstate(self, cb): print(cb.text() + ', isChecked= ' + str(cb.isChecked()) + ',checkState=' + str(cb.checkState())) #下拉列表 def qcombobox(self): layout = QVBoxLayout() self.combo_label = QLabel('请选择编程语言') self.combobox = QComboBox() self.combobox.addItem('c++') self.combobox.addItem('python') self.combobox.addItems(['java', 'C', 'Ruby']) #当QComboBox的索引发生变化的时候触发此方法, self.combobox.currentIndexChanged.connect(self.combox_selectionchange) layout.addWidget(self.combo_label) layout.addWidget(self.combobox) mainFrame = QWidget() # 把布局添加总的组件内 mainFrame.setLayout(layout) # 最后把总的组件放在整个窗口上 self.setCentralWidget(mainFrame) #下拉列表的槽 def combox_selectionchange(self, i): self.combo_label.setText(self.combobox.currentText()) #根据文本自动调节大小 self.combo_label.adjustSize() for count in range(self.combobox.count()): #当前索引的文本 print('item ' + str(count) + '=' + self.combobox.itemText(count)) #当前显示的文本 print('current index',i, 'selection changed', self.combobox.currentText()) #滑块控件 def qslider_demo(self): layout = QVBoxLayout() self.slider_label = QLabel('你好 PyQt5') self.slider_label.setAlignment(Qt.AlignHCenter) layout.addWidget(self.slider_label) #滑块水平 self.slider = QSlider(Qt.Horizontal) #设置最小值 self.slider.setMinimum(12) self.slider.setMaximum(48) #步长 self.slider.setSingleStep(3) #设置当前值 self.slider.setValue(18) #设置刻度的位置,刻度在下方 self.slider.setTickPosition(QSlider.TicksBelow) #设置刻度的间隔 self.slider.setTickInterval(6) #设置信号,绑定槽,当滑块的值发生变化时触发 self.slider.valueChanged.connect(self.qlider_valuechange) layout.addWidget(self.slider) #垂直布局 self.slider1 = QSlider(Qt.Vertical) layout.addWidget(self.slider1) # 设置最小值 self.slider1.setMinimum(10) # 设置最大值 self.slider1.setMaximum(60) # 步长 self.slider1.setSingleStep(5) # 设置当前值 self.slider1.setValue(30) # 设置刻度的位置,刻度在下方 self.slider1.setTickPosition(QSlider.TicksLeft) # 设置刻度的间隔 self.slider1.setTickInterval(2) self.slider1.valueChanged.connect(self.qlider_valuechange) self.setLayout(layout) mainFrame = QWidget() # 把布局添加总的组件内 mainFrame.setLayout(layout) # 最后把总的组件放在整个窗口上 self.setCentralWidget(mainFrame) #滑动槽位 def qlider_valuechange(self): #使用sender()来接受信号 print('当前值:%s' % self.sender().value()) value = self.sender().value() self.slider_label.setFont(QFont('Arial', value)) #计数器控件 def qspinbox_demo(self): layout = QVBoxLayout() self.spinbox_label = QLabel('当前值') self.spinbox_label.setAlignment(Qt.AlignCenter) layout.addWidget(self.spinbox_label) self.spinbox = QSpinBox() #设置初始值 self.spinbox.setValue(18) #设置范围 self.spinbox.setRange(10, 38) #设置步调 self.spinbox.setSingleStep(3) #计数器控件的值发生变化时触发此信号 self.spinbox.valueChanged.connect(self.spinbox_valuechange) layout.addWidget(self.spinbox) mainFrame = QWidget() # 把布局添加总的组件内 mainFrame.setLayout(layout) # 最后把总的组件放在整个窗口上 self.setCentralWidget(mainFrame) def spinbox_valuechange(self): self.spinbox_label.setText('当前值:' + str(self.spinbox.value())) # 对话框控件QDialog def qdialog_demo(self): #加self和不加self的区别,加self相当于是把QMina主窗口传入button中, # 后面就不需要在加入到主窗口中,和下面的在dialog中加按键类似 self.dialog_button = QPushButton('弹出对话框', self) self.dialog_button.move(50, 50) self.dialog_button.clicked.connect(self.dialog_showdialog) #对话框QDialog的槽 def dialog_showdialog(self): dialog = QDialog() #这样创建直接按键传到对话框的主控件上,后边不需要再加 button = QPushButton('确定', dialog) button.move(50, 50) #设置对话框的标题 dialog.setWindowTitle('对话框') #设置只有关闭此操作时候才能继续操作其他的控件 dialog.setWindowModality(Qt.ApplicationModal) dialog.exec_() #消息对话框控件QMessageBox def qmessagebox_demo(self): layout = QVBoxLayout() self.messagebox_button1 = QPushButton('关于对话框') self.messagebox_button1.clicked.connect(self.message_show) layout.addWidget(self.messagebox_button1) self.messagebox_button2 = QPushButton('消息对话框') self.messagebox_button2.clicked.connect(self.message_show) layout.addWidget(self.messagebox_button2) self.messagebox_button3 = QPushButton('警告对话框') self.messagebox_button3.clicked.connect(self.message_show) layout.addWidget(self.messagebox_button3) self.messagebox_button4 = QPushButton('错误对话框') self.messagebox_button4.clicked.connect(self.message_show) layout.addWidget(self.messagebox_button4) self.messagebox_button5 = QPushButton('提问对话框') self.messagebox_button5.clicked.connect(self.message_show) layout.addWidget(self.messagebox_button5) mainFrame = QWidget() # 把布局添加总的组件内 mainFrame.setLayout(layout) # 最后把总的组件放在整个窗口上 self.setCentralWidget(mainFrame) def message_show(self): text = self.sender().text() print(text) if text == '关于对话框': QMessageBox.about(self, '关于', '这是一个关于对话框') elif text == '消息对话框': reply = QMessageBox.information(self, '消息', '这是一个消息对话框', QMessageBox.Yes | QMessageBox.No, QMessageBox.Yes) print(reply == QMessageBox.Yes) elif text == '警告对话框': QMessageBox.warning(self, '警告', '这是一个警告对话框', QMessageBox.Yes | QMessageBox.No, QMessageBox.Yes) elif text == '错误对话框': QMessageBox.critical(self, '警告', '这是一个警告对话框', QMessageBox.Yes | QMessageBox.No, QMessageBox.Yes) elif text == '提问对话框': QMessageBox.question(self, '警告', '这是一个警告对话框', QMessageBox.Yes | QMessageBox.No, QMessageBox.Yes) #字体对话框QFontDialog def qfontdialog_demo(self): layout = QVBoxLayout() self.fontdialog_button = QPushButton('选择字体') self.fontdialog_button.clicked.connect(self.fontdialog_getfont) layout.addWidget(self.fontdialog_button) self.fontdialog_label = QLabel('Hello, 测试字体') layout.addWidget(self.fontdialog_label) mainFrame = QWidget() # 把布局添加总的组件内 mainFrame.setLayout(layout) # 最后把总的组件放在整个窗口上 self.setCentralWidget(mainFrame) #字体对话框的槽 def fontdialog_getfont(self): font, ok = QFontDialog.getFont() if ok: self.fontdialog_label.setFont(font) #颜色对话框QColorDialog def qcolordialog_demo(self): layout = QVBoxLayout() self.color_button1 = QPushButton('设置颜色') self.color_button1.clicked.connect(self.color_getcolor) layout.addWidget(self.color_button1) self.color_button2 = QPushButton('设置背景色') self.color_button2.clicked.connect(self.color_getbgcolor) layout.addWidget(self.color_button2) self.color_label = QLabel('Hello, 测试颜色的例子') layout.addWidget(self.color_label) mainFrame = QWidget() # 把布局添加总的组件内 mainFrame.setLayout(layout) # 最后把总的组件放在整个窗口上 self.setCentralWidget(mainFrame) #颜色对话框的槽 def color_getcolor(self): color = QColorDialog.getColor() p = QPalette() #调出调色板 #给字体调色 p.setColor(QPalette.WindowText, color) self.color_label.setPalette(p) #背景颜色对话框的槽 def color_getbgcolor(self): color = QColorDialog.getColor() p = QPalette() p.setColor(QPalette.Window, color) #允许设置背景颜色 self.color_label.setAutoFillBackground(True) self.color_label.setPalette(p) #文件对话框QFileDialog def qfiledialog(self): layout = QVBoxLayout() self.file_button1 = QPushButton('加载图片') self.file_button1.clicked.connect(self.loadImage) layout.addWidget(self.file_button1) self.imageLabel = QLabel() layout.addWidget(self.imageLabel) self.file_button2 = QPushButton('加载文本文件') self.file_button2.clicked.connect(self.loadText) layout.addWidget(self.file_button2) self.file_contents = QTextEdit() layout.addWidget(self.file_contents) mainFrame = QWidget() # 把布局添加总的组件内 mainFrame.setLayout(layout) # 最后把总的组件放在整个窗口上 self.setCentralWidget(mainFrame) def loadImage(self): fname, _ = QFileDialog.getOpenFileName(self, '打开文件', '.', '图像文件(*.jpg *.png)') self.imageLabel.setPixmap(QPixmap(fname)) #加载文本有点问题!!!!!! def loadText(self): dialog = QFileDialog() dialog.setFileMode(QFileDialog.AnyFile) dialog.setFilter(QDir.Files) if dialog.exec(): filenames = dialog.selectedFiles() f = open(filenames[0], encoding='utf-8', mode='r') with f: data = f.read() print(data) self.file_contents.setText(data) #绘图QPainter,继承QWdget组件 def paintEvent(self, event): pass # painter = QPainter(self) # painter.begin(self) # painter.setPen(QColor(150, 43, 5)) # painter.setFont(QFont('SimSun', 25)) # # painter.drawText(event.rect(), Qt.AlignCenter, self.text) # painter.end() #绘制正弦曲线,继承QWdget组件 def paintEvent(self, event): pass # painter = QPainter() # painter.begin(self) # painter.setPen(Qt.blue) # size = self.size() # # for i in range(1000): # x = 100 * (-1 + 2.0 * i / 1000) + size.width() / 2.0 # y = -50 * math.sin((x - size.width() / 2.0) * math.pi / 50) + size.height() / 2.0 # painter.drawPoint(x, y) #绘制不同的直线,继承QWiget组件的paintEvent方法 def paintEvent(self, event): painter = QPainter() painter.begin(self) pen = QPen(Qt.red, 3, Qt.SolidLine) painter.setPen(pen) painter.drawLine(20, 40, 250, 40) pen.setStyle(Qt.DashLine) painter.setPen(pen) painter.drawLine(20, 80, 250, 80) pen.setStyle(Qt.DashDotDotLine) painter.setPen(pen) painter.drawLine(20, 120, 250, 120) pen.setStyle(Qt.DotLine) painter.setPen(pen) painter.drawLine(20, 160, 250, 160) pen.setStyle(Qt.DashDotDotLine) painter.setPen(pen) painter.drawLine(20, 200, 250, 200) pen.setStyle(Qt.CustomDashLine) pen.setDashPattern([1, 10, 5, 8]) painter.setPen(pen) painter.drawLine(20, 240, 250, 240) size = self.size() painter.end() if __name__ == '__main__': app = QApplication(sys.argv) # app.setWindowIcon(QIcon('images/cartoon1.ico')) ui = Ui_MainWin() ui.show() sys.exit(app.exec_())
git 地址https://gitee.com/wuzhibin112423/QT5/tree/master
线上文档https://doc.qt.io/qt-5/classes.html
csdn 地址 https://blog.csdn.net/La_vie_est_belle/article/details/82316745