在微服务架构的系统中, 我们通常会使用轻量级的消息代理来构建 一 个共用的消息主题让系统中所有微服务实例都连接上来, 由于该主题中产生的消息会被所有实例监听和消费, 所以我们称它为消息总线。 在总线上的各个实例都可以方便地广播 一 些需要让其他连接在该主题上的实例都知道的消息, 例如配置信息的变更或者其他 一 些管理操作等。
由于消息总线在微服务架构系统中被广泛使用, 所以它同配置中心 一 样, 几乎是微服务架构中的必备组件。 Spring Cloud 作为微服务架构综合性的解决方案,对此自然也有自己的实现。 通过使用 Spring Cloud Bus,可以非常容易地搭建起消息总线, 同时实现了 一 些消息总线中的常用功能, 比如, 配合Spring Cloud Config 实现微服务应用配置信息的动态更新等。
消息代理:
消息代理 (Message Broker) 是 一 种消息验证、 传输、 路由的架构模式。 它在应用程序之间起到通信调度并最小化应用之间的依赖的作用, 使得应用程序可以高效地解耦通信过程。 消息代理是 一 个中间件产品, 它的核心是 一 个消息的路由程序, 用来实现接收和分发消息, 并根据设定好的消息处理流来转发给正确的应用。 它包括独立的通信和消息传递协议, 能够实现组织内部和组织间的网络通信。 设计代理的目的就是为了能够从应用程序中传入消息, 并执行 一 些特别的操作, 下面这些是在企业应用中, 我们经常需要使用消息代理的场景:
- 将消息路由到 一 个或多个目的地。
- 消息转化为其他的表现方式。
- 执行消息的聚集、 消息的分解, 并将结果发送到它们的目的地, 然后重新组合响应返回给消息用户。
- 调用Web服务来检索数据。
- 响应事件或错误。
- 使用发布-订阅模式来提供内容或基于主题的消息路由。
RabbitMQ实现消息总线整合Spring Cloud Bus:
关于 RabbitMQ 的安装及使用等请查阅 https://www.cnblogs.com/wuzhenzhao/category/1528254.html。
接下去我们就基于 spring-cloud-config-server分布式配置中心 的服务端及客户端的Demo工程来整合消息总线。
1.将服务端及客户端都注册到Eureka集群中。
2.修改客户端的依赖,添加以下依赖:
<dependency>
    <groupId>org.springframework.boot</groupId>
    <artifactId>spring-boot-starter-actuator</artifactId>
</dependency>
<dependency>
    <groupId>org.springframework.cloud</groupId>
    <artifactId>spring-cloud-starter-bus-amqp</artifactId>
</dependency>
3.在配置文件中增加关于RabbitMQ的连接和用户信息。
spring.rabbitmq.host = 192.168.1.101
spring.rabbitmq.username = guest
spring.rabbitmq.password = guest
spring.rabbitmq.port = 5672
eureka.client.service-url.defaultZone = http://localhost:7001/eureka/,http://localhost:7002/eureka/
# actuator
management.endpoints.web.exposure.include = *
4.在配置的需要刷新的属性对应的类上添加注解@RefreshScope
启动 config-server, 再启动两个config客户端。我们可以在 config客户端中的控制台中看到如下内容, 在启动时, 客户端程序多了一个 /actuator/bus-refresh 请求。

- 先访问两个 config 客户端的/hello请求, 会返回当前config的 foo属性。
- 接着,修改GitHub上面config-test.properties中的foo属性值,并发送POST请求到 localhost:8889/actuator/bus-refresh 。
- 最后, 再访问两个config 客户端的/hello请求,此时均会返回最新的 foo属性。
到这里, 我们已经能够通过SpringCloud Bus来实时更新总线上的属性配置了 。
原理分析:
我们通过使用Spring Cloud Bus与Spring Cloud Config的整合, 并以RabbitMQ作为消息代理, 实现了应用配置的动态更新 。假设当前的服务架构如下图所示:
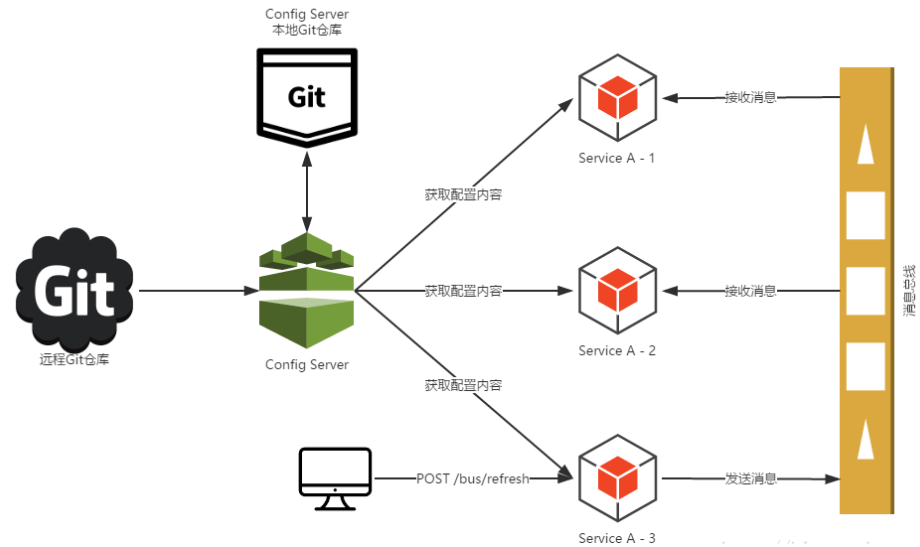
当我们将系统启动起来之后, 图中"Service A"的三个实例会请求ConfigServer以 获取配置信息, ConfigServer根据应用配置的规则从Git仓库中获取配置信息并返回。此时,通过Git管理工具去仓库中修改对应的属性值,但是这个修改并不会触发"Service A"实例的属性更新。我们向"Service A"的实例3发送POST请求, 访问 /actuator/bus-refresh接口。 此时,"Service A"的实例3就会将刷新请求发送到消息总线中, 该消息事件会被"Service A"的实例1和实例2从总线中获取到, 并重新从 ConfigServer中获取它们的配置信息, 从而实现配置信息的动态更新。而从Git仓库中配置的修改到发起/actuator/bus-refresh的POST请求这 一 步可以通过Git仓库的Web Hook来自动触发。 由于所有连接到消息总线上的应用都会接收到更新请求,所以在 Web Hook中就不需要维护所有节点内容来进行更新, 从而解决了仅通过Web Hook来逐个进行刷新的问题。
指定刷新范围:
在上面的例子中,我们通过向服务实例 请求SpringCloud Bus的/actuator/bus-refresh接口,从而触发 总线上其他服务实例的/refresh。 但是在一 些特殊场景下, 我们希望可以刷新微服务中某个具体实例的配置。Spring Cloud Bus 对这种场景也有很好的支待,/actuator/bus-refresh 接口提供了一 个destinatin参数, 用来定位具体要 刷新的应用程序。在启动信息中库看到:

比如, 我们可以请 求/actuator/bus-refresh?destination = customers:9000, 此时总线上的各应用实例会根据destination属性的值来判断是否为自己的实例名, 若符合才进行配置刷新, 若不符合就忽略该消息。关于应用的实例名,它的默认命名按此规则生成: ${spring.cloud.client.hostname}:${spring.application.name}:${spring.application.instance-id:${server.port}}。destination参数除了可以定位具体的实例之外, 还可以用来定位具体的服务。 定位服务的原理是通过使用 Spring的PathMatecher (路径匹配)来实现的, 比如/actuator/bus-refresh?destination = customers:**, 该请求会触发 customers服务的所有实例进行刷新。
既然SpringCloud Bus的 /actuator/bus-refresh接口提供了针对服务和实例进行配置更新的参数, 那么我们的架构也可以相应做出一 些调整。 在之前的架构中, 服务的配置更新需要通过向具体服务中的某个实例发送请求, 再触发对整个服务集群的配置更新。 虽然能实现功能, 但是这样的结果是, 我们指定的应用实例会不同千集群中的其他应用实例, 这样会增加集群内部的复杂度, 不利于将来的运维工作。为解决这类问题我们主要做了以下这些改动:
- 在ConfigServer中也引入SpringCloud Bus, 将配置服务端也加入到消息总线中来。
- /actuator/bus-refresh请求不再发送到具体服务实例上, 而是发送给Config Server, 并通过destination参数来指定需要更新配置的服务或实例。通过上面的改动,我们的服务实例不需要再承担触发配置更新的职责。 同时,对于Git的触发等配置都只需要针对ConfigServer即可, 从而简化了集群上的 一 些维护工作。
Kafka实现消息总线:
Spring Cloud Bus除了支持RabbitMQ的自动化配置之外, 还支持现在被广泛应用的Kafka。关于kafka的安装入门请参考:https://www.cnblogs.com/wuzhenzhao/category/1528269.html
1.若我们要使用Kafka来实现消息总线 时, 只需把spring-cloud-starter-bus-amqp替换成spring-cloud-starter-bus- kafka模块,客户端及服务端都需要添加此依赖
<dependency>
    <groupId>org.springframework.cloud</groupId>
    <artifactId>spring-cloud-starter-bus-kafka</artifactId>
</dependency>
2.客户换及服务端都增加以下配置:
#Kafka的服务端列表 localhost
spring.cloud.stream.kafka.binder.brokers=192.168.1.101
#Kafka服务端的默认端口,当brokers属性中没有配置端口信息时,就会使用这个默认端口 9092
spring.cloud.stream.kafka.binder.defaultBrokerPort = 9092
#Kafka服务端连接的ZooKeeper节点列表    localhost
spring.cloud.stream.kafka.binder.zkNodes = 192.168.1.101
#ZooKeeper节点的默认端口,当zkNodes属性中没有配置端口信息时,就会使用这个默认端口2181
spring.cloud.stream.kafka.binder.defaultZkPort =2181
3.启动服务端/客户端会看到如下信息,那么说明我们的配置没问题:

4.查看 kafka的 topic:可以在 Kafka 中看到已经多了一 个名为springCloudBus 的 Topico

5.可以查看kafka消息存储日志,只要我们向/actuator/bus-refresh请求一次,这里消息就会增加:

由于服务端跟客户端启动的时候我们可以获取到两者的 groupId,所以我们可以通过这个命令查看对应的用户的消费偏移量。具体怎么查看可以参考 https://www.cnblogs.com/wuzhenzhao/p/10137490.html
sh /mysoft/kafka/bin/kafka-console-consumer.sh --topic __consumer_offsets --partition 40 --bootstrap-server 192.168.1.101:9092 --formatter 'kafka.coordinator.group.GroupMetadataManager$OffsetsMessageFormatter'

sh kafka-console-consumer.sh --bootstrap-server 192.168.1.101:9092 --topic springCloudBus --from-beginning
启动对springCloudBus的 消费者控制台来进行观察。启动消费者控制台之后,我们向config-server发送 POST请求: /bus-refresh,此时在控制台中可以看到类似如下的内容:

这个就是消息的具体内容。下面, 我们来详细理解消息中的信息内容。
- type: 消息的事件类型。在上面的例子中,包含了RefreshRemoteApplicationEvent和AckRemoteApplicatuonEvent。其中,RefreshRemoteApplicationEvent事件就是我们用来刷新配置的事件,而AckRemoteApplicationEvent是响应消息已经正确接收的告知消息事件。
- timestamp: 消息的时间戳。
- originService: 消息的来源服务实例。
- destinationService: 消息的目标服务实例。 上面示例中的 "**"代表了总线上的所有服务实例。 如果想要指定服务或是实例, 在之前介绍RabbitMQ实现消息总线时已经提过, 只需要通过使用destination参数来定位具体要刷新的应用实例即可, 比如发起/actuator/bus-refresh?destination = c9onfig-client请求。
- id: 消息的唯 一 标识。
上面的消息内容是RefreshRemoteApplicationEvent和AckRemoteApplicationEvent类型共有的, 下面几个属性是AckRemoteApplicationEvent所特有的,分别表示如下含义。
- ackId:Ack消息对应的消息来源。我们可以看到第 一 条AckRemoteApplicationEvent的 ackid对应了 RefreshRemoteApplicationEvent的id, 说明这条Ack是告知该 RefreshRemoteApplicationEvent事件的消息已经被收到。
- ackDestinationService: Ack 消息的目标服务实例。 可以看到这里使用的是
- destinationService:** , 所以消息总线上所有的实例都会收到该Ack消息。
- event: Ack 消息的来源事件。 可以看到上例中的两个 Ack均来源于刷新 配置的
- RefreshRemoteApplicationEvent 事件, 我们在测试的时候由于启动了两个config-client, 所以有两个实例接收到了配置刷新事件, 同时它们都会返回 一 个Ack消息 。 由于ackDestinationService为 **, 所以两个 config-client都会收到对RefreshRemoteApplicationEvent事件的Ack消息。
源码分析:
通过上面的分析, 我们已经得到了两个非常重要的线索RefreshRemoteApplicationEvent和AckRemoteApplicationEvent。 我们不妨顺着这两个事件类来详细看看Spring Cloud Bus的源码, 以帮助我们理解它的运行机制。顺着RefreshRemoteApplicationEvent和AckRemoteApplicationEvent,我们可以整理出如下的事件关系类图。

可以看到其中RefreshRemoteApplicationEvent和AckRemoteApplicationEvent 这些 我们已经接触过的事件都继承了 RemoteApplicationEvent抽象类, 而RemoteApplicationEvent继承自SpringFramework的ApplicationEvent, 可以断定, SpringCloud Bus也采用了 Spring的事件驱动模型。
Spring 的事件驱动模型中包含了三个基本概念: 事件、 事件监听者和 事件发布者, 如下图所示。

事件: Spring中定义了事件的抽象类ApplicationEvent, 它继承自JDK的EventObject类。从图中我们可以看到,事件包含了两个成员变量:tirnestamp,该字段用千存储事件发生的时间戳, 以及父类中的source , 该字段表示源事件对象。 当我们需要 自定义事件的 时候, 只需要继承ApplicationEvent,比如RernoteApplicationEvent 、RefreshRernoteApplicationEvent等, 可以在自定义 的Event中增加 一 些事件的属性来给事件监听者处理。
事件监听者: Spring 中定义了事件监听者的接口 ApplicationListener, 它继承自 JDK 的EventListener接口, 同时ApplicationListener接口限定了ApplicationEvent子类作为该接口中onApplicationEvent(E event); 函数 的参数。 所以, 每一 个 ApplicationListener 都是针对某个ApplicationEvent子类的监听和处理者。
那么, 事件与监听者是如何关联起来 的呢?我们看下图:

事件发布者: Spring中定义了ApplicationEventPublisher和ApplicationEventMulticaster两个接口用来发布事件。其中ApplicationEventPublisher接口定义了发布事件的函数publishEvent(ApplicationEvent event)和publishEvent(Object event); 而ApplicationEventMulticaster接口中定义了对ApplicationListener的维护操作(比如新增、 移除等)以及将ApplicationEvent多播给可用ApplicationListener的操作。ApplicationEventPublisher的publishEvent实现在AbstractApplicationContext 中, 具体如下:
protected void publishEvent(Object event, @Nullable ResolvableType eventType) {
        Assert.notNull(event, "Event must not be null");// .........
        if (this.earlyApplicationEvents != null) {
            this.earlyApplicationEvents.add(applicationEvent);
        }
        else {
            getApplicationEventMulticaster().multicastEvent(applicationEvent, eventType);
        }
        // ........
}
可以看到, 它最终会调用 ApplicationEventMulticaster的multicastEvent来具体实现发布事件给监听者的操作。 而ApplicationEventMulticaster在Spring的默认实现位于SimpleApplicationEventMulticaster中, 具体如下:
public void multicastEvent(final ApplicationEvent event, @Nullable ResolvableType eventType) {
        ResolvableType type = (eventType != null ? eventType : resolveDefaultEventType(event));
     //
        for (final ApplicationListener<?> listener : getApplicationListeners(event, type)) {
            Executor executor = getTaskExecutor();
            if (executor != null) {
                executor.execute(() -> invokeListener(listener, event));
            }
            else {
                invokeListener(listener, event);
            }
        }
    }
private void doInvokeListener(ApplicationListener listener, ApplicationEvent event) {
        try {
            listener.onApplicationEvent(event);
        }
        catch (ClassCastException ex) {
            String msg = ex.getMessage();
            if (msg == null || matchesClassCastMessage(msg, event.getClass().getName())) {
                // Possibly a lambda-defined listener which we could not resolve the generic event type for
                // -> let's suppress the exception and just log a debug message.
                Log logger = LogFactory.getLog(getClass());
                if (logger.isDebugEnabled()) {
                    logger.debug("Non-matching event type for listener: " + listener, ex);
                }
            }
            else {
                throw ex;
            }
        }
}
SimpleApplicationEventMulticaster 通过遍历维护的 ApplicationListener集合来找到对应 ApplicationEvent 的监听器,然后调用监听器的 onApplicationEvent函数来对具体事件做出处理操作。
Spring Cloud Bus中的事件定义:
在对 Spring 的事件模型有了一 定的理解之后, 下面我们来详细介绍Spring Cloud Bus中的事件定义。 首先, 从 RemoteApplicationEvent抽象类开始:
//Jackson 对多态类型的处理注解, 当进行序列化时,会使用子类的名称作为 type 属性的值, 比如之前示例中的type": "RefreshRernoteApplicationEvent" 。
@JsonTypeInfo(use = JsonTypeInfo.Id.NAME, property = "type")
//序列化的时候忽略 source 属性,source 是 ApplicationEvent 的父类 EventObject 的属性, 用来定义事件的发生源。
@JsonIgnoreProperties("source")
public abstract class RemoteApplicationEvent extends ApplicationEvent {
    private static final Object TRANSIENT_SOURCE = new Object();
    private final String originService;
    private final String destinationService;
    private final String id;
        ......
}
来看看它的属性: originService、 destinationService、 id, 这些内容都可以在 RemoteApplicationEvent 的子类事件消息中找到。再来分别看看 RemoteApplicationEvent 的几个具体实现的事件类。
RefreshRemoteApplicationEvent 事件类, 该事件用于远程刷新应用的配置信息。 它的实现非常简单, 只是继承了 RemoteApplicationEvent, 并没有增加其他内容。从之前的示例中我们也能看到,消息中的内容与 RemoteApplicationEvent 中包含的属性完全 一 致。
AckRemoteApplicationEvent 事件类,该事件用于告知某个事件消息已经被接收, 通过该消息我们可以监控各个事件消息的响应。 从其成员属性中, 我们可以找到之前示例中所总结的, 比 RefreshRemoteApplicationEvent 事件的消息多出的几个属性: ackid、 ackDestinationService 以及 event 。 其中 event成员变量通过泛型限定了必须为 RemoteApplicationEvent 的子类对象, 该定义符合这样的逻辑: Ack 消息肯定有一 个事件源头, 而每 一 个事件都必须继承RemoteApplicationEvent 抽象类,所以 AckRemoteApplicationEvent 的事件源头肯定是 一 个 RemoteApplicationEvent 的子类, 比如示例中的 Ack 消息源头就是 RemoteApplicationEvent 的子类事件: RefreshRemoteApplicationEvent 。
public class AckRemoteApplicationEvent extends RemoteApplicationEvent {

    private final String ackId;
    private final String ackDestinationService;
    private Class<? extends RemoteApplicationEvent> event;
        //......
}
EnvironmentChangeRemoteApplicationEvent事件类, 该事件用于动态更新消息总线上每个节点的 Spring 环境属性。可以看到,该类中定义了一 个Map 类型的成员变量,而接收消息的节点就是根据该 Map 对象中的属性来覆盖本地的 Spring环境属性。
public class EnvironmentChangeRemoteApplicationEvent extends RemoteApplicationEvent {

    private final Map<String, String> values;
        //......
}
SentApplicationEvent事件类,该类的结构和内容与 RemoteApplicationEvent 非常相似, 不同的是: 该类不是抽象 类, 并且多一个成员 Class<? extendsRemoteApplicationEvent> type 。 SentApplicatonEvent 事件较为特殊, 它主要用于发送信号来表示 一 个远程的事件已经在系统中被发送到某些地方了, 从它的继承关系中, 我们可以知道它本身并不是 一 个远程的事件(不是继承自 RemoteApplicationEvent), 所以它不会被发送到消息总线上去, 而是在本地产生(通常是由于响应了某个远程的事件)。由于该事件的远属性能够匹配消费者 AckRemoteApplicationEvent 消息中的ackid, 所以应用程序可以通过监听这个事件来监控远程事件消息的消费情况。
@JsonTypeInfo(use = JsonTypeInfo.Id.NAME, property = "type")
@JsonIgnoreProperties("source")
public class SentApplicationEvent extends ApplicationEvent {

    private static final Object TRANSIENT_SOURCE = new Object();
    private final String originService;
    private final String destinationService;
    private final String id;
    private Class<? extends RemoteApplicationEvent> type;
        //.......
}
Spring Cloud Bus中的事件监听器:
了解了Spring Cloud Bus 中的事件类之后, 我们来看看另外 一 个重要元素: 事件监听器。

其中, RefreshListener 和 EnvironmentChangeListener 都继承了 Spring 事件模型中的监听器接口 ApplicationListener
- RefreshListener :从泛型中我们可以看到该监听器就是针对我们之前所介绍的 RefreshRemoteApplicationEvent 事件的, 其中 onApplicationEvent函 数中调用了ContextRefresher 中的 refresh ()函数进行配置属性的刷新。
- EnvironmentChangeListener :针对 EnvironmentChangeRemoteApplicationEvent 事件的监听类, 在处理类中, 可以看到它从 EnvironmentChangeRemoteApplicationEvent 中获取了之前提到的事件中定义的 Map 对象,然后通过遍历来更新 EnvironmentManager 中的属性内容。
事件跟踪:
还有 一 个与它们都有点不同的 TraceListener 监听器。我们都可以看到该监听器并没有实现 ApplicationListener 接口, 但可以看到这里使用了 @EventListener 注解。 该注解是从 Spring 4.2 开始提供的新功能,通过它可以自动地将函数注册为 一 个 ApplicationListener 的实现。所以在该类中, 实际上等价于实现了两个监听器,一 个监听AckRemoteApplicationEvent事件, 一个监听 SentApplicationEvent 事件。
public class TraceListener {

    private static Log log = LogFactory.getLog(TraceListener.class);

    private HttpTraceRepository repository;

    public TraceListener(HttpTraceRepository repository) {
        this.repository = repository;
    }

    @EventListener
    public void onAck(AckRemoteApplicationEvent event) {
        Map<String, Object> trace = getReceivedTrace(event);
        // FIXME boot 2 this.repository.add(trace);
    }

    @EventListener
    public void onSend(SentApplicationEvent event) {
        Map<String, Object> trace = getSentTrace(event);
        // FIXME boot 2 this.repository.add(trace);
    }

    protected Map<String, Object> getSentTrace(SentApplicationEvent event) {
        Map<String, Object> map = new LinkedHashMap<String, Object>();
        map.put("signal", "spring.cloud.bus.sent");
        map.put("type", event.getType().getSimpleName());
        map.put("id", event.getId());
        map.put("origin", event.getOriginService());
        map.put("destination", event.getDestinationService());
        if (log.isDebugEnabled()) {
            log.debug(map);
        }
        return map;
    }

    protected Map<String, Object> getReceivedTrace(AckRemoteApplicationEvent event) {
        Map<String, Object> map = new LinkedHashMap<String, Object>();
        map.put("signal", "spring.cloud.bus.ack");
        map.put("event", event.getEvent().getSimpleName());
        map.put("id", event.getAckId());
        map.put("origin", event.getOriginService());
        map.put("destination", event.getAckDestinationService());
        if (log.isDebugEnabled()) {
            log.debug(map);
        }
        return map;
    }
}
这两个函数会收集关于发送和接收到的 Ack 事件信息, 并且两个函数获得的内容就是事件定义相关的 一 些属性, 看到这里大家是否感觉似曾相识?是的, 这些信息与之前我们通过 Kafka 的控制台工具获取的消息内容非常类似。既然Spring Cloud Bus已经提供了 Trace 跟踪信息的监听和记录, 我们不妨尝试使用一 下。 要开启该功能非常简单,只需在配置文件中将下面的属性设置为 true 即可:
spring.cloud.bus.trace.enabled=true
然后请求对应的 /actuator/trace 接口就会获取到kafka上消息的类似信息。
Spring Cloud Bus中的事件发布:
通过上面的分析, 我们已经了解了 Spring Cloud Bus 中事件以及监听器的定义, 下面来看看这些事件是如何发布给监听器进行处理的。我们可以从 Spring Cloud Bus 的自动化配置类中看看它在启动的时候都加载了什么内容:
BusAutoConfiguration 类是关键:
@Configuration
@ConditionalOnBusEnabled
@EnableBinding(SpringCloudBusClient.class)
@EnableConfigurationProperties(BusProperties.class)
public class BusAutoConfiguration implements ApplicationEventPublisherAware {

    public static final String BUS_PATH_MATCHER_NAME = "busPathMatcher";

    @Autowired
    @Output(SpringCloudBusClient.OUTPUT)
   //定义了发送消息的抽象方法。
   private MessageChannel cloudBusOutboundChannel;

  //该对象中提供了下面两个重要函数, 用来判断事件的来源服务是否为自己, 以及判断目标是否为自己, 以此作为依据是否要响应消息进行事件的处理。
    @Autowired
    private ServiceMatcher serviceMatcher;

  //定义了消息服务的绑定属性。
    @Autowired
    private BindingServiceProperties bindings;

    //该对象定义了Spring Cloud Bus的属性
    @Autowired
    private BusProperties bus;

  //Spring事件模型中用来发布事件的接口
    private ApplicationEventPublisher applicationEventPublisher;
    //.....
}
除了定义的这些成员变量之外, 还能看到这里定义了两个监听方法 acceptLocal 和 acceptRemote。
其中, acceptLocal方法如下所示。在其实现中并非所有的RemoteApplicationEvent事件都会处理。 根据 if 中的条件, 可以 看到在该监听 处理中,只对事件来源是自己并且事件 类型不是AckRemoteApplicationEvent的内容进行后续的处理, 而后续的处理就是通过消息管道 将该事件 发送出去。 所以, 该 监听器的功能就是监听本地事件来进行消息的发送。
//可以将该函数理解为对 RemoteApplicationEvent事件的监听器
@EventListener(classes = RemoteApplicationEvent.class)
public void acceptLocal(RemoteApplicationEvent event) {
  if (this.serviceMatcher.isFromSelf(event)
      && !(event instanceof AckRemoteApplicationEvent)) {
    this.cloudBusOutboundChannel.send(MessageBuilder.withPayload(event).build());
  }
}
再来看看acceptRemote方法。 该方法中使用了@StreamListener注解修饰, 该注解的作用是将该函数注册为消息代理上数据流的事件 监听器, 注解中的属性值SpringCloudBusClient.INPUT指定了监听的通道名。 同时, 回头看该函数所在类的定义,使用 了@EnableBinding注解, 该注解用来实现与消息代理的连接,注解中的 属性值SpringCloudBusClient.class声明了输入和输出通道的定义(这部分内容源自Spring Cloud Stream这里我们只需理解它用来绑定消息代理的输入与输出, 以 实现向消息总线上发送和接收消息即可)。
@StreamListener(SpringCloudBusClient.INPUT)
public void acceptRemote(RemoteApplicationEvent event) {
        if (event instanceof AckRemoteApplicationEvent) {
            if (this.bus.getTrace().isEnabled() && !this.serviceMatcher.isFromSelf(event)
                    && this.applicationEventPublisher != null) {
                this.applicationEventPublisher.publishEvent(event);
            }
            // If it's an ACK we are finished processing at this point
            return;
        }
        if (this.serviceMatcher.isForSelf(event)
                && this.applicationEventPublisher != null) {
            if (!this.serviceMatcher.isFromSelf(event)) {
                this.applicationEventPublisher.publishEvent(event);
            }
            if (this.bus.getAck().isEnabled()) {
                AckRemoteApplicationEvent ack = new AckRemoteApplicationEvent(this,
                        this.serviceMatcher.getServiceId(),
                        this.bus.getAck().getDestinationService(),
                        event.getDestinationService(), event.getId(), event.getClass());
                this.cloudBusOutboundChannel
                        .send(MessageBuilder.withPayload(ack).build());
                this.applicationEventPublisher.publishEvent(ack);
            }
        }
        if (this.bus.getTrace().isEnabled() && this.applicationEventPublisher != null) {
            // We are set to register sent events so publish it for local consumption,
            // irrespective of the origin
            this.applicationEventPublisher.publishEvent(new SentApplicationEvent(this,
                    event.getOriginService(), event.getDestinationService(),
                    event.getId(), event.getClass()));
        }
}
通过上面的分析,我们已经可以知道 Spring Cloud Bus 通过 acceptRemote 方法来监听消息代理的输入通道, 并根据事件类型和配置内容来确定是否要发布事件给我们之前分析的几个事件监听器来对事件做具体的处理;而 acceptLocal 方法用来监听本地的事件,针对事件来源是自己,并且事件类型不是 AckRemoteApplicationEvent的内容通过消息代理的输出通道发送到总线上去。
控制端点:
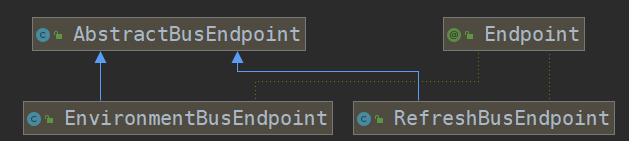
在介绍了 Spring Cloud Bus 中实现的事件模型之后, 我们已经知道每个节点是如何响应消息总线上的事件了。 那么这些发送到消息总线上用来触发各个节点的事件处理的动作是如何实现的呢?回想 一 下之前在实现配置属性刷新时, 我们在修改了 Git 仓库上的配置信息之后,往总线上的某个节点发送了 一 个请求 /actuator/bus-refresh 来触发总线上的所有节点进行配置刷新。在 org.springframework.cloud.bus. endpoint包下的 RefreshBusEndpoint 和 EnvironmentBusEndpoint 分别创建了两个控制端点: /actuator/bus-refresh 和 /actuator/bus-env。 通过整理 org.springframework.cloud.bus.endpoint 包下的内容, 我们可以得到如下类图:
springCloud Bus中的Endpoint也是通过spring-boot-actuator模块来实现的 。我们需要添加以下配置开启端点
# actuator
management.endpoints.web.exposure.include = *