1.5.docker序幕篇[上]
1.5.1 在Win10上准备centos7
和大家说明一下,我们的目的仅仅是要安装一个centos7,然后在centos7上安装docker
如果搞不定vagrant+virtualbox的方式,也可以直接使用VM搭建一个centos7
或者你可以直接使用一台云服务器,上面安装了centos7
毕竟我们的目的只是为了得到一个centos7的机器,所以不必花太多精力在这个问题上折腾
我上课用的环境是
【
win10 64位
VirtualBox-6.0.12-133076-Win [已上传到网盘的“上课课件/virtualbox”目录]
vagrant_2.2.6_x86_64 [已上传到网盘的“上课课件/vagrant”目录]
centos7 [已上传到网盘的“上课课件”目录]
XShell6
】
采坑指南:如果安装过程碰到一些问题,我特地给大家准备了一份手记,放在gper上
https://gper.club/articles/7e7e7f7ff7g58gc1g6e
采用vagrant+virtual box
1.5.1.1 下载安装vagrant
01 访问Vagrant官网
https://www.vagrantup.com/
02 点击Download
Windows,MacOS,Linux等
03 选择对应的版本
04 傻瓜式安装
05 命令行输入vagrant,测试是否安装成功
1.5.1.2 下载安装virtual box
01 访问VirtualBox官网
https://www.virtualbox.org/
02 选择左侧的“Downloads”
03 选择对应的操作系统版本
04 傻瓜式安装
05 [win10中若出现]安装virtualbox快完成时立即回滚,并提示安装出现严重错误
(1)打开服务
(2)找到Device Install Service和Device Setup Manager,然后启动
(3)再次尝试安装
1.5.1.3 安装centos7
01 创建centos7文件夹,并进入其中[目录全路径不要有中文字符]
02 在此目录下打开cmd,运行vagrant init centos/7
此时会在当前目录下生成Vagrantfile,同时指定使用的镜像为centos/7,关键是这个镜像在哪里,我已经提前准备好了,名称是virtualbox.box文件
03 将virtualbox.box文件添加到vagrant管理的镜像中
(1)下载网盘中的virtualbox.box文件
(2)保存到磁盘的某个目录,比如D:virtualbox.box
(3)添加镜像并起名叫centos/7:vagrant box add centos/7 D:virtualbox.box
(4)vagrant box list 查看本地的box[这时候可以看到centos/7]
04 centos/7镜像有了,根据Vagrantfile文件启动创建虚拟机
来到centos7文件夹,在此目录打开cmd窗口,执行vagrant up[打开virtual box观察,可以发现centos7创建成功]
05 以后大家操作虚拟机,还是要在centos文件夹打开cmd窗口操作
vagrant halt 优雅关闭
vagrant up 正常启动
06 vagrant常用命令
(1)vagrant ssh
进入刚才创建的centos7中
(2)vagrant status
查看centos7的状态
(3)vagrant halt
停止/关闭centos7
(4)vagrant destroy
删除centos7
(5)vagrant status
查看当前vagrant创建的虚拟机
(6)Vagrantfile中也可以写脚本命令,使得centos7更加丰富
但是要注意,修改了Vagrantfile,要想使正常运行的centos7生效,必须使用vagrant reload
至此,使用vagrant+virtualbox搭建centos7完成,后面可以修改Vagrantfile对虚拟机进行相应配置
1.5.1.4 若想通过Xshell连接centos7
01 使用centos7的默认账号连接

在centos文件夹下执行vagrant ssh-config

关注:Hostname Port IdentityFile

IP:127.0.0.1

port:2222

用户名:vagrant

密码:vagrant

文件:Identityfile指向的文件private-key


02 使用root账户登录

vagrant ssh   进入到虚拟机中

sudo -i

vi /etc/ssh/sshd_config

修改PasswordAuthentication yes

passwd修改密码,比如abc123

systemctl restart sshd

使用账号root,密码abc123进行登录
1.5.1.5 Vagrantfile通用写法
# -*- mode: ruby -*-
# vi: set ft=ruby :
# All Vagrant configuration is done below. The "2" in Vagrant.configure
# configures the configuration version (we support older styles for
# backwards compatibility). Please don't change it unless you know what
# you're doing.
Vagrant.configure("2") do |config|
# The most common configuration options are documented and commented below.
# For a complete reference, please see the online documentation at
# https://docs.vagrantup.com.
# Every Vagrant development environment requires a box. You can search for
# boxes at https://vagrantcloud.com/search.
config.vm.box = "centos/7"
# Disable automatic box update checking. If you disable this, then
# boxes will only be checked for updates when the user runs
# `vagrant box outdated`. This is not recommended.
# config.vm.box_check_update = false
# Create a forwarded port mapping which allows access to a specific port
# within the machine from a port on the host machine. In the example below,
# accessing "localhost:8080" will access port 80 on the guest machine.
# NOTE: This will enable public access to the opened port
# config.vm.network "forwarded_port", guest: 80, host: 8080
# Create a forwarded port mapping which allows access to a specific port
# within the machine from a port on the host machine and only allow access
# via 127.0.0.1 to disable public access
# config.vm.network "forwarded_port", guest: 80, host: 8080, host_ip: "127.0.0.1"
# Create a private network, which allows host-only access to the machine
# using a specific IP.
# config.vm.network "private_network", ip: "192.168.33.10"
# Create a public network, which generally matched to bridged network.
# Bridged networks make the machine appear as another physical device on
# your network.
config.vm.network "public_network"
# Share an additional folder to the guest VM. The first argument is
# the path on the host to the actual folder. The second argument is
# the path on the guest to mount the folder. And the optional third
# argument is a set of non-required options.
# config.vm.synced_folder "../data", "/vagrant_data"
# Provider-specific configuration so you can fine-tune various
# backing providers for Vagrant. These expose provider-specific options.
# Example for VirtualBox:
#
# config.vm.provider "virtualbox" do |vb|
# # Display the VirtualBox GUI when booting the machine
# vb.gui = true
#
# # Customize the amount of memory on the VM:
# vb.memory = "1024"
# end
config.vm.provider "virtualbox" do |vb|
vb.memory = "4000"
vb.name= "jack-centos7"
vb.cpus= 2
end
#
# View the documentation for the provider you are using for more
# information on available options.
# Enable provisioning with a shell script. Additional provisioners such as
# Puppet, Chef, Ansible, Salt, and Docker are also available. Please see the
# documentation for more information about their specific syntax and use.
# config.vm.provision "shell", inline: <<-SHELL
# apt-get update
# apt-get install -y apache2
# SHELL
end
1.5.1.6 box的打包分发
01 退出虚拟机
vagrant halt
02 打包
vagrant package --output first-docker-centos7.box
03 得到first-docker-centos7.box
04 将first-docker-centos7.box添加到其他的vagrant环境中
vagrant box add first-docker-centos7 first-docker-centos7.box
05 得到Vagrantfile
vagrant init first-docker-centos7
06 根据Vagrantfile启动虚拟机
vagrant up [此时可以得到和之前一模一样的环境,但是网络要重新配置]
1.5.2 安装docker
https://docs.docker.com/install/linux/docker-ce/centos/
01 进入centos7
vagrant ssh
02 卸载之前的docker
sudo yum remove docker
docker-client
docker-client-latest
docker-common
docker-latest
docker-latest-logrotate
docker-logrotate
docker-engine
03 安装必要的依赖
sudo yum install -y yum-utils
device-mapper-persistent-data
lvm2
补充:
设置阿里云加速器:
sudo mkdir -p /etc/docker
sudo tee /etc/docker/daemon.json <<-'EOF'
{
"registry-mirrors": ["https://inpoh9ma.mirror.aliyuncs.com"]
}
EOF
查看是否设置成功:
cat /etc/docker/daemon.json
04 设置docker仓库 [设置阿里云镜像仓库可以先自行百度,后面课程也会有自己的docker hub讲解]
sudo yum-config-manager
--add-repo
https://download.docker.com/linux/centos/docker-ce.repo
[访问这个地址,使用自己的阿里云账号登录,查看菜单栏左下角,发现有一个镜像加速器:https://cr.console.aliyun.com/cn-hangzhou/instances/mirrors]
05 安装docker
sudo yum install -y docker-ce docker-ce-cli containerd.io
06 启动docker
sudo systemctl start docker
sudo systemctl enable docker 设置开机启动
07 测试docker安装是否成功
docker version
docker pull hello-world
docker images
docker run --name myhello-world hello-world
//sudo docker run hello-world
docker ps -a 查看当前运行的container容器
docker rmi -f hello-world 删除image[根据名称]
docker run hello-world 如果本地没有hello-world的image,会先从远端垃取,再run
1.5.3 docker基本体验
01 创建tomcat容器
docker pull tomcat [默认拉取最新版本latest------tag表示版本号]
docker run -d --name my-tomcat -p 9090:8080 tomcat 映射主机端口9090,通过它触发访问
docker ps 查看运行的容器
docker exec -it 容器名/id /bin/bash 进入容器目录【usr/local/tomcat】
docker exec -it my-tomcat /bin/bash
浏览器访问http://30.50.32.7:9090/
可以创建多个tomcat容器:
只需要run时,设置不同的容器名称即可。映射端口也要相应变化,如:
docker run -d --name tomcat01 -p 9091:8080 tomcat
全部container删除:
docker rm -f $(docker ps -aq)
比较以前布署:
下载download---->解压到目录---->进入bin,启动start.sh
02 创建mysql容器
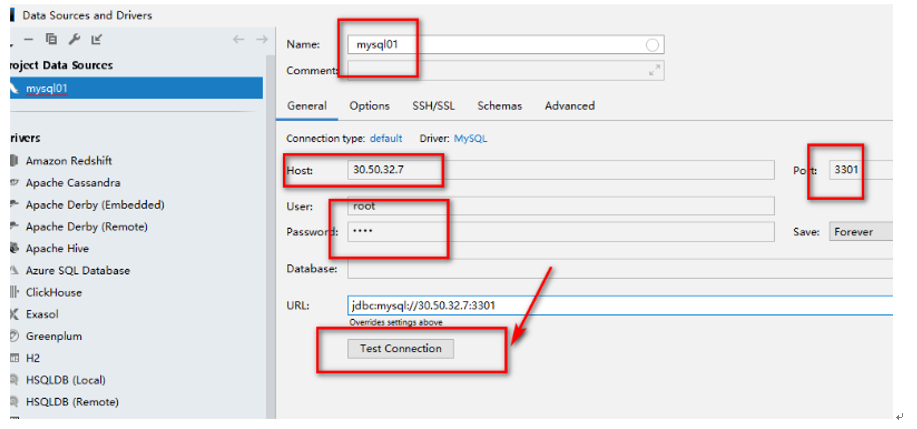
docker run -d --name my-mysql -p 3301:3306 -e MYSQL_ROOT_PASSWORD=root --privileged mysql
使用idea中datesource连接数据库:
进入mysql目录:
docker exec -it my-mysql /bin/bash
登录mysql:
root@2094a81d8219:/# mysql -uroot -proot
mysql> show databases;
mysql> use docker_mysql;
mysql> show tables;
mysql> create database db_test;
03 进入到容器里面
docker exec -it containerid /bin/bash
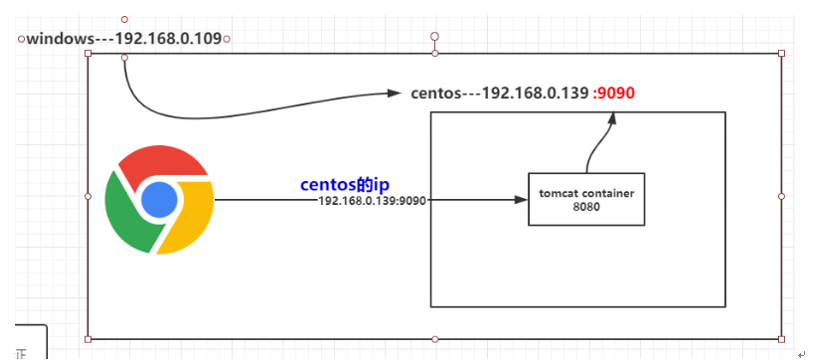
端口映射的原理图解:
使用idea中datesource连接数据库:
1.5.4 可能有的疑惑
(1)docker pull在哪拉取的镜像?
默认是在hub.docker.com
(2)docker pull tomcat拉取的版本是?
默认是最新的版本,可以在后面指定版本":"
(3)简单先说一下命令咯
docker pull       拉取镜像到本地

docker run         根据某个镜像创建容器

-d                 让容器在后台运行,其实就是一个进程

--name             给容器指定一个名字

-p                 将容器的端口映射到宿主机的端口

docker exec -it   进入到某个容器中并交互式运行
(4)docker为何如此神奇?假如我是设计者,我会如何设计?
以tomcat为例:
下载download ------>上传到centos,解压----》到安装目录:/usr/local/tomcat--->/bin/start.sh启动
mysql下载---》config配置----》解压,---》启动。
springboot应用-----》。。。。。
container底层依赖linux------------image依赖linux,
1.6.docker灵魂探讨篇[上]
1.6.1 image的得来
docker network ls

docker inspect bridge
通过查看hub.docker.com官方提供的image,如:mysql,它的生成都取决于Dockerfile
https://github.com/docker-library/mysql/blob/master/5.6/Dockerfile
对于我们的自定义应用,我们也可以把它变成image。
所以,需要自定义Dockerfile,需要学习它的语法规则:
1.6.1.1.Dockerfile文件语法
学习/研究mysql:8官方定义的Dockerfile,学习其语法,关键字:
FROM debian:stretch-slim
# add our user and group first to make sure their IDs get assigned consistently, regardless of whatever dependencies get added
RUN groupadd -r mysql && useradd -r -g mysql mysql
RUN apt-get update && apt-get install -y --no-install-recommends gnupg dirmngr && rm -rf /var/lib/apt/lists/*
# add gosu for easy step-down from root
ENV GOSU_VERSION 1.7
RUN set -x
&& apt-get update && apt-get install -y --no-install-recommends ca-certificates wget && rm -rf /var/lib/apt/lists/*
&& wget -O /usr/local/bin/gosu "https://github.com/tianon/gosu/releases/download/$GOSU_VERSION/gosu-$(dpkg --print-architecture)"
&& wget -O /usr/local/bin/gosu.asc "https://github.com/tianon/gosu/releases/download/$GOSU_VERSION/gosu-$(dpkg --print-architecture).asc"
&& export GNUPGHOME="$(mktemp -d)"
&& gpg --batch --keyserver ha.pool.sks-keyservers.net --recv-keys B42F6819007F00F88E364FD4036A9C25BF357DD4
&& gpg --batch --verify /usr/local/bin/gosu.asc /usr/local/bin/gosu
&& gpgconf --kill all
&& rm -rf "$GNUPGHOME" /usr/local/bin/gosu.asc
&& chmod +x /usr/local/bin/gosu
&& gosu nobody true
&& apt-get purge -y --auto-remove ca-certificates wget
RUN mkdir /docker-entrypoint-initdb.d
RUN apt-get update && apt-get install -y --no-install-recommends
# for MYSQL_RANDOM_ROOT_PASSWORD
pwgen
# for mysql_ssl_rsa_setup
openssl
# FATAL ERROR: please install the following Perl modules before executing /usr/local/mysql/scripts/mysql_install_db:
# File::Basename
# File::Copy
# Sys::Hostname
# Data::Dumper
perl
&& rm -rf /var/lib/apt/lists/*
RUN set -ex;
# gpg: key 5072E1F5: public key "MySQL Release Engineering <mysql-build@oss.oracle.com>" imported
key='A4A9406876FCBD3C456770C88C718D3B5072E1F5';
export GNUPGHOME="$(mktemp -d)";
gpg --batch --keyserver ha.pool.sks-keyservers.net --recv-keys "$key";
gpg --batch --export "$key" > /etc/apt/trusted.gpg.d/mysql.gpg;
gpgconf --kill all;
rm -rf "$GNUPGHOME";
apt-key list > /dev/null
ENV MYSQL_MAJOR 8.0
ENV MYSQL_VERSION 8.0.18-1debian9
RUN echo "deb http://repo.mysql.com/apt/debian/ stretch mysql-${MYSQL_MAJOR}" > /etc/apt/sources.list.d/mysql.list
# the "/var/lib/mysql" stuff here is because the mysql-server postinst doesn't have an explicit way to disable the mysql_install_db codepath besides having a database already "configured" (ie, stuff in /var/lib/mysql/mysql)
# also, we set debconf keys to make APT a little quieter
RUN {
echo mysql-community-server mysql-community-server/data-dir select '';
echo mysql-community-server mysql-community-server/root-pass password '';
echo mysql-community-server mysql-community-server/re-root-pass password '';
echo mysql-community-server mysql-community-server/remove-test-db select false;
} | debconf-set-selections
&& apt-get update && apt-get install -y mysql-community-client="${MYSQL_VERSION}" mysql-community-server-core="${MYSQL_VERSION}" && rm -rf /var/lib/apt/lists/*
&& rm -rf /var/lib/mysql && mkdir -p /var/lib/mysql /var/run/mysqld
&& chown -R mysql:mysql /var/lib/mysql /var/run/mysqld
# ensure that /var/run/mysqld (used for socket and lock files) is writable regardless of the UID our mysqld instance ends up having at runtime
&& chmod 777 /var/run/mysqld
VOLUME /var/lib/mysql
# Config files
COPY config/ /etc/mysql/
COPY docker-entrypoint.sh /usr/local/bin/
RUN ln -s usr/local/bin/docker-entrypoint.sh /entrypoint.sh # backwards compat
ENTRYPOINT ["docker-entrypoint.sh"]
EXPOSE 3306 33060
CMD ["mysqld"]
1.6.1.2springboot项目打成image
01 准备一个springboot项目---->打成一个jar包【mvn clean package】
02 把这个项目做成一个image,进入docker环境,先创建一个目录【存放自定义image】
mkdir first-docker-demo
03 上传jar包到该目录----------直接把jar文件拖到centos中即可。
04 创建Dockerfile文件,用来生成image
dockerfile---->docker build image ---->docker run image
vi Dockerfile,然后创建如下内容:
FROM openjdk:8
MAINTAINER wf1556160572
LABEL name="dockerfile-demo" version="1.0" author="wf1556160572"
COPY ali-springboot-mq-demo-0.0.1-SNAPSHOT.jar docker-image.jar
CMD ["java","-jar","docker-image.jar"]
:wq【保存退出】
05 构建image,根据当前的dockerfile,image的名称【test-docker-image】,[.]表示当前目录
docker build -t test-docker-image .
docker images
06 基于image,创建container容器,
docker run -d --name springboot-mq-demo -p 8081:8080 test-docker-image
07 查看container启动日志,
docker logs springboot-mq-demo[容器名称]
08 宿主机访问
docker exec -it springboot-mq-demo /bin/bash 进入应用中
curl localhost:8080/demo/test
09 还可再次启动一个容器
docker run -d --name springboot-mq-demo-01 -p 8081:8080 test-docker-image
10 windows浏览器访问:
30.50.32.7/8081/demo/test
全部container删除:
docker rm -f $(docker ps -aq)
xshell上传文件到linux:
01 安装linux工具lrzsz,使用命令:sudo yum -y install lrzsz
02 直接拖动文件到linux,就可以直接上传了。实际上执行:rz -E
03 查看上传文件:ll
docker run 自定义image失败:
Unable to find image '8080:8099' locally
docker: Error response from daemon: pull access denied for 8080, repository does not exist or may require 'docker login': denied: requested access to the resource is denied.
原因:是-p参数指定不正确,中间要有空格。
启动container后,想访问docker布署应用,怎么办?
(1)docker exec -it springboot-mq-demo /bin/bash 进入应用中
curl localhost:8081/demo/test
docker rmi -f hello-world 删除image[根据名称]
FROM openjdk:8
MAINTAINER wf1556160572 //hub.docker.com的注册帐号
LABEL name="dockerfile-demo" version="1.0" author="wf1556160572"
COPY ali-springboot-mq-demo-0.0.1-SNAPSHOT.jar docker-image.jar
CMD ["java","-jar","docker-image.jar"]
image---》最底层依赖linux内核,而jdk的image底层也会依赖linux内核,所以,不需要from centos.
所以,只需要jdk镜像。
现在,我在我的机器上生成一个test-docker-image镜像文件,另一同事也想在他的机器上使用这个image,应该怎么办呢?
如何把这个image给别人呢?--------我们拉取image是从官方hub.docker.com下载来的。所以我可以先传上去。再让别人从那下载。
1.5.1.3 tomcat 的Dockerfile研究
传统:下载tomcat包------》解压到/usr/local/tomcat------->进入bin/webapp下war包,启动start.sh
官方Dockerfile写法:
https://github.com/docker-library/tomcat/blob/master/8.5/jdk8/openjdk/Dockerfile
FROM openjdk:8-jdk
ENV CATALINA_HOME /usr/local/tomcat
ENV PATH $CATALINA_HOME/bin:$PATH
RUN mkdir -p "$CATALINA_HOME"
WORKDIR $CATALINA_HOME
...
2.Docker hub镜像仓库
有几种类型:
1.官方hub.docker.com
2.阿里云的docker hub
3.搭建自己的docker hub---局域网--------云服务器ECS
2.1.官方hub.docker.com
注册docker.hub:
https://hub.docker.com/search?type=image
登录: