1.yum源安装
yum -y install heartbeat

更新yum源
yum install epel-release -y

yum源有问题,改用下载rpm包安装
2.rpm安装
下载rpm包
heartbeat-3.0.4-2.el6.x86_64.rpm https://pkgs.org/download/heartbeat
heartbeat-libs-3.0.4-2.el6.x86_64.rpm https://pkgs.org/download/libapphb.so.2()(64bit)
安装rpm包
rpm -ivh heartbeat-3.0.4-2.el6.x86_64.rpm
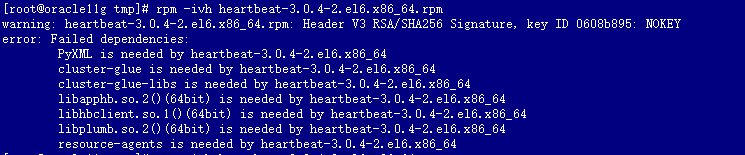
yum源安装依赖包
yum -y install PyXML
yum -y install cluster-glue
yum -y install resource-agents
rpm -ivh heartbeat-libs-3.0.4-2.el6.x86_64.rpm heartbeat-3.0.4-2.el6.x86_64.rpm

3.heartbeat配置,详情https://www.cnblogs.com/liwei0526vip/p/6391833.html
#主节点:192.168.0.204 备节点:192.168.0.205 网关:192.168.0.2
#拷贝三个配置文件至/etc/ha.d/目录
cd /usr/share/doc/heartbeat-3.0.4/
cp authkeys ha.cf haresources /etc/ha.d/
chmod 600 /etc/ha.d/authkeys #若不设置该权限启动时会报错
vi /etc/ha.d/authkeys
#增加以下内容,保存:
auth 3
3 md5 Hello!
vi /etc/ha.d/haresources
#增加以下内容,保存:
oracle11g 192.168.0.206/24/eth0:0 haproxy
#注:hostname vip/掩码/vip设备名 haproxy为heartbeat监控的服务
vi /etc/ha.d/ha.cf
#增加以下内容,保存:
debugfile /var/log/ha-debug
logfile /var/log/ha-log
logfacility local0
keepalive 2
deadtime 30
warntime 10
initdead 60
udpport 694
ucast eth0 192.168.0.205
auto_failback on
node oracle11g
node haproxy
ping 192.168.0.2
respawn hacluster /usr/lib64/heartbeat/ipfail #注:64位系统为lib64目录
#将配置拷贝至备节点:
scp authkeys ha.cf haresources root@192.168.0.205:/etc/ha.d
#修改备节点ha.cf配置
ucast eth0 192.168.0.205 修改为 ucast eth0 192.168.0.204
4.启动heartbeat
service heartbeat start
#先启主节点,再启备节点


#若启动有报错,根据报错信息查相应解决方案
5.测试vip漂移
#主节点 ip a

#备节点 ip a

#关掉主节点heartbeat
service heartbeat stop
#vip漂移到备节点
