一、场景及需求描述
- 被调试虚拟机:Centos下KVM虚拟机
- 调试工具:Windows物理机下Windbg
- 拓扑关系:
- 保证Centos服务器与Windows物理机能相互ping通!!!
- KVM虚拟机(TCP/Client) <-> 物理机 (TCP/Server) <-> Com_X串口 <-> Windbg调试器
- 需求:Windbg与KVM虚拟机双机内核调试
二、具体方法
- qemu-system-x86_64直接创建虚拟机
https://www.linux-kvm.org/page/WindowsGuestDrivers/UpdatedGuestDebugging
https://www.linux-kvm.org/page/WindowsGuestDrivers/GuestDebugging
- libvirt工具:根据已有的img镜像磁盘和XML配置文件,以virsh系列命令构建虚拟机
在XML配置文件中添加如下代码:
<domain>
  ......
  <devices>
    ......
    <serial type='tcp'>
      <source mode='connect' host='物理机IP' service='TCP通信端口' tls='no'/>
      <protocol type='raw'/>
      <target type='isa-serial' port='0'>
        <model name='isa-serial0'/>
      </target>
      <alias name='serial0'/>
    </serial>
    <console type='tcp'>
      <source mode='connect' host='物理机IP' service='TCP通信端口' tls='no'/>
      <protocol type='raw'/>
      <target type='serial' port='0'/>
      <alias name='serial0'/>
    </console>
    ......
  </devices>
</domain>
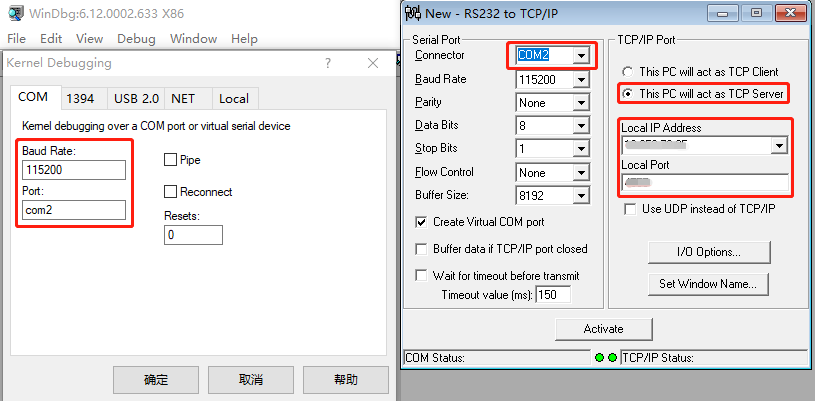
在物理机安装TCP-Com工具,作为TCP的Server端,设置物理机IP、TCP通信端口。https://files.cnblogs.com/files/qinghuan190319/TCPCom900.rar
Windbg采用COM方式连接,注意:不要选pipe管道!!!