00-所需工具
xshell:https://www.netsarang.com/zh/downloading/?token=ZlZnVUNsWDJuM0VaZnVPUjZST1dwd0AzYlNteUZwb0dhRlUxRVV4bmNUZ2ZR

xftp:https://www.netsarang.com/zh/downloading/?token=QlBLQUdldk1mUjliSzVQdzczeTVkQUA3R1RiZDFNcGQxOXFHVFAyaGhhREZn
01-uwsgi介绍
uWSGI是一个Web服务器,它实现了WSGI协议、uwsgi、http等协议。Nginx中HttpUwsgiModule的作用是与uWSGI服务器进行交换。

要注意 WSGI / uwsgi / uWSGI 这三个概念的区分。

1. WSGI是一种Web服务器网关接口。它是一个Web服务器(如nginx,uWSGI等服务器)与web应用(如用Flask框架写的程序)通信的一种规范。
2. uwsgi是一种线路协议而不是通信协议,在此常用于在uWSGI服务器与其他网络服务器的数据通信。
3. 而uWSGI是实现了uwsgi和WSGI两种协议的Web服务器。
4. uwsgi协议是一个uWSGI服务器自有的协议,它用于定义传输信息的类型(type of information),每一个uwsgi packet前4byte为传输信息类型描述,它与WSGI相比是两样东西。
02-nginx介绍
Nginx是一个Http和反向代理服务器
什么是反向代理服务器呢?

正向的就是由浏览器主动的想代理服务器发出请求,经代理服务器做出处理后再转给目标服务器
反向的就是不管浏览器同不同意,请求都会经过代理服务器处理再发给目标服务器
这其中的区别就是必须经过Nginx反向代理服务器,这就有了使用Nginx的几个好处:

安全:不管什么请求都要经过代理服务器,这样就避免了外部程序直接攻击web服务器
负载均衡:根据请求情况和服务器负载情况,将请求分配给不同的web服务器,保证服务器性能
提高web服务器的IO性能:这个我也没看懂,总结来说就是请求从客户端传到web服务器是需要时间的,
传递多长时间就会让这个进程阻塞多长时间,而通过反向代理,就可以在反向代理这完整接受请求,然后再
传给web服务器,从而保证服务器性能,而且有的一些简单的事情(比如静态文件)可以直接由反向代理处理,不经过web服务器
03-centos7的部署
以全新服务器为例:
yum -y update

yum install gcc

yum -y install zlib*

yum install openssl-devel -y
04-ssh安装
yum install openssh-server -y

service sshd restart

#xshell连不上,SSH服务端不允许密码验证。
#服务端开启密码验证的方法:

vim /etc/ssh/sshd_config

把PasswordAuthentication项为yes

重启服务
service sshd restart
05-安装MySQL
#1.安装
wget http://dev.mysql.com/get/mysql-community-release-el7-5.noarch.rpm
rpm -ivh mysql-community-release-el7-5.noarch.rpm
yum install mysql-community-server

#2.重启服务
service mysqld restart

# 查看是否开机自启
执行命令:
chkconfig --list | grep mysqld
chkconfig mysqld on

#3. 设置bind-ip

    vim /etc/my.cnf
    在 [mysqld]:
        下面加一行
        bind-address = 0.0.0.0

#4.登录mysql
mysql -u root

#5. 设置外部ip可以访问
#mysql中输入命令:
#后面用navicat连接远程服务器mysql的用户名和密码
GRANT ALL PRIVILEGES ON *.* TO 'root'@'%' IDENTIFIED BY '123456' WITH GRANT OPTION;

FLUSH PRIVILEGES;

#6.设置mysql密码
进入mysql:
set password =password('123456');     #密码123456
flush privileges;
5.1 卸载MySQL
# 查看是否已安装mysql
执行命令:yum list installed | grep mysql

#yum方式安装的mysql:

1、yum remove mysql mysql-server mysql-libs compat-mysql51
2、rm -rf /var/lib/mysql
3、rm /etc/my.cnf

# 删除mysql相关文件
提示:该命令是查找mysql的相关文件
执行命令:find / -name mysql

执行命令:rm -rf [上面命令查出的结果目录]
提示:删除命令执行完之后,可再使用find / -name mysql 确认是否已经全部删除

可以回到安装步骤重新安装mysql了。
5.2 CentOS7 安装 MariaDB10.3
# 1. 配置repo文件,通过yum安装:
vi /etc/yum.repos.d/MariaDB.repo

# 2. 添加以下内容:
# MariaDB 10.3 CentOS repository list - created 2018-06-21 09:11 UTC
# http://downloads.mariadb.org/mariadb/repositories/
[mariadb]
name = MariaDB
# baseurl = http://yum.mariadb.org/10.3/centos7-amd64
# 修改为国内源
baseurl = http://mirrors.aliyun.com/mariadb/yum/10.3/centos7-amd64/
gpgkey =  http://mirrors.aliyun.com/mariadb/yum/RPM-GPG-KEY-MariaDB
gpgcheck = 1

# 3. 安装:
sudo yum install MariaDB-server MariaDB-client

# 4. 修改数据库文件目录:
service mysql stop
mkdir -p /data/mysqldb
#拷贝默认数据库到新的位置,-a表示将文件属性一起拷贝
cp -a /var/lib/mysql /data/mysqldb

# 5. 修改mysql启动配置
vim /etc/my.cnf.d/server.cnf

# 6. 找到[mysqld],添加以下内容:
[mysqld]
datadir=/data/mysqldb/mysql
socket=/var/lib/mysql/mysql.sock
#default-character-set=utf8
character_set_server=utf8
slow_query_log=on
slow_query_log_file=/data/mysqldb/slow_query_log.log
long_query_time=2

# 7. 创建慢查询日志文件
touch /data/mysqldb/slow_query_log.log
chmod 666 /data/mysqldb/slow_query_log.log

# 8. 启动MariaDB
service mysql start

# 9. 修改root密码:
mysqladmin -u root password 'root'

# 10. root原始密码存在于:/root/.mysql_secret

# 11. 授权ip登录:
grant all on *.* to 'root'@'%' identified by 'password' with grant option;

# 12. 启停命令:
service mysql start
service mysql stop
service mysql restart
service mysql status
06-pip和python3.6的安装
#安装pip

wget https://bootstrap.pypa.io/get-pip.py  --no-check-certificate

sudo python get-pip.py
# 安装python3.6
1. 获取
wget https://www.python.org/ftp/python/3.6.2/Python-3.6.2.tgz
tar -xzvf Python-3.6.2.tgz -C  /tmp
cd  /tmp/Python-3.6.2/

2. 把Python3.6安装到 /usr/local 目录
./configure --prefix=/usr/local
make
make altinstall

3. 更改/usr/bin/python链接
ln -s /usr/local/bin/python3.6 /usr/bin/python3
07-虚拟环境的安装
yum install python-setuptools python-devel
pip install virtualenvwrapper

#编辑.bashrc文件
vim ~/.bashrc

#添加进去
export WORKON_HOME=$HOME/.virtualenvs
source /usr/bin/virtualenvwrapper.sh

#sudo find / -name virtualenvwrapper.sh      查看你的virtualenvwrapper.sh在什么地方

#重新加载.bashrc文件
source ~/.bashrc

#虚拟环境保存的路径
cd ~/.virtualenvs/      (创建的虚拟环境都会保存在这个目录,前面设置的)

#创建指定python版本的虚拟环境方法
mkvirtualenv -p /usr/local/bin/python3.6 workmanage02

workon MxShop

#进虚拟环境安装依赖包

首先 pip freeze > requirements.txt
 将本地的虚拟环境安装包导出来,上传到服务器

pip install -r requirements.txt

#安装mysqlclient出问题

    centos 7:
        yum install python-devel mariadb-devel -y

    ubuntu:
        sudo apt-get install libmysqlclient-dev

    然后:
        pip install mysqlclient
08-安装git
yum install git

git config --global user.name "Your Name"
git config --global user.email "youremail@domain.com"

cd ~/ && ssh-keygen -t rsa -C "你的邮箱"

#提示的信息,直接按enter就行

cd .ssh

把公钥文件(id_rsa.pub)中的码复制到github

#就可以开始clone代码了

git clone
09-拉取项目静态文件
# 在django的setting文件中,添加下面一行内容:

    STATIC_ROOT = os.path.join(BASE_DIR, "static/")

# 运行命令
    python manage.py collectstatic

10-安装uwsgi
1. 进虚拟环境安装
workon workmanage02

pip install uwsgi
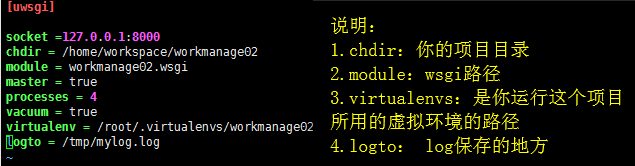
2. 在项目目录下新建uwsgi.ini文件
[uwsgi]

socket =127.0.0.1:8000
chdir = /home/workspace/workamange02
module = workamange02.wsgi
master = true
processes = 4
vacuum = true
virtualenv = /root/.virtualenvs/workamange02
logto = /tmp/mylog.log
[uwsgi]
#使用HTTP访问的端口号, 使用这个端口号是直接访问了uWSGI, 绕过了Nginx
http = :8010
#与外界连接的端口号, Nginx通过这个端口转发给uWSGI
socket = 127.0.0.1:8001
#是否使用主线程
master = true
# 项目在服务器中的目录(绝对路径)
chdir = /home/workspace/workamange02

# Django's wsgi 文件目录
wsgi-file = /home/workspace/workamange02/workmanage02/wsgi.py
# 最大进程数
processes = 4
#每个进程的线程数
threads = 2
#状态监听端口
stats = 127.0.0.1:9191
# 退出时自动清理环境配置
vacuum = true
#目录下文件改动时自动重启
touch-reload = /home/workspace/workamange02
#Python文件改动时自动重启
#py-auto-reload = 1
#后台运行并把日志存到.log文件
daemonize = /home/workspace/workamange02/uWSGI.log
11-安装nginx
这里有安装方法:https://www.digitalocean.com/community/tutorials/how-to-install-nginx-on-centos-7
# 要添加CentOS 7 EPEL存储库,请打开终端并使用以下命令:
sudo yum install epel-release
# 安装nginx
sudo yum install nginx

# Nginx并不是自己开始的。要运行Nginx,请键入:
sudo systemctl start nginx

#可能会用到的命令
service nginx restart
service nginx stop
service nginx start
11.1 配置文件
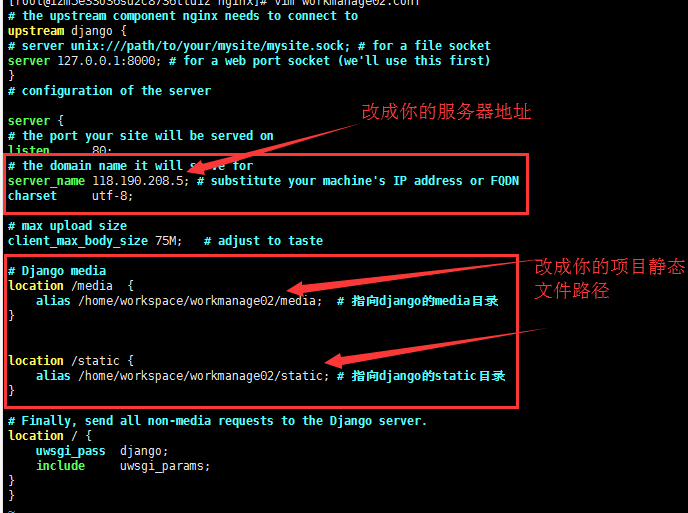
在/etc/nginx/conf.d下新workmanage02.conf
# the upstream component nginx needs to connect to
upstream django {
# server unix:///path/to/your/mysite/mysite.sock; # for a file socket
server 127.0.0.1:8000; # for a web port socket (we'll use this first)
}
# configuration of the server

server {
# the port your site will be served on
listen      80;
# the domain name it will serve for
server_name 118.190.208.5; # substitute your machine's IP address or FQDN
charset     utf-8;

# max upload size
client_max_body_size 75M;   # adjust to taste

# Django media
location /media  {
    alias /home/workspace/workmanage02/media;  # 指向django的media目录
}


location /static {
    alias /home/workspace/workmanage02/static; # 指向django的static目录
}

# Finally, send all non-media requests to the Django server.
location / {
    uwsgi_pass  django;
    include     uwsgi_params;
}
}
配置好后
nginx -t

service nginx restart

12-MySQL数据库数据传输
12.1 远程连接服务器数据库mysql
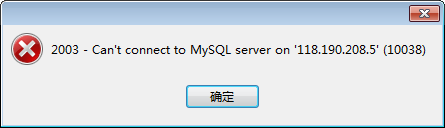
# 解决方法:
网上一大堆解决方法,都是开放端口、给账号开放远程连接权限,但都设置了 可还是不行。
原因应该是:在阿里云安全组添加3306端口规则,把3306端口添加到入方向规则。成功了!

12.2 新建数据库
12.3 右键 点击数据传输
数据传输完成,配置也都配置好后,就可以开始访问了
#创建超级用户

python manage.py createsuperuser

#把uswgi服务开启

uwsgi --ini uwsgi.ini

#访问
http://你的ip地址/