手把手搭建一个完整的javaweb项目
本案例使用Servlet+jsp制作,用MyEclipse和Mysql数据库进行搭建,详细介绍了搭建过程及知识点。
下载地址:http://download.csdn.net/detail/qq_23994787/9904842 点击下载
主要功能有:
1.用户注册
2.用户登录
3.用户列表展示
4.用户信息修改
5.用户信息删除
涉及到的知识点有:
1.JDBC
2.Servlet
3.过滤器
4..EL与JSTL表达式
1.首先打开mysql数据库 新建一个数据库test,然后生成对应的表结构
- CREATE TABLE `user` (
- `id` int(11) NOT NULL auto_increment,
- `name` varchar(255) NOT NULL,
- `pwd` varchar(255) NOT NULL,
- `sex` varchar(255) NOT NULL,
- `home` varchar(255) NOT NULL,
- `info` varchar(255) NOT NULL,
- PRIMARY KEY (`id`)
- ) ENGINE=InnoDB AUTO_INCREMENT=5 DEFAULT CHARSET=utf8;
- INSERT INTO `user` VALUES ('3', '123', '123', '123', '123', '123');
- INSERT INTO `user` VALUES ('4', '123123', '123123', '男', '北京', '123123');
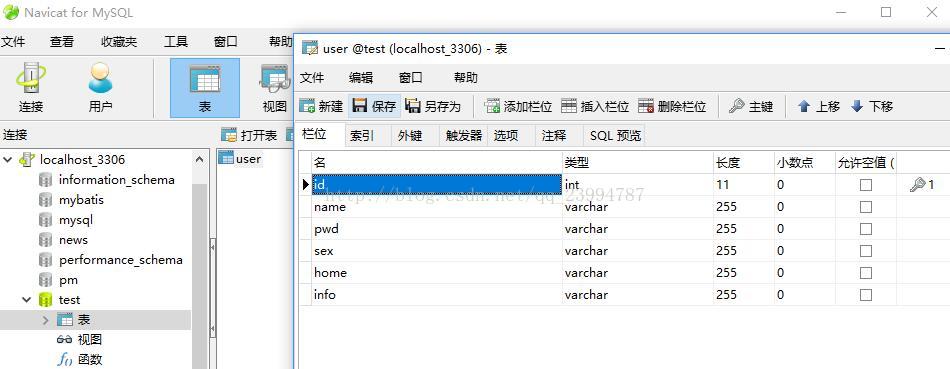
这里使用到了navicat for mysql 这是一种mysql的图形界面化工具,后期可以非常方便的操作数据库。
需要的童鞋 给你们个连接 http://download.csdn.net/download/qq_23994787/10168988
2.然后打开MyEclipse新建一个web项目
3.在webroot下的WEB-INF下的lib中导入mysql的驱动jar包
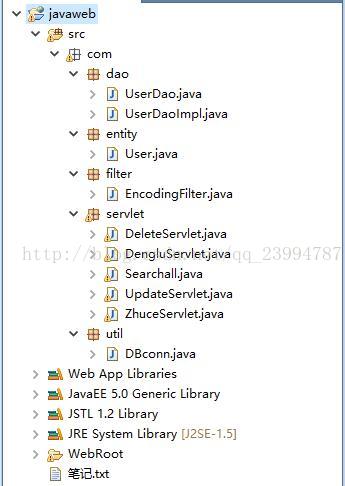
4.建立对应的包结构
com.filter //过滤器 解决中文字符集乱码
com.util //数据库连接工具类
com.entity //实体类
com.dao //数据操作类
com.servlet //servlet类
5.在filter下新建一个EncodingFilter用来解决中文字符集乱码,它需要实现Filter接口,并重写doFilter函数
- package com.filter;
- import java.io.IOException;
- import javax.servlet.Filter;
- import javax.servlet.FilterChain;
- import javax.servlet.FilterConfig;
- import javax.servlet.ServletException;
- import javax.servlet.ServletRequest;
- import javax.servlet.ServletResponse;
- public class EncodingFilter implements Filter{
- public EncodingFilter(){
- System.out.println("过滤器构造");
- }
- public void destroy() {
- System.out.println("过滤器销毁");
- }
- public void doFilter(ServletRequest request, ServletResponse response,FilterChain chain) throws IOException, ServletException {
- request.setCharacterEncoding("utf-8"); //将编码改为utf-8
- response.setContentType("text/html;charset=utf-8");
- chain.doFilter(request, response);
- }
- public void init(FilterConfig arg0) throws ServletException {
- System.out.println("过滤器初始化");
- }
- }
6.到web.xml下进行对EncodingFilter相应的配置
- <?xml version="1.0" encoding="UTF-8"?>
- <web-app version="2.5"
- xmlns="http://java.sun.com/xml/ns/javaee"
- xmlns:xsi="http://www.w3.org/2001/XMLSchema-instance"
- xsi:schemaLocation="http://java.sun.com/xml/ns/javaee
- http://java.sun.com/xml/ns/javaee/web-app_2_5.xsd">
- <display-name></display-name>
- <filter>
- <filter-name>EncodingFilter</filter-name>
- <filter-class>com.filter.EncodingFilter</filter-class><!--全路径 从根包开始一直到类名-->
- </filter>
- <filter-mapping>
- <filter-name>EncodingFilter</filter-name>
- <url-pattern>/*</url-pattern> <!--*即为过滤所有-->
- </filter-mapping>
- <welcome-file-list>
- <welcome-file>denglu.jsp</welcome-file>
- </welcome-file-list>
- </web-app>
7.在util下新建一个DBconn类用来处理对数据库的连接操作(用户名或密码按照自己的数据库更改)
- package com.util;
- import java.sql.*;
- public class DBconn {
- static String url = "jdbc:mysql://localhost:3306/test?useunicuee=true& characterEncoding=utf8";
- static String username = "root";
- static String password = "root";
- static Connection conn = null;
- static ResultSet rs = null;
- static PreparedStatement ps =null;
- public static void init(){
- try {
- Class.forName("com.mysql.jdbc.Driver");
- conn = DriverManager.getConnection(url,username,password);
- } catch (Exception e) {
- System.out.println("init [SQL驱动程序初始化失败!]");
- e.printStackTrace();
- }
- }
- public static int addUpdDel(String sql){
- int i = 0;
- try {
- PreparedStatement ps = conn.prepareStatement(sql);
- i = ps.executeUpdate();
- } catch (SQLException e) {
- System.out.println("sql数据库增删改异常");
- e.printStackTrace();
- }
- return i;
- }
- public static ResultSet selectSql(String sql){
- try {
- ps = conn.prepareStatement(sql);
- rs = ps.executeQuery(sql);
- } catch (SQLException e) {
- System.out.println("sql数据库查询异常");
- e.printStackTrace();
- }
- return rs;
- }
- public static void closeConn(){
- try {
- conn.close();
- } catch (SQLException e) {
- System.out.println("sql数据库关闭异常");
- e.printStackTrace();
- }
- }
- }
8.在entity下新建一个User实体类(实体即抽象出来的用户对象,对应数据库中的user表,表中每个字段在实体中为一个属性,也可以理解为一个User对象对应数据库中的user表一条记录)
- package com.entity;
- public class User {
- private int id;
- private String name;
- private String pwd;
- private String sex;
- private String home;
- private String info;
- public int getId() {
- return id;
- }
- public void setId(int id) {
- this.id = id;
- }
- public String getName() {
- return name;
- }
- public void setName(String name) {
- this.name = name;
- }
- public String getPwd() {
- return pwd;
- }
- public void setPwd(String pwd) {
- this.pwd = pwd;
- }
- public String getSex() {
- return sex;
- }
- public void setSex(String sex) {
- this.sex = sex;
- }
- public String getHome() {
- return home;
- }
- public void setHome(String home) {
- this.home = home;
- }
- public String getInfo() {
- return info;
- }
- public void setInfo(String info) {
- this.info = info;
- }
- }
9.在dao下新建一个UserDao接口 以及对应的方法实现类(使用接口类是为了规范开发)
UserDao.java
- package com.dao;
- import java.util.List;
- import com.entity.User;
- public interface UserDao {
- public boolean login(String name,String pwd);//登录
- public boolean register(User user);//注册
- public List<User> getUserAll();//返回用户信息集合
- public boolean delete(int id) ;//根据id删除用户
- public boolean update(int id,String name, String pwd,String sex, String home,String info) ;//更新用户信息
- }
新建UserDaoImpl.java 实现UserDao接口,及未实现的方法 (SQL语句建议在mysql中测试以下,没有问题然后在拿到实现类中使用,可以避免无必要的麻烦)
本例子SQL使用字符串拼接的方式,其实还有一种预加载的方式,有兴趣的童鞋可以参考我的博客,了解预加载的方式处理SQL语句与字符串拼接方式的区别。
- package com.dao;
- import java.sql.ResultSet;
- import java.sql.SQLException;
- import java.util.ArrayList;
- import java.util.List;
- import com.entity.User;
- import com.util.DBconn;
- public class UserDaoImpl implements UserDao{
- public boolean register(User user) {
- boolean flag = false;
- DBconn.init();
- int i =DBconn.addUpdDel("insert into user(name,pwd,sex,home,info) " +
- "values('"+user.getName()+"','"+user.getPwd()+"','"+user.getSex()+"','"+user.getHome()+"','"+user.getInfo()+"')");
- if(i>0){
- flag = true;
- }
- DBconn.closeConn();
- return flag;
- }
- public boolean login(String name, String pwd) {
- boolean flag = false;
- try {
- DBconn.init();
- ResultSet rs = DBconn.selectSql("select * from user where name='"+name+"' and pwd='"+pwd+"'");
- while(rs.next()){
- if(rs.getString("name").equals(name) && rs.getString("pwd").equals(pwd)){
- flag = true;
- }
- }
- DBconn.closeConn();
- } catch (SQLException e) {
- e.printStackTrace();
- }
- return flag;
- }
- public List<User> getUserAll() {
- List<User> list = new ArrayList<User>();
- try {
- DBconn.init();
- ResultSet rs = DBconn.selectSql("select * from user");
- while(rs.next()){
- User user = new User();
- user.setId(rs.getInt("id"));
- user.setName(rs.getString("name"));
- user.setPwd(rs.getString("pwd"));
- user.setSex(rs.getString("sex"));
- user.setHome(rs.getString("home"));
- user.setInfo(rs.getString("info"));
- list.add(user);
- }
- DBconn.closeConn();
- return list;
- } catch (SQLException e) {
- e.printStackTrace();
- }
- return null;
- }
- public boolean update(int id,String name, String pwd,String sex, String home,String info) {
- boolean flag = false;
- DBconn.init();
- String sql ="update user set name ='"+name
- +"' , pwd ='"+pwd
- +"' , sex ='"+sex
- +"' , home ='"+home
- +"' , info ='"+info+"' where id = "+id;
- int i =DBconn.addUpdDel(sql);
- if(i>0){
- flag = true;
- }
- DBconn.closeConn();
- return flag;
- }
- public boolean delete(int id) {
- boolean flag = false;
- DBconn.init();
- String sql = "delete from user where id="+id;
- int i =DBconn.addUpdDel(sql);
- if(i>0){
- flag = true;
- }
- DBconn.closeConn();
- return flag;
- }
- }
10.在servlet下创建DengluServlet用来实现对用户登录的操作(Servlet有两种方式创建,一种手工创建。另一种程序自动生成。前者自己创建java类,实现Servlet具体内容,然后需要去WEB_INF下的web.xml去配置servlet . 而后者则直接由程序替我们配置好了Servlet)本例子使用第二种方式生成Servlet
DengluServlet.java
- package com.servlet;
- import java.io.IOException;
- import java.io.PrintWriter;
- import javax.servlet.ServletException;
- import javax.servlet.http.HttpServlet;
- import javax.servlet.http.HttpServletRequest;
- import javax.servlet.http.HttpServletResponse;
- import com.dao.UserDao;
- import com.dao.UserDaoImpl;
- public class DengluServlet extends HttpServlet { //需要继承HttpServlet 并重写doGet doPost方法
- public void doGet(HttpServletRequest request, HttpServletResponse response)
- throws ServletException, IOException {
- doPost(request, response); //将信息使用doPost方法执行 对应jsp页面中的form表单中的method
- }
- public void doPost(HttpServletRequest request, HttpServletResponse response)
- throws ServletException, IOException {
- String name = request.getParameter("name"); //得到jsp页面传过来的参数
- String pwd = request.getParameter("pwd");
- UserDao ud = new UserDaoImpl();
- if(ud.login(name, pwd)){
- request.setAttribute("xiaoxi", "欢迎用户"+name); //向request域中放置信息
- request.getRequestDispatcher("/success.jsp").forward(request, response);//转发到成功页面
- }else{
- response.sendRedirect("index.jsp"); //重定向到首页
- }
- }
- }
有两点要注意的地方:
一:getParameter与getAttribute两者的区别
request.setAttribute("xiaoxi", "欢迎用户"+name);//向request域中放置信息 ( 键值对的形式) 名字为xiaoxi 内容为"欢迎用户"+name
request.getAttribute("xiaoxi");//得到request域中放置名字为xiaoxi的信息
request.getParameter("name");//得到request域的参数信息(得到jsp页面传过来的参数)
getAttribute表示从request范围取得设置的属性,必须要先setAttribute设置属性,才能通过getAttribute来取得,设置与取得的为Object对象类型 。
getParameter表示接收参数,参数为页面提交的参数,包括:表单提交的参数、URL重写(就是xxx?id=1中的id)传的参数等,因此这个并没有设置参数的方法(没有setParameter),而且接收参数返回的不是Object,而是String类型
二:转发与重定向的区别
(1).重定向的执行过程:Web服务器向浏览器发送一个http响应--》浏览器接受此响应后再发送一个新的http请求到服务器--》服务器根据此请求寻找资源并发送给浏览器。它可以重定向到任意URL,不能共享request范围内的数据。
(2).重定向是在客户端发挥作用,通过新的地址实现页面转向。
(3).重定向是通过浏览器重新请求地址,在地址栏中可以显示转向后的地址。
(4).转发过程:Web服务器调用内部方法在容器内部完成请求和转发动作--》将目标资源发送给浏览器,它只能在同一个Web应用中使用,可以共享request范围内的数据。
(5).转发是在服务器端发挥作用,通过forward()方法将提交信息在多个页面间进行传递。
(6).转发是在服务器内部控制权的转移,客户端浏览器的地址栏不会显示出转向后的地址。
11.在servlet下创建一个ZhuceServlet用来实现用户注册的操作
ZhuceServlet.java
- package com.servlet;
- import java.io.IOException;
- import java.io.PrintWriter;
- import javax.servlet.ServletException;
- import javax.servlet.http.HttpServlet;
- import javax.servlet.http.HttpServletRequest;
- import javax.servlet.http.HttpServletResponse;
- import com.dao.UserDao;
- import com.dao.UserDaoImpl;
- import com.entity.User;
- public class ZhuceServlet extends HttpServlet {
- public void doGet(HttpServletRequest request, HttpServletResponse response)
- throws ServletException, IOException {
- doPost(request, response);
- }
- public void doPost(HttpServletRequest request, HttpServletResponse response)
- throws ServletException, IOException {
- String name = request.getParameter("name"); //获取jsp页面传过来的参数
- String pwd = request.getParameter("pwd");
- String sex = request.getParameter("sex");
- String home = request.getParameter("home");
- String info = request.getParameter("info");
- User user = new User(); //实例化一个对象,组装属性
- user.setName(name);
- user.setPwd(pwd);
- user.setSex(sex);
- user.setHome(home);
- user.setInfo(info);
- UserDao ud = new UserDaoImpl();
- if(ud.register(user)){
- request.setAttribute("username", name); //向request域中放置参数
- //request.setAttribute("xiaoxi", "注册成功");
- request.getRequestDispatcher("/denglu.jsp").forward(request, response); //转发到登录页面
- }else{
- response.sendRedirect("index.jsp");//重定向到首页
- }
- }
- }
12.在servlet下创建SearchallServlet用来返回数据库中所有用户信息
Searchall.java
- package com.servlet;
- import java.io.IOException;
- import java.io.PrintWriter;
- import java.util.List;
- import javax.servlet.ServletException;
- import javax.servlet.http.HttpServlet;
- import javax.servlet.http.HttpServletRequest;
- import javax.servlet.http.HttpServletResponse;
- import com.dao.UserDao;
- import com.dao.UserDaoImpl;
- import com.entity.User;
- public class Searchall extends HttpServlet {
- public void doGet(HttpServletRequest request, HttpServletResponse response)
- throws ServletException, IOException {
- doPost(request, response);
- }
- public void doPost(HttpServletRequest request, HttpServletResponse response)
- throws ServletException, IOException {
- UserDao ud = new UserDaoImpl();
- List<User> userAll = ud.getUserAll();
- request.setAttribute("userAll", userAll);
- request.getRequestDispatcher("/showall.jsp").forward(request, response);
- }
- }
13.在servlet下创建DeleteServlet用来删除用户操作
DeleteServlet.java
- package com.servlet;
- import java.io.IOException;
- import java.io.PrintWriter;
- import javax.servlet.ServletException;
- import javax.servlet.http.HttpServlet;
- import javax.servlet.http.HttpServletRequest;
- import javax.servlet.http.HttpServletResponse;
- import com.dao.UserDao;
- import com.dao.UserDaoImpl;
- public class DeleteServlet extends HttpServlet {
- public void doGet(HttpServletRequest request, HttpServletResponse response)
- throws ServletException, IOException {
- doPost(request, response);
- }
- public void doPost(HttpServletRequest request, HttpServletResponse response)
- throws ServletException, IOException {
- String id = request.getParameter("id");
- int userId = Integer.parseInt(id);
- UserDao ud = new UserDaoImpl();
- if(ud.delete(userId)){
- request.setAttribute("xiaoxi", "删除成功");
- request.getRequestDispatcher("/Searchall").forward(request, response);
- }else{
- response.sendRedirect("index.jsp");
- }
- }
- }
14.在servlet下创建UpdateServlet操作用来更新用户信息
UpdateServlet.java
- package com.servlet;
- import java.io.IOException;
- import java.io.PrintWriter;
- import javax.servlet.ServletException;
- import javax.servlet.http.HttpServlet;
- import javax.servlet.http.HttpServletRequest;
- import javax.servlet.http.HttpServletResponse;
- import com.dao.UserDao;
- import com.dao.UserDaoImpl;
- import com.entity.User;
- public class UpdateServlet extends HttpServlet {
- public void doGet(HttpServletRequest request, HttpServletResponse response)
- throws ServletException, IOException {
- doPost(request, response);
- }
- public void doPost(HttpServletRequest request, HttpServletResponse response)
- throws ServletException, IOException {
- String id = request.getParameter("id");
- int userId = Integer.parseInt(id);
- String name = request.getParameter("name");
- String pwd = request.getParameter("pwd");
- String sex = request.getParameter("sex");
- String home = request.getParameter("home");
- String info = request.getParameter("info");
- System.out.println("------------------------------------"+userId);
- UserDao ud = new UserDaoImpl();
- if(ud.update(userId, name, pwd, sex, home, info)){
- request.setAttribute("xiaoxi", "更新成功");
- request.getRequestDispatcher("/Searchall").forward(request, response);
- }else{
- response.sendRedirect("index.jsp");
- }
- }
- }
15.配置servlet 如果非手打而用MyEclipse生成则不用配置 附完整web.xml
- <?xml version="1.0" encoding="UTF-8"?>
- <web-app version="2.5"
- xmlns="http://java.sun.com/xml/ns/javaee"
- xmlns:xsi="http://www.w3.org/2001/XMLSchema-instance"
- xsi:schemaLocation="http://java.sun.com/xml/ns/javaee
- http://java.sun.com/xml/ns/javaee/web-app_2_5.xsd">
- <display-name></display-name>
- <filter><!--过滤器配置-->
- <filter-name>EncodingFilter</filter-name>
- <filter-class>com.filter.EncodingFilter</filter-class>
- </filter>
- <filter-mapping>
- <filter-name>EncodingFilter</filter-name>
- <url-pattern>/*</url-pattern>
- </filter-mapping>
- <servlet><!--servlet类路径配置-->
- <servlet-name>DengluServlet</servlet-name>
- <servlet-class>com.servlet.DengluServlet</servlet-class>
- </servlet>
- <servlet>
- <servlet-name>ZhuceServlet</servlet-name>
- <servlet-class>com.servlet.ZhuceServlet</servlet-class>
- </servlet>
- <servlet>
- <servlet-name>Searchall</servlet-name>
- <servlet-class>com.servlet.Searchall</servlet-class>
- </servlet>
- <servlet>
- <servlet-name>DeleteServlet</servlet-name>
- <servlet-class>com.servlet.DeleteServlet</servlet-class>
- </servlet>
- <servlet>
- <servlet-name>UpdateServlet</servlet-name>
- <servlet-class>com.servlet.UpdateServlet</servlet-class>
- </servlet>
- <servlet-mapping><!--servlet类映射配置-->
- <servlet-name>DengluServlet</servlet-name>
- <url-pattern>/DengluServlet</url-pattern>
- </servlet-mapping>
- <servlet-mapping>
- <servlet-name>ZhuceServlet</servlet-name>
- <url-pattern>/ZhuceServlet</url-pattern>
- </servlet-mapping>
- <servlet-mapping>
- <servlet-name>Searchall</servlet-name>
- <url-pattern>/Searchall</url-pattern>
- </servlet-mapping>
- <servlet-mapping>
- <servlet-name>DeleteServlet</servlet-name>
- <url-pattern>/DeleteServlet</url-pattern>
- </servlet-mapping>
- <servlet-mapping>
- <servlet-name>UpdateServlet</servlet-name>
- <url-pattern>/UpdateServlet</url-pattern>
- </servlet-mapping>
- <welcome-file-list><!--默认首页地址-->
- <welcome-file>denglu.jsp</welcome-file>
- </welcome-file-list>
- </web-app>
16.新建jsp页面
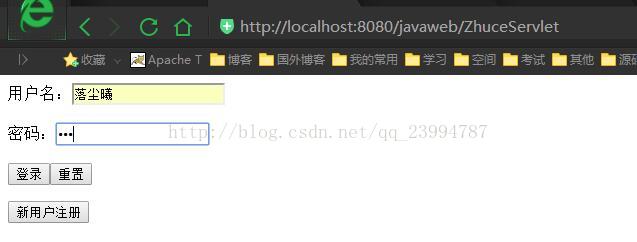
denglu.jsp 用户登录页面 默认页面进入项目后 先进入该页面(web.xml中配置)
form表单中需要注意的是<form action="DengluServlet" method="post">
其中action即为要跳转的servlet路径(即在web.xml中配置的servlet-mapping :<url-pattern>/DengluServlet</url-pattern> ,)写 / 后的内容。
method="post"为传递值得方法类型有两种,第一种get,第二种post。网上介绍这两种的区别有很多,阐述的又是百家争鸣。而我觉得那个方便就用那个,一般使用post传递,可避免乱码。
另一个需要注意的是 用户名:<input type="text" name="name" value=""> input标签 一定要起个名字 如name="name"
起名的作用就是让后台通过request.getParterment("name");来取值
- <%@ page language="java" import="java.util.*" pageEncoding="utf-8"%>
- <!DOCTYPE HTML PUBLIC "-//W3C//DTD HTML 4.01 Transitional//EN">
- <html>
- <head>
- <title>登录注册页面</title>
- </head>
- <body >
- <form action="DengluServlet" method="post" style="padding-top:-700px;">
- 用户名:<input type="text" name="name"value=""><br><br>
- 密码: <input type="password" name="pwd"value=""><br><br>
- <input type="submit"value="登录"name="denglu"><input type="reset"value="重置"><br>
- </form>
- <form action="zhuce.jsp">
- <input type="submit"value="新用户注册">
- </form>
- </body>
- </html>
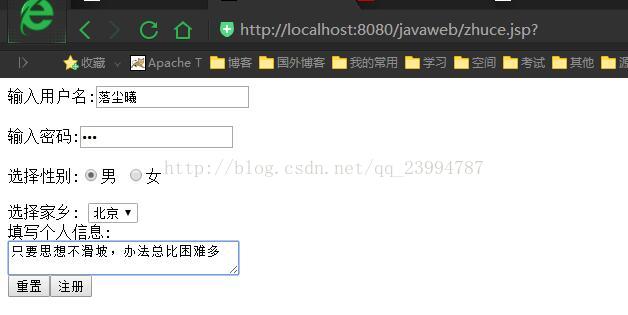
zhuce.jsp 用户注册页面
- <%@ page language="java" import="java.util.*" pageEncoding="utf-8"%>
- <%
- String path = request.getContextPath();
- String basePath = request.getScheme()+"://"+request.getServerName()+":"+request.getServerPort()+path+"/";
- %>
- <!DOCTYPE HTML PUBLIC "-//W3C//DTD HTML 4.01 Transitional//EN">
- <html>
- <head>
- <title>My JSP 'BB.jsp' starting page</title>
- </head>
- <body >
- <form action="ZhuceServlet"method="post" style="padding-top:-700px;">
- 输入用户名:<input name="name" type="text"><br><br>
- 输入密码:<input name="pwd" type="password"><br><br>
- 选择性别:<input type="radio"name="sex"value="男"checked>男
- <input type="radio"name="sex"value="女">女<br><br>
- 选择家乡:
- <select name="home">
- <option value="上海">上海</option>
- <option value="北京" selected>北京</option>
- <option value="纽约">纽约</option>
- </select><br>
- 填写个人信息:<br>
- <textarea name="info" row="5"cols="30"></textarea><br>
- <input type="reset"value="重置"><input type="submit"value="注册">
- </form>
- </body>
- </html>
index.jsp 失败页面
- <%@ page language="java" import="java.util.*" pageEncoding="UTF-8"%>
- <%
- String path = request.getContextPath();
- String basePath = request.getScheme()+"://"+request.getServerName()+":"+request.getServerPort()+path+"/";
- %>
- <!DOCTYPE HTML PUBLIC "-//W3C//DTD HTML 4.01 Transitional//EN">
- <html>
- <head>
- <title>My JSP 'index.jsp' starting page</title>
- </head>
- <body>
- <h1>失敗</h1>
- </body>
- </html>
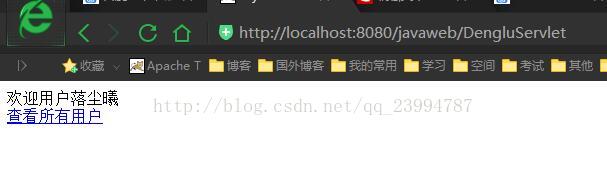
success.jsp 成功页面
${xiaoxi}为EL表达式 获取request域中的键名为xiaoxi的值
- <%@ page language="java" import="java.util.*" pageEncoding="utf-8"%>
- <%
- String path = request.getContextPath();
- String basePath = request.getScheme()+"://"+request.getServerName()+":"+request.getServerPort()+path+"/";
- %>
- <!DOCTYPE HTML PUBLIC "-//W3C//DTD HTML 4.01 Transitional//EN">
- <html>
- <head>
- <title>My JSP 'success.jsp' starting page</title>
- </head>
- <body>
- ${xiaoxi} <br>
- <a href="Searchall">查看所有用户</a>
- </body>
- </html>
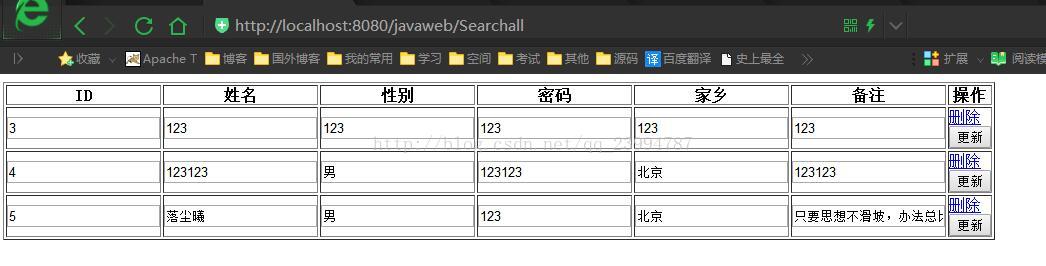
showall.jsp 展现所有用户页面
页面使用的到JSTL表达式 即c标签。使用c标签需要引入头文件<%@ taglib prefix="c" uri="http://java.sun.com/jsp/jstl/core"%> 。
需要注意的的是El标签配合JSTl标签的使用,<c:forEach var="U" items="${userAll}" > 例子foeEach标签的遍历内容即为EL表达式获取的${userAll}
而且当指定别名后var="U" ,别名可以随便起,为了方便一般是小写类名命名。
C标签内遍历的属性也是需要用${ }获取。此时别名U即为当前集合中的User对象,想得到属性只需要用 ${ U.属性名 } 即可
- <%@ page language="java" import="java.util.*" pageEncoding="UTF-8"%>
- <%@ taglib prefix="c" uri="http://java.sun.com/jsp/jstl/core"%>
- <%
- String path = request.getContextPath();
- String basePath = request.getScheme()+"://"+request.getServerName()+":"+request.getServerPort()+path+"/";
- %>
- <!DOCTYPE HTML PUBLIC "-//W3C//DTD HTML 4.01 Transitional//EN">
- <html>
- <head>
- <base href="<%=basePath%>">
- <title>所有用户页面</title>
- </head>
- <body>
- <h1>${xiaoxi}</h1>
- <table width="600" border="1" cellpadding="0" >
- <tr>
- <th>ID</th>
- <th>姓名</th>
- <th>性别</th>
- <th>密码</th>
- <th>家乡</th>
- <th>备注</th>
- <th>操作</th>
- </tr>
- <c:forEach var="U" items="${userAll}" >
- <form action="UpdateServlet" method="post">
- <tr>
- <td><input type="text" value="${U.id}" name="id" ></td>
- <td><input type="text" value="${U.name}" name="name"></td>
- <td><input type="text" value="${U.sex}" name="sex"></td>
- <td><input type="text" value="${U.pwd}" name="pwd"></td>
- <td><input type="text" value="${U.home}" name="home"></td>
- <td><input type="text" value="${U.info}" name="info"></td>
- <td><a href="DeleteServlet?id=${U.id}">删除</a> <input type="submit" value="更新"/></td>
- </tr>
- </form>
- </c:forEach>
- </table>
- </body>
- </html>
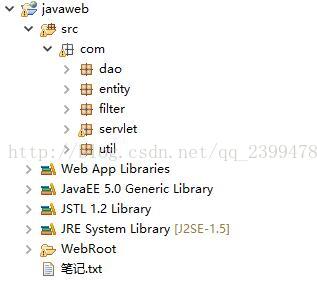
项目结构