文件/目录管理命令:
cd命令主要是改变目录的功能
cd ~ 返回登录目录
cd / 返回系统根目录
cd ../ 或者cd .. 返回上一级目录
cd - 返回上一次访问的目录
pwd命令用于显示用户当前所在的路径、目录
文件内容查看:
cat song.log : 查看song.log文件内容
head s.log :查看s.log文件内容的前10行
head -n 20 s.log :查看s.log文件内容的前20行
tail s.log :查看s.log文件内容的后10行
tail -n 20 s.log :查看s.log文件内容的后20行
more s.log :以翻页的形式查看s.log的内容(按空格键下翻,不能上翻)
less s.log : 以翻页的形式查看s.log的内容(按上下键进行上下翻页,按q退出)
查看文件:
基本语法: find 查找位置 查找参数
find . -name *java* 在当前位置下查找文件名包含java字符的文件
find . -perm 777 在当前位置下查找权限为777 的文件
find / -user ouyang 在系统中查找用户为ouyang的文件
find . -type d 在当前位置下查看找类型为文件夹的文件
查找参数:
-name -perm -user -group -ctime -type -size
新建:
mkdir [option] dir
mkdir a :创建目录文件夹a
mkdir -p a/b/c/d : 当前目录下创建多个目录
touch [option] filename
touch a.txt : 创建文件a.txt
[songshichao@song ~]$ cd dir1
[songshichao@song dir1]$ mkdir dir_1 dir_2 dir_3 #创建目录
[songshichao@song dir1]$ touch file_1 file_2 #创建文件
[songshichao@song dir1]$ touch -d '4/4/18 00:00' file_3 #创建文件并改变时间戳
[songshichao@song dir1]$ ll
总用量 0
drwxrwxr-x. 2 songshichao songshichao  6 4月   5 21:32 dir_1
drwxrwxr-x. 3 songshichao songshichao 18 4月   5 21:22 dir2
drwxrwxr-x. 2 songshichao songshichao  6 4月   5 21:32 dir_2
drwxrwxr-x. 2 songshichao songshichao  6 4月   5 21:32 dir_3
-rw-rw-r--. 1 songshichao songshichao  0 4月   5 21:33 file_1
-rw-rw-r--. 1 songshichao songshichao  0 4月   5 21:33 file_2
-rw-rw-r--. 1 songshichao songshichao  0 4月   4 00:00 file_3
重命名:
rename aaa bbb
删除:
rm [option] file
r:删除目录时将目录中的所有内容一并删除
f:忽略删除的目录中不存在的子目录,并且删除时不提示用户
[songshichao@song dir1]$ rm file_1
[songshichao@song dir1]$ rmdir dir_2 #删除空白目录
[songshichao@song dir1]$ rm dir_3 #目录含有其他的目录或文件
rm: 无法删除"dir_3": 是一个目录
[songshichao@song dir1]$ rm -rf dir_3 #删除目录及目录中的所有文件和子目录,要配合选项r和f
[songshichao@song dir1]$ ll
总用量 0
drwxrwxr-x. 2 songshichao songshichao  6 4月   5 21:32 dir_1
drwxrwxr-x. 3 songshichao songshichao 18 4月   5 21:22 dir2-rw-rw-r--. 1 songshichao songshichao  0 4月   5 21:33 file_2
-rw-rw-r--. 1 songshichao songshichao  0 4月   4 00:00 file_3
移动:
mv filename dir
filename:需要移动的文件或目录名
dir:移动后的位置和文件名,若该参数指定的文件已经存在,则覆盖已经存在的文件,如果不存在,则移动文件并重命名。
[songshichao@song dir1]$ mv dir_1 dir2/
[songshichao@song dir1]$ cd dir2
[songshichao@song dir2]$ ll
总用量 0
drwxrwxr-x. 2 songshichao songshichao 6 4月   5 21:32 dir_1
drwxrwxr-x. 2 songshichao songshichao 6 4月   5 21:22 dir3
[songshichao@song dir1]$ mkdir dir3
[songshichao@song dir1]$ mv -i dir3 dir2/ #覆盖文件
mv:是否覆盖"dir2/dir3"? y
[songshichao@song dir1]$ cd dir2
[songshichao@song dir2]$ ll
总用量 0
drwxrwxr-x. 2 songshichao songshichao 6 4月 5 21:32 dir_1
drwxrwxr-x. 2 songshichao songshichao 6 4月 5 21:58 dir3
复制:
cp [option] filename Directory
filename:要复制的源文件
Directory:复制文件的新位置,如果此参数是一个新目录名,则将文件复制 到新位置时重命名文件
[songshichao@song dir2]$ cp /home/songshichao/dir1/file_2 ./#复制到当前目录下
[songshichao@song dir2]$ cp /home/songshichao/dir1/file_2 ./file_2_1 #复制并重命名
[songshichao@song dir2]$ ll
总用量 0
drwxrwxr-x. 2 songshichao songshichao 6 4月   5 21:32 dir_1
drwxrwxr-x. 2 songshichao songshichao 6 4月   5 21:58 dir3
-rw-rw-r--. 1 songshichao songshichao 0 4月   5 22:07 file_2
-rw-rw-r--. 1 songshichao songshichao 0 4月   5 22:08 file_2_1

[songshichao@song dir1]$ cp -r /home/songshichao/dir1/dir2 /home/songshichao/dir1/dir_2_1 #复制目录dir2到dir1,包括子目录与文件
[songshichao@song dir1]$ ll
总用量 0
drwxrwxr-x. 4 songshichao songshichao 61 4月   5 22:08 dir2
drwxrwxr-x. 4 songshichao songshichao 61 4月   5 22:14 dir_2_1
-rw-rw-r--. 1 songshichao songshichao  0 4月   5 21:33 file_2
-rw-rw-r--. 1 songshichao songshichao  0 4月   4 00:00 file_3
覆盖与追加内容
cat /etc/pass > new.txt # > 表示文件覆盖写入
echo "something" > new.txt
echo "append" >> new.txt # >>表示追加到文件末尾
cat a.txt b.txt > c.txt # 合并文件内容
了解一下tar命令,
必选其中之一参数(仅能存在一个!不可同时存在)
- -c:建立一个压缩文件的参数指令(create 的意思);
- -x:解开一个压缩文件的参数指令!
- -t:查看 tarfile 里面的文件!
- -r:向压缩归档文件末尾追加文件
- -u:更新原压缩包中的文件
可选参数
- -z:有gzip属性,即需要用 gzip 压缩
- -j:有bz2属性,即需要用 bzip2 压缩
- -Z:有compress属性的
- -v :压缩的过程中显示文件(显示所有过程)!这个常用,但不建议用在背景执行过程!
- -O:将文件解开到标准输出
- -f :使用档名,请留意,在 f 之后要立即接档名!不要再加参数!
- -p :使用原文件的原来属性(属性不会依据使用者而变)
- -P :可以使用绝对路径来压缩!
- -N :比后面接的日期(yyyy/mm/dd)还要新的才会被打包进新建的文件中!
- --exclude FILE:在压缩的过程中,不要将 FILE 打包!
文件归档打包
tar -cvf test.tar a.txt b.txt c.txt new.txt
压缩
tar –cvf jpg.tar *.jpg // 将目录里所有jpg文件打包成tar.jpg
tar –czf jpg.tar.gz *.jpg // 将目录里所有jpg文件打包成jpg.tar后,并且将其用gzip压缩,生成一个gzip压缩过的包,命名为jpg.tar.gz
tar –cjf jpg.tar.bz2 *.jpg // 将目录里所有jpg文件打包成jpg.tar后,并且将其用bzip2压缩,生成一个bzip2压缩过的包,命名为jpg.tar.bz2
tar –cZf jpg.tar.Z *.jpg // 将目录里所有jpg文件打包成jpg.tar后,并且将其用compress压缩,生成一个umcompress压缩过的包,命名为jpg.tar.Z
gizp test.txt #将文件test.txt压缩,后缀为.gz
gzip -r log.tar #压缩一个tar备份文件,此时压缩文件的扩展名为.tar.gz
gzip -rv test6 #递归的压缩目录
gzip [选项] 压缩(解压缩)的文件名
-c 将输出写到标准输出上,并保留原有文件。
-d 将压缩文件解压。
-l 对每个压缩文件,显示下列字段:
压缩文件的大小;未压缩文件的大小;压缩比;未压缩文件的名字
-r 递归式地查找指定目录并压缩其中的所有文件或者是解压缩。
-t 测试,检查压缩文件是否完整。
-v 对每一个压缩和解压的文件,显示文件名和压缩比。
-num 用指定的数字 num 调整压缩的速度,-1 或 --fast 表示最快压缩方法(低压缩比),
-9 或--best表示最高压缩方法(高压缩比)。系统缺省值为 6。
bzip2 test.txt #将文件压缩 .bz2格式
解压
tar –xvf file.tar // 解压 tar包
tar -zxvf file.tar.gz // 解压tar.gz
tar -jxvf file.tar.bz2 // 解压 tar.bz2
tar –Zxvf file.tar.Z // 解压tar.Z
gzip -dr test6 #递归地解压目录
修改文件属性:
chgrp 修改文件属组
chgrp users l.log 修改文件l.log的所属用户组为users
chown 修改属主
chown bin install.log 修改install.log的所有者为bin
chmod 修改权限
Linux文件的基本权限有9个,分别是owenr、group、others三种身份各自有自己的r、w和x。假如文件的权限字符为:“-rwxrwxrwx”,这9个权限是三个三个一组的,我们可以使用数字表示权限:
r->4
w->2
x->1
所以,当文件权限为“-rwxrwx---”时,分数是:
owner->4+2+1=7
group->4+2+1=7
others->0+0+0=0
此时文件的权限数字就是770.
假如有一文件bashrc,权限字符为“-rwxrwxrwx”,我们需要修改为“-rwxr-xr--”,计算得权限数字为754,所以,执行命令:
- # chmod 754 bashrc
还有一个改变权限的办法。我们知道文件有9个基本权限,分别是owner、group和others三种身份各自的三个权限,我们用u、g、o代表三种身份,用a(all)代表所有身份,得到下表:
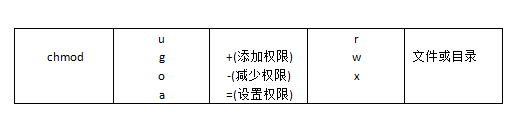
例如,我们可以这样设置文件bashrc的权限:
- # chmod u=rwx,go=rx bashrc
即user权限为rwx,group和others的权限均为rx。
如果我们想让每个人都可对文件bashrc写入,则可以:
- # chmod a+w bashrc
而如果要将权限去掉,则用-。例如我们去掉全部人的执行权限:
- # chmod a-x bashrc