 (function(modules) {
   // 缓存已经加载过的 module 的 exports
     var installedModules = {};
   // _webpack_require 与 commonjs 的 require类似,它是 webpack加载函数,用来加载webpack定义的模块,返回exports导出对象
     function __webpack_require__(moduleId) {
     // 如果缓存中存在当前模块就直接返回
         if(installedModules[moduleId]) {
             return installedModules[moduleId].exports;
         }
      //第一次加载时, 初始化时模块对象,并将当前模块进行缓存
         var module = installedModules[moduleId] = {
             i: moduleId,  // 模块id
             l: false,     // 是否已加载
             exports: {}  // 模块导出对象
         };
     // module.exports 模块导出对象引用,改变模块包裹函数内部的this指向,module当前模块对象的引用,module.exports 模块导出对象的引用,__webpack_require__ 用于在模块中加载其他模块
         modules[moduleId].call(module.exports, module, module.exports, __webpack_require__);
     // 标记是否已加载
         module.l = true;
     // 返回模块导出对象引用
         return module.exports;
     }
   // 加载入口模块并返回入口模块的exports
     return __webpack_require__(__webpack_require__.s = "./src/index.js");
 })
 ({

 "./src/a.js":

 (function(module, exports, __webpack_require__) {

eval("let b = __webpack_require__(/*! ./base.js/b */ "./src/base.js/b.js")
module.exports = 'a' + b

//# sourceURL=webpack:///./src/a.js?");

 }),

 "./src/base.js/b.js":
 (function(module, exports) {

eval("module.exports = 'b'

//# sourceURL=webpack:///./src/base.js/b.js?");

 }),

 "./src/index.js":
 (function(module, exports, __webpack_require__) {

eval("let str = __webpack_require__(/*! ./a.js */ "./src/a.js")
console.log(str)

//# sourceURL=webpack:///./src/index.js?");

 })

 });
上面代码的核心骨架其实就是一个IIFE (立即调用函数表达式)
这个立即执行函数接受一个对象 modules 作为参数,key 为依赖文件路径, value 是一个简单处理过后的函数,函数内部的代码不完全等同于是我们编写的源码,而是被webpack包裹后的内容。 这就是modules接收到的数据。
需要将require方法改写成__webpack_require__方法,因为浏览器端不支持require方法。
大致结构是这样的
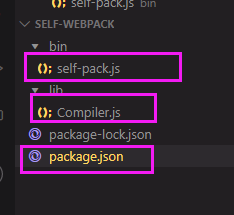
先在package.json文件里配置打包命令
package.json
{
  "name": "self-webpack",
  "version": "1.0.0",
  "description": "",
  "main": "index.js",
  "bin": {
    "self-pack": "./bin/self-pack.js"
  },
  "scripts": {
    "test": "echo "Error: no test specified" && exit 1"
  },
  "keywords": [],
  "author": "",
  "license": "ISC"
}
在self-webpack文件里写我们的打包流程
self-webpack.js
//通过此文件,需要解析编译用户配置的webpack.config.js文件

//1.需要找到当前执行名的路径 拿到webpack.config.js
//1.1拿到文件路径
let path = require('path')
//1.2config配置文件
let config = require(path.resolve(__dirname))
//1.3编译配置文件
let Compiler = require('./lib/Compiler')
let compiler = new Compiler(config)
//1.4运行
compiler.run()
在Compiler文件中写主要的打包逻辑,拿到webpack.config.js里面的配置信息,解析入口,解析文件依赖关系,发射文件。
Compiler.js
class Complier{
    constructor(config){
        this.config = config
        //需要保存入口文件的路径
        this.entryId  //主模块路径 "./src/index.js"
        //需要保存所有模块的依赖
        this.module = {}
        //入口路径
        this.entry = config.entry
        //工作目录 是指执行打包命令的文件夹地址 比如在d:/aa/b目录下执行 npm run build 那么cwd就是d:/aa/b
        this.root = process.cwd()
    }
    buildModule(modulePath,isEntry){

    }
    emitFile(){

    }
    run(){
        //创建模块的依赖关系
        this.buildModule(path.resolve(this.root,this.entry),true) //true表示是主模块

        //发射一个文件 打包后的文件
        this.emitFile()
    }
}
module.exports = Complier
大概流程就是这样,构建模块时,我们需要拿到模块的内容(我们编写的源码)。这个通过getSource函数拿到即可。我们还需要拿到模块id
接下来构建路径对应的模块内容
getSource(modulePath){
        //拿到模块内容
        let content = fs.readFileSync(modulePath,'utf8')
        return content

    }
    //构建模块
    buildModule(modulePath,isEntry){
        //拿到路径对应的内容
        let source = this.getSource(modulePath)
        //模块id
        let moduleName = './'+path.relative(this.root, modulePath)
        console.log(sorce,moduleName) //sorce: let str = require('./a.js') console.log(str) moduleName: './src/index.js'

    }
    emitFile(){

    }
    run(){
        //创建模块的依赖关系
        this.buildModule(path.resolve(this.root,this.entry),true) //true表示是主模块

        //发射一个文件 打包后的文件
        this.emitFile()
    }
console.log(sorce,moduleName)对应的内容

接下来要做的就是解析入口文件里面的文件依赖,解析依赖文件的依赖,递归解析出所有文件的依赖。
//解析源码
    parse(source,parentPath){ //AST解析语法树
        console.log(source,parentPath)
    }
    //构建模块
    buildModule(modulePath,isEntry){
        //拿到路径对应的内容
        let source = this.getSource(modulePath)
        //模块id 'src/index.js'
        let moduleName = './'+path.relative(this.root, modulePath)
        console.log(sorce,moduleName) //sorce: let str = require('./a.js') console.log(str) moduleName: './src/index.js'

        if(isEntry){
            this.entryId = moduleName //保存入口文件名字
        }
        //解析需要把source源码进行改造 返回一个依赖列表 比如index.js文件里面引入了a.js,需要把这个a.js进行解析,a.js里面要是再引入b.js也要把b.js对应的内容解析
        let {sourceCode,dependencies} = this.parse(source,path.dirname(moduleName)) //  path.dirname(moduleName)取父路径 .src
        //把模块路径和模块中的内容对应起来
        this.modules[moduleName] = sourceCode
    }

下面需要把let str = require('./a.js') 这种,/a.js转换成 './src/a.js' ,还有一个是将require方法改成 __webpack_require__console.log,这就是解析语法树的工作
parse方法需要安装几个包来解析,还需要看看ast的结构
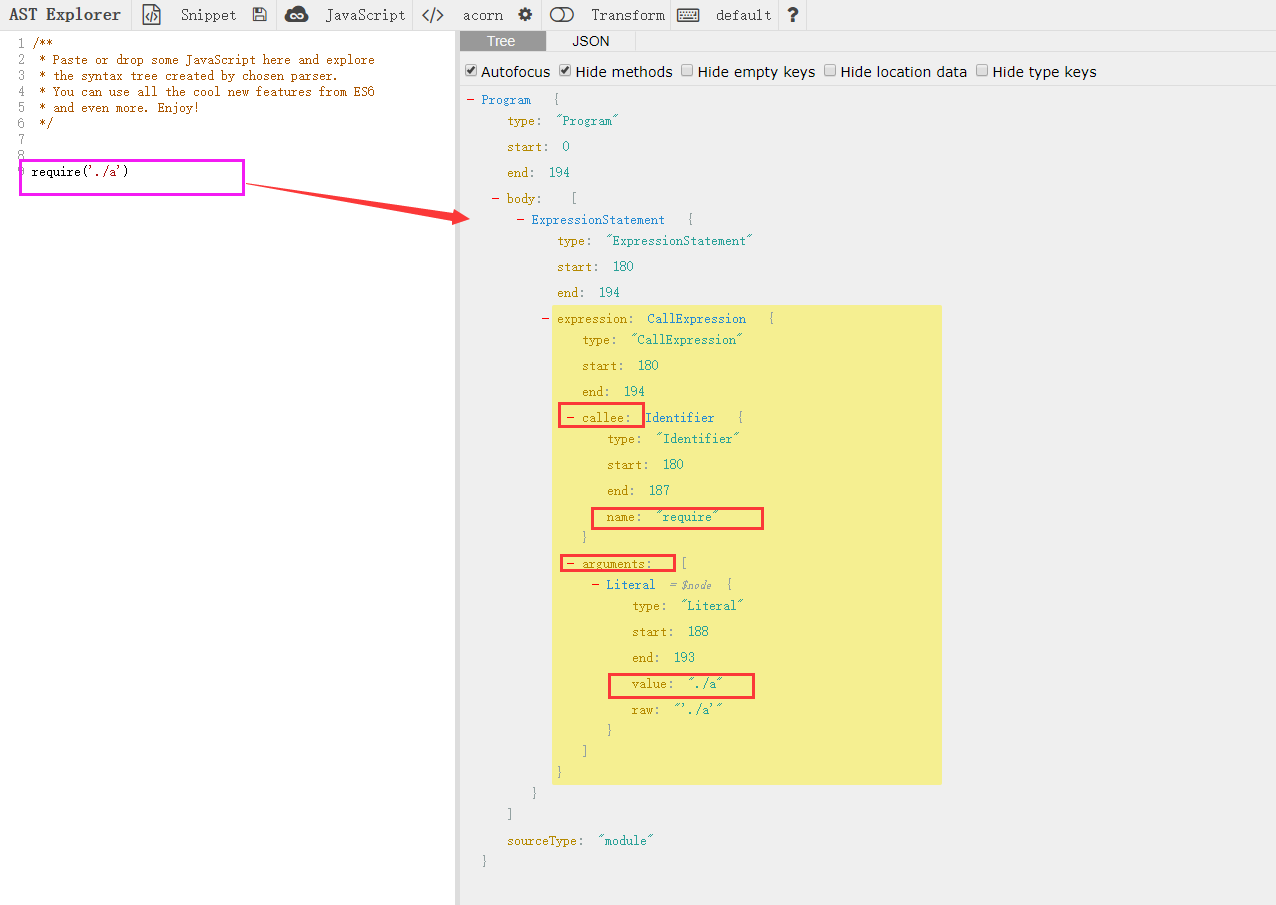
require('./a') 对应的ast的结构
下面就开始解析
//解析源码
    //babylon 把源码转换成ast
    // @babel/traverse
    //@babel/types
    //@babel/generator
    parse(source,parentPath){ //AST解析语法树
        console.log(source,parentPath)
        let ast = babylon.parse(source)
        let dependencies = [] //存放依赖模块
        traverse(ast,{
            CallExpression(p){
                let node = p.node //对应的节点
                if(node.callee.name === 'require') {
                    node.callee.name = "__webpack_require__" //改require名字
                    let moduleName = node.arguments[0].value //取到引用模块的名字 a
                    moduleName = moduleName + (path.extname(moduleName)?'': '.js') //拼接成./a.js
                    moduleName = './'+path.join(parentPath,moduleName) // ./src/a.js
                    dependencies.push(moduleName) //将这个依赖模块存入数组
                    node.arguments = [traverse.stringLiteral(moduleName)] //改源码
                }

            }
        })
        let sourceCode =  generator(ast).code
        return {sourceCode,dependencies}
    }
    //构建模块
    buildModule(modulePath,isEntry){
        //拿到路径对应的内容
        let source = this.getSource(modulePath)
        //模块id 'src/index.js'
        let moduleName = './'+path.relative(this.root, modulePath)
        console.log(sorce,moduleName) //sorce: let str = require('./a.js') console.log(str) moduleName: './src/index.js'

        if(isEntry){
            this.entryId = moduleName //保存入口文件名字
        }
        //解析需要把source源码进行改造 返回一个依赖列表 比如index.js文件里面引入了a.js,需要把这个a.js进行解析,a.js里面要是再引入b.js也要把b.js对应的内容解析
        let {sourceCode,dependencies} = this.parse(source,path.dirname(moduleName)) //  path.dirname(moduleName)取父路径 .src
        console.log(sourceCode,dependencies)
        //把模块路径和模块中的内容对应起来
        this.modules[moduleName] = sourceCode
        //若依赖模块里面又依赖别的模块就需要递归解析
        dependencies.forEach(dep=>{
            this.buildModule(path.join(this.root,dep),false) //false表示不是主模块
        })

    }
    emitFile(){

    }
    run(){
        //创建模块的依赖关系
        this.buildModule(path.resolve(this.root,this.entry),true) //true表示是主模块
        console.log(this.modules,this.entryId)
        //发射一个文件 打包后的文件
        this.emitFile()
    }


接下来看看发射文件,需要准备一个webpack打包后的模板,并且增加一个渲染引擎,这里我选择 ejs
其实就是写一个模板,然后将我们拿到的模块id和对应的内容渲染到模板,再发射出去这个文件
首先需要一个ejs模板
(function (modules) { // webpackBootstrap

    // The module cache

    var installedModules = {};

    // The require function

    function __webpack_require__(moduleId) {

        // Check if module is in cache

        if (installedModules[moduleId]) {

            return installedModules[moduleId].exports;

        }

        // Create a new module (and put it into the cache)

        var module = installedModules[moduleId] = {

            i: moduleId,

            l: false,

            exports: {}

        };

        // Execute the module function

        modules[moduleId].call(module.exports, module, module.exports, __webpack_require__);

        // Flag the module as loaded

        module.l = true;

        // Return the exports of the module

        return module.exports;

    }

    // Load entry module and return exports

    return __webpack_require__(__webpack_require__.s = "<%-entryId%>");

})

/************************************************************************/

({

    <% for(let key in modules){ %>

"<%- key %>":

(function(module, exports, __webpack_require__) {

eval(`<%- modules[key] %>`)

}),

<% } %>

})
开始渲染,将拿到的模块id以及模块内容渲染到模板中,在发射到一个文件即可
emitFile(){

        //将打包好的资源放到哪个目录下
        let main = path.join(this.config.output.path,this.config.output.filename)
        //模板路径 读取模板内容
        let templateStr = this.getSource(path.join(__dirname,'main.ejs'))
        //渲染
        let code = ejs.render(templateStr,{entryId:this.entryId,modules:this.modules})
        this.assets = {}
        //路径对应的代码
        this.assets[main] = code
        fs.writeFileSync(main,this.assets[main])
    }
完整版:
let fs = require('fs')
let path = require('path')
let babylon = require('babylon')
let traverse = require('@babel/traverse')
let types = require('@babel/types')
let generator = require('@babel/generator')
class Complier{
    constructor(config){
        this.config = config
        //需要保存入口文件的路径
        this.entryId  //主模块路径 "./src/index.js"
        //需要保存所有模块的依赖
        this.module = {}
        //入口路径
        this.entry = config.entry
        //工作目录 是指执行打包命令的文件夹地址 比如在d:/aa/b目录下执行 npm run build 那么cwd就是d:/aa/b
        this.root = process.cwd()
    }
    getSource(modulePath){
        //拿到模块内容
        let content = fs.readFileSync(modulePath,'utf8')
        return content

    }
    //解析源码
    //babylon 把源码转换成ast
    // @babel/traverse
    //@babel/types
    //@babel/generator
    parse(source,parentPath){ //AST解析语法树
        console.log(source,parentPath)
        let ast = babylon.parse(source)
        let dependencies = [] //存放依赖模块
        traverse(ast,{
            CallExpression(p){
                let node = p.node //对应的节点
                if(node.callee.name === 'require') {
                    node.callee.name = "__webpack_require__" //改require名字
                    let moduleName = node.arguments[0].value //取到引用模块的名字 a
                    moduleName = moduleName + (path.extname(moduleName)?'': '.js') //拼接成./a.js
                    moduleName = './'+path.join(parentPath,moduleName) // ./src/a.js
                    dependencies.push(moduleName) //将这个依赖模块存入数组
                    node.arguments = [traverse.stringLiteral(moduleName)] //改源码
                }

            }
        })
        let sourceCode =  generator(ast).code
        return {sourceCode,dependencies}
    }
    //构建模块
    buildModule(modulePath,isEntry){
        //拿到路径对应的内容
        let source = this.getSource(modulePath)
        //模块id 'src/index.js'
        let moduleName = './'+path.relative(this.root, modulePath)
        console.log(sorce,moduleName) //sorce: let str = require('./a.js') console.log(str) moduleName: './src/index.js'

        if(isEntry){
            this.entryId = moduleName //保存入口文件名字
        }
        //解析需要把source源码进行改造 返回一个依赖列表 比如index.js文件里面引入了a.js,需要把这个a.js进行解析,a.js里面要是再引入b.js也要把b.js对应的内容解析
        let {sourceCode,dependencies} = this.parse(source,path.dirname(moduleName)) //  path.dirname(moduleName)取父路径 .src
        console.log(sourceCode,dependencies)
        //把模块路径和模块中的内容对应起来
        this.modules[moduleName] = sourceCode
        //若依赖模块里面又依赖别的模块就需要递归解析
        dependencies.forEach(dep=>{
            this.buildModule(path.join(this.root,dep),false) //false表示不是主模块
        })

    }
    emitFile(){

        //将打包好的资源放到哪个目录下
        let main = path.join(this.config.output.path,this.config.output.filename)
        //模板路径 读取模板内容
        let templateStr = this.getSource(path.join(__dirname,'main.ejs'))
        //渲染
        let code = ejs.render(templateStr,{entryId:this.entryId,modules:this.modules})
        this.assets = {}
        //路径对应的代码
        this.assets[main] = code
        fs.writeFileSync(main,this.assets[main])
    }
    run(){
        //创建模块的依赖关系
        this.buildModule(path.resolve(this.root,this.entry),true) //true表示是主模块
        console.log(this.modules,this.entryId)
        //发射一个文件 打包后的文件
        this.emitFile()
    }
}
module.exports = Complier
这样我们就能把我们写的代码进行打包,并且可以在浏览器端运行。后续工作就是添加loader和plugin
到这里, 我们就可以大概总结一下webpack的运作流程是这样的 :
- 获取配置参数
- 实例化Compiler, 通过run方法开启编译
- 根据入口文件, 创建依赖项, 并递归获取所有模块的依赖模块
- 把模块内容通过渲染模板渲染成代码块
- 输出文件到指定路径