处理 Json
review Json
- Json 有 2 种格式
- Json 对象:{key:value, key:value, …}
- Json 数组:[value1, value2 …]
- Json 对象解析方式
- 对象:对象.key
- 数组:for 循环遍历
- Java 转换 Json
- Bean & Map → Json 对象
- Collection → Json 数组
返回 Json
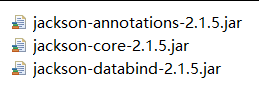
- 加入 jar 包
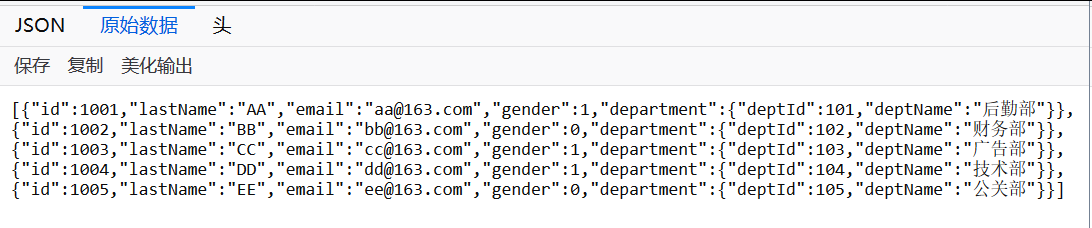
- 编写目标方法,使其返回 JSON 对应的对象或集合;方法上加上注解 @ResponseBody
@RequestMapping("/testJson") @ResponseBody // SpringMVC 对 JSON 的支持 public Collection<Employee> testJson() { Collection<Employee> emps = empDao.getAll(); return emps; } - 开启 MVC 驱动:
<mvc:annotation-driven />(不加,HTTP Statu:406) - 编写页面代码
<script type="text/javascript"> $(function() { $("#btn").click(function() { $.ajax({ url:"testJson", type:"POST", dataType:"json", success:function(msg) { var tb = "<table border='1'>"; tb += "<tr><th>id</th><th>lastName</th><th>email</th> <th>gender</th><th>dept</th></tr>"; for(var index in msg) { var emp = msg[index]; tb += "<tr><td>" + emp.id + "</td>"; tb += "<td>" + emp.lastName + "</td>"; tb += "<td>" + emp.email + "</td>"; tb += "<td>" + emp.gender + "</td>"; tb += "<td>" + emp.department.deptName + "</td></tr>"; } tb += "</table>" $("body").append(tb); } }); }); }); </script> <body> <a href="testJson">测试 Json-1</a> <input id="btn" type="button" value="测试 Json-2" /> </body> - 测试 Json-1
- 测试 Json-2

HMConverter 原理
HttpMessageConverter<T> 是 Spring 3.0 新添加的一个接口,负责将请求信息转换为一个对象(类型为 T),将对象(类型为 T)输出为响应信息。
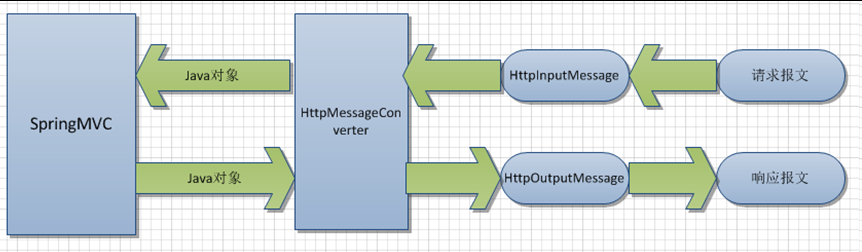
public interface HttpInputMessage extends HttpMessage {
    InputStream getBody() throws IOException;
}

public interface HttpOutputMessage extends HttpMessage {
    OutputStream getBody() throws IOException;
}
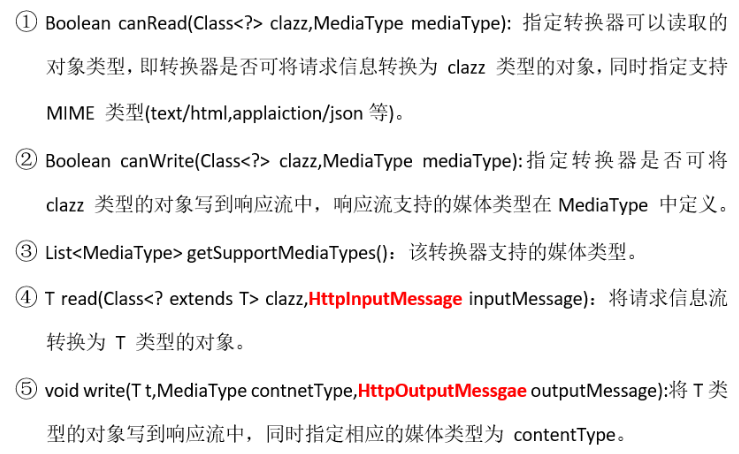
HttpMessageConverter<T> 接口定义的方法:
Converters:

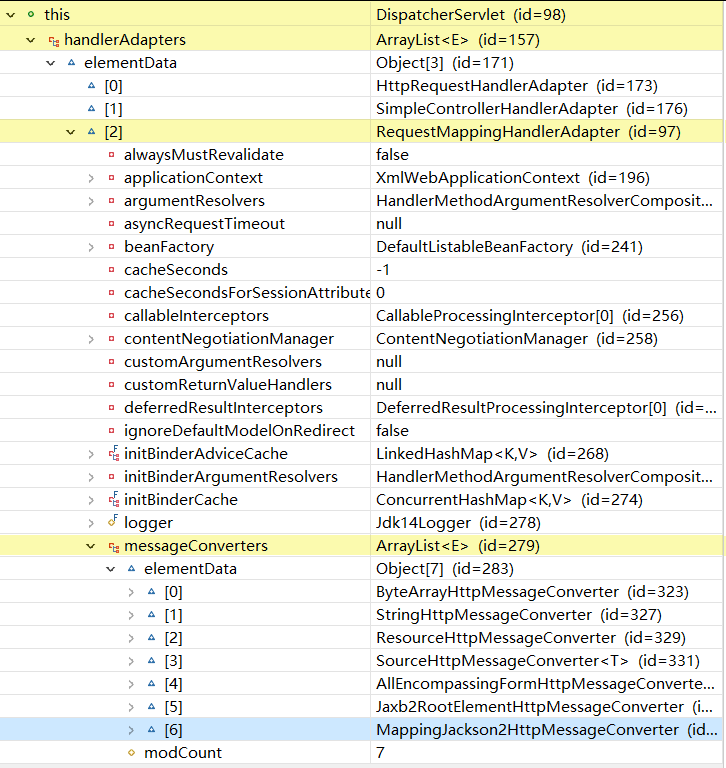
DispatcherServlet 默认装配 RequestMappingHandlerAdapter ,而其默认装配如下 HttpMessageConverter(默认情况下数组长度是6个,是增加了 jackson. jar 后才多出的 MappingJackson2HttpMessageConverter):
使用 HMConverter
- 使用
HttpMessageConverter<T>将请求信息转化并绑定到处理方法的入参中或将响应结果转为对应类型的响应信息,Spring 提供了两种途径:- 使用
@RequestBody / @ResponseBody对处理方法进行标注
- 使用
HttpEntity<T> / ResponseEntity<T>作为处理方法的形参或返回值

- 使用
- 当控制器处理方法使用到
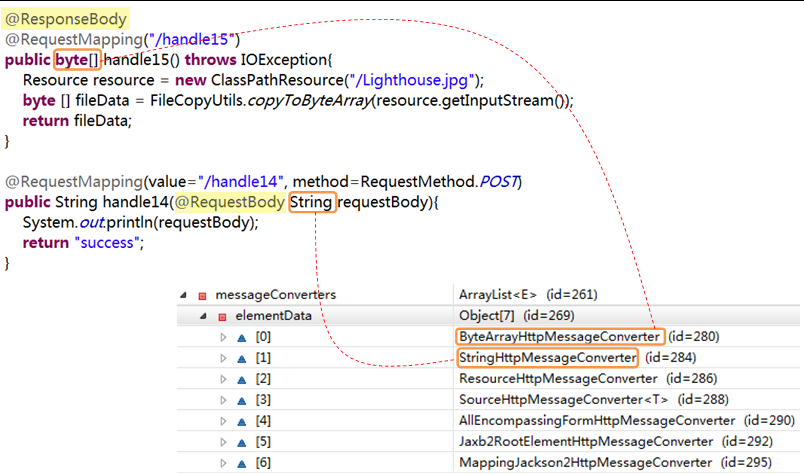
@RequestBody/@ResponseBody或HttpEntity<T>/ResponseEntity<T>时, Spring 首先根据请求头或响应头的 Accept 属性选择匹配的 HttpMessageConverter, 进而根据参数类型或泛型类型的过滤得到匹配的 HttpMessageConverter,若找不到可用的 HttpMessageConverter 将报错 - @RequestBody 和 @ResponseBody 不需要成对出现
文件上传下载
文件下载
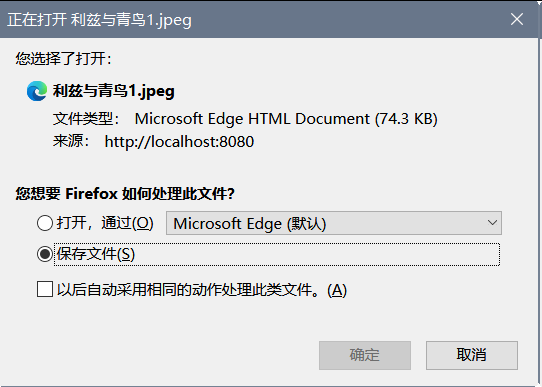
使用 @ResponseEntity 实现文件下载
@RequestMapping("/download")
public ResponseEntity<byte[]> download(HttpSession session) throws IOException {
    // 获取下载文件的路径
    String fileName = "利兹与青鸟1.jpeg";
    String realPath = session.getServletContext().getRealPath("img");
    String finalPath = realPath + File.separator + fileName;
    InputStream is = new FileInputStream(finalPath);
    // (1) available(): 获取输入流所读取的文件的最大字节数
    byte[] bys = new byte[is.available()];
    is.read(bys);
    // (2) HttpHeaders implements MultiValueMap<String, String>
    HttpHeaders headers = new HttpHeaders();
    // headers.add("Content-Disposition", "attachment; filename=1.jpeg");
    headers.setContentDispositionFormData("attachment", URLEncoder.encode(fileName, "UTF-8"));
    // (3) 设置响应状态
    HttpStatus statusCode = HttpStatus.OK;
    ResponseEntity<byte[]> entity = new ResponseEntity<>(bys, headers, statusCode);
    return entity;
}
文件上传
- Spring MVC 为文件上传提供了直接的支持,这种支持是通过即插即用的 MultipartResolver 实现的
- Spring 用 Jakarta Commons FileUpload 技术实现了一个 MultipartResolver 实现类:CommonsMultipartResolver
- Spring MVC 上下文中默认没有装配 MultipartResovler,因此默认情况下不能处理文件的上传工作,如果想使用 Spring 的文件上传功能,需现在上下文中配置 MultipartResolver
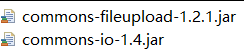
<!-- 作用:[Client] File → [Server] MultipartFile id 值固定,必须是如下这个!否则,会抛异常:IllegalArgumentException Expected MultipartHttpServletRequest: is a MultipartResolver configured? --> <bean id = "multipartResolver" class = "org.springframework.web.multipart.commons.CommonsMultipartResolver"> <!-- 设置文件解析的编码,注意:一定要和页面的 pageEncoding 保持一致 --> <property name = "defaultEncoding" value = "UTF-8"></property> <!-- 设置上传文件的最大字节数 (不支持表达式) --> <property name = "maxUploadSize" value = "1024000"></property> </bean> - 为了让 CommonsMultipartResolver 正确工作,必须先将 Jakarta Commons FileUpload 及 Jakarta Commons io 的类包添加到类路径下
文件上传示例:
<body>
<form action="upload" method="post" enctype="multipart/form-data">
    图片:<input type="file" name="uploadFile" />
    描述:<input type="text" name="desc" />
    <input type="submit" value="upload" />
</form>
</body>
@RequestMapping(value="/upload", method=RequestMethod.POST)
// 若是多文件上传,将形参改为 MultipartFile[] uploadFiles 即可
public String upload(String desc, MultipartFile uploadFile
        , HttpServletRequest request) throws IOException {
    // File → [MultipartResolver] → MultipartFile
    // System.out.println(uploadFile.getName()); 表单元素 name 属性值
    String fileName = uploadFile.getOriginalFilename(); // 实际文件名
    String finalFileName = UUID.randomUUID()
            + fileName.substring(fileName.lastIndexOf("."));
    String path = request.getServletContext()
            .getRealPath("upload") + File.separator + finalFileName;
    File dest = new File(path);
    uploadFile.transferTo(dest);
    return "success";
}
拦截器
概述
Spring MVC 也可以使用拦截器对请求进行拦截处理,用户可以自定义拦截器来实现特定的功能,自定义的拦截器可以实现 HandlerInterceptor<I>,也可以继承 HandlerInterceptorAdapter 适配器类(空实现接口)。
- preHandle():这个方法在业务处理器处理请求之前被调用,在该方法中对用户请求 request 进行处理。如果程序员决定该拦截器对请求进行拦截处理后还要调用其他的拦截器,或者是业务处理器去进行处理,则返回 true;如果程序员决定不需要再调用其他的组件去处理请求,则返回 false。
- postHandle():这个方法在业务处理器处理完请求(即生成 ModelAndView)后,但在 DispatcherServlet 向客户端返回响应前被调用,在该方法中对用户请求 request 进行处理。
- afterCompletion():这个方法在 DispatcherServlet 完全处理完请求后被调用,可以在该方法中进行一些资源清理的操作。

测试代码
springMVC.xml
<!-- 写在 interceptors 中的 bean 是拦截器bean -->
<mvc:interceptors>
    <!-- 默认拦截所有请求 -->
    <bean class="cn.edu.nuist.interceptor.FirstInterceptor"></bean>

    <!--
        ref 方式声明,要求拦截器类上必须加注解 @Component
        <ref bean="firstInterceptor"/>
    -->
</mvc:interceptors>
FirstInterceptor
// @Component
public class FirstInterceptor implements HandlerInterceptor {

    @Override
    public boolean preHandle(HttpServletRequest request
            , HttpServletResponse response, Object handler) throws Exception {
        System.out.println("First: preHandle");
        return true;
    }

    @Override
    public void postHandle(HttpServletRequest request, HttpServletResponse response
            , Object handler, ModelAndView modelAndView) throws Exception {
        System.out.println("First: postHandle");
    }

    @Override
    public void afterCompletion(HttpServletRequest request, HttpServletResponse response
            , Object handler, Exception ex) throws Exception {
        System.out.println("First: afterCompletion");
    }
}
TestInterceptorController
@RequestMapping("testInterceptor")
public String testInterceptor() {
    // System.out.println(1/0);
    return "success";
}
运行结果:
- preHandle 返回 false
First: preHandle - preHandle 返回 true
First: preHandle First: postHandle First: afterCompletion - preHandle 返回 true && 测试方法中放开注释的那一行
First: preHandle
First: afterCompletion
单个拦截器的执行顺序

设置自定义拦截方式
<!-- 配置用于 session 验证的拦截器 -->
<!-- 若有多个拦截器满足拦截处理的要求,则依据配置的先后顺序来执行 -->
<mvc:interceptors>
    <mvc:interceptor>
        <!-- 拦截所有的请求,这个必须写在前面,也就是写在 {不拦截} 的上面 -->
        <mvc:mapping path="/**" />
        <!-- 但是排除下面这些,也就是不拦截请求 -->
        <mvc:exclude-mapping path="/login.html" />
        <mvc:exclude-mapping path="/account/login.do" />
        <mvc:exclude-mapping path="/account/regist.do" />
        <bean class="cn.edu.nuist.interceptors.SessionInterceptor" />
    </mvc:interceptor>
</mvc:interceptors>
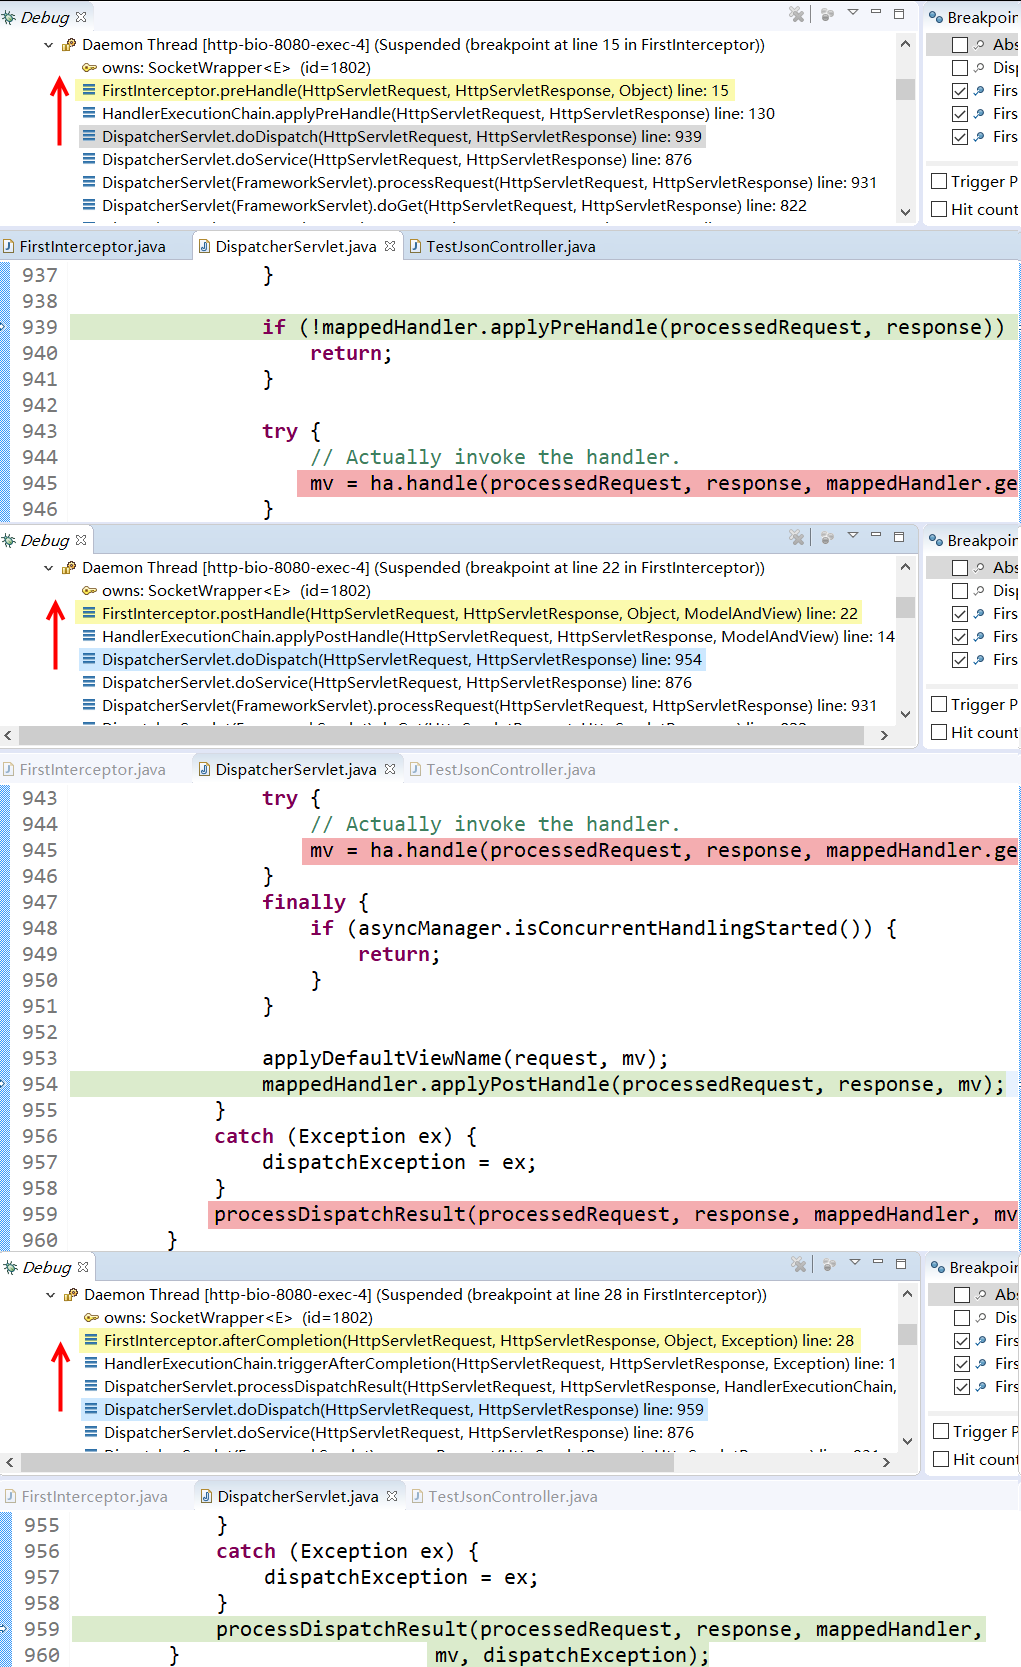
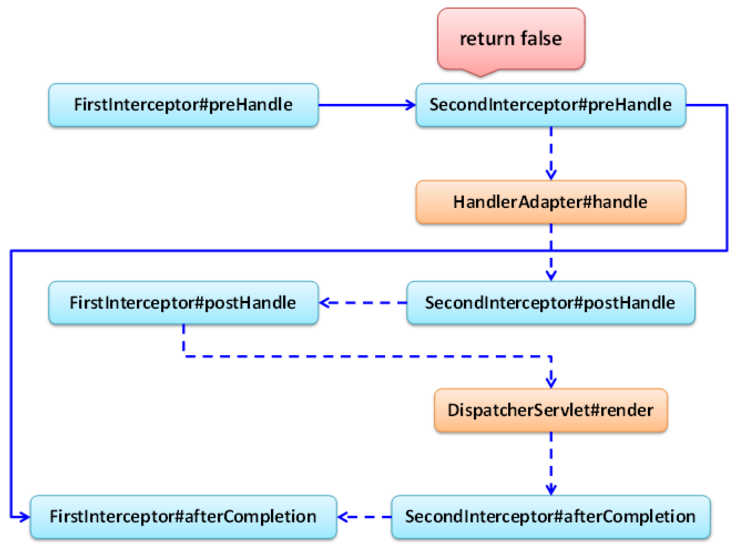
多个拦截器的执行顺序
[3.3 - 单个拦截器执行流程] 截取的源码中标注绿色的方法 Step Into 即可看到如下代码
演示 2 种情况:
- First#preHandle:true,Second#preHandle:true
- First#preHandle:true,Second#preHandle:false
异常处理
异常处理概述
- Spring MVC 通过 HandlerExceptionResolver 处理程序的异常,包括 Handler 映射、数据绑定以及目标方法执行时发生的异常。
- SpringMVC 提供的 HandlerExceptionResolver 的实现类
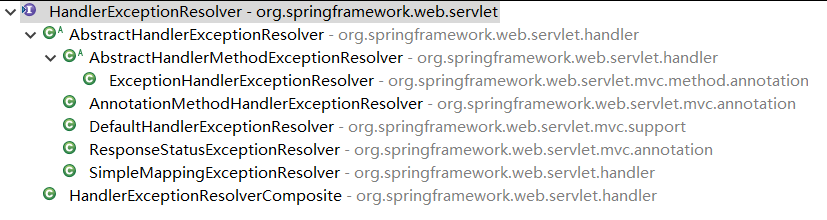
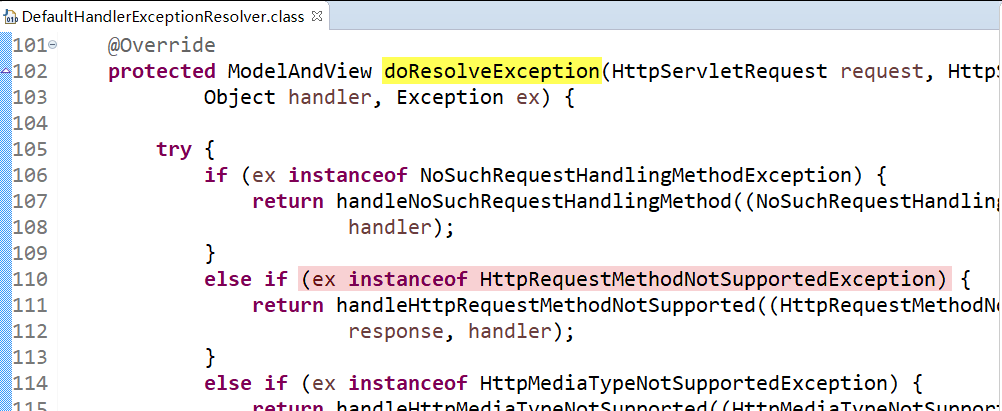
DefaultHandlerExceptionResolver
对一些特殊的异常进行处理,比如:NoSuchRequestHandlingMethodException、HttpRequestMethodNotSupportedException、HttpMediaTypeNotSupportedException、HttpMediaTypeNotAcceptableException 等。
测试:
- 增加页面链接(GET 请求)
<a href="testDefaultHandlerExceptionResolver">testDefaultHandlerExceptionResolver</a> - 增加处理器方法(POST 请求)
@RequestMapping(value="/testDefaultHandlerExceptionResolver",method=RequestMethod.POST) public String testDefaultHandlerExceptionResolver() { System.out.println("testDefaultHandlerExceptionResolver..."); return "success"; } - 出现异常错误
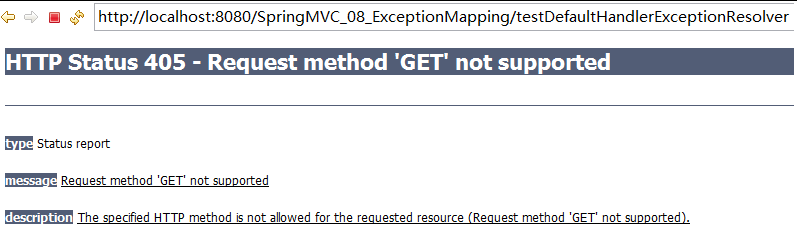
- 出现异常交给 DefaultHandlerExceptionResolver 处理
SimpleMappingExceptionResolver
如果希望对所有异常进行统一处理,可以使用 SimpleMappingExceptionResolver,它将异常类名映射为视图名,即发生异常时使用对应的视图报告异常。
部分源码
private Properties exceptionMappings;

protected String determineViewName(Exception ex, HttpServletRequest request) {
    String viewName = null;
    if (this.excludedExceptions != null) {
        for (Class<?> excludedEx : this.excludedExceptions) {
            if (excludedEx.equals(ex.getClass())) {
                return null;
            }
        }
    }
    // Check for specific exception mappings.
    if (this.exceptionMappings != null) {
        viewName = findMatchingViewName(this.exceptionMappings, ex);
    }
    // Return default error view else, if defined.
    if (viewName == null && this.defaultErrorView != null) {
        if (logger.isDebugEnabled()) {
            logger.debug("Resolving to default view '" + this.defaultErrorView
                    + "' for exception of type [" +
            ex.getClass().getName() + "]");
        }
        viewName = this.defaultErrorView;
    }
    return viewName;
}

@Override
protected ModelAndView doResolveException(HttpServletRequest request
        , HttpServletResponse response, Object handler, Exception ex) {
    // Expose ModelAndView for chosen error view.
    String viewName = determineViewName(ex, request);
    if (viewName != null) {
        // Apply HTTP status code for error views, if specified.
        // Only apply it if we're processing a top-level request.
        Integer statusCode = determineStatusCode(request, viewName);
        if (statusCode != null) {
            applyStatusCodeIfPossible(request, response, statusCode);
        }
        return getModelAndView(viewName, ex, request);
    } else {
        return null;
    }
}
测试
springMVC.xml
<bean class="org.springframework.web.servlet.handler.SimpleMappingExceptionResolver">
    <property name="exceptionMappings">
        <props>
            <prop key="java.lang.NullPointerException">error</prop>
        </props>
    </property>
</bean>
testException.jsp
<a href="testException">测试异常</a>
ExceptionController
@RequestMapping(value="/testException", method=RequestMethod.GET)
public String test() {
    String s = null;
    System.out.println(s.toString());
    return "success";
}
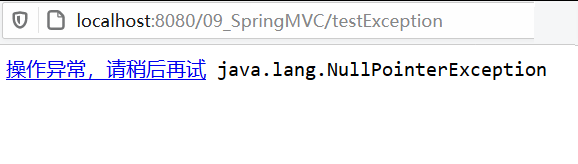
error.jsp
<body>
    <a href="#">操作异常,请稍后再试</a>
    ${exception }
</body>
结果如下:
运行流程
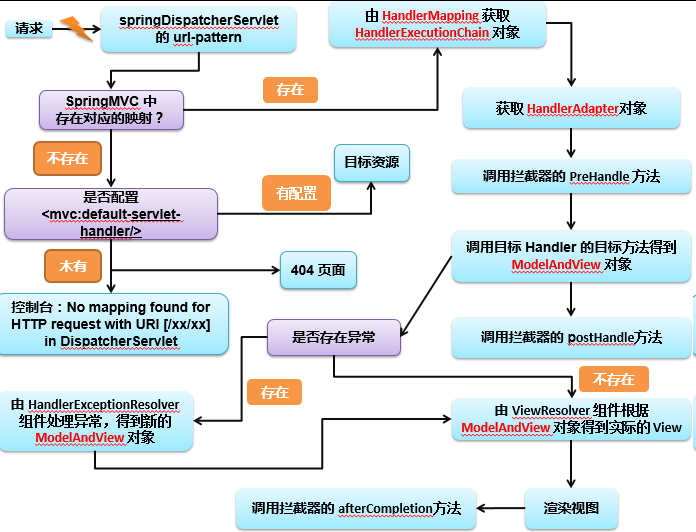
- 用户向服务器发送请求,请求被 SpringMVC 前端控制器 DispatcherServlet 捕获
- DispatcherServlet 对请求 URL 进行解析,得到请求资源标识符(URI),继而判断请求 URI 对应的映射
- 不存在,再判断是否配置了
<mvc:default-servlet-handler />- 如果没配置,则控制台报出
[警告:No mapping found for HTTP request ...],客户端展示 404 错误 - 如果有配置,则执行目标资源(一般为静态资源,如:JS/CSS/HTML)
- 如果没配置,则控制台报出
- 存在,执行下面流程
- 不存在,再判断是否配置了
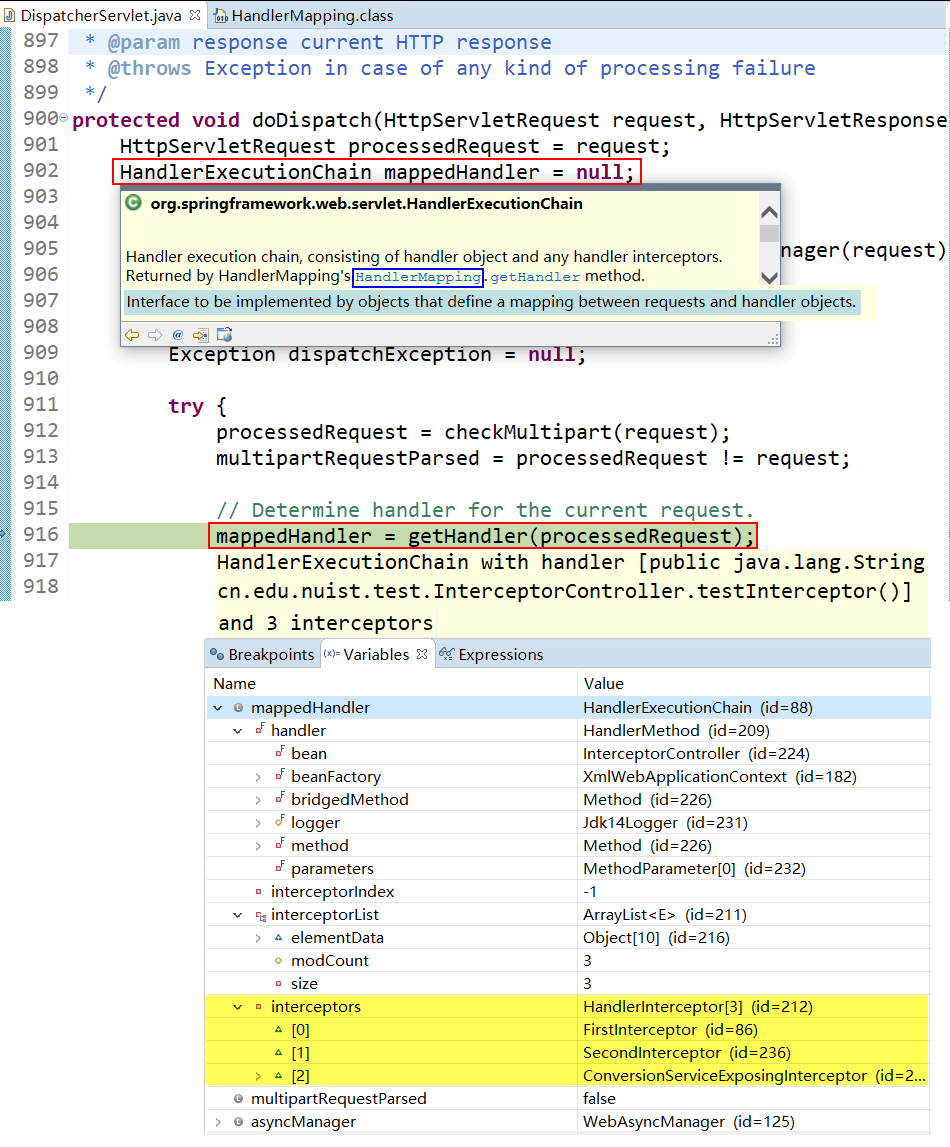
- 根据该 URI,调用 HandlerMapping 获得该 Handler 配置的所有相关的对象(包括 Handler 对象以及 Handler 对象对应的 Interceptor),最后以该请求所对应的 HandlerExecutionChain 对象的形式返回
- DispatcherServlet 根据获得的Handler,选择一个合适的HandlerAdapter。
- 如果成功获得 HandlerAdapter 后,此时将开始执行拦截器的
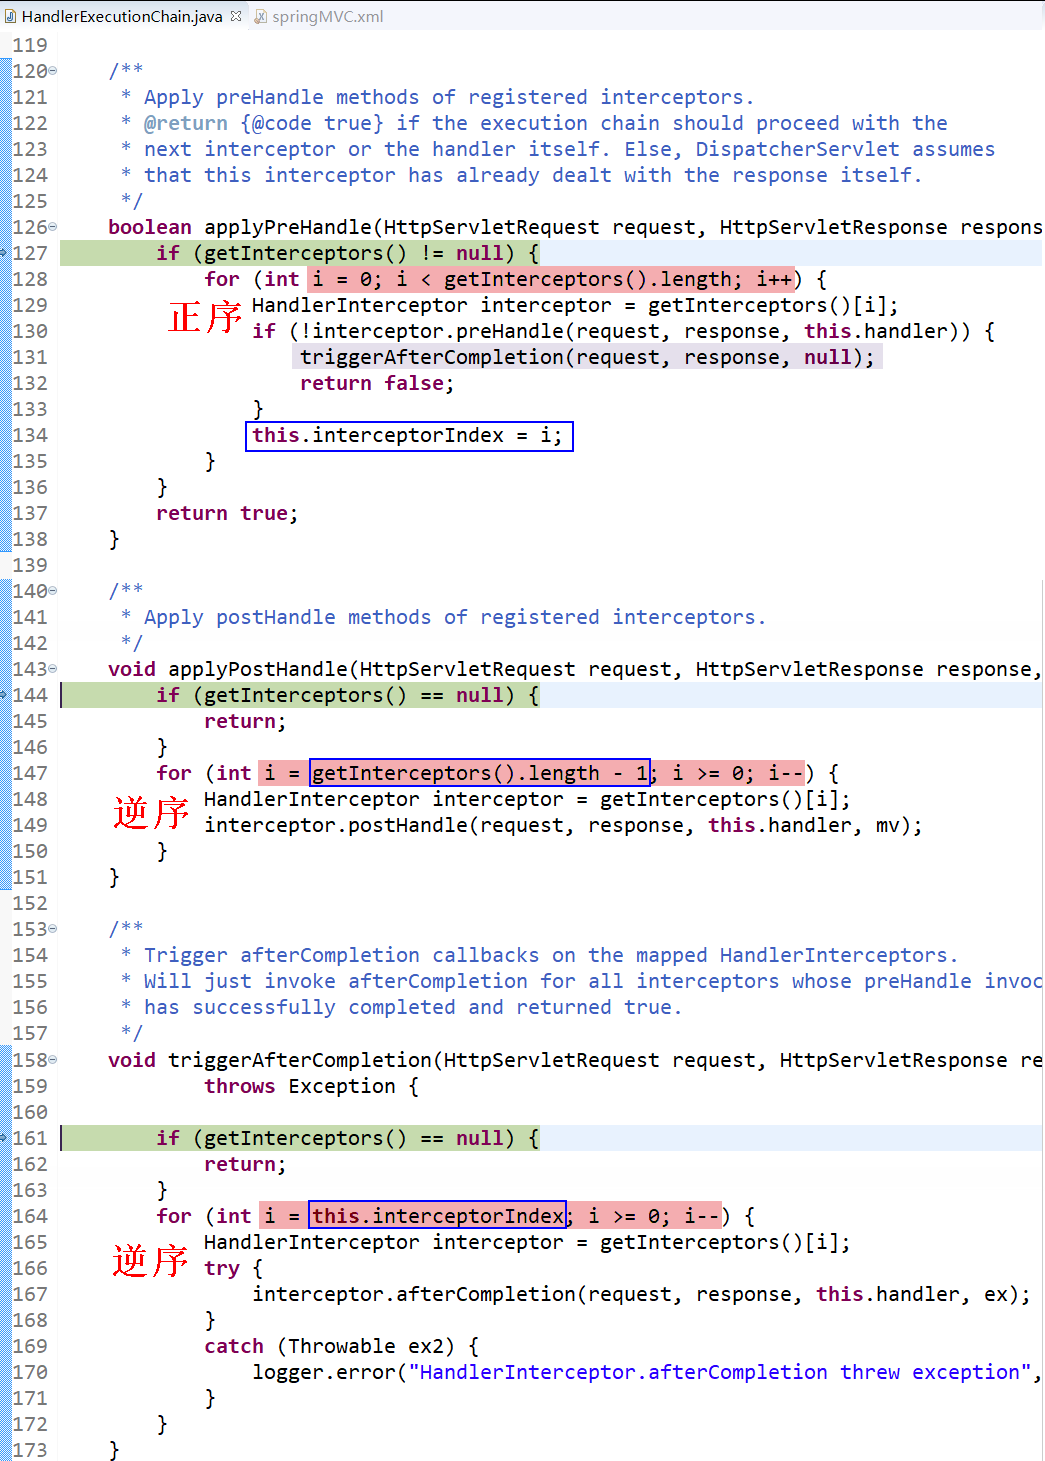
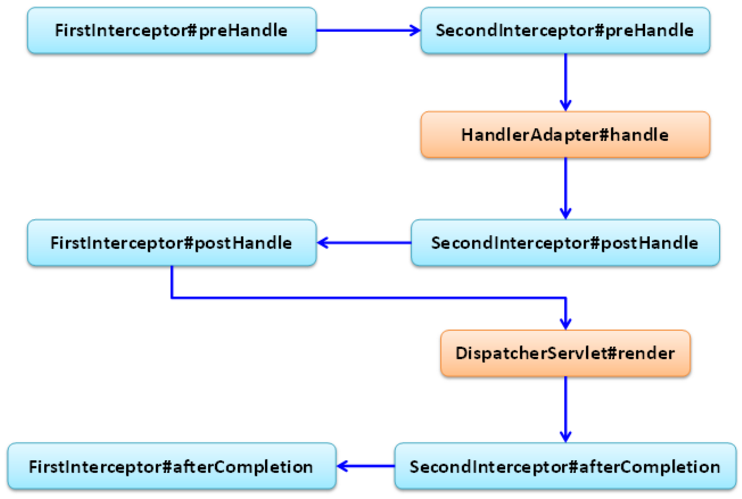
preHandler(...)【正向】 - 提取 request 中的模型数据:填充 Handler 形参,开始执行 Handler (Controller) 方法,处理请求
// Actually invoke the handler. mv = ha.handle(processedRequest, response, mappedHandler.getHandler()); - 在填充 Handler 的形参过程中,根据你的配置,Spring 将帮你做一些额外的工作
- HttpMessageConveter: 将请求消息(如 Json、xml 等数据)转换成一个对象,将对象转换为指定的响应信息
- 数据转换:对请求消息进行数据转换。如 String 转换成 Integer、Double 等
- 数据根式化:对请求消息进行数据格式化。 如将字符串转换成格式化数字或格式化日期等
- 数据验证: 验证数据的有效性(长度、格式等),验证结果存储到 BindingResult 或 Error 中
- Handler 执行完成后,向DispatcherServlet 返回一个ModelAndView对象
- 此时将开始执行拦截器的
postHandle(...)【逆向】 - 根据返回的 ModelAndView(此时会判断是否存在异常:如果存在异常,则执行 HandlerExceptionResolver 进行异常处理)选择一个适合的 ViewResolver(必须是已经注册到 Spring 容器中的 ViewResolver)返回给 DispatcherServlet,根据 Model 和 View,来渲染视图
- 在返回给客户端时需要执行拦截器的
AfterCompletion【逆向】 - 将渲染结果返回给客户端
与 Spring 整合
- 需要进行 Spring 整合 SpringMVC 吗 ?
- 还是否需要再加入 Spring 的 IOC 容器 ?
- 是否需要在web.xml 文件中配置启动 Spring IOC 容器的 ContextLoaderListener ?
- 需要
- 需要:通常情况下,类似于数据源 / 事务 / 整合其他框架都是放在 Spring 的配置文件中(而不是放在 SpringMVC 的配置文件中)。实际上放入 Spring 配置文件对应的 IOC 容器中的还有 Service 和 Dao。
- 不需要:都放在 SpringMVC 的配置文件中;也可以分多个 Spring 的配置文件,然后使用 import 节点导入其他的配置文件。
配置 Listener
web.xml
<!-- 配置启动 Spring IOC 容器的 Listener -->
<context-param>
    <param-name>contextConfigLocation</param-name>
    <param-value>classpath:beans.xml</param-value>
</context-param>

<listener>
    <listener-class>org.springframework.web.context.ContextLoaderListener</listener-class>
</listener>
相关源码
public class ContextLoaderListener extends ContextLoader
        implements ServletContextListener {
    @Override
    public void contextInitialized(ServletContextEvent event) {
        initWebApplicationContext(event.getServletContext());
    }
}

public class ContextLoader {
    public static final String CONFIG_LOCATION_PARAM = "contextConfigLocation";

    // The root WebApplicationContext instance that this loader manages.
    private WebApplicationContext context;


    public WebApplicationContext initWebApplicationContext(ServletContext servletContext) {
        // ...
        servletContext.setAttribute(WebApplicationContext
                .ROOT_WEB_APPLICATION_CONTEXT_ATTRIBUTE, this.context);
        // ...
    }
}
bean 冲突
在 HelloWorldHandler、UserService 类中增加构造器,启动服务器,查看构造器执行情况。
【问题】若 Spring 的 IOC 容器和 SpringMVC 的 IOC 容器扫描的包有重合的部分,就会导致有的 bean 会被创建 2 次
【解决】使 Spring 的 IOC 容器扫描的包和 SpringMVC 的 IOC 容器扫描的包没有重合的部分:使用 <exclude-filter> 和 <include-filter> 子节点来规定只能扫描的注解
spring.xml
<!-- Spring 除 [控制层组件] 外都扫描 -->
<context:component-scan base-package="cn.edu.nuist">
    <context:exclude-filter type="annotation" expression
        ="org.springframework.stereotype.Controller"/>
</context:component-scan>
springMVC.xml
<!-- SpringMVC 只扫描 [控制层组件] -->
<context:component-scan base-package="cn.edu.nuist.controller" />
两个容器的关系
SpringMVC 的 IOC 容器中的 bean 可以来引用 Spring IOC 容器中的 bean。反之则不行。Spring IOC 容器中的 bean 却不能来引用 SpringMVC IOC 容器中的 bean。
- 在 Spring MVC 配置文件中引用业务层的 Bean
- 多个 Spring IOC 容器之间可以设置为父子关系,以实现良好的解耦
- Spring MVC WEB 层容器可作为 “业务层” Spring 容器的子容器:即 WEB 层容器可以引用业务层容器的 Bean,而业务层容器却访问不到 WEB 层容器的 Bean
对比 struts2
- Spring MVC 的入口是 Servlet,而 Struts2 是 FilterSpring MVC 会稍微比 Struts2 快些
- Spring MVC 是基于方法设计,而 Sturts2 是基于类,每次发一次请求都会实例一个 Action
- Spring MVC 使用更加简洁,开发效率 Spring MVC 确实比 struts2 高:支持 JSR303,处理 ajax 的请求更方便
- Struts2 的 OGNL 表达式使页面的开发效率相比 Spring MVC 更高些