简介
前面几章我们已经学习了 NIO 的核心组件,再次不多赘述。
- NIO 缓冲区 Buffer
- 多路复用选择器 Selector
本章我们就将使用 NIO 的核心组件来实现 TCP 的客户端和服务端。
BIO 模型
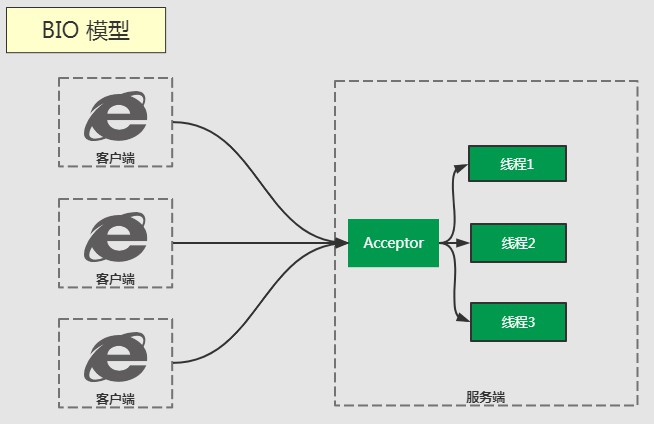
为什么需要把 Acceptor 和业务处理放到不同的线程中?
主要原因是套接字的挂起连接数的数量是有限的。以下是 ServerSocketChannel 的 API
API:java.nio.channels 1.4
- ServerSocketChannel bind(SocketAddress local, int backlog)
绑定套接字管道到指定的地址,并设置套接字上的最大挂起连接数 backlog
while (true) {
      channel.accept();
      Thread.sleep(2000); // 这2秒种示意读写阻塞或者业务处理时长
}
这样就会大大增加被服务端拒绝连接的客户端数量,原理和 Socket 是相通的,详细的,可以参看这篇文章 浅谈 Java Socket 构造函数参数 backlog
服务端接收到套接字管道对象之后,交给新建的线程去进行处理,这就是典型的 BIO 模型,接下来我将 “换汤不换药” 的用 java.nio.channels 中的组件来实现 BIO 模型中的服务端。
Java ServerSocketChannel 服务端
public class TcpServer {

    public static void main(String[] args) {
        try {
            // 1. 打开管道
            ServerSocketChannel channel = ServerSocketChannel.open();
            // 2. 绑定端口
            channel.bind(new InetSocketAddress(8081));
            while (true) {
                // 3. 获取套接字管道
                SocketChannel socketChannel = channel.accept();
                System.out.println("建立一个新的连接");
                // BIO 模型,交给线程去处理
                new Thread(new SocketChannelHandler(socketChannel)).start();
            }
        } catch (IOException ex) {
            System.out.println("TcpServer " + ex);
        }
    }
}
另外一个类
public class SocketChannelHandler implements Runnable {
    private SocketChannel channel;

    public SocketChannelHandler(SocketChannel channel) {
        this.channel = channel;
    }

    @Override
    public void run() {
        try {
            // 分配缓冲区
            ByteBuffer buffer = ByteBuffer.allocate(1024);
            while (true) {
                //  坑:读取前先清空缓冲区,不然重复读取到相同的内容
                buffer.clear();
                // 读取数据
                channel.read(buffer);
                System.out.print("Reading ");
                // 切换到读模式
                buffer.flip();
                // 申请 JVM 字节数组
                byte[] data = new byte[buffer.remaining()];
                // 从缓冲区读取到数组中
                buffer.get(data);
                String message = new String(data);
                if (message.equals("Exit")) {
                    channel.close();
                    // 坑:如果不退出循环,下次 read 时会报错
                    break;
                } else {
                    System.out.println(new String(data));
                }
            }
        } catch (IOException e) {
            System.out.println("SocketChannelHandler run:" + e);
        }
    }
}
读取前先清空缓冲区
如果我们注释掉 buffer.clear(),那么接下来每次读取到的数据都是第一次接收到的数据。
比如,我们使用 telnet 127.0.0.1 8081 打开 Windows Telnet 客户端,然后按 Ctrl + ] ,接着输入 send 1 按下回车。
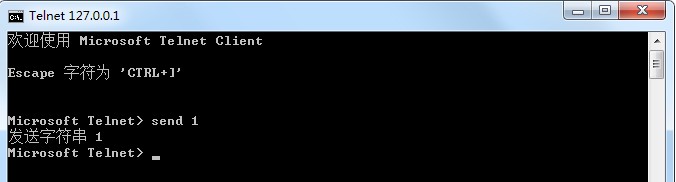
这样,我们通过 Telnet 客户端给我们的 Java 服务端发送了一条 TCP 消息。
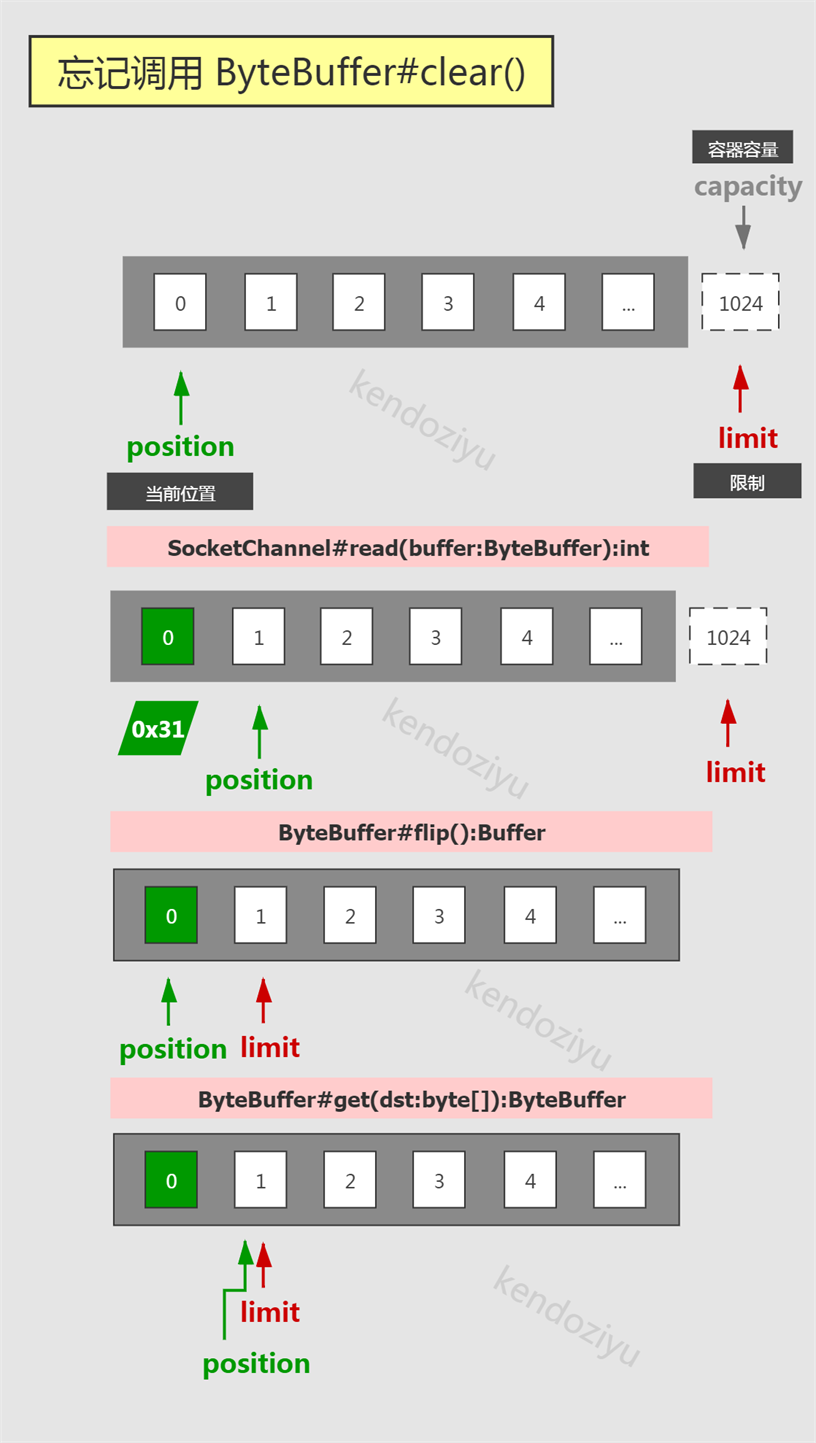
再循环之后,channel.read(buffer) 直接返回 0,因为此时 buffer.remaining() == 0,控制台一直输出1!

所以我们需要在调用 int read(ByteBuffer buffer) 之前,先调用 Buffer clear() 清空缓冲区 Buffer,保证 TCP 数据的顺利写入。
关闭管道后退出循环
这个比较好理解,调用了 SocketChannel#close() 方法之后, SocketChannel.isOpen() 会返回 false,表示当前套接字管道已经关闭了。
此时,如果还去调用读写方法,例如 SocketChannel#read(ByteBuffer buffer),会抛出 java.nio.channels.ClosedChannelException 异常。
NIO 模型
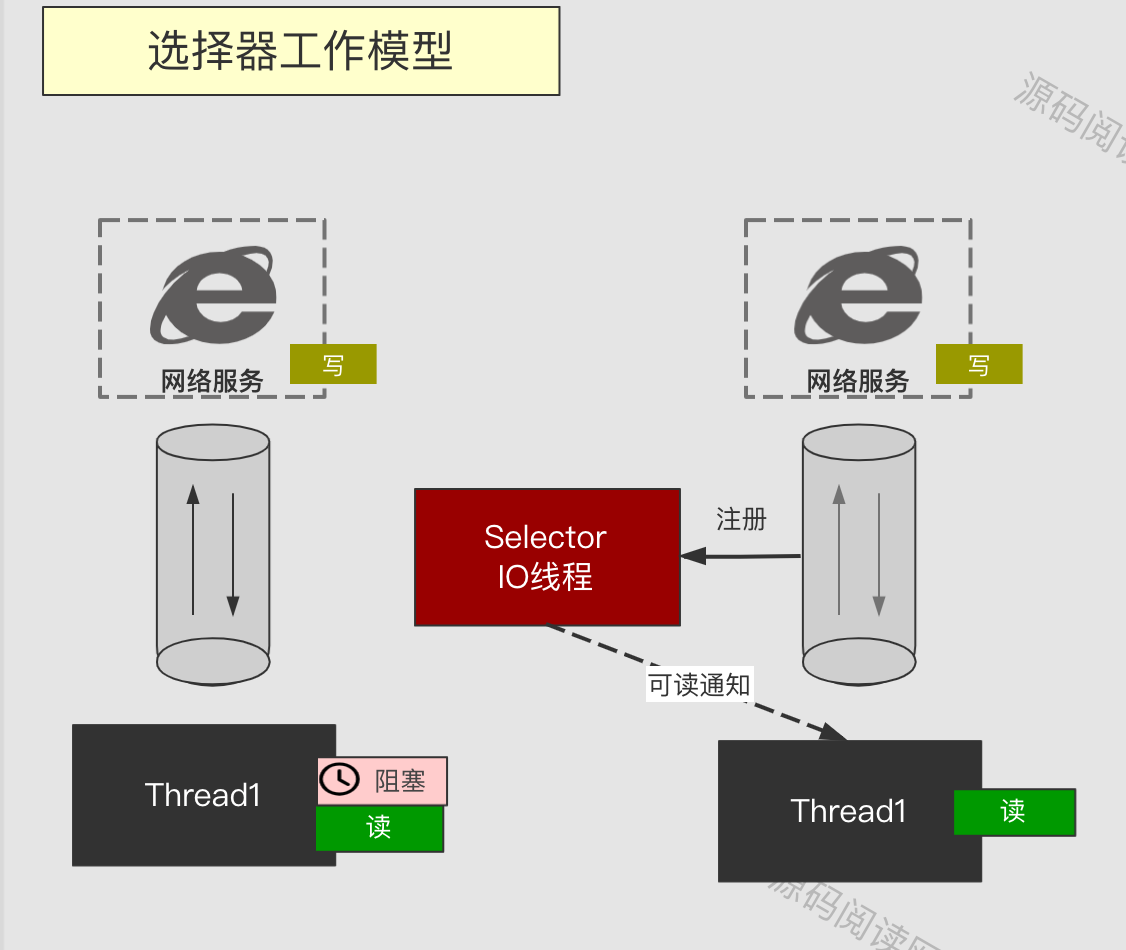
上一节,我们用管道实现了一个 BIO 阻塞式模型,在 BIO 模型中,服务端建立连接后就会立马分配一个线程等待消息到达。由于不知道什么时候消息能到达客户端,所以主要一直阻塞等待。
能否等消息到达之后在分配线程进行处理?这就需要 Selector 出场了。只要将管道设置为非阻塞模式,然后注册至 Selector 。当消息到达后就会得到通知。
API:java.nio.channels.SelectableChannel 1.4
- SelectableChannel configureBlocking(boolean block)
设置管道的阻塞模式。
1.初始化管道
初始化管道又分为 创建一个空的服务端套接字管道,绑定套接字端口,设置非阻塞模式,注册事件
// 创建一个空的套接字管道
ServerSocketChannel channel = ServerSocketChannel.open();
// 坑:如果不设置非阻塞,还是阻塞式模型
channel.configureBlocking(false);
// 绑定端口
channel.bind(new InetSocketAddress(8081));
Selector selector = Selector.open();
// 注册事件,监听建立连接事件
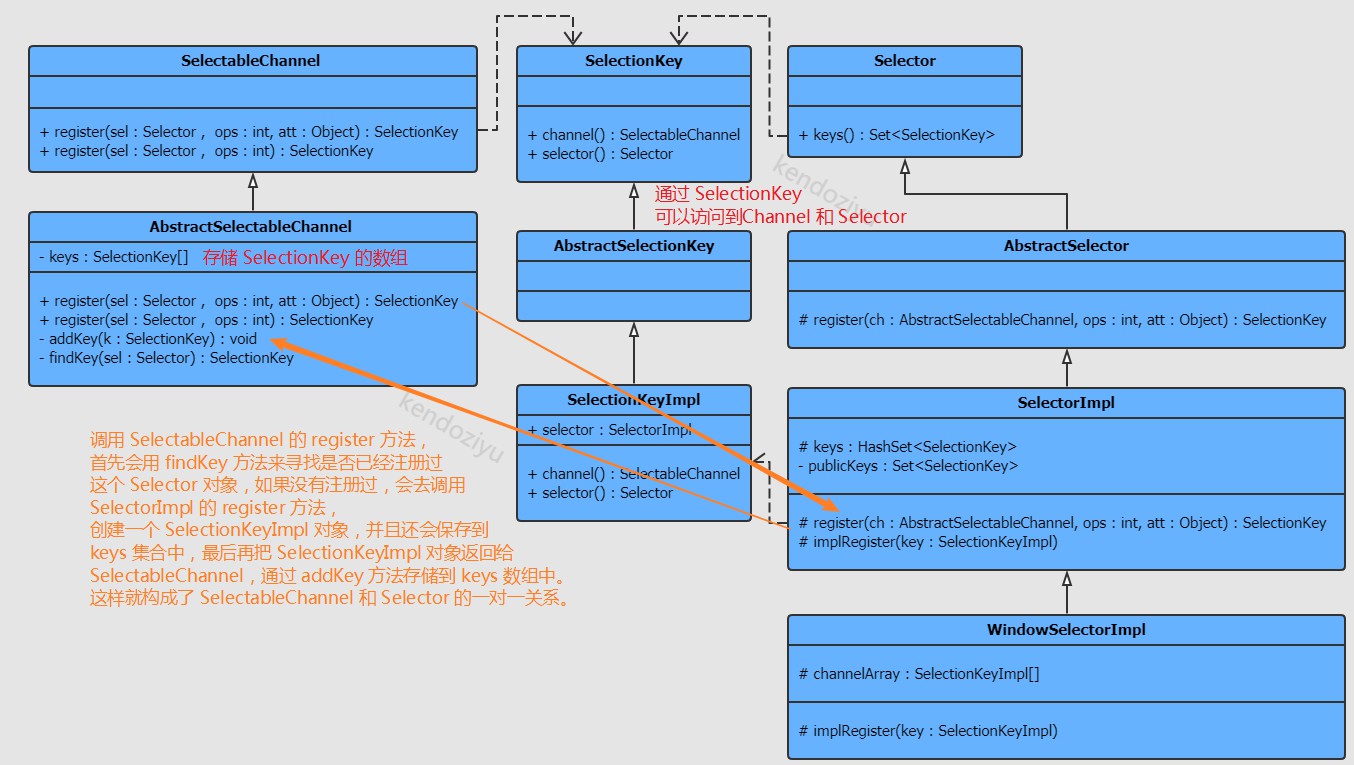
channel.register(selector, SelectionKey.OP_ACCEPT);
SelectableChannel 注册事件到 Selector 上,本质上是要建立两者之间的一对一关系。我们可以看一下下面的 UML 图:
为什么是注册 OP_ACCEPT 而不是其他事件呢?
因为 ServerSocketChannel 只能注册 OP_ACCEPT 事件,其他事件都不会注册成功。详细请看 NIO入门之多路复用选择器Selector
注意
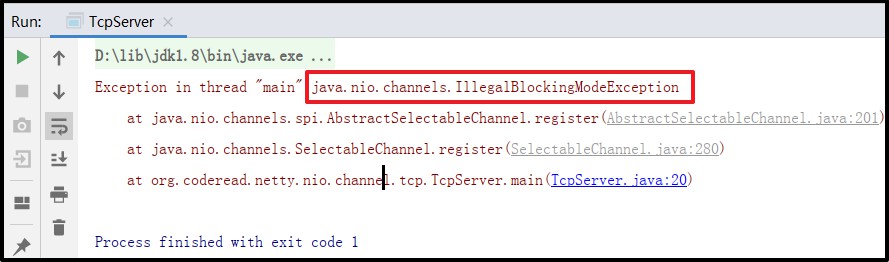
- 如果我们不设置非阻塞,即调用
channel.configureBlocking(false);,那么注册事件将会失败。即下图所示的 IllegalBlockingModeException 异常
2.遍历键集
while (true) {
      int count = selector.select();
      if (count == 0) continue;
      Iterator<SelectionKey> iterator = selector.selectedKeys().iterator();
      while (iterator.hasNext()) {
            SelectionKey selectionKey = iterator.next();
            if (selectionKey.isAcceptable()) {
                  handleAccept(selectionKey);
            } else if (selectionKey.isReadable()) {
                  handleRead(selectionKey);
            } else if (selectionKey.isWritable()) {
                  handleWrite(selectionKey);
            }
            // 坑,如果不移除,同一个事件会重复处理
            iterator.remove();
      }
}
3.处理 OP_ACCEPT 接受连接,注册管道
ServerSocketChannel server = (ServerSocketChannel) selectionKey.channel();
SocketChannel socketChannel = server.accept();
// 坑:虽然设置好了 ServerSocketChannel 是非阻塞的,但是还是需要设置 SocketChannel 也是非阻塞的
socketChannel.configureBlocking(false);
SelectionKey read = socketChannel.register(selectionKey.selector(), SelectionKey.OP_READ);
System.out.println(read.equals(selectionKey)); // 输出 false
这里也需要 设置非阻塞,否则注册时也会抛出 IllegalBlockingModeException 异常。
需要使用 Selector 注册每个新建立的套接字管道 SocketChannel。
一般来说,服务器都是响应客户端的请求的,所以会注册 OP_READ 事件。如果注册 OP_WRITE 事件,写事件不会阻塞,会立即触发。
4.处理 OP_READ 事件,读取数据
private void handleRead(SelectionKey selectionKey) throws IOException {
      ByteBuffer buffer = ByteBuffer.allocate(1024);
      SocketChannel socketChannel = (SocketChannel) selectionKey.channel();
      buffer.clear();
      socketChannel.read(buffer);
      buffer.flip();
      byte[] data = new byte[buffer.remaining()];
      buffer.get(data);
      System.out.print("Reading ");
      System.out.println(new String(data));
      SelectionKey write = socketChannel.register(selector, SelectionKey.OP_WRITE);
//      SelectionKey write = selectionKey.interestOps(SelectionKey.OP_WRITE);
      System.out.println(write.equals(selectionKey));
}
- 调用 register 和 interestOps 这里效果是一样的。

因为 handleAccept 的时候,就已经注册好 SocketChannel 和 Selector 的一对一关系了。所以就算是调用register其实也就是调用interestOps。
5.处理 OP_WRITE 事件
private void handleWrite(SelectionKey selectionKey) throws IOException {
      System.out.println("Writing...");
      SocketChannel socketChannel = (SocketChannel) selectionKey.channel();
      socketChannel.write(ByteBuffer.wrap("heartbeat
".getBytes()));
      selectionKey.interestOps(SelectionKey.OP_READ);
}
总结
java 1.4 引入 java.nio 包,使用这些 API 可以实现一个 BIO 模型,也可以实现 NIO 模型。
BIO模型在客户端与服务端建立连接之后,服务端就会立即分配一个线程,但是服务端又需要阻塞线程来等待读取客户端发送数据。
这样就需要不断创建新的线程应对不断增加的服务端请求,而创建线程是需要消耗服务器性能的。那么可不可以等客户端数据到达后再分配线程进行处理呢?
Selector 以及基于事件处理的 NIO 模型“应运而生”。
参考源码
服务端
public class TcpServer {

    public static void main(String[] args) {
        try {
            ServerSocketChannel channel = ServerSocketChannel.open();
            // 坑:如果不设置非阻塞,还是阻塞式模型
            channel.configureBlocking(false);
            channel.bind(new InetSocketAddress(8081));

            Selector selector = Selector.open();
            channel.register(selector, SelectionKey.OP_ACCEPT);

            new Thread(new SelectorIO(selector), "Selector-IO").start();
            System.in.read(); // 阻塞主线程
        } catch (IOException ex) {
            System.out.println("TcpServer " + ex);
        }
    }
}
IO 线程
public class SelectorIO implements Runnable {

    private Selector selector;

    public SelectorIO(Selector selector) {
        this.selector = selector;
    }

    @Override
    public void run() {
        try {
            while (true) {
                int count = selector.select();
                if (count == 0) continue;
                Iterator<SelectionKey> iterator = selector.selectedKeys().iterator();
                while (iterator.hasNext()) {
                    SelectionKey selectionKey = iterator.next();
                    if (selectionKey.isAcceptable()) {
                        handleAccept(selectionKey);
                    } else if (selectionKey.isReadable()) {
                        handleRead(selectionKey);
                    } else if (selectionKey.isWritable()) {
                        handleWrite(selectionKey);
                    }
                    // 坑,如果不移除,同一个事件会重复处理
                    iterator.remove();
                }
            }
        } catch (Exception e) {
            System.out.println("SelectorIO run error." + e);
            e.printStackTrace();
        }
    }

    private void handleWrite(SelectionKey selectionKey) throws IOException {
        System.out.println("Writing...");
        SocketChannel socketChannel = (SocketChannel) selectionKey.channel();
        socketChannel.write(ByteBuffer.wrap("heartbeat
".getBytes()));
        selectionKey.interestOps(SelectionKey.OP_READ);
    }

    private void handleRead(SelectionKey selectionKey) throws IOException {
        ByteBuffer buffer = ByteBuffer.allocate(1024);
        SocketChannel socketChannel = (SocketChannel) selectionKey.channel();
        buffer.clear();
        socketChannel.read(buffer);
        buffer.flip();
        byte[] data = new byte[buffer.remaining()];
        buffer.get(data);
        System.out.print("Reading ");
        System.out.println(new String(data));
        SelectionKey write = socketChannel.register(selector, SelectionKey.OP_WRITE);
//        SelectionKey write = selectionKey.interestOps(SelectionKey.OP_WRITE);
        System.out.println(write.equals(selectionKey));
    }

    private void handleAccept(SelectionKey selectionKey) throws IOException {
        ServerSocketChannel server = (ServerSocketChannel) selectionKey.channel();
        SocketChannel socketChannel = server.accept();
        // 坑:虽然设置好了 ServerSocketChannel 是非阻塞的,但是还是需要设置 SocketChannel 也是非阻塞的
        socketChannel.configureBlocking(false);
        SelectionKey read = socketChannel.register(selectionKey.selector(), SelectionKey.OP_READ);
        System.out.println(read.equals(selectionKey));
    }
}