内容回顾:
1、CSS的基本概念:
层叠样式表。
2、CSS的三种书写方式
① 行内样式
<div style="color: red;">sdfdsf</div>
② 内部样式
head标签之内:
<head>
    <meta charset="UTF-8">
    <title>Title</title>
    <style>
        div{
            color: red;
        }
    </style>
</head>
<body>
    <div>sdfsdsd</div>
</body>
这里又有CSS几种常见的选择器:
标签选择器:
<style>
        div{
            color: red;
        }
</style>
ID选择器:
<style>
        #id{
            font-size:12px;
        }
    </style>
类别选择器:
.class{
      color: red;
}
包含选择器:
<div>
        <span></span>
</div>

div  span{
    color: red;
}
分组选择器:
div,span{
    color: red;
}
通用选择器:
*{
    color: red;
}
伪类选择器:
鼠标放上去颜色发生改变
a: hover{
    color:red;
}


a:active{
    color: red;
}

a:visited{
    color: red;
}

a:link{
    color:red;
}
③ 外部样式
<link href="a.css" />
3、CSS文字段落基本属性
设置div的高度: height
设置宽度: width
让123居中 <div>123</div>
line-height: 设置行高与height一致
text-align: left right center 让文字往左右居中
为div设置一个框: border:1px solid red;
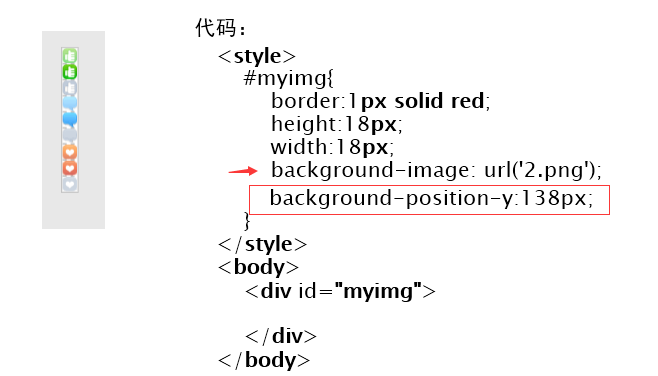
4、CSS的背景
background:
1、 background-color: red;
background-img: url("1.jpg");
在X轴上进行重复: background-repeat-x:
在Y轴上进行重复: background-repeat-y:
2、 background-position-x:
3、 background-position-y:
5、CSS的布局
让div往左或者往右浮动
float: left; right
配合清除浮动: <div style="clear:both"></div>
6、CSS的盒子模型
主要是2个属性,1个叫做margin,1个叫做padding
margin: 设置外边距 (1个值,上下左右都是10PX,2个值,上下,左右,3个值,第一个是上,第二个是左右,第三个下,提供四个,上-右-下-左) margin是对外元素的距离,用来控制元素本身的浮动位置。
padding: 设置内边距(相同),是对内元素,用来控制元素内部元素的位置
7、position:
1、fixed
固定,类似狗皮膏药的感觉,离上下左右的高度:
top right left bottom 都为0就是展开整个页面
2、relative
3、absolute
定位方式:如果父级有定位方式,则以父级定位,如果没有则以body定位
8、z-index:
z-index: 如果有浮层,想让哪个div往上浮动,就设置大点就完事。
9、IE6的bug
出现的一些bug
10、透明度
opcatiy: 值越大就越深,越小就透明。
主要内容
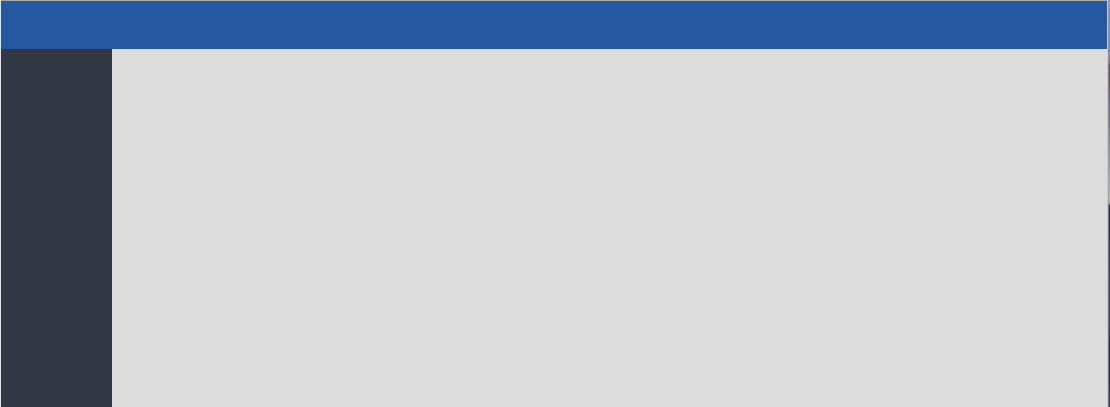
1、页面布局
<!DOCTYPE html>
<html lang="en">
<head>
    <meta charset="UTF-8">
    <title>Title</title>
    <style>
        body{
            margin:0;
        }
        .pg-header{
            height: 48px;
            background-color: #2459a2;
        }
        .pg-body .pg-menu{
            10%;
            background-color: #333744;
            /*height:1000px;*/
            position: absolute;
            top:48px;
            left:0;
            bottom:0;
        }
        .pg-body .pg-content{
             90%;
            background-color: gainsboro;
            position: absolute;
            top: 48px;
            right:0;
            bottom:0;
            overflow: auto;
        }
    </style>
</head>
<body>
    <div class="pg-header">

    </div>
    <div class="pg-body">
        <div class="pg-menu">

        </div>
        <div class="pg-content">

        </div>
    </div>
</body>
</html>
2、后台布局+下拉菜单
后台管理布局的下拉菜单需要注意:
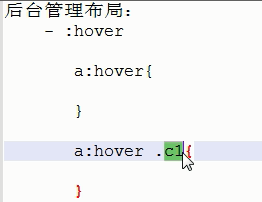
对a标签进行hover,然后让a下面的c1进行一个反应。
我要实现下面一个功能,就是我鼠标放在上面就会弹出下面的框

代码如下:


<!DOCTYPE html>
<html lang="en">
<head>
    <meta charset="UTF-8">
    <title>Title</title>
    <style>
        body{
            margin:0;
        }
        .left{
            float: left;
        }
        .right{
            float: right;
        }
        .pg-header{
            height: 48px;
            background-color: #2459a2;
        }
        .pg-body .pg-menu{
            10%;
            background-color: #333744;
            /*height:1000px;*/
            position: absolute;
            top:48px;
            left:0;
            bottom:0;
        }
        .pg-body .pg-content{
             90%;
            background-color: gainsboro;
            position: absolute;
            top: 48px;
            right:0;
            bottom:0;
            overflow: auto;
            z-index: 9;
        }
        .pg-header .logo{
            color: white;
            text-align: center;
             10%;
            line-height:48px;
            background-color: #7abd54;
        }
        .pg-header .userinfo img{
            border-radius: 50%;
        }
        .pg-header .userinfo{
            border: 1px solid red;
            margin-top: 4px;
            140px;
        }
        .pg-header .userinfo .infolist{
            display: none;
            position: absolute;
            top:43px;
            right: 36px;
            background-color: lavender;
            z-index: 10;
        }
        .pg-header .userinfo:hover .infolist{
            display: block;
            color: red;
        }

        .pg-header .userinfo .infolist a{
            display: block;
            color: white;
            140px;
        }

    </style>
</head>
<body>
    <div class="pg-header">
        <div class="logo left">
            <span>欢迎光临</span>
        </div>
        <div class="userinfo right" style="position: relative;">
            <img src="11.png" alt="" width="40" height="40">
            <div class="infolist">
                <a>我的信息</a>
                <a>登录</a>
            </div>
        </div>
    </div>
    <div class="pg-body">
        <div class="pg-menu">

        </div>
        <div class="pg-content">

        </div>
    </div>
</body>
</html>
3、JS 之DOM操作
写一个表格
快速写表格的方法
<body>
table>(thead>tr>th{ }*3)+(tbody>tr*3>td{ }*3)
</body>
然后按TAB键即可。
效果如下:

点击按钮,触发函数,需要用到
<input type="button" value="全选" onclick="selectAll();">
然后呢,在查看点击按钮是否能运行函数
<script>
    function selectAll(){
        console.log('dsdfdsf');
    }
</script>
然后点击按钮查看日志

最后实现下面的效果:

代码如下:
<!DOCTYPE html> <html lang="en"> <head> <meta charset="UTF-8"> <title>Title</title> </head> <body> <input type="button" value="全选" onclick = "selectAll();"/> <input type="button" value="取消" onclick = "cancelAll();"/> <input type="button" value="反选" onclick = "reverseAll();"/> <table border="1"> <thead> <tr> <th>操作</th> <th>IP</th> <th>端口</th> </tr> </thead> <tbody id="info"> <tr> <td><input type="checkbox"></td> <td> </td> <td> </td> </tr> <tr> <td><input type="checkbox"></td> <td> </td> <td> </td> </tr> <tr> <td><input type="checkbox"></td> <td> </td> <td> </td> </tr> </tbody> </table> </body> <script> function selectAll(){ // console.log('dsdfdsf'); var myTbody = document.getElementById("info"); // 1、得到Tbody console.log(myTrs); // 2、找下面的孩子 var myTrs = myTbody.children; // console.log(myTrs); for(var i=0; i<myTrs.length;i++){ // console.log(myTrs[i].children[0].children[0]); var myInput = myTrs[i].children[0].children[0]; myInput.checked = true; } } function cancelAll(){ // console.log('dsdfdsf'); var myTbody = document.getElementById("info"); // 1、得到Tbody console.log(myTrs); // 2、找下面的孩子 var myTrs = myTbody.children; // console.log(myTrs); for(var i=0; i<myTrs.length;i++){ // console.log(myTrs[i].children[0].children[0]); var myInput = myTrs[i].children[0].children[0]; myInput.checked = false; } } function reverseAll(){ // console.log('dsdfdsf'); var myTbody = document.getElementById("info"); // 1、得到Tbody console.log(myTrs); // 2、找下面的孩子 var myTrs = myTbody.children; // console.log(myTrs); for(var i=0; i<myTrs.length;i++){ // console.log(myTrs[i].children[0].children[0]); var myInput = myTrs[i].children[0].children[0]; if(myInput.checked){ myInput.checked = false; }else{ myInput.checked = true; } } } </script> </html>
4、模态框
实现效果如下:
点击按钮以后弹出模块框,记住这里是有3层叠加

代码如下:
<!DOCTYPE html>
<html lang="en">
<head>
    <meta charset="UTF-8">
    <title>Title</title>
    <style>
        .one{
            position: fixed;
            top: 0;
            left:0;
            right:0;
            bottom:0;
            background-color: black;
            opacity:0.6;
        }
        .info{
            position: fixed;
            400px;
            height:300px;
            top: 50px;
            left:400px;
            right:400px;
            background-color: white ;
        }
        .hide{
            display: none;
        }
        .show{
            display: block;
        }
    </style>
</head>
<body>
    <div>
        <input type="button" value="点击" onclick="showModel();" />
    </div>
    <!--遮罩层-->
    <div class="one hide"></div>

    <!--弹出框-->
    <div class="info hide">
        <p>
            <input type="text"><p></p>
            <input type="text"><p></p>
            <input type="button" value="取消" onclick="hideModel();">
            <input type="button" value="确定">
        </p>
    </div>
</body>
<script>
    function showModel(){
//        拿到弹框
        var myone = document.getElementsByClassName("one")[0];
        var info = document.getElementsByClassName("info")[0];
//        console.log(myone);
        myone.classList.remove('hide');
        info.classList.remove('hide');
    }

    function hideModel(){
//        拿到弹框
        var myone = document.getElementsByClassName("one")[0];
        var info = document.getElementsByClassName("info")[0];
//        console.log(myone);
        myone.classList.add('hide');
        info.classList.add('hide');
    }
</script>
</html>
5、跑马灯
<!DOCTYPE html>
<html lang="en">
<head>
    <meta charset="UTF-8">
    <title>Title</title>
</head>
<body>
    <div id="wel">
        不要拦我,这次我要拿次A
    </div>
</body>
<script>
    function test(){
        var mywel = document.getElementById("wel");
        var content = mywel.innerText;

        var f_content = content.charAt(0);
        var l_content = content.substring(1,content.length);

        var new_content = l_content + f_content;

        mywel.innerText = new_content;
    }

    setInterval("test()",1000);
</script>

</html>
附上一个最简单的跑马灯
<!DOCTYPE html>
<html lang="en">
<head>
    <meta charset="UTF-8">
    <title>Title</title>
</head>
<body>
<marquee behavior="" direction="">谁都不要拦我,这次我要拿次A</marquee>
</body>
</html>
6、时间模块
<!DOCTYPE html>
<html lang="en">
<head>
    <meta charset="UTF-8">
    <title>Title</title>
</head>
<body>
    <div id="clock"></div>
</body>
    <script>
        function clock(){
            var mydate = new Date();
            var myyear = mydate.getFullYear();
            var mymonth = mydate.getMonth();
            var myday = mydate.getDay();
            var myhour = mydate.getHours();
            var myminuts = mydate.getMinutes();
            var mysec = mydate.getSeconds();

            var res = myyear + "-" + mymonth+"-"+myday+" "+ myhour +":"+myminuts+":"+mysec
            var mycolck = document.getElementById("clock");
            mycolck.innerText = res;
        }
        setInterval("clock();",1000);
    </script>
</html>