一、Ansible大纲
-
Ansible被红帽收购
-
1.什么是Ansible
-
2.Ansible特性优点
-
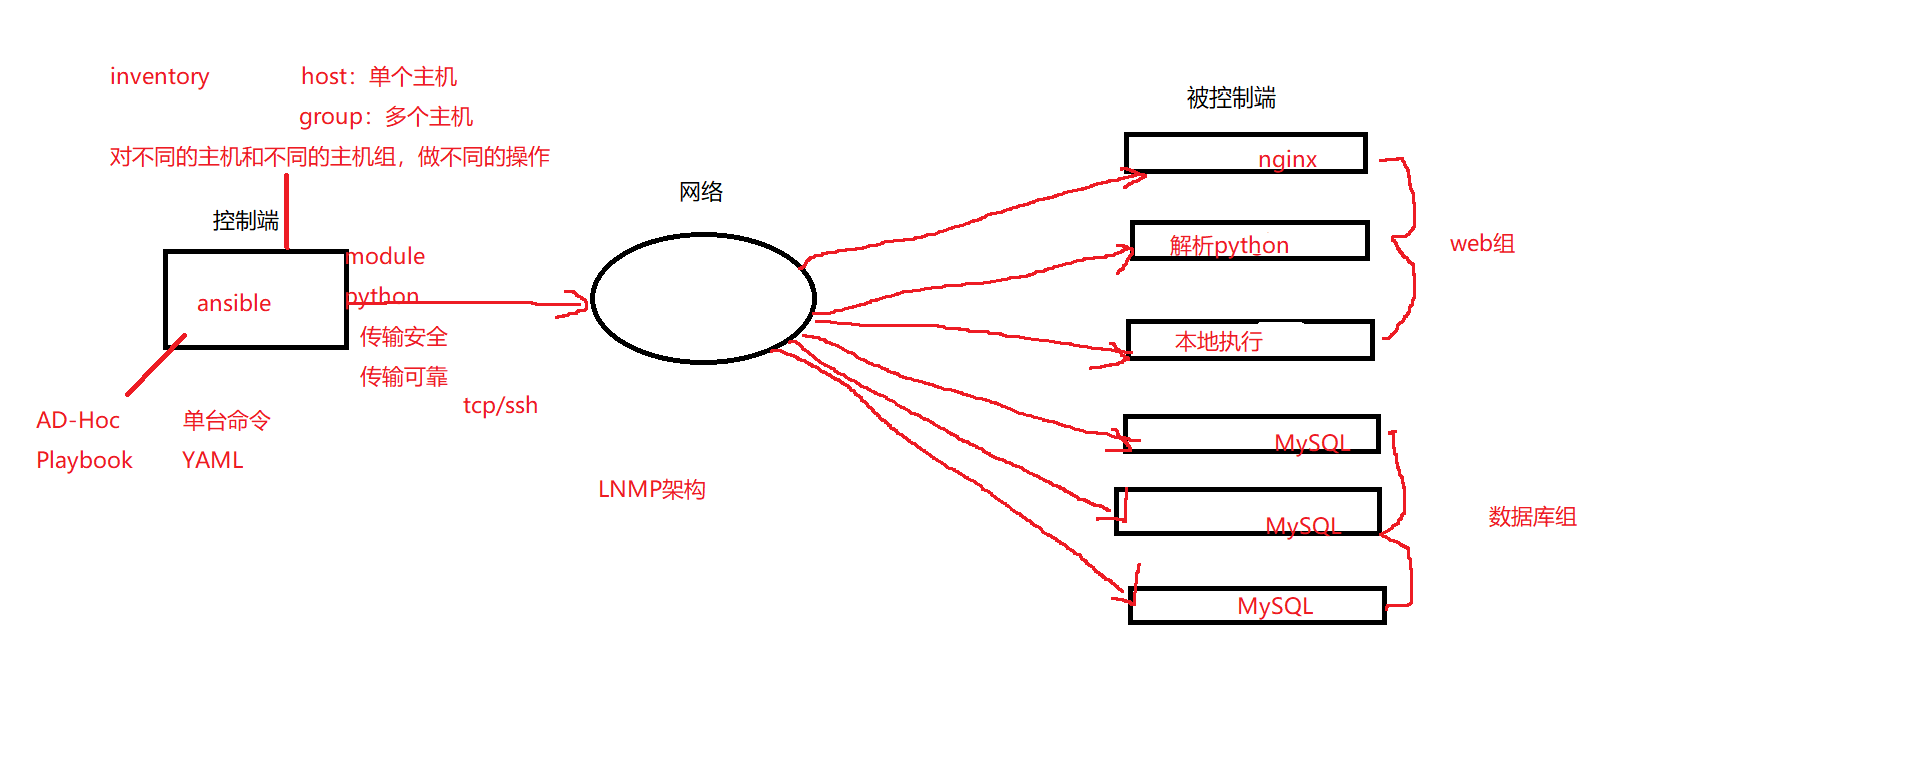
3.Ansible基础架构
- 控制端被控端inventoryad-hocplaybook连接协议....
-
4.Ansible安装
-
5.ANsible配置
-
6.Ansible inventory
-
7.Ansible Ad-hoc shell命令
-
8.Ansible playbook shell脚本 YAML
-
9.变量 variables
- 变量优先级
-
10.判断语句
-
11.循环语句
-
12.异常处理
-
13.tag标签
-
14.handlers触发器
-
15.include包含
-
16.ansible jinja模板
- keeplaived
- nginx_proxy
-
17.ansible role角色
- 编排工具--->清晰目录规划--->严格按照目录规划来
-
18.ansible galaxy
-
19.ansible tower(图形界面)
-
20.ansible部署集群架构
二、Ansible 基础与playbook
1、什么是Ansible
ansible是一个IT自动化的配置管路工具,自动化的主要体现在ansible集成了丰富的模块,丰富的功能组件,可以通过一个命令完成一系列的操作,今儿能减少我们重复此昂的工作和维护成本吗,以提高工作的效率。
2、Ansible可以完成哪些功能呢?
- 批量执行远程命令,可以减少对N多台主机同时进行命令的执行
- 批量配置软件,可以进行自动化的凡事配置和管理服务
- 实现软件开发功能,jumpserver底层使用ansible来实现的自动化管理
- 编排高级的IT任务,ansible的Playbook是一门编程语言,可以用来描绘一套IT架构
3、Ansible特点
- 容易学习 无代理模式。不像saltstack既要学习客户端与服务端,还需要学习客户端与服务端中间通讯协议
- 操作灵活 体现在ansible由较多的模块,提供了丰富的功能,playbook则提供类似于编程语言的复杂功能
- 简单易用,体现在ansible一个命令就可以完成很多事情
- 安全可靠,因为ansible使用了ssh协议进行通讯,既稳定也安全
- 移植性高,可以将写好的playbook拷贝至任意机器进行执行
- ansible的架构中的控制节点,被控制节点,inventroy,ad-hoc,playbook,连接协议这些是什么?
4、ansible的安装及配置文件的解读
需要安装阿里云的epel源(python的版本是2)
wget -O /etc/yum.repos.d/epel.repo http://mirrors.aliyun.com/repo/epel-7.repo
安装ansible
yum -y install ansible
ansible配置文件路径
/etc/ansible/ansible.cfg
ansible的配置文件可以存放在任何位置,但配置文件有读取顺序
ansible的配置文件有优先级的,查找顺序
- z最先查找$ANSIBL_CONFIG变量
- 其次查找当前目录下 ansible.cfg 项目目录
- 然后查找用户家目录下的 .ansible.cfg 当前用户的家目录
- 最后查找 /etc/ansible/ansible.cfg(默认)
测试:
[root@jkl ~]# cd project1/
[root@jkl project1]# ls
[root@jkl project1]# ll
总用量 0
[root@jkl project1]# touch ansible.cfg
[root@jkl project1]# ansible --version
ansible 2.9.3
  config file = /root/project1/ansible.cfg   # 配置文件现在的位置
  configured module search path = [u'/root/.ansible/plugins/modules', u'/usr/share/ansible/plugins/modules']
  ansible python module location = /usr/lib/python2.7/site-packages/ansible
  executable location = /usr/bin/ansible
  python version = 2.7.5 (default, Apr  9 2019, 14:30:50) [GCC 4.8.5 20150623 (Red Hat 4.8.5-36)]
对ansible配置文件的部分解读
[root@jkl ~]# cat /etc/ansible/ansible.cfg

#inventory      = /etc/ansible/hosts                   主机列表配置文件
#library        = /usr/share/my_modules/               库文件存放目录

#remote_tmp     = ~/.ansible/tmp                       临时py文件存放在远程主机目录
#local_tmp      = ~/.ansible/tmp                       本机的临时执行目录
#forks          = 5                                    默认并发数
#sudo_user      = root                                 默认sudu用户
#ask_sudo_pass = True                                  每次执行是否询问sudo的ssh密码
#ask_pass      = True                                  每次执行是否询问ssh的密码
#remote_port    = 22                                   远程主机端口
host_key_checking = False                              跳过检查主机指纹
log_path = /var/log/ansible.log                        ansible日志


[privilege_escalation]            # 如果是普通用户需要提权
#become=True
#become_method=sudo
#become_user=root
#become_ask_pass=False
5、Ansible Inventory
inventory文件中填写需要被管理主机与主机组信息(逻辑上定义)。默认inventory文件在/etc/ansible/host。当然也可以自定义,然后使用-i指定iventory文件位置。
场景一:基于密码连接
[root@jkl ~]# cat /etc/ansiblehost

# 方式一、主机+端口+密码
[webservers]
10.0.0.1 ansible_ssh_port=22 ansible_ssh_user=root ansible_ssh_pass='123123'
10.0.0.2 ansible_ssh_port=22 ansible_ssh_user=root ansible_ssh_pass='123123'

# 方式2 主机+端口+密码
[webservers]
web[1:2].qq.com ansible_ssh_pass='123123'


# 方式3:主机+端口+密码
[webservers]
web[1:2].qq.com
[webservers:vars]
ansible_ssh_pass='123123'
场景2:基于密钥连接,需要先创建公钥和私钥,并下发公钥至空端
[root@jkl project1]# ssh-copy-id -i ~/.ssh/id_rsa.pub root@192.168.159.128
[root@jkl project1]# ssh-copy-id -i ~/.ssh/id_rsa.pub root@192.168.159.129
# 方式1:主机+端口+密钥
[root@jkl ~]# cat hosts
[webservers]
192.168.159.128
192.168.159.129

# 方式2 别名+主机+端口+密钥
[root@jkl ~]# cat hosts
[webservers]
web1  ansible_ssh_host=192.168.159.128 ansible_ssh_port=22
web2  ansible_ssh_hsot=192.168.159.129
场景3:主机组使用方式
[lbsersvers] #d定义lbservers组
192.168.159.128
192.168.159.129

[webservsers] #定义webservers组
192.168.159.128
192.168.159.129
生产案例1、如果控制端和被控制端第一次通讯,需要确认指纹信息,如果机器特别多少的情况下怎么办?
- 将 Ansible 配置文件中的 host_key_checking = False 参数注释打开即可。
- 但要注意ansible.cfg文件的读取顺序。
6、Ansible Ad-Hoc
- 执行命令模块
- 软件管理模块
- 文件管理模块
- 服务管理模块
- 用户管理模块
- 定时任务模块
- 磁盘挂载模块
- 防火墙管理模块
- 常用模块练习
什么是ad-hoc
ad-hoc简而言之就是“临时命令”。执行完即结束,并不会保存
ad-hoc模式的使用场景
比如在多台机器上查看某个进程是否启动,或拷贝指定文件到本地。
ad-hoc模式的命令使用,ansible 'jkl' -m command -a 'df -h'
# 解析命令

命令格式  ansible   jkl      -m       command   -a      'df -h'    -f                  1
格式说明  命令      主机名称   指定模块   模块名称  模块动作    具体命令  返回命令执行结果的数量 返回1
使用ad-hoc执行一次远程命令注意观察返回结果的颜色
绿色:代表被管理端主机没有被修改
黄色:代表被管理端主机发现变更
红色:代表出现了故障,注意查看提示
7、ad-hoc模式的常用模块有如下:
command(默认)                       # 执行shell命令(不支持管道等特殊字符)
shell                              # 执行shell命令
scripts                            # 执行shell脚本
yum_repository                     # 配置yum仓库
yum                                # 安装软件
copy                               # 变更配置文件
file                               # 建立目录或文件
service                            # 启动或停止服务
cron                               # 定时任务
mount                              # 挂载设备
firewalld                          # 防火墙
get_url                            # 下载软件

command(默认)  shell模块   scripts 本质上执行都是执行命令
yum模块示例
(安装present、卸载absent、升级latest、排除exclude、指定仓库enablerepo)
#示例一、安装当前最新的Apache软件,如果存在则更新
ansible jkl -m yum -a "name=httpd state=latest" -i hosts

#示例二、安装当前最新的Apache软件,通过epel仓库安装
ansible jkl -m yum -a "name=httpd state=latest enablerepo=epel" -i hosts

#示例三、通过公网URL安装rpm软件
ansible jkl -m yum -a "name=https://mirrors.aliyun.com/zabbix/zabbix/4.2/rhel/7/x86_64/zabbix-agent-4.2.3-2.el7.x86_64.rpm state=latest" -i hosts

#示例五、更新所有的软件包,但排除和kernel相关的
ansible jkl -m yum -a "name=* state=latest exclude=kernel*,foo*" -i hosts

#示例六、删除Apache软件
ansible jkl -m yum -a "name=httpd state=absent" -i hosts
copy模块示例
scp /etc/httpd/conf/httpd.conf root@172.16.1.61:/root/project1/
参数:
- src 复制到远程服务器的文件本地路径,可以是绝对路径或相对路径
- dest 文件复制到远程的绝对路径
- owner root(defaults) 文件复制到远程并设定属主
- group root(defaults) 文件复制到远程并设定属组
- mode file=644 directory=755 文件复制到远程并设定权限
- backup yes 备份被修改前的配置文件
- content 新建文件并给文件添加内容
#示例一、将本地的httpd.conf文件Listen端口修改为9999,然后推送到远端服务。
ansible jkl -m copy -a "src=./httpd.conf dest=/etc/httpd/conf/httpd.conf owner=root group=root mode=644" -i hosts

#示例二、将本地的httpd.conf文件Listen端口修改为9090,然后推送到远端,检查远端是否存在上一次的备份文件
ansible jkl -m copy -a "src=./httpd.conf dest=/etc/httpd/conf/httpd.conf owner=root group=root mode=644 backup=yes" -i hosts

#示例三、往远程的主机文件中写入内容
ansible jkl -m copy -a "content=HttpServer... dest=/var/www/html/index.html" -i hosts
file-get-url模块示例
参数:
- url HTTP、HTTPS 资源文件在互联网上的具体位置
- dest 文件下载位置的绝对路径
- mode 文件下载后的权限
- checksum md5 sha256 对下载的资源进行校验
- timeout 10(defaults) URL请求超时时间
#示例一、下载互联网的软件至本地
url  ==> http  https  ftp
# ansible jkl -m get_url -a "url=http://fj.xuliangwei.com/public/ip.txt dest=/var/www/html/" -i hosts

#示例二、下载互联网文件并进行md5校验(了解)
# ansible jkl -m get_url -a "url=http://fj.xuliangwei.com/public/ip.txt dest=/var/www/html/ checksum=md5:7b86f423757551574a7499f0aae" -i hosts
file模块 创建目录 授权
参数:
- path 指定远程服务器的路径
- recurse 递归方式(可以是递归授权)
- state touch、directory、link、absent 文件复制到远程的状态
- owner root(defaults) 文件复制到远程并设定属主
- group root(defaults) 文件复制到远程并设定属组
- mode file=644 firectory=755 文件复制到远程并设定权限
#示例一、创建文件,并设定属主、属组、权限。
ansible jkl -m file -a "path=/var/www/html/tt.html state=touch owner=apache group=apache mode=644" -i hosts

#示例二、创建目录,并设定属主、属组、权限。
ansible jkl -m file -a "path=/var/www/html/dd state=directory owner=apache group=apache mode=755" -i hosts

#示例三、递归授权目录的方式。
ansible jkl  -m file -a "path=/var/www/html/ owner=apache group=apache mode=755" -i hosts
ansible jkl  -m file -a "path=/var/www/html/ owner=apache group=apache recurse=yes" -i hosts
service模块
ansible管理服务的启动与停止,使用service
参数:
- name httpd nginx 定义要启动服务器的名称
- state started stopped restarted reloaded 指定服务的状态
- enabled yes no 允许服务开机自启或禁止服务自启
#示例一、启动Httpd服务
[root@ansible ~]# ansible jkl -m service -a "name=httpd state=started"

#示例二、重载Httpd服务
[root@ansible ~]# ansible jkl -m service -a "name=httpd state=reloaded"

#示例三、重启Httpd服务
[root@ansible ~]# ansible jkl -m service -a "name=httpd state=restarted"

#示例四、停止Httpd服务
[root@ansible ~]# ansible jkl -m service -a "name=httpd state=stopped"

#示例五、启动Httpd服务,并加入开机自启
[root@ansible ~]# ansible jkl -m service -a "name=httpd state=started enabled=yes"
总结:
yum 安装
copy 配置
file 创建目录,或授权
get_url 下载文件
service 启动服务 重载服务
group
#示例一、创建news基本组,指定uid为9999
# ansible jkl -m group -a "name=news gid=9999 state=present" -i hosts

#示例二、创建http系统组,指定uid为8888
# ansible jkl -m group -a "name=http gid=8888 system=yes state=present" -i hosts
yes		true	真
no		false	假

#示例三、删除news基本组
# ansible jkl -m group -a "name=news state=absent" -i hosts
user
#示例一、创建joh用户,uid是1040,主要的组是adm
ansible jkl -m user -a "name=joh uid=1040 group=adm" -i hosts

#示例二、创建joh用户,登录shell是/sbin/nologin,追加bin、sys两个组
ansible jkl -m user -a "name=joh shell=/sbin/nologin groups=bin,sys" -i hosts

#示例三、创建jsm用户,为其添加123作为登录密码,并且创建家目录
ansible localhost -m debug -a "msg={{ '123' | password_hash('sha512', 'salt') }}"
$6$salt$jkHSO0tOjmLW0S1NFlw5veSIDRAVsiQQMTrkOKy4xdCCLPNIsHhZkIRlzfzIvKyXeGdOfCBoW1wJZPLyQ9Qx/1

ansible jkl -m user -a 'name=jsm password=$6$salt$jkHSO0tOjmLW0S1NFlw5veSIDRAVsiQQMTrkOKy4xdCCLPNIsHhZkIRlzfzIvKyXeGdOfCBoW1wJZPLyQ9Qx/1 create_home=yes'

#示例四、移除joh用户
ansible jkl  -m user -a 'name=joh state=absent remove=yes' -i hosts

#示例五、创建http用户,并为该用户创建2048字节的私钥,存放在~/http/.ssh/id_rsa
ansible jkl  -m user -a 'name=http generate_ssh_key=yes ssh_key_bits=2048 ssh_key_file=.ssh/id_rsa' -i hosts
总结
- yum
- copy
- group user file
- service
cron
#示例一、添加定时任务。每分钟执行一次ls  * * * * * ls >/dev/null
ansible jkl -m cron -a "name=job1 job='ls >/dev/null'" -i hosts

#示例二、添加定时任务,    每天的凌晨2点和凌晨5点执行一次ls。"0 5,2 * * ls >/dev/null
ansible jkl -m cron -a "name=job2 minute=0 hour=5,2 job='ls >/dev/null'" -i hosts

#示例三、关闭定时任务,使定时任务失效
ansible jkl -m cron -a "name=job2 minute=0 hour=5,2 job='ls >/dev/null' disabled=yes" -i hosts
mount
永久
present 将挂载信息写入/etc/fstab
unmounted 卸载临时,不会清理/etc/fstab
临时
mounted 先挂载,在将挂载信息/etc/fstab
absent 卸载临时,也会清理/etc/fstab
#环境准备:将172.16.1.61作为nfs服务端,172.16.1.7、172.16.1.8作为nfs客户端挂载
ansible localhost -m yum -a 'name=nfs-utils state=present'
ansible localhost -m file -a 'path=/ops state=directory'
ansible localhost -m copy -a 'content="/ops 172.16.1.0/24(rw,sync)" dest=/etc/exports'
ansible localhost -m service -a "name=nfs state=restarted"

#示例一、挂载nfs存储至本地的/opt目录,并实现开机自动挂载
ansible jkl -m mount -a "src=172.16.1.61:/ops path=/opt fstype=nfs opts=defaults state=mounted"

#示例三、永久卸载nfs的挂载,会清理/etc/fstab
ansible webservers -m mount -a "src=172.16.1.61:/ops path=/opt fstype=nfs opts=defaults state=absent"
selinux
ansible jkl-m selinux -a "state=disabled" -i hosts
firewalld
ansible jkl -m service -a "name=firewalld state=started" -i hosts
# 示例一 永久放行https的流量,只有重启才会生效
ansible jkl -m firewalld -a "zone=public service=https permanent=yes state=enabled" -i hosts

# 示例一 永久放行8081端口的流量,只有重启才会生效
ansible jkl -m firewalld -a "zone=public port=8080/tcp permanent=yes state=enabled" -i hosts

# 示例一 放行8080-8090的所有tcp端口流量,临时和永久都生效.
ansible jkl -m firewalld -a "zone=public port=8080-8090/tcp permanent=yes immediate=yes state=enabled" -i hosts
8、Playbook
什么是playbook
- playbook:定义一个文本文件,以yml为后缀结尾(翻译:我有一个剧本)
- play:定义的是主机的角色(翻译:找哪个大腕明星)
- task:定义的是具体执行的任务(翻译:大腕每一集拍什么)
找一个人干多件事情 playbook 1个play 多个task
找多个人干多件事情 playbook 多个play 多个task
总结:playbook是由一个或多个play组成,一个play可以包含多个task任务,可以 理解为:使用不同的模块来共同完成一件事情
playbook与AD-Hoc的关系
- playbook是对AD-Hoc的一种编排方式
- playbook可以持久运行,而AD-Hoc只能临时运行
- playbook适合复杂的任务,而AD-Hoc适合做快速简单的任务
- playbook能控制任务执行的先后顺序
playbook书写格式
playbook是由yml语法书写,结构清晰,可读性强,所以必须掌握yml的基础语法
| 语法 | 描述 |
|---|---|
| 缩进 | YAML使用固定的缩进风格表示层级结构,每个缩进由两个空格组成, 不能使用tabs |
| 冒号 | 以冒号结尾的除外,其他所有冒号后面所有必须有空格 |
| 短横线 | 表示列表项,使用一个短横杠加一个空格。多个项使用同样的缩进级别作为同一列表。 |
playbook测试:
1.安装http服务 yum
2.编写简单网页测试内容 copy (Name-OldboyEdu.com)
3.启动服务并加入开机自启 service
4.放行firewalld对应的端口 firewalld
案例1:使用ansible安装并配置httpd服务
httpd.yaml
- hosts: jkl
  tasks:

    - name: install httpd server
      yum: name=httpd state=present

    - name: configure httpd server
      copy: src=./httpd.conf.j2 dest=/etc/httpd/conf/httpd.conf backup=yes

    - name: configure httpd website
      copy: src=./tt.j2 dest=/var/www/html/tt.html owner=http group=http mode=644

    - name: service httpd server
      service: name=httpd state=started enabled=yes

    - name: service firewalld server
      service: name=firewalld state=restarted

    - name: configure firewalld server
      firewalld: zone=public service=http permanent=yes immediate=yes state=enabled
案例2:使用ansible安装并配置nfs服务
服务端:192.168.159.128
- 安装nfs
- 配置nfs
- 根据配置创建目录,创建用户,授权
- 启动并加入开机自启
客户端:192.168.159.129
- 准备一个空目录
- 挂载128山共享的努力即可
nfs.yaml
- hosts: 192.168.159.128
  tasks:


    - name: Install Nfs server
      yum: name=nfs-utils state=present

    - name: configure NFS Server
      copy: src=./exports.j2  dest=/etc/exports backup=yes

    - name: create NFS Group
      group: name=www gid=666

    - name: create NFS User
      user: name=www uid=666 group=666 shell=/sbin/nologin create_home=no

    - name: create NFS Data
      file: path=/data  state=directory owner=www group=www recurse=yes

    - name: service NFS server
      service: name=nfs state=started enabled=yes


- hosts: 192.168.159.129
  tasks:

    - name: Client Create NFS Data
      file: path=/nfs_tt state=directory

    - name:  Client Mount NFS server
      mount:
        src: 192.168.159.128:/data
        path: /nfs_tt
        fstype: nfs
        opts: defaults
        state: mounted
坑坑坑坑坑坑
执行剧本的时候会出现这个:
TASK [Client Mount NFS server] **********************************************************
fatal: [192.168.159.129]: FAILED! => {"changed": false, "msg": "Error mounting /nfs_tt: mount: 文件系统类型错误、选项错误、192.168.159.128:/data 上有坏超级块、
       缺少代码页或助手程序,或其他错误
       (对某些文件系统(如 nfs、cifs) 您可能需要
       一款 /sbin/mount.<类型> 助手程序)

       有些情况下在 syslog 中可以找到一些有用信息- 请尝试
       dmesg | tail  这样的命令看看。
"}
解决
centos7默认不支持挂在nfs文件系统. 安装包:yum install nfs-utils rpcbind
注意:
-
客户端服务端的防火墙状态
-
目标主机的rpc-bind的状态
案例3:使用ansible安装并配置httpd服务
根据不同的主机配置不同的网站。(多个play使用方式,但不是生产推荐(了解即可),生产推荐使用循环方式)
清空原来http软件
ansible jkl -m yum -a "name=httpd state=absent" -i hosts
jkl:
- 安装http
- 配置http
- 用户 存在? ttt gid=7788
- 端口 7788
- 启动http
- 防火墙 放行7788
- hosts: jkl
  tasks:

    - name: Install Httpd Server
      yum: name=httpd state=present

    - name: Config Httpd Server
      copy: src=./httpd.conf.j2 dest=/etc/httpd/conf/httpd.conf backup=yes

    - name: Create Httpd Group
      group: name=ttt gid=7788 state=present

    - name: Create Httpd User
      user: name=ttt uid=7788 group=7788 shell=/sbin/nologin create_home=no

    - name: Service Httpd Server
      service: name=httpd state=started enabled=yes

    - name: Service Firewalld Server
      service: name=firewalld state=started

    - name: Configure Firewalld Server
      firewalld:
        zone: public
        port: 7788/tcp
        permanent: yes
        immediate: yes
        state: enabled


- hosts: 192.168.159.128
  tasks:
    - name: Configure Web Site
      copy: content='web-8....' dest=/var/www/html/index.html


- hosts: 192.168.159.129
  tasks:
    - name: Configure Web Site
      copy: content='web-9....' dest=/var/www/html/index.html
案例4:使用ansiblfe方式构建LAMP架构
具体步骤如下:
1.使用yum安装 httpd、php、php-mysql、mariadb、firewalld等
2.启动httpd、firewalld、mariadb等服务
3.添加防火墙规则,放行http的流量,并永久生效
4.使用get_url下载http://fj.xuliangwei.com/public/index.php文件
5.扩展: 可道云代码下载解压到指定目录
效果: 执行完playbook后,访问网站,就跳出网站安装向导
apache+php 模块 重启apache
nginx+php 代理 fastcgi协议
版本冲突
lamp.yaml
#1.缩进
#2.冒号
#3.短横线


- hosts: 192.168.159.129   #play
  tasks:

#1.使用yum安装 httpd、php、firewalld等
    - name: Install Httpd PHP firewalld
      yum: name=httpd,php,php-pdo,php-mbstring,php-gd,firewalld state=present

#2.启动httpd、firewalld、mariadb等服务
    - name: Serice Httpd Server
      service: name=httpd state=started

    - name: Service Firewalld Service
      service: name=firewalld state=started

#3.添加防火墙规则,放行http的流量
    - name: Configure Firewalld
      firewalld: port=80/tcp immediate=yes state=enabled

#4.使用get_url下载http://fj.xuliangwei.com/public/index.php文件
    - name: Get Url index.php
      get_url:
        url: http://fj.xuliangwei.com/public/index.php
        dest: /var/www/html/tt.php

#5.扩展:  可道云代码下载解压到指定目录
    - name: Copy Kod Cloud Code
      unarchive: src=./kodexplorer4.40.zip dest=/var/www/html/ mode=0777
#6.变更权限为Httpd进程的运行用户,apache
    - name: Chown Directory
      file: path=/var/www/html owner=apache group=apache recurse=yes

三、Ansible-variables变量
1、为什么要使用变量
简化playbook项目的一个维护,使用一个固定的字符串-->表示一个不固定的值
2、ansible怎么定义变量 怎么使用变量{{ 变量名称 }}
① 通过playbook文件中的play进行定义
- 通过vars来进行定义变量
- 通过vars_files来进行定义变量
注意:和shell定义变量的方式不一样,shell=: version=1.12 yml语法:version: 1.12
-
定义变量:
vars:
-v1: value
-v2: value
-v3: value
-
使用变量:
{{ v1 }}
固定写法{{}}中间直接填写变量名称即可
② 通过inventory主机清单进行变量定义
- 通过host_vars对主机进行定义
- 通过group_vars对主机组进行定义
③ 通过执行playbook时使用-e参数指定变量
- ansible变量优先级
- ansible 变量注册
- ansible facts变量
3、通过playbook文件中的play使用变量
例:
vars1.yaml
- hosts: jkl
  vars:
    - web_packages: httpd-2.4.6
    - ftp_packages: vsftpd-3.0.2

  tasks:
    - name: installed {{ web_packages }} {{ ftp_packages }}
      yum:
        name:
          - "{{ web_packages }}"
          - "{{ ftp_packages }}"
        state: present
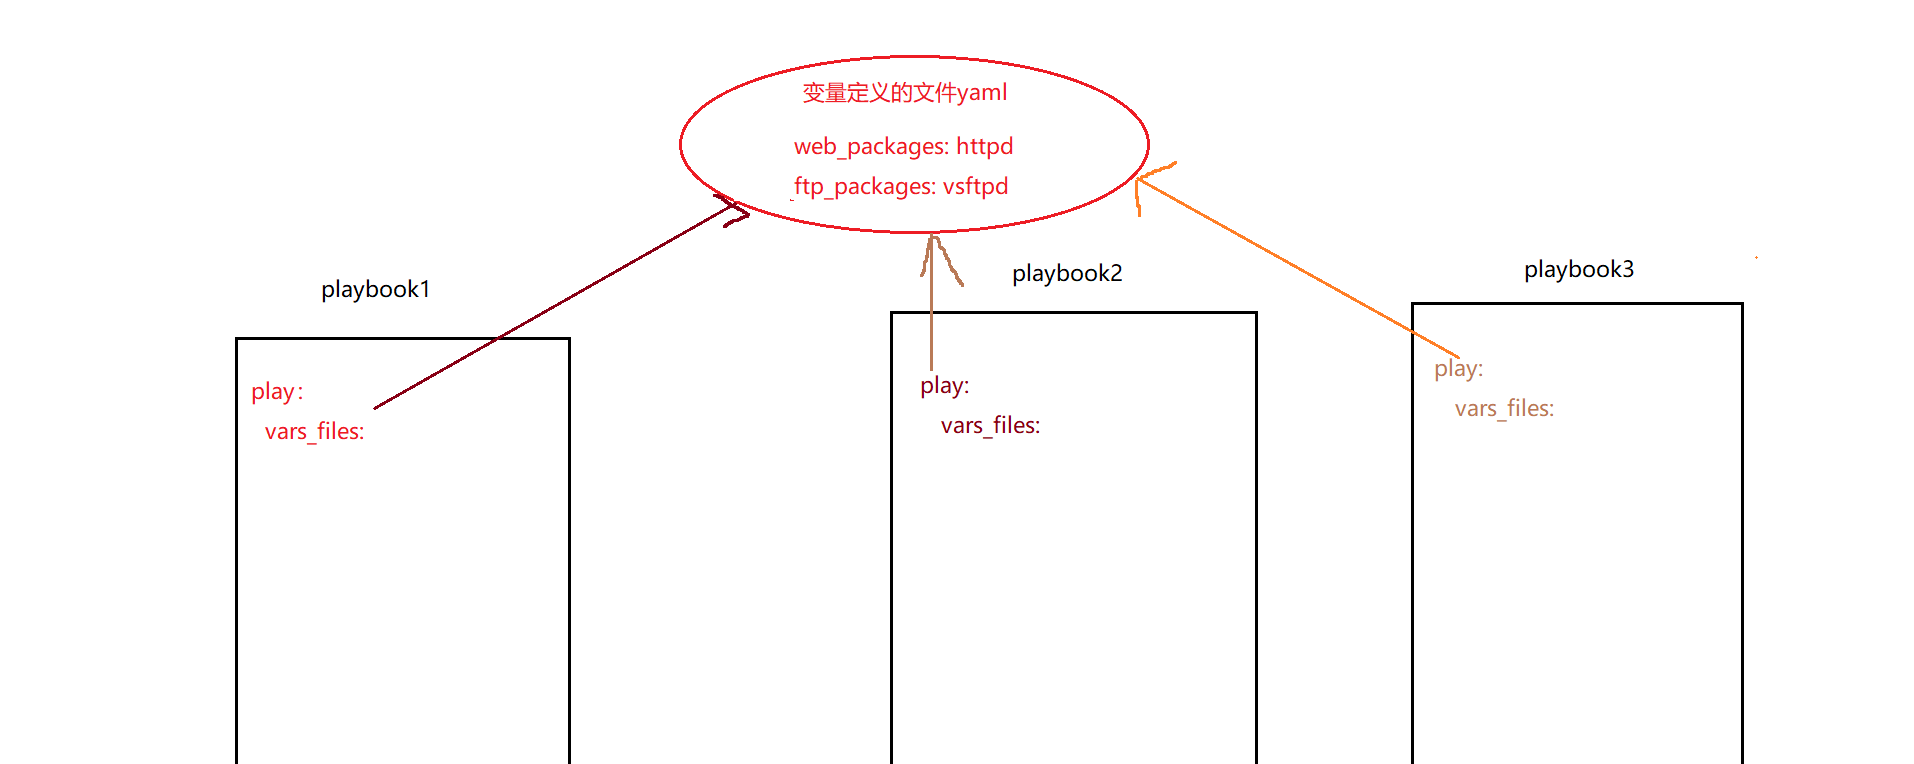
4、通过定义一个变量文件,然后使用playbook进行调用
例:
var_public.yml
web_packages: httpd
ftp_packaags: vsftpd
var1.yml
- hosts: jkl
  vars_files: ./vars_public.yml    # 注意这里是引用了t同一级的一个的变量,可以引用多个,要注意路径,注意这里的vars_files有个  s

  tasks:
    - name: installed {{ web_packages }} {{ ftp_packages }}
      yum:
        name:
          - "{{ web_packages }}"
          - "{{ ftp_packages }}"
        state: present
5、通过inventory主机清单进行变量定义
注意:主机变量优先级高于主机组变量
官方建议:在项目目录下创建两个变量的目录,host_vars group_vars
# 1、在当前的项目目录中创建两个变量的目录
	host_vars 	group_vars

# 2、在group_vars目录中创建一个文件,文件名与inventory清单中的组名称要保持一致
cat group_vars/jkl
web_packages: wget
ftp_packages: tree

# 3、编写playbook,只需要playbook文件中使用变量即可。
cat vars4.yml
- hosts: jkl
  tasks:
    - name: Install Rpm Packages "{{ web_packages }}" "{{ ftp_packages }}"
      yum:
        name:
          - "{{ web_packages }}"
          - "{{ ftp_packages }}"
        state: present
注意:
默认情况下,group_vars目录中文件名与hosts清单中的组名保持一致.
比如在group_vars目录中创建了oldboy组的变量,其他组是无法使用oldboy组的变量
系统提供了一个特殊组,all,只需要在group_vars目录下建立一个all文件,编写好变量,所有组都可使用.
#1)在host_vars目录中创建一个文件,文件名与inventory清单中的主机名称要保持完全一致
[root@ansible project1]# cat hosts
[oldboy]
172.16.1.7
172.16.1.8

#2)在host_vars目录中创建文件,给172.16.1.7主机定义变量
[root@ansible project1]# cat host_vars/192.168.159.128
web_packages: zlib-static
ftp_packages: zmap

#3)准备一个playbook文件调用host主机变量
[root@ansible project1]# cat f4.yml
- hosts: 192.168.159.128
  tasks:
    - name: Install Rpm Packages "{{ web_packages }}" "{{ ftp_packages }}"
      yum:
        name:
          - "{{ web_packages }}"
          - "{{ ftp_packages }}"
        state: present

- hosts: 192.168.159.129
  tasks:
    - name: Install Rpm Packages "{{ web_packages }}" "{{ ftp_packages }}"
      yum:
        name:
          - "{{ web_packages }}"
          - "{{ ftp_packages }}"
        state: present
注意
- host_vars 特殊的变量目录,针对单个主机进行变量.
- group_vars 特殊的变量目录,针对inventory主机清单中的组进行变量定义. 对A组定义的变量 B组无法调用
- group_vars/all 特殊的变量文件,可以针对所有的主机组定义变量.
6、通过执行playbook时使用-e参数指定变量
hosts
[jkl]
192.168.159.128

[db]
192.168.159.129
vars7.yml
- hosts: "{{ hosts }}"	#注意:这是一个变量名称
  tasks:
    - name: Install Rpm Packages "{{ web_packages }}" "{{ ftp_packages }}"
      yum:
        name:
          - "{{ web_packages }}"
          - "{{ ftp_packages }}"
        state: present
[root@m01 project1]# #ansible-playbook -i hosts vars_7.yml -e "hosts=jkl"
[root@m01 project1]# #ansible-playbook -i hosts vars_7.yml -e "hosts=jkl" -e "web_package=lrzsz"
7、ansible变量优先级
定义相同的变量不同值,来测试变量的优先级,操作步骤如下:
- 在plabook中定义vars变量
- 在playbook中定义vars_files变量
- 在host_vars中定义变量
- 在group_vars中定义变量
- 通过执行命令传递变量
vars8.yml
- hosts: jkl
  vars:
    file_name: paly_vars
  vars_files: ./vars_public.yml
  tasks:

    - name: Create Variables {{ file_name }}
      file: path=/tmp/{{ file_name }} state=touch
[root@m01 project1]# vim vars_public.yml
[root@m01 project1]# vim host_vars/192.168.159.129
[root@m01 project1]# vim group_vars/jkl
[root@m01 project1]# vim group_vars/all
变量的优先级
外置传参--->playbook(vars_files--->vars)--->inventory(host_vars-->group_vars/group_name--->group_vars-all)
8、ansible变量注册
register debug
vars9.yml
- hosts: jkl

  tasks:
    - name: Installed Httpd Server
      yum: name=httpd state=present

    - name: Service Httpd Server
      service: name=httpd state=started

    - name: Check Httpd Server
      shell: ps aux|grep httpd    # 执行shell命令
      register: check_httpd       # 将这个shell命令执行的结果存入check_httpd变量中,这个变量名可以随便取

    - name: OutPut Variables
      debug:           # 通过debug模块中的msg方法,输出变量所有的内容,如果希望 输出部分内容就用  变量.方法  输出
        msg: "{{ check_httpd.stdout_lines }}"
9、ansible facts变量
用来采集被控端的状态指标,比如: IP地址 主机名称 cpu信息 内存 等等
默认情况的facts变量名都已经预先定义好了, 只需要采集被控端的信息,然后传递至facts变量即可.
获取主机清单中的主机名和IP地址
facts.yml
- hosts: jkl
  tasks:
    - name: Output variables ansible facts
      debug:
        msg: IP address "{{ ansible_fqdn }}" is "{{ ansible_default_ipv4.address }}"

# ansible_fqdn获取jkl主机组中的所有主机的主机名   ansible_default_ipv4.address  获取jkl主机组中的所有主机的IP
安装Zabbix-agent
-
copy: 将文件原样拷贝
-
template:会将拷贝的文件进行变量的解析,然后再分发
zabbix-agentd.yml
- hosts: jkl
  tasks:

    - name: Configure Zabbix agent
      template: src=./zabbix_agentd.conf.j2  dest=/etc/zabbix/zabbix_agentd.conf
安装memcached
使用facts变量根据不同的内存生成不同Memcached配置文件
1)准备两台物理内存不一样的主机
192.168.159.128 1G memcached 500MB
192.168.159.129 2G memcached 1Gb
准备好memcache的配置文件(再空闲的机器上直接yum安装memcached)
2)如何提取被控端的总内存大小
[root@m01 project1]# ansible 192.168.159.128 -m setup -a "filter=ansible_memtotal_mb" -i hosts
172.16.1.8 | SUCCESS => {
"ansible_facts": {
"ansible_memtotal_mb": 1996,
"discovered_interpreter_python": "/usr/bin/python"
},
"changed": false
}
3)把memcached的配置文件放到当前的目录下,并进行修改和书写memcached安装的yml文件
[root@jkl project1]# cp /etc/sysconfig/memcached ./memcacehd.j2
[root@jkl project1]# vim memcacehd.j2
[root@jkl project1]# cat memcached.j2
PORT="11211"
USER="memcached"
MAXCONN="1024"
CACHESIZE="{{ ansible_memtotal_mb //2 }}"
OPTIONS=""
[root@jkl project1]# ansible-playbook -i hosts vars12.yml
vars12.yml
- hosts: jkl
  tasks:

    - name:  Installed Memcached
      yum: name=memcached state=present

    - name: Configure Memcached
      template: src=./memcached.j2 dest=/etc/sysconfig/memcached


    - name: Service Memcached Server
      service: name=memcached state=started enabled=yes


    - name: Check Memcached Server
      shell: ps aux | grep memcached
      register: check_mem


    - name: Debug Memcached Variables
      debug:
        msg: "{{ check_mem.stdout_lines }}"
在写任何新的服务之前,请先手动测试一遍,提取安装的命令配置文件路径启动命令
[root@jkl project1]# cat /etc/sysconfig/memcached
PORT="11211"
USER="memcached"
MAXCONN="1024"
CACHESIZE="64"
OPTIONS=""
- 启动服务并检查端口
[root@jkl project1]# systemctl start memcached
[root@jkl project1]# lsof -i:11211
COMMAND PID USER FD TYPE DEVICE SIZE/OFF NODE NAME
memcached 9931 memcached 26u IPv4 59215 0t0 TCP *:memcache (LISTEN)
memcached 9931 memcached 27u IPv6 59216 0t0 TCP *:memcache (LISTEN)
memcached 9931 memcached 28u IPv4 59219 0t0 UDP *:memcache
memcached 9931 memcached 29u IPv6 59220 0t0 UDP *:memcache
nginx+php 完成 kod云搭建
nginx+php
1.卸载php低版本
2.安装nginx1.12 ---> epel
3.安装php5.4 ---> base
4.创建组和用户 www
5.配置nginx -->nginx.conf 指定运行的用户身份www
6.配置nginx.conf.d/kod.conf 虚拟主机
7.根据虚拟主机的配置创建存放代码的目录
8.拷贝kod云的代码.解压
9.授权目录的权限
7.配置php-fpm 管理php的用户身份
8.配置php程序,php.ini 调整可道云上传的大小
9.测试nginx 和php的配置文件是否正确,正确则启动
老版
当前项目的目录下有提前准备好的几个配置文件
- 虚拟主机配置文件 kod.conf.j2
server {
        listen       8081;
        server_name   kod.jkl.com;
        root         /ansible_code/;

        location / {
           index index.php index.html;
        }
        location ~ .php$ {
                fastcgi_pass 127.0.0.1:9000;
                fastcgi_param SCRIPT_FILENAME $document_root$fastcgi_script_name;
                include fastcgi_params;
         }
        }
- Nginx配置文件 nginx.conf.j2
# For more information on configuration, see:
#   * Official English Documentation: http://nginx.org/en/docs/
#   * Official Russian Documentation: http://nginx.org/ru/docs/

user www;
worker_processes auto;
error_log /var/log/nginx/error.log;
pid /run/nginx.pid;

# Load dynamic modules. See /usr/share/doc/nginx/README.dynamic.
include /usr/share/nginx/modules/*.conf;

events {
    worker_connections 1024;
}

http {
    log_format  main  '$remote_addr - $remote_user [$time_local] "$request" '
                      '$status $body_bytes_sent "$http_referer" '
                      '"$http_user_agent" "$http_x_forwarded_for"';

    access_log  /var/log/nginx/access.log  main;

    sendfile            on;
    tcp_nopush          on;
    tcp_nodelay         on;
    keepalive_timeout   65;
    types_hash_max_size 2048;

    include             /etc/nginx/mime.types;
    default_type        application/octet-stream;

    # Load modular configuration files from the /etc/nginx/conf.d directory.
    # See http://nginx.org/en/docs/ngx_core_module.html#include
    # for more information.
    include /etc/nginx/conf.d/*.conf;

    server {
        listen       80 default_server;
        listen       [::]:80 default_server;
        server_name  _;
        root         /usr/share/nginx/html;

        # Load configuration files for the default server block.
        include /etc/nginx/default.d/*.conf;

        location / {
        }

        error_page 404 /404.html;
            location = /40x.html {
        }

        error_page 500 502 503 504 /50x.html;
            location = /50x.html {
        }
    }

# Settings for a TLS enabled server.
#
#    server {
#        listen       443 ssl http2 default_server;
#        listen       [::]:443 ssl http2 default_server;
#        server_name  _;
#        root         /usr/share/nginx/html;
#
#        ssl_certificate "/etc/pki/nginx/server.crt";
#        ssl_certificate_key "/etc/pki/nginx/private/server.key";
#        ssl_session_cache shared:SSL:1m;
#        ssl_session_timeout  10m;
#        ssl_ciphers HIGH:!aNULL:!MD5;
#        ssl_prefer_server_ciphers on;
#
#        # Load configuration files for the default server block.
#        include /etc/nginx/default.d/*.conf;
#
#        location / {
#        }
#
#        error_page 404 /404.html;
#            location = /40x.html {
#        }
#
#        error_page 500 502 503 504 /50x.html;
#            location = /50x.html {
#        }
#    }

}
-
php配置文件 php.ini.j2
-
php_www.conf.j2
nginx-php.yml
---
- hosts: jkl
# 1.卸载php低版本
# 2.安装nginx1.12   --->epel
# 3.安装phph5.4   ---base
  tasks:
    - name: Installed Nginx PHP
      yum: name=nginx,php,php-fpm,php-pdo,php-gd,php-mbstring state=present

# 4.创建用户和组   www
    - name: Create Group www
      group: name=www gid=666 state=present

    - name: Create User www
      user: name=www uid=666 group=666 shell=/sbin/nologin create_home=no  state=present

# 5.配置nginx --nginx.conf  指定运行的用户身份www
    - name: Configure Nginx server
      copy: src=./nginx.conf.j2 dest=/etc/nginx/nginx.conf backup=yes

# 6.配置nginx.conf.d/kod.conf   虚拟主机
    - name: Configure Virtual Server
      copy: src=./kod.conf.j2  dest=/etc/nginx/conf.d/kod.conf backup=yes

# 7.根据虚拟主机的配置创建存放代码的目录
    - name: Create Kod Data Directory
      file: path=/ansible_code state=directory

# 8.拷贝kod云的代码、解压
    - name: Unzip Kod Data Directory
      unarchive: src=./back/kodexplorer4.40.zip  dest=/ansible_code

# 9.授权目录的权限
    - name: Chown Kod Data www
      file: path=/ansible_code owner=www group=www  recurse=yes mode=0777

# 10.配置php-fpm 管理php的用户身份
    - name: Configure PHP Sever
      copy: src=./php_www.conf.j2 dest=/etc/php-fpm.d/www.conf

# 11.配置php程序,php.ini 调整可道云上传的大小
    - name: Configure PHP Server
      copy: src=./php.ini.j2 dest=/etc/php.ini
# 12.测试nginx和php的配置文件是否正确,正确则启动
    - name: Server Nginx Server
      service: name=nginx state=restarted enabled=yes

    - name: Server PHP-fpm Server
      service: name=php-fpm state=restarted enabled=yes
升级版
[root@jkl project1]# cat group_vars/all
nginx php variables
web_user: www
nginx_conf: /etc/nginx/nginx.conf
nginx_virt: /etc/nginx/conf.d
nginx_code: /ansible_code
php_fpm_conf: /etc/php-fpm.d/www.conf
php_ini_conf: /etc/php.ini
php_ini_max_upload: 200M
[root@jkl project1]# cat nginx_php.yml
- hosts: jkl
#1.卸载php低版本
#2.安装nginx1.12 php5.4
  tasks:
    - name: Installed Nginx
      yum: name=nginx,php,php-fpm,php-pdo,php-gd,php-mbstring state=present
#4.创建组和用户 www
    - name: Create Group {{ web_user }}
      group: name={{ web_user }} gid=666 state=present

    - name: Create User {{ web_user }}
      user: name={{ web_user }} uid=666 group=666 shell=/sbin/nologin state=present

#5.配置nginx -->nginx.conf  指定运行的用户身份www
    - name: Configure Nginx {{ nginx_conf }}
      template: src=./nginx.conf.j2 dest={{ nginx_conf }} backup=yes

#6.配置nginx.conf.d/kod.conf 虚拟主机
    - name: Configure Virtual {{ nginx_virt }}
      template: src=./kod.conf.j2 dest={{ nginx_virt }}/kod.conf backup=yes

#7.根据虚拟主机的配置创建存放代码的目录
    - name: Create Kod {{ nginx_code }} Directory
      file: path={{ nginx_code }} state=directory

#8.拷贝kod云的代码.解压
    - name: Unzip Kod {{ nginx_code }} Directory
      unarchive: src=./backup/kodexplorer4.40.zip dest={{ nginx_code }}

#9.授权目录的权限
    - name: Chown Kod Data {{ web_user }}
      file: path={{ nginx_code }} owner={{ web_user }} group={{ web_user }} recurse=yes mode=0777

#7.配置php-fpm 管理php的用户身份
    - name: Configure PHP-FPM {{ php_fpm_conf }}
      template: src=./php_www.conf.j2 dest={{ php_fpm_conf }}

#8.配置php程序,php.ini 调整可道云上传的大小
    - name: Configure PHP Server {{ php_ini_conf }}
      template: src=./php.ini.j2 dest={{ php_ini_conf }}

#9.测试nginx 和php的配置文件是否正确,正确则启动
    - name: Service Nginx Server
      service: name=nginx state=started enabled=yes

    - name: Service PHP-FPM Server
      service: name=php-fpm state=started enabled=yes
10、ansible 判断语句 when
案例1:
根据不同的操作系统,安装相同的软件包
[root@jkl project1]# cat task_1.yml
- hosts: jkl
  tasks:

    - name: Installed {{ ansible_distribution }} http  Server
      yum: name=httpd state=present
      when: (ansible_distribution == "Centos")

    - name: Installed {{ ansible_distribution }}  HTTP2 Server
      yum: name=httpd2 state=present
      when: (ansible_distribution == "Ubuntu")
案例2:
为所有的web主机名添加nginx仓库,其余的都跳过添加
[root@jkl project1]# cat task_2.yml
- hosts: all
  tasks:

    - name: Create Yum Repo
      yum_repository:
        name: ansible_nginx  # name的值:不仅是yum源的文件名和还是yum源的仓库名
        description: ansible_test
        baseurl: https://mirrors.jkl.com
        gpgcheck: no
        enabled: no
      when: (ansible_fqdn is match ("web*"))
主机名称是web或主机名称是lb的则添加这个nginx源
[root@jkl project1]# cat task_2.yml
- hosts: all
  tasks:
    - name: Create YUM Repo
      yum_repository:
        name: ansible_nginx
        description: ansible_test
        baseurl: https://mirrors.oldboy.com
        gpgcheck: no
        enabled: no
      when: ( ansible_fqdn is match ("web*")) or
	        ( ansible_fqdn is match ("lb*"))
案例3:
根据命令执行的结果进行判断
[root@jkl project1]# cat task_2.yml、
- hosts: all
  tasks:

#检查httpd服务是否是活动的
    - name: Check Httpd Server
      command: systemctl is-active httpd
      ignore_errors: yes
      register: check_httpd

#如果check_httpd变量中的rc结果等于0,则执行重启httpd,否则跳过
    - name: Httpd Restart
      service: name=httpd state=restarted
      when: check_httpd.rc == 0
11、循环语句 with_items
案例1:
使用循环启动多个服务
老版
- hosts: webserver
  tasks:

    - name: Service Nginx Server
      service: name=nginx state=restarted

    - name: Service PHP Server
      service: name=php-fpm state=restarted
升级版
- hosts: webserver
  tasks:

    - name: Service Nginx Server
    # 注意:下面的 {{ item }}是固定的值
      service: name={{ item }} state=restarted
      with_items:
        - nginx
        - php-fpm

    # 执行service的时候name=item会去with_items中去找,去读取有几个任务,有一个服务算一个依次往下写
案例2:
定义变量方式循环安装软件包
- hosts: webserver
  tasks:
    - name: Installed Httpd Mariadb Package
      yum: name={{ pack }} state=latest
      vars:
       pack:
         - httpd
         - mariadb-server
案例3:
使用变量字典循环方式批量创建用户
- hosts: webserver
  tasks:
     - name: Create User
       user: name={{ item.name }} groups={{ item.groups }} state=present
       with_items:
         - { name: 'www', groups: 'bin'}
         - { name: 'test', groups: 'root'}
案例4:
使用变量字典循环方式批量拷贝文件
要求:
rsync: /etc/rsyncd.conf 644 /etc/rsync.pass 600
当前目录下有 rsyncd.conf.j2 和 rsync.pass.j2 文件
- hosts: webserver
  tasks:

    - name: Configure Rsyncd Server
      copy: src={{ item.src }} dest={{ item.dest }} mode={{ item.mode }}
      with_items:
        - { src: './rsyncd.conf.j2', dest: '/tmp/rsyncd.conf', mode: '0644' }
        - { src: './rsync.pass.j2', dest: '/tmp/rsync.pass', mode: '0600' }
高阶写法
 - name: Configure PHP-FPM {{ php_fpm_conf }}
      template: src={{ item.src }} dest={{ item.dest }}
      with_items:
        - { src: './docs1/php_www.conf.j2', dest: '{{ php_fpm_conf }}' }
        - { src: './docs1/php.ini.j2', dest: '{{ php_ini_conf }}' }
12、handlers 触发器
过程是:notify监控 ---> 通知 ---> Handlers触发
案例1:
安装nginx服务playbook,要求能够实现配置变更,服务自动重载 (万一配置修改错误.怎么办?)
- hosts: webserver

#1.定义变量,在配置文件中调用
  vars:
    http_port: 8881

#2.安装httpd服务
  tasks:
    - name: Install Httpd Server
      yum: name=httpd state=present

#3.使用template模板,引用上面vars定义的变量至配置文件中
    - name: Configure Httpd Server
      template: src=./httpd.conf dest=/etc/httpd/conf/httpd.conf
      notify:   #调用名称为Restart Httpd Server的handlers(可以写多个)
        - Restart Httpd Server

#4.启动Httpd服务
    - name: Start Httpd Server
      service: name=httpd state=started enabled=yes

#5.如果配置文件发生变化会调用该handlers下面的对应名称的task
  handlers:
    - name: Restart Httpd Server
      service: name=httpd state=restarted
handlers注意事项
1.无论多少个task通知了相同的handlers,handlers仅会在所有tasks结束后运行一次。
2.只有task发生改变了才会通知handlers,没有改变则不会触发handlers
3.不能使用handlers替代tasks、因为handlers是一个特殊的tasks。
13、tags标签
根据指定的标签执行 调试
1.对一个tasks指定一个tags标签
2.对一个tasks指定多个tags标签
3.多个tasks任务指定一个tags标签
指定执行某个tags标签
[root@m01 docs1]# ansible-playbook -i hosts nginx_php.yml -t "test_user"
忽略执行某个tags标签
[root@m01 docs1]# ansible-playbook -i hosts nginx_php.yml --skip-tags "test_user"
[root@m01 project1]# cat tasks_8.yml
- hosts: webserver
  tasks:
    - name: Install Nfs Server
      yum: name=nfs-utils state=present
      tags: install_nfs

    - name: Service Nfs Server
      service: name=nfs-server state=started enabled=yes
      tags: start_nfs-server
14、include 包含
5.include包含
1)编写restart_httpd.yml文件
[root@ansible project1]# cat restart_httpd.yml #注意这是一个tasks所有没有play的任何信
- name: Restart Httpd Server
  service: name=httpd state=restarted
2)A Project的playbook如下
[root@ansible project1]# cat a_project.yml
- hosts: webserver
  tasks:
    - name: A Project command
      command: echo "A"

    - name: Restart httpd
      include: restart_httpd.yml
3)B Project的playbook如下
[root@ansible project1]# cat b_project.yml
- hosts: webserver
  tasks:
    - name: B Project command
      command: echo "B"

    - name: Restart httpd
      include_tasks: restart_httpd.yml
导入一个完整的playbook文件 (play task)
[root@jkl project1]# cat tasks_total.yml
- import_playbook: ./tasks_1.yml
- import_playbook: ./tasks_2.yml
三、 Ansible-jinja-roles
1、Ansible-jinja2的基本介绍
什么是jinjia2
Jinjia2是Python的全功能模版引擎
jinjia2模版与Ansible有什么关系
Ansible通常会使用Jinjia2模版来修改被管理主机的配置文件,例如给10台远程主机都装上http服务,但是要求每个服务器的端口不一样,如何解决?
Ansible如何使用Jinjia2模版
使用ansible的jinjia2模版,也就是template模块。该模块和copy模块一样,都是将文件复制到远端主机上去,但是区别在于template模块可以获取要赋值的文件中的变量的值,而copy则是原封不动的把文件内容复制过去,比如:针对不同的主机定义不同的变量,template会在将配置文件分发出去前读取变量到jinjia2模版,然后分发到不同的被管理主机上
Ansibe使用jinjia2注意事项
Ansible允许Jinjia2模版中使用条件判断和循环,但是jinjia判断循环语法不允许在playboook中使用。
注意:不是每个管理员都需要这个特性,但是有些时候jinjia2模版能大大提高效率。
2、Ansible jinjia2基本使用
jinjia模版基本语法
- 要想在配置文件中使用jinjia2,playbook中的tasks必须使用template模块
- 模版配置文件里面使用变量,比如{{ PORT }}或使用{{ facts变量 }}
jinjia模版逻辑关系
{% for i in EXPR %}.....{% endfor%} 作为循环方式
判断语句
{% if ansible_fqdn == "web01" %}
echo "123"
{% elif ansible_fqdn == "web02" %}
echo "456"
{% else %}
echo "789"
{% endif %}
{% if EXPR %}.....{% elif EXPR %}...{% endof%} 作为条件判断
循环语句
{% for i in EXPR %}...{% endfor%} 作为循环表达式
{% for i in range(1,10) %}
server 172.16.1.{{i}};
{% endfor %}
{# COMMENT #} 表示注释
3、jinjia2渲染nginx_proxy配置文件 keepalived配置文件
[root@jkl project1]# cat kod_proxy.conf.j2
upstream php_pools {
         server 192.168.159.128;
         server 192.168.159.129;
}


server {
        listen 80;
        server_name kod.jkl.com;
        location  / {
            proxy_pass http://php_pools;
            include proxy_params;
       }
}
[root@web01 project1]# cat jinjia2.yml
- hosts: lbserver
  tasks:

    - name: Installed Nginx Server
      yum: name=nginx state=present

    - name: Configure Nginx Virt
      template: src=./kod_proxy.conf.j2 dest=/etc/nginx/conf.d/proxy_kod.jkl.com.conf
      notify: Restart Nginx Server


    - name: Start Nginx Server
      servive: name=nginx state=started enabled=yes

  handlers:
    - name: Restrat Nginx Server
      service: name=nginx sttate=present
四、Ansible roles
1、Ansible Roles基本概述
Roles基于一个已知的文件结构,去自动的加载某些vars_files,tasks,以及handles,以便playbook更好的调用。roles相比playbook的结构更加的清晰有层次,但roles显然要比playbook更加的复杂难以理解。
Ansible注意事项:在编写roles的时候,最好能够将一个task拆分为一个文件,方便后续复用。
2、Ansible Roles目录结构
roles官方目录结构,必须按如下定义,在每个目录中必须有 main.yml文件,这些属于强制要求
[root@web01 roles]# tree
.
├── nfs                  # 角色名称
│   ├── files            # 存放文件
│   ├── handles          # 触发任务
│   ├── meta             #依赖关系
│   ├── tasks            # 具体任务
│   ├── templates        # 模版文件
│   └── vars             # 定义变量
3、Ansible Roles 依赖关系
roles允许你在使用role时自动引入其他role。role依赖关系存储在role目录中meat/main.yml文件中
4、Roles小技巧
- 创建roles目录结构。手动或使用ansible-galaxy init test roles
- 编写roles的功能, 也就是tasks
- 最后playbook引用roles编写好的tasks
5、ansible项目实战
基础环境
1.基础环境:
1) 关闭防火墙 Firewalld Selinux
2) 创建统一用户www,uid为666 gid为666
2) 添加base epel仓库
3) 特定主机需要添加特定的仓库源 nginx php mysql zabbix elk .....
4) 安装基础软件包 rsync nfs-utils net-tools lrzsz wget unzip vim tree.....
6) 内核升级内核参数调整文件描述符调整
[root@jkl1 roles]# cat hosts
[lbserver]
172.16.1.5
172.16.1.6
[webserver]
172.16.1.7
172.16.1.8
[nfsserver]
172.16.1.31
[dbserver]
172.16.1.51
[root@m01 roles]# mkdir /opt/base/{tasks,handlers,templates,vars,files} -p
[root@m01 roles]# cat base/tasks/main.yml
- name: Disabled Firewalld Server
  service: name=firewalled state=stopped  enabled=no

- name: Disabled Selinux Server
  selinux: state=disabled

- name: Create Web {{ web_user }}  {{ web_user_id }}  Group
  group: name={{ web_user }} gid={{ web_user_id }}

- name: Create Web  {{ web_user }}  {{ web_user_id }}  User
  user: name={{ web_user }} gid={{ web_user_id }} group={{ web_user }}

- name: Add Base Yum Repository
  yum_repository:
    name: base
    description: Base Aliyun Repository
    baseurl: http://mirrors.aliyun.com/centos/$releasever/os/$basearch/
    gpgcheck: yes
    gpgkey: http://mirror.aliyun.com/centos/RPM-GPG-KEY-Centos-7

- name: Add Eple Yum Repository
  yum_repository:
    name: epel
    description: epel Aliyun Repository
    baseurl: http://mirrors.aliyun.com/epel/7/$basearch/
    gpgcheck: no

- name: Add Nginx Yum Repository
  yum_repository:
    name: nginx
    description: nginx  Repository
    baseurl: http://nginx.org/packages/centos/7/$basearch/
    gpgcheck: no
   when: (ansible_hostname is match("web*")) or
         (ansible_hostname is match("lb*"))

- name: Add PHP Yum Repository
  yum_repository:
    name: php
    description: nginx  Repository
    baseurl: http://us-east.repo.webtatic.com/yum/el7/x86_64/
    gpgcheck: no
   when: (ansible_hostname is match("web*"))

- name: Installed Packages All
  yum: name={ packages } state=present
  vars:
    packages:
      - rsync
      - nfs-utils
      - net-tools
      - wget
      - tree
      - lrzsz
      - vim
      - unzip
      - httpd-tools
      - bash-completion
      - iftop
      - glances

- name: Change Limit /etc/security/limit.conf
  pam_limits:
    domain: "*"
    limit_type: "{{ item.limit_type }}"
    limit_item: "{{ item.limit_item }}"
    value: "{{ item.value  }}"
  with_items:
    - { limit_type: 'soft', limit_item: 'nofile',value: '100000' }
    - { limit_type: 'hard', limit_item: 'nofile',value: '100000' }
[root@m01 roles]# cat /opt/group_vars/all
web_user: www
web_user_id: 666
编写Nginx服务
[root@jkl roles]# mkdir nginx/{tasks,handlers,templates} -p
基础任务
[root@jkl opt]# cat roles/nginx/tasks/main.yml
- name: Installed Nginx Server
  yum: name=nginx state=present

- name: Configure Nginx Server
  template: src=nginx.conf.j2 dest=/etc/nginx/nginx.conf
  notify: Restart Nginx Server

- name: Started Nginx Server
  service: name=nginx state=started
触发器
[root@jkl opt]# cat roles/nginx/handlers/main.yml
- name: Restart Nginx Server
  service: name=nginx state=restarted
nginx的模板配置文件
[root@jkl opt]# cat roles/nginx/templates/nginx.conf.j2
user  {{ web_user }};
error_log  /var/log/nginx/error.log warn;
pid        /var/run/nginx.pid;

worker_processes  {{ ansible_processor_cores }};

events {
    worker_connections  {{ ansible_processor_cores * 2048 }};
}

http {
    include       /etc/nginx/mime.types;
    default_type  application/octet-stream;
    client_max_body_size 64m;
    log_format  main  '$remote_addr - $remote_user [$time_local] "$request" '
                       '$status $body_bytes_sent "$http_referer" '
                       '"$http_user_agent" "$http_x_forwarded_for"';

    access_log  /var/log/nginx/access.log main;
    sendfile        on;
    tcp_nopush      on;
    tcp_nodelay     on;

    keepalive_timeout  65;
    keepalive_requests 100;

    server_tokens on;
    gzip on;
    include /etc/nginx/conf.d/*.conf;
}
编写php服务
[root@jkl roles]# mkdir php-fpm/{tasks,handlers,templates} -p
基础任务
[root@jkl opt]# cat roles/php-fpm/tasks/main.yml
- name: Remove PHP-FPM Server
  yum: name="php-*-5*" state=absent

- name: Installed PHP-FPM Server
  yum: name={{ packages }} state=present
  vars:
    packages:
      - php71w
      - php71w-cli
      - php71w-common
      - php71w-devel
      - php71w-embedded
      - php71w-gd
      - php71w-mcrypt
      - php71w-mbstring
      - php71w-pdo
      - php71w-xml
      - php71w-fpm
      - php71w-mysqlnd
      - php71w-opcache
      - php71w-pecl-memcached
      - php71w-pecl-redis
      - php71w-pecl-mongodb

- name: Configure PHP-FPM Server
  template: src=www.conf.j2 dest=/etc/php-fpm.d/www.conf
  notify: Restart PHP-FPM Server

- name: Configure PHP.INI Server
  template: src=php.ini.j2 dest=/etc/php.ini
  notify: Restart PHP-FPM Server

- name: Start PHP-FPM Server
  service: name=php-fpm state=started enabled=yes
触发器
[root@jkl opt]# cat roles/php-fpm/handlers/main.yml
- name: Restart PHP-FPM Server
  service: name=php-fpm state=restarted
php-fpm模板配置文件
[root@jkl opt]# cat roles/php-fpm/templates/www.conf.j2
[www]
user = {{ web_user }}
group = {{ web_user }}
listen = 127.0.0.1:9000
listen.allowed_clients = 127.0.0.1
pm = dynamic
pm.max_children = 50
pm.start_servers = 10
pm.min_spare_servers = 5
pm.max_spare_servers = 35
slowlog = /var/log/php-fpm/www-slow.log
php_admin_value[error_log] = /var/log/php-fpm/www-error.log
php_admin_flag[log_errors] = on
php_value[soap.wsdl_cache_dir]  = /var/lib/php/wsdlcache
php.ini配置文件
[root@jkl opt]# cat roles/php-fpm/templates/php.ini.j2
[Session]
session.save_handler = redis
session.save_path = "tcp://{{ redis_server_ip }}:{{ redis_server_port }}"
编写Redis服务
[root@jkl roles]# mkdir redis/{tasks,handlers,templates} -p
基础任务
[root@jkl opt]# cat roles/redis/tasks/main.yml
- name: Install Redis Server
  yum: name=redis state=present

- name: Configure Redis Server
  template: src=redis.conf.j2 dest=/etc/redis.conf
  notify: Restart Redis Server

- name: Started Redis Server
  service: name=redis state=started enabled=yes
触发器
[root@jkl opt]# cat roles/redis/handlers/main.yml
- name: Restart Redis Server
  service: name=redis state=restarted
redis模板配置文件(注意修改bind,其他略)
[root@jkl opt]# cat roles/redis/templates/redis.conf.j2
bind 127.0.0.1 {{ ansible_eth1.ipv4.address }}
编写 NFS服务
[root@jkl roles]# mkdir nfs/{tasks,handlers,templates} -p
基础任务
[root@jkl opt]# cat roles/nfs/tasks/main.yml
- name: Install NFS Server
  yum: name=nfs-utils state=present

- name: Configure NFS Server
  template: src=exports.j2 dest=/etc/exports
  notify: Restart NFS Server

- name: Create NFS Server Share Directory
  file: path={{ nfs_dir }} state=directory owner={{ web_user }} group={{ web_user }}

- name: Started NFS Server
  service: name=nfs state=started enabled=yes
触发器
[root@jkl opt]# cat roles/nfs/handlers/main.yml
- name: Restart NFS Server
  service: name=nfs state=restarted
模版配置文件
[root@jkl opt]# cat roles/nfs/templates/exports.j2
{{ nfs_dir }} {{ nfs_share_ip }}(rw,sync,all_squash,anonuid={{ web_user_id }},anongid={{ web_user_id }})
编写MySQL服务
[root@m01 roles]# mkdir mysql/{tasks,handlers,templates} -p
基础任务
[root@jkl opt]# cat roles/mysql/tasks/main.yml
- name: Install Mriadb Server
  yum: name={{ packages }} state=present
  vars:
    packages:
      - mariadb
      - mariadb-server
      - MySQL-python


- name: Configure Mariadb Server
  template: src=my.cnf.j2 dest=/etc/my.cnf backup=yes
  notify: Restart Mariadb Server

- name: Started Mariadb Server
  service: name=mariadb state=started enabled=yes

- name: Create Application Database
  mysql_db: name={{ item }} state=present
  with_items:
    - wordpress
    - zh
    - phpmyadmin
    - zabbix
    - jpress

- name: Create Web Remote Application DB User
  mysql_user:
    name: "{{ web_db_user }}"
    password: "{{ web_db_pass }}"
    priv: '*.*:ALL'
    host: '%'
    state: present
触发器
[root@jkl opt]# cat roles/mysql/handlers/main.yml
- name: Restart Mariadb Server
  service: name=mariadb state=restarted
模版配置文件mysql
[root@jkl opt]# cat roles/mysql/templates/my.cnf.j2
[mysqld]
datadir=/var/lib/mysql
socket=/var/lib/mysql/mysql.sock
symbolic-links=0

[mysqld_safe]
log-error=/var/log/mariadb/mariadb.log
pid-file=/var/run/mariadb/mariadb.pid

!includedir /etc/my.cnf.d
编写keepalived服务
[root@jklroles]# mkdir keepalived/{tasks,handlers,templates} -p
基础任务
[root@jkl opt]# cat roles/keepalived/tasks/main.yml
- name: Install keepalived Server
  yum: name=keepalived state=present

- name: Configure Keepalived Server
  template: src=keepalived.conf.j2 dest=/etc/keepalived/keepalived.conf
  notify: Restart keepalived Server

- name: Start Keepalived Server
  service: name=keepalived state=started enabled=yes
触发器
[root@jkl opt]# cat roles/keepalived/handlers/main.yml
- name: Restart keepalived Server
  service: name=keepalived state=restarted
模板配置文件
[root@m01 opt]# cat roles/keepalived/templates/keepalived.conf.j2
global_defs {
    router_id {{ ansible_hostname }}
}
vrrp_instance VI_1 {
{% if ansible_hostname == "lb01" %}
    state MASTER
    priority 150
{% elif ansible_hostname == "lb02" %}
    state BACKUP
    priority 100
{% endif %}
    interface eth0
    virtual_router_id 50
    advert_int 1
    authentication {
        auth_type PASS
        auth_pass 1111
}
    virtual_ipaddress {
        10.0.0.3
    }
}