kubelet 主要功能
Pod 管理
在 kubernetes 的设计中,最基本的管理单位是 pod,而不是 container。pod 是 kubernetes 在容器上的一层封装,由一组运行在同一主机的一个或者多个容器组成。如果把容器比喻成传统机器上的一个进程(它可以执行任务,对外提供某种功能),那么 pod 可以类比为传统的主机:它包含了多个容器,为它们提供共享的一些资源。
之所以费功夫提供这一层封装,主要是因为容器推荐的用法是里面只运行一个进程,而一般情况下某个应用都由多个组件构成的。
pod 中所有的容器最大的特性也是最大的好处就是共享了很多资源,比如网络空间。pod 下所有容器共享网络和端口空间,也就是它们之间可以通过 localhost 访问和通信,对外的通信方式也是一样的,省去了很多容器通信的麻烦。
除了网络之外,定义在 pod 里的 volume 也可以 mount 到多个容器里,以实现共享的目的。
最后,定义在 pod 的资源限制(比如 CPU 和 Memory) 也是所有容器共享的。
容器健康检查
创建了容器之后,kubelet 还要查看容器是否正常运行,如果容器运行出错,就要根据设置的重启策略进行处理。检查容器是否健康主要有三种方式:执行命令,http Get,和tcp连接。
不管用什么方式,如果检测到容器不健康,kubelet 会删除该容器,并根据容器的重启策略进行处理(比如重启,或者什么都不做)。
容器监控
kubelet 还有一个重要的责任,就是监控所在节点的资源使用情况,并定时向 master 报告。知道整个集群所有节点的资源情况,对于 pod 的调度和正常运行至关重要。
kubelet 使用 cAdvisor 进行资源使用率的监控。cAdvisor 是 google 开源的分析容器资源使用和性能特性的工具,在 kubernetes 项目中被集成到 kubelet 里,无需额外配置。默认情况下,你可以在 localhost:4194 地址看到 cAdvisor 的管理界面。
除了系统使用的 CPU,Memory,存储和网络之外,cAdvisor 还记录了每个容器使用的上述资源情况。
kubelet创建pod启动过程
流程图:
流程内容分析
-
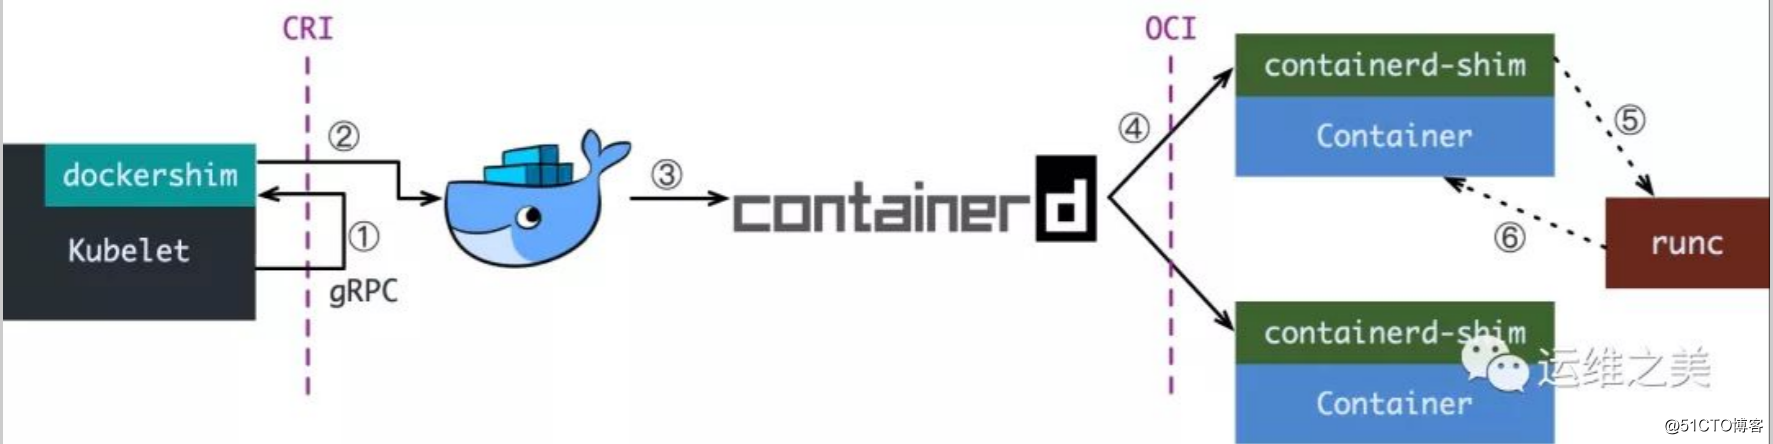
kubelet通过gRPC调用dockershim发起创建容器,CRI即容器运行时接口(container runtime interface),目前dockershim的代码内嵌在kubele中,所以接受创建容器的就是kubelet进程。
-
dockershim把创建容器的命令转换成docker daemon可以识别的命令,之后发送给docker daemon创建容器。
-
docker daemon在1.12版本之后就会把创建容器的命令分发给另一个进程: comtainerd。
-
containerd收到创建容器的命令后,创建另一个进程:containerd-shim进程,由该进程执行具体的创建命令,containerd进程做为父进程存在。
-
创建容器的时候需要namespace隔离容器启动和创建需要的资源,cgroup限制容器可以使用资源的大小等操作,这些事情该怎么做已经有看公开的规范OCI(open container initivtive 开放容器标准),它的一个参考实现叫做runc。于是containerd--shim在这一步需要调用runc命令,来启动容器。
-
runc启动容器之后就直接退出,containerd-shim则会成为容器进程的父进程,收集容器进程的状态,上报给contanierd,并在容器种pid为1的进程退出后接管容器中的子进程进行清理,确保不会出现僵尸进程。
pod生命周期:
链接:https://kubernetes.io/zh/docs/concepts/workloads/pods/pod-lifecycle/
- 1.pod生命周期调度只有一次,scheduler调度到node会为pod打上node uid全局唯一,当pod重启时不会改变node。更新后pod名字可以不变uid会改变。
- 2.当节点失效或资源紧缺被驱逐后才会重新调度。
- 3.service-api向kubelet发送停止指令,pod会终止。 #pod停止为优雅停止,在kill之前会给定宽容期,与微服务优雅停止相近都是给容器或服务发送 TERM信号拒绝接受新的请求,并在宽容期后停止容器。
这其中有两个名词概念容易混淆
CRI:容器运行时接口 container runtime interface
其主要的作用:
- 针对容器操作的接口,包括容器的创建、启动和停止等
- 针对镜像的操作,拉去、删除镜像等
- 针对podsandbox(容器沙箱环境)
OCI:开放容器标准 open container initiative
主要作用,制作容器
-
容器镜像制作内容,即imagespec
-
容器需要接收哪些指令,即runtimespec
kubelet pod健康检查
kubelet默认对于容器检查非常的简单粗暴,就是对于入口程序pid为1的程序,只要监测是否存活即为容器正常。
kubelet对于容器资源的监控主要使用cAdvisor,cAdvisor是用于针对于docker stats接口的采集工具。kubelet内部集成了cAdvisor,内部函数中定义了定时器及监控采集,1秒钟就会去采集汇报。
- 健康检查三种机制
- 通过命令返回值来判断 (执行命令后返回值非0则为失败)
- 通过tcp端口是否开启来判断容器是否正常
- 通过http rest请求来判断是否正常
#rest简单描述为前后台通讯GET/POST,客户端与服务端通信,用户通过socket发送请求后选择子标签,服务端返回子标签json,客户端在发送请求加上子标签,对应的调用标签对应的接口或功能。rest也是无状态统一接口,客户端负责用户用户状态维持。
基于cmd 健康检查


apiVersion: apps/v1
kind: Deployment
metadata:
  name: web-demo
  namespace: dev
spec:
  selector:
    matchLabels:
      app: web-demo
  replicas: 1
  template:
    metadata:
      labels:
        app: web-demo
    spec:
      containers:
      - name: web-demo
        image: hub.mooc.com/kubernetes/web:v1
        ports:
        - containerPort: 8080
        livenessProbe:
          exec:
            command:
            - /bin/sh
            - -c
            - ps -ef|grep java|grep -v grep
          initialDelaySeconds: 10 #等待容器启动时间
          periodSeconds: 10 #监控检查等待时间间隔
          failureThreshold: 2 #健康检查连续失败次数
          successThreshold: 1 #健康检查从错误到正常次数
          timeoutSeconds: 5 #执行命令超时时间
#pod创建后,会在配置文件中添加liveness exec [具体命令及执行时间,判断返回值等]。本质是容器启动时kubelet为容器添加默认执行命令。判断命令执行返回值,echo $? 上次命令执行返回值查看。
基于http健康检查
apiVersion: apps/v1
kind: Deployment
metadata:
  name: web-demo
  namespace: dev
spec:
  selector:
    matchLabels:
      app: web-demo
  replicas: 1
  template:
    metadata:
      labels:
        app: web-demo
    spec:
      containers:
      - name: web-demo
        image: hub.mooc.com/kubernetes/web:v1
        ports:
        - containerPort: 8080
        livenessProbe:
          httpGet:
            path: /examples/index.html
            port: 8080
            scheme: HTTP
          initialDelaySeconds: 10 #等待容器启动时间
          periodSeconds: 5 #检查等待时间 间隔
          failureThreshold: 1 #健康检查连续失败次数
          successThreshold: 1 #从失败到成功的次数
          timeoutSeconds: 5 #执行命令超时时间
#http健康检查通过http返回值200来判断,300 400 500等都为失败,使用一定要通过一个稳定静态文件来获取。service添加后端pod时是根据后端pod端口是否启动进行判断,本质是tcp判断。http服务一定要注意。
基于tcp端口健康检查
apiVersion: apps/v1
kind: Deployment
metadata:
  name: web-demo
  namespace: dev
spec:
  selector:
    matchLabels:
      app: web-demo
  replicas: 1
  template:
    metadata:
      labels:
        app: web-demo
    spec:
      containers:
      - name: web-demo
        image: hub.mooc.com/kubernetes/web:v1
        ports:
        - containerPort: 8080
        livenessProbe:
          tcpSocket:
            port: 8080
          initialDelaySeconds: 20 #等待容器启动时间
          periodSeconds: 10 #检查隔间时间
          failureThreshold: 2 #连续失败次数
          successThreshold: 1 #失败到成功次数
          timeoutSeconds: 5 #超时时间
基于http状态向service发送就绪状态
apiVersion: apps/v1
kind: Deployment
metadata:
  name: web-demo
  namespace: dev
spec:
  selector:
    matchLabels:
      app: web-demo
  replicas: 1
  template:
    metadata:
      labels:
        app: web-demo
    spec:
      containers:
      - name: web-demo
        image: hub.mooc.com/kubernetes/web:v1
        ports:
        - containerPort: 8080
        livenessProbe:
          tcpSocket:
            port: 8080
          initialDelaySeconds: 20
          periodSeconds: 10
          failureThreshold: 2
          successThreshold: 1
          timeoutSeconds: 5
        readlinessProbe: #用于向service发送状态
          httpGet:
            path: /examples/index.html
            port: 8080
            scheme: HTTP
          initialDelaySeconds: 10 #等待容器启动时间
          periodSeconds: 5 #检查等待时间 间隔
          failureThreshold: 1 #健康检查连续失败次数
          successThreshold: 1 #从失败到成功的次数
          timeoutSeconds: 5 #执行命令超时时间
tcp-http.yaml
用tcp去探测启动探针与存活探针,用http返回去向service发送就绪状态值。通过改变容器状态值为read。
###当容器restart,检查时可以将Pod 的 spec 中包含一个 restartPolicy 字段修改,取值包括 Always、OnFailure 和 Never。默认值是 Always。也可以修改探针策略把探针修改为肯定可以成功的值。
Scheduler--- 玩转pod调度
Scheduler调度过程
流程图:

- 1.kubectl向api-service发送创建指令。api-service将创建指令转换为yaml存入etcd中。
- 2.informer reflector watch api-service 通过pod信息中是否绑定nodename。将请求分配给scheduler。
- 3.scheduler将pod放入优先级队列中,通过informer store取出node节点信息做cache缓存#cache经过一系列聚合计算结果存储为缓存(node节点信息由kubelet通过定时器定时向apiserver上报 写入etcd中)
- 4.执行预选策略,查询是否绑定label,端口是否存在,cpu及内存等是否超过resouce限定,挂载文件类型是否匹配,nodeselect规则匹配,节点状态是否正常。筛选出符合的node。
- 5.执行优选策略,通过cpu及内存平衡性(pod limit总的值剩余量及当前运行状态),node中是否预先存在运行镜像,同一deployment pod是否调度在同一node中等对其进行评分,分值最高的为选中节点。
- 6.scheduler将该pod绑定node,赋予一个nodename,并生成全局唯一uid,上传到apiservice,写入etcd。
- 7.informer reflector watch api-service 将pod信息通知node kubelet,kublet通过相应动作策略通过cri指令发送给容器守护进程,容器进程调用cni及oci创建pod(cni及cgroup等分配给pause实现部分资源共享)。
- 8.kubelet将pod节点信息上传给api-service。informer进行监听同步,通知到controller。
预选策略node亲和性调度
apiVersion: apps/v1
kind: Deployment
metadata:
  name: web-demo-node
  namespace: dev
spec:
  selector:
    matchLabels:
      app: web-demo-node
  replicas: 1
  template:
    metadata:
      labels:
        app: web-demo-node
    spec:
      containers:
      - name: web-demo-node
        image: hub.mooc.com/kubernetes/web:v1
        ports:
        - containerPort: 8080
      affinity:
        nodeAffinity:
          requiredDuringSchedulingIgnoredDuringExecution: #必须要满足不能被忽略的条件
            nodeSelectorTerms:  #节点的选择策略(数组形式)
            - matchExpressions: #匹配一个表达式
              - key: beta.kubernetes.io/arch #节点label名字
                operator: In #是否在其中或不在其中 NotIn
                values:
                - amd64 #label具体内容
                ####可以定义多个matchExpressions 他们之间的关系是并且的关系 有多个同时都要满足
                ####如果要定义或的关系要定义多个nodeSelectorTerms
          preferredDuringSchedulingIgnoredDuringExecution: #执行期间最好满足的条件(最好满足)
          - weight: 1 #策略权重 可以定义多个preferred
            preference:  #优先权
              matchExpressions: #匹配表达式
              - key: disktype #label名称为
                operator: NotIn #不在其中
                values: #label名称对应具体内容
                - ssd
- nodeAffinity:(节点选择)
- requiredDuringSchedulingIgnoredDuringExecution(必须要满足的条件)
####可以定义多个matchExpressions 他们之间的关系是并且的关系 有多个同时都要满足
####如果要定义或的关系要定义多个nodeSelectorTerms
-
- preferredDuringSchedulingIgnoredDuringExecution(最好要满足的条件)
预选策略pod亲和性调度
apiVersion: apps/v1
kind: Deployment
metadata:
  name: web-demo-pod
  namespace: dev
spec:
  selector:
    matchLabels:
      app: web-demo-pod
  replicas: 1
  template:
    metadata:
      labels:
        app: web-demo-pod
    spec:
      containers:
      - name: web-demo-pod
        image: hub.mooc.com/kubernetes/web:v1
        ports:
        - containerPort: 8080
      affinity:
        podAffinity: #pod策略
          requiredDuringSchedulingIgnoredDuringExecution:  #必须满足的条件
          - labelSelector:  #label选择
              matchExpressions: #匹配式
              - key: app     #跟pod label app=web-demo的运行在一起
                operator: In
                values:
                - web-demo
            topologyKey: kubernetes.io/hostname #范围选择 这定义了节点范围
          preferredDuringSchedulingIgnoredDuringExecution: #非必须满足的条件
          - weight: 100  #倾向于跟web-demo-node运行于同一node 可能实现也可能不实现
            podAffinityTerm:
              labelSelector:
                matchExpressions:
                - key: app
                  operator: In
                  values:
                  - web-demo-node
              topologyKey: kubernetes.io/hostname
(一个区域范围内一个pod跟其他pod的亲和关系)
#podAffinity亲和性与podAntiAffinity反亲和性是可以同时配置的 与某些pod部署一起与某些pod不部署在一起
#所有pod跑到同一node上可以将自身label定义上去
pod反亲和性调度
apiVersion: apps/v1
kind: Deployment
metadata:
  name: web-demo-pod
  namespace: dev
spec:
  selector:
    matchLabels:
      app: web-demo-pod
  replicas: 4
  template:
    metadata:
      labels:
        app: web-demo-pod
    spec:
      containers:
      - name: web-demo-pod
        image: 172.17.166.217/kubenetes/web:v1
        ports:
        - containerPort: 8080
      affinity:
        podAntiAffinity: #pod 反对策略
          requiredDuringSchedulingIgnoredDuringExecution: #必须要满足的调教
          - labelSelector: #拒绝与app=web-demo-pod部署到一起
              matchExpressions:
              - key: app
                operator: In
                values:
                - web-demo-pod
            topologyKey: kubernetes.io/hostname
          preferredDuringSchedulingIgnoredDuringExecution: #最好满足
          - weight: 100
            podAffinityTerm:  #最好部署在没有web-demo-pod的节点
              labelSelector:
                matchExpressions:
                - key: app
                  operator: NotIn
                  values:
                  - web-demo-pod
              topologyKey: kubernetes.io/hostname
#反亲和性最常用的操作 条件为自己不与相同label的pod运行在一起 这样部署之后每个pod都会分散
pod污点标签与select污点容忍
#特殊node节点不想给一半pod使用,打上污点标签 防止pod调用,想要调用 配置污点容忍(污点容忍为容忍不是一定要在一起 )
kubectl taint nodes node-3-172.17.166.219 gpu=true:NoSchedule #给node打上污点标签 污点策略为禁止调度其上

kubectl taint nodes node-3-172.17.166.219 gpu- #去除污点
apiVersion: apps/v1
kind: Deployment
metadata:
  name: web-demo-taint
  namespace: dev
spec:
  selector:
    matchLabels:
      app: web-demo-taint
  replicas: 1
  template:
    metadata:
      labels:
        app: web-demo-taint
    spec:
      containers:
      - name: web-demo-taint
        image: hub.mooc.com/kubernetes/web:v1
        ports:
        - containerPort: 8080
      tolerations:
      - key: "key"
        operator: "Equal"
        value: "value"
        effect: "NoSchedule"
#operator 等于Exists(如果key存在就可以生效跟值无关) 等于Equal(key与value必须对应,如果等于exists则不用配置value)effect 污点标签策略必须要对应。
- 污点标签策略
- (1)NoSchedule:Pod不会调度到这个节点上。
- (2)PreferNoSchedule:Pod可能会调度到这个节点上,都是不会优先调度到这个节点上。
- (3)NoExecute:Pod如果没在这个节点上运行,那么不会调度到这个节点上,如果Pod已经在这个节点上运行,则这个Pod将会被驱逐。#可设置容忍时间 过了时间驱逐掉
部署更新策略
-
1.重建
-
2.滚动
-
3.蓝绿
-
4.金丝雀
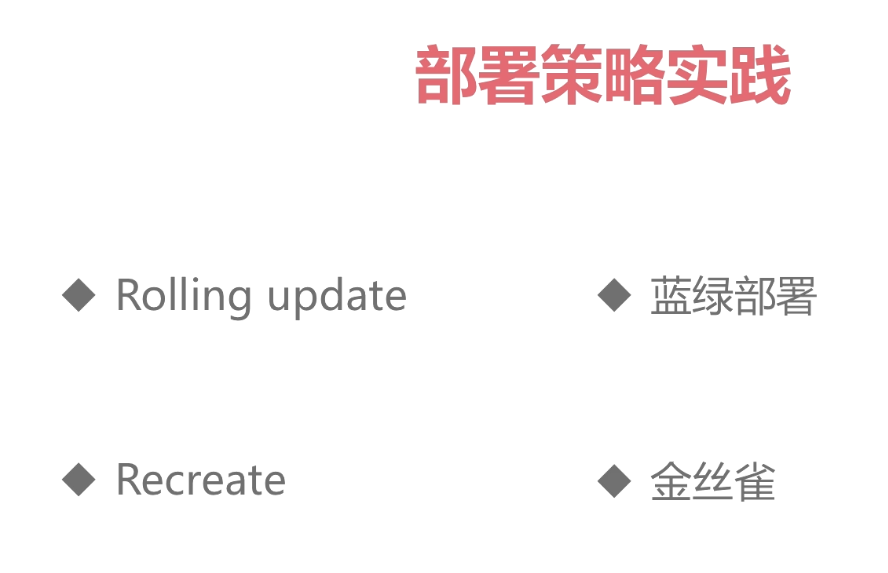
rolling update滚动更新与recreate重新是kubernetes层面支持的重启策略
蓝绿部署与金丝雀部署是利用service label select机制结合deployment去完成
重建部署
apiVersion: apps/v1
kind: Deployment
metadata:
  name: web-recreate
  namespace: dev
spec:
  strategy:
    type: Recreate
  selector:
    matchLabels:
      app: web-recreate
  replicas: 2
  template:
    metadata:
      labels:
        app: web-recreate
    spec:
      containers:
      - name: web-recreate
        image: hub.mooc.com/kubernetes/web:v1
        ports:
        - containerPort: 8080
        livenessProbe:
          tcpSocket:
            port: 8080
          initialDelaySeconds: 20
          periodSeconds: 10
          failureThreshold: 2
          successThreshold: 1
          timeoutSeconds: 5
        readinessProbe:
          httpGet:
            path: /examples/index.html
            port: 8080
            scheme: HTTP
          initialDelaySeconds: 10
          periodSeconds: 5
          failureThreshold: 1
          successThreshold: 1
          timeoutSeconds: 5
####strategy:type: Recreate 定义重启策略为重建
滚动部署
apiVersion: apps/v1
kind: Deployment
metadata:
  name: web-rollingupdate
  namespace: dev
spec:
  strategy:
    rollingUpdate:
      maxSurge: 25% #最多可以启动多少
      maxUnavailable: 25% #最多有多少服务停止
    type: RollingUpdate
  selector:
    matchLabels:
      app: web-rollingupdate
  replicas: 2
  template:
    metadata:
      labels:
        app: web-rollingupdate
    spec:
      containers:
      - name: web-rollingupdate
        image: hub.mooc.com/kubernetes/web:v1
        ports:
        - containerPort: 8080
        resources:
          requests:
            memory: 1024Mi
            cpu: 500m
          limits:
            memory: 2048Mi
            cpu: 2000m
        livenessProbe:
          tcpSocket:
            port: 8080
          initialDelaySeconds: 20
          periodSeconds: 10
          failureThreshold: 3
          successThreshold: 1
          timeoutSeconds: 5
        readinessProbe:
          httpGet:
            path: /hello?name=test
            port: 8080
            scheme: HTTP
          initialDelaySeconds: 20
          periodSeconds: 10
          failureThreshold: 1
          successThreshold: 1
          timeoutSeconds: 5
#可以指定停止百分比或者pod个数
deployment升级操作
kubectl rollout pause deployment web-rollingupdate -n dev#暂停当前滚动部署

kubectl rollout resume deployment web-rollingupdate -n dev#继续部署

kubectl rollout undo deployment web-rollingupdate -n dev #退回上一个版本
蓝绿部署
apiVersion: apps/v1
kind: Deployment
metadata:
  name: web-bluegreen
  namespace: dev
spec:
  strategy:
    rollingUpdate:
      maxSurge: 25%
      maxUnavailable: 25%
    type: RollingUpdate
  selector:
    matchLabels:
      app: web-bluegreen
  replicas: 2
  template:
    metadata:
      labels:
        app: web-bluegreen
        version: v1.0
    spec:
      containers:
      - name: web-bluegreen
        image: hub.mooc.com/kubernetes/web:v1
        ports:
        - containerPort: 8080
        resources:
          requests:
            memory: 1024Mi
            cpu: 500m
          limits:
            memory: 2048Mi
            cpu: 2000m
        livenessProbe:
          tcpSocket:
            port: 8080
          initialDelaySeconds: 20
          periodSeconds: 10
          failureThreshold: 3
          successThreshold: 1
          timeoutSeconds: 5
        readinessProbe:
          httpGet:
            path: /hello?name=test
            port: 8080
            scheme: HTTP
          initialDelaySeconds: 20
          periodSeconds: 10
          failureThreshold: 1
          successThreshold: 1
          timeoutSeconds: 5
#通过给pod的label添加version,让service去选择。
apiVersion: v1
kind: Service
metadata:
  name: web-bluegreen
  namespace: dev
spec:
  ports:
  - port: 80
    protocol: TCP
    targetPort: 8080
  selector:
    app: web-blue
  type: ClusterIP

---
#ingress
apiVersion: extensions/v1beta1
kind: Ingress
metadata:
  name: web-bluegreen
  namespace: dev
spec:
  rules:
  - host: web-bluegreen.mooc.com
    http:
      paths:
      - path: /
        backend:
          serviceName: web-bluegreen
          servicePort: 80
#service选择pod label version标签 ingress AB也可做到,一般旧版本都会随着新版本运行一段时间确定无问题在删除,称为红绿。
金丝雀部署
部署一个新版本的pod,名称与已有pod相同。在pod个数上与旧版本区分,从而实现小流量访问进行测试。利用ipvs的特性,ingress流量控制更为精准。
深入Pod
pod理解:一个容器是单进程模式,如果一个容器跑多个服务,违背了container设计原则。在调度层面如果没有pod整合,多个容器进行部署,部署到某个程度忽然发现资源不足就会创建失败,通过pod可以在调度层面进行整体估算。pod本质上还是容器层面的隔离,在物理机上没有真实存在的一个叫做pod的东西。pod真正要处理的是namespace、cgroup等,pod的本质是共享了同一个networknamespace,同一个vlume。docker命令也可以实现指定network指定namespace,但是这个有一个问题是,对于容器的启动顺序有要求,这样容器之间就不是一个对等关系,处理起来非常的复杂。pod通过中间容器pause容器启动,pod中第一个启动的容器就是pause(pause不会占用资源永远暂停状态),pause会给一个pod下多个容器分配同一个网络及valume。
-
总结:
- 1.pod为了在部署层面整和多个容器,计算整体部署需要资源。
- 2.pod采用多容器通过pause共享一个networknamespace及valume,减少复杂度、去除container启动顺序,使多容器之间对等。
测试:定义ip与网络模式,测试一个pod下多个容器是否共有一个namaspace。

pod生命周期
pod生命启停传入指令
apiVersion: v1
kind: Pod
metadata:
  name: pod-volume
spec:
  containers:
  - name: web
    image: hub.mooc.com/kubernetes/web:v1
    ports:
    - containerPort: 8080
    volumeMounts:
    - name: shared-volume
      mountPath: /shared-web
  - name: dubbo
    env:
    - name: DUBBO_PORT
      value: "20881"
    image: hub.mooc.com/kubernetes/dubbo:v1
    ports:
    - containerPort: 20881
      hostPort: 20881
      protocol: TCP
    volumeMounts:
    - name: shared-volume
      mountPath: /shared-dubbo
    lifecycle:
      postStart:
        exec:
          command: ["/bin/sh", "-c", "echo web starting ... >> /var/log/messages"]
      preStop:
        exec:
          command: ["/bin/sh", "-c", "echo web stopping ... >> /var/log/messages && sleep 3"]
  volumes:
  - name: shared-volume
    hostPath:
      path: /shared-volume-data
###pod lifecycle指令是串行,先启动才停止。
pod状态
- Pendding (pod首选会处于pendding状态由于某些原因例如内存不足、拉取不到镜像、匹配不到node还未被调度)
- containerCreating (Pendding状态之后pod被调度到node中 处于创建中)
- Running (pod创建完成后会处于running运行中)
- Succeeded (pod成功退出会处于成功退出状态)
- Failed(pod失败退出处于这个状态) succ与faile只有job会有这个状态
- Ready (当处于Running运行后通过配置好的健康检查通过后会处于Ready状态)
- CrashLoopBack0ff (崩溃状态健康检查失败处于CrashLoopBack0ff 一直检查失败当次数过多处于这个状态 说明服务未正常启动)
- Unknown (未知状态,一般是apiservice未收到pod相关信息,也就是说kubelet与apiserver中间通讯出现问题)
- Terminating (终止状态,kubelet接收到删除指令,停止容器并更新状态为终止状态,默认容忍时间30s,在此期间api-server读到并写入etcd。在容忍时间后彻底删除。)
pod ProjectedVolume 投射数据卷
#ProjectedVolume是一种轻量级的valume,是由api-server投射到pod中,pod需要什么文件在启动中就投射进pod。
ProjectedVolume三种类型
- 1.Secret
- 2.ConfigMap
- 3.DownloadAPI
pod secret
#秘钥文件用于用户名及密码等加密信息,配置好后由api-server存入etcd中。
手动创建secret
kubectl create secret tls mooc-tls --key mooc.key --cert mooc.crt
apiVersion: v1
kind: Secret
metadata:
  name: dbpass
type: Opaque
data:
  username: aW1vb2M=
  passwd:  aW1vb2MxMjM=
kubectl create -f secret.yaml#创建secret
###默认自己使用的secret类型为type: Opaque(浑浊的)
pod使用secret
apiVersion: v1
kind: Pod
metadata:
  name: pod-secret
spec:
  containers:
  - name: springboot-web
    image: hub.mooc.com/kubernetes/springboot-web:v1
    ports:
    - containerPort: 8080
    volumeMounts:
    - name: db-secret
      mountPath: /db-secret
      readOnly: true
  volumes:
  - name: db-secret
    projected:
      sources:
      - secret:
          name: dbpass
#secret默认加密方式base64 如果用户名或密码更换 直接重新更新secret.yaml 经过一段时间延迟 容器就会更新 可以动态修改容器
configmap
#用来存储不需要加密的参数,比如启动参数,一些参数的配置
创建一个配置文件
enemies=aliens
lives=3
enemies.cheat=true
enemies.cheat.level=noGoodRotten
secret.code.passphrase=UUDDLRLRBABAS
secret.code.allowed=true
secret.code.lives=30
从文件中创建configmap
kubectl create configmap web-config --from-file game.properties
从yaml文件中创建configmap
apiVersion: v1
data:
  game.properties1: |
    enemies=aliens
    lives=2
    enemies.cheat=true
    enemies.cheat.level=noGoodRotten
    secret.code.passphrase=UUDDLRLRBABAS
    secret.code.allowed=true
    secret.code.lives=30
kind: ConfigMap
metadata:
  managedFields:
  - apiVersion: v1
    fieldsType: FieldsV1
    fieldsV1:
      f:data:
        .: {}
        f:game.properties1: {}
    manager: kubectl-create
    operation: Update
  name: web1-config
  namespace: default
pod使用configmap
apiVersion: v1
kind: Pod
metadata:
  name: pod-game
spec:
  containers:
  - name: web
    image: hub.mooc.com/kubernetes/springboot-web:v1
    ports:
    - containerPort: 8080
    volumeMounts:
    - name: game
      mountPath: /etc/config/game
      readOnly: true
  volumes:
  - name: game
    configMap:
      name: web-game
修改configmap文件
kubectl edit cm web-game
创建configmap用于启动参数
apiVersion: v1
kind: ConfigMap
metadata:
  name: configs
data:
  JAVA_OPTS: -Xms1024m
  LOG_LEVEL: DEBUG
configmap用于环境变量evn引用
apiVersion: v1
kind: Pod
metadata:
  name: pod-cmd
spec:
  containers:
  - name: web
    image: hub.mooc.com/kubernetes/springboot-web:v1
    command: ["/bin/sh", "-c", "java -jar /springboot-web.jar -DJAVA_OPTS=$(JAVA_OPTS)"]
    ports:
    - containerPort: 8080
    env:
      - name: JAVA_OPTS
        valueFrom:
          configMapKeyRef:
            name: configs
            key: JAVA_OPTS
pod downloadapi
#用于程序取pod本身的一些相关信息
apiVersion: v1
kind: Pod
metadata:
  name: pod-downwardapi
  labels:
    app: downwardapi
    type: webapp
spec:
  containers:
  - name: web
    image: hub.mooc.com/kubernetes/springboot-web:v1
    ports:
    - containerPort: 8080
    volumeMounts:
      - name: podinfo
        mountPath: /etc/podinfo
  volumes:
    - name: podinfo
      projected: #项目
        sources:
        - downwardAPI:
            items:
              - path: "labels"  #定义名称
                fieldRef:
                  fieldPath: metadata.labels #定义来源
              - path: "name"
                fieldRef:
                  fieldPath: metadata.name
              - path: "namespace"
                fieldRef:
                  fieldPath: metadata.namespace
              - path: "cpu-request"
                resourceFieldRef:
                  containerName: web
                  resource: limits.memory