spring的主要特性是IOC,实现IOC的关键是bean,而更关键的是如何bean的管理容器,也就是BeanFactory,本文的目标是弄清楚BeanFactory具体是怎么样的存在。
先看下最简单的获取bean的案例,代码如下:
1 public static void main(String[] args){
2         BeanFactory factory = new XmlBeanFactory(new ClassPathResource("spring-beans.xml"));
3         User user = (User) factory.getBean("user");
4         System.out.println(JSON.toJSON(user).toString());
5     }
首先是读取spring的配置文件,创建BeanFactory实例,如何直接从BeanFactory实例中获取指定名称的bean。接下来就从这几行简单的代码入手,分析下BeanFactory。
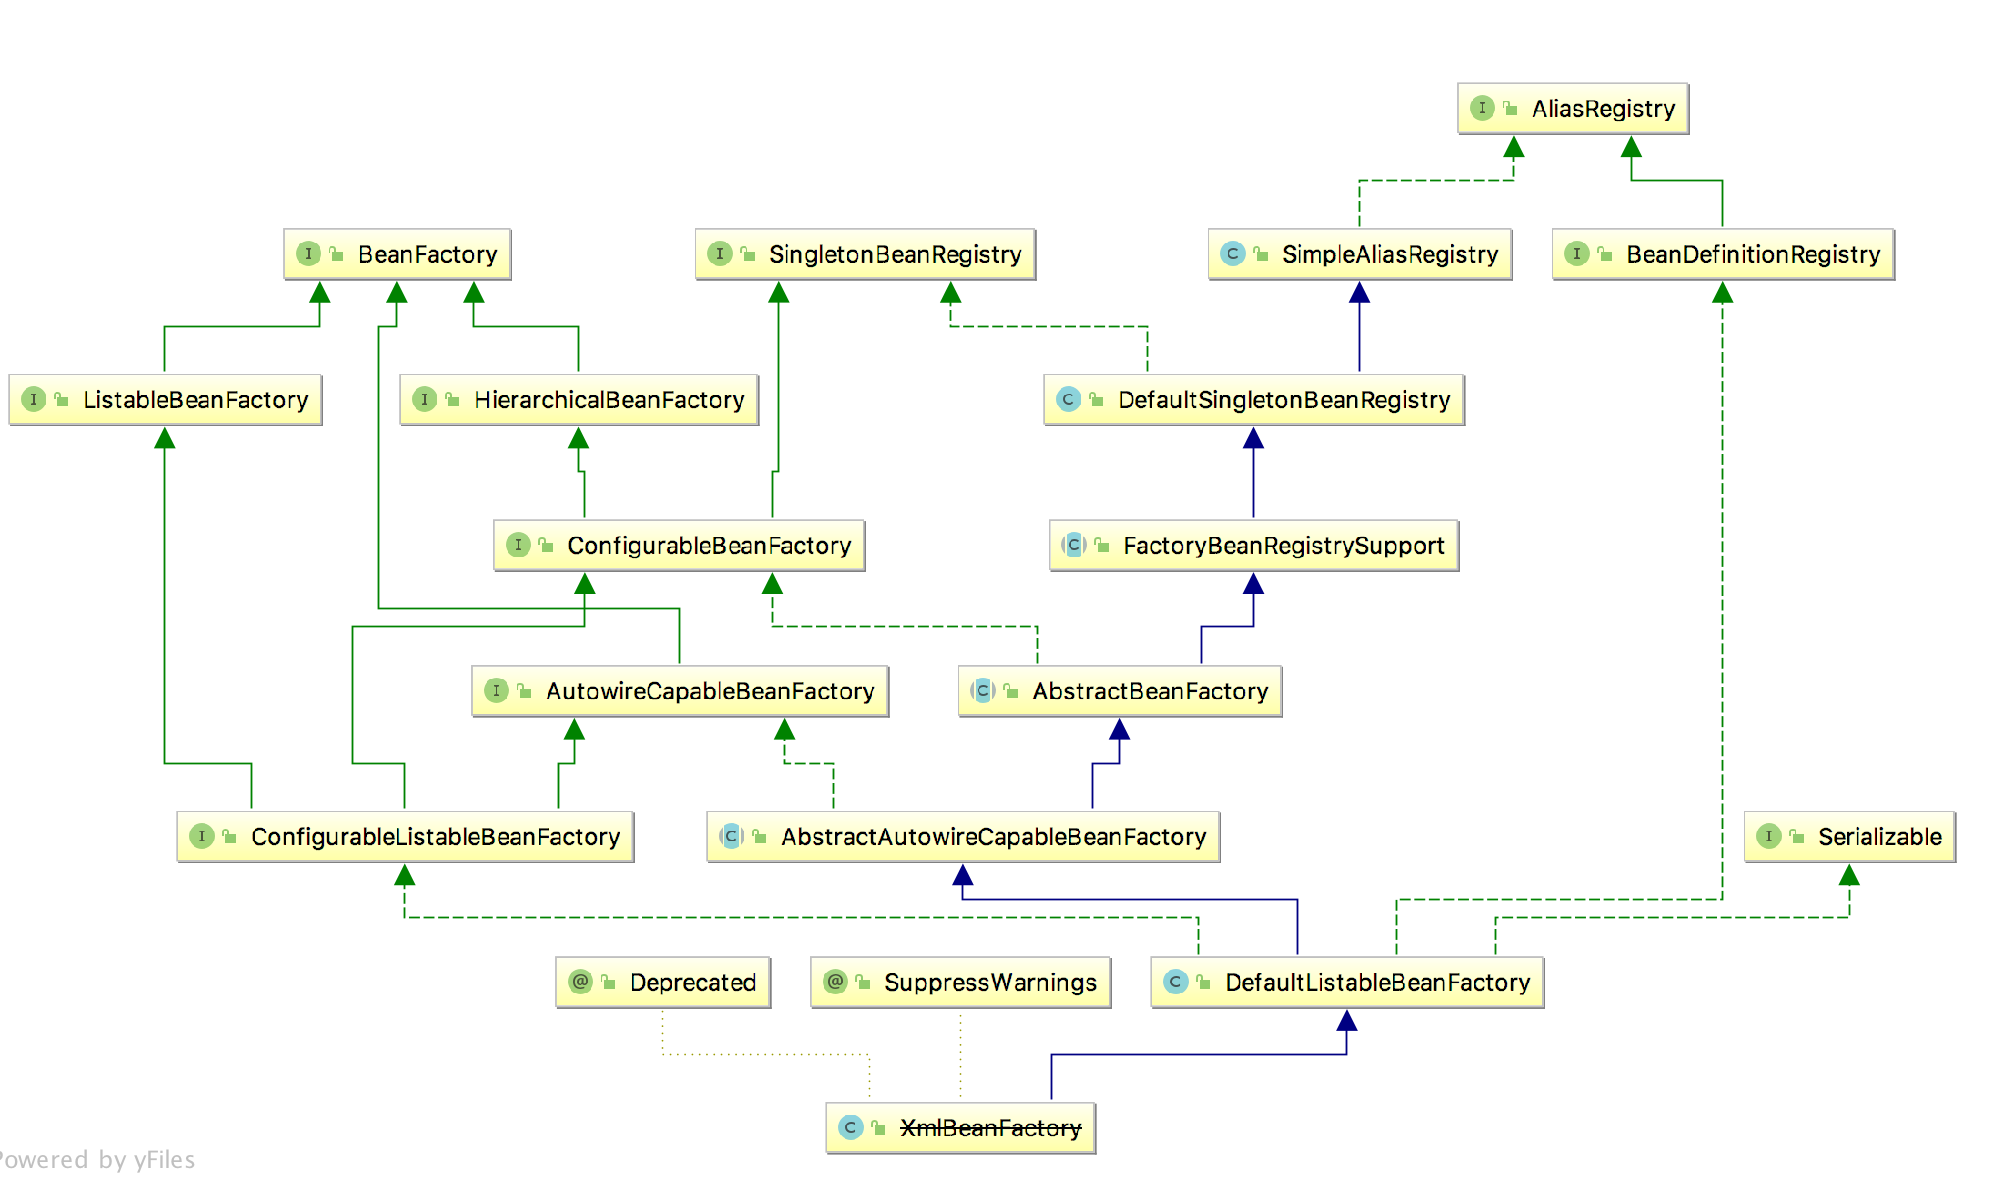
BeanFactory实例是通过XmlBeanFactory来创建的,很明显XmlBeanFactory是BeanFactory的子类,继承关系图如下:
那么先就从XmlBeanFactory的构造方法开始,源码如下:
 1 public class XmlBeanFactory extends DefaultListableBeanFactory {
 2
 3     private final XmlBeanDefinitionReader reader = new XmlBeanDefinitionReader(this);
 4
 5     public XmlBeanFactory(Resource resource) throws BeansException {
 6         this(resource, null);
 7     }
 8
 9     public XmlBeanFactory(Resource resource, BeanFactory parentBeanFactory) throws BeansException {
10         super(parentBeanFactory);
11         this.reader.loadBeanDefinitions(resource);
12     }
13
14 }
第5行的构造方法调用第9行的构造方法,首先是执行父类的构造方法,然后执行XmlBeanFefinitionReader的loadBeanFefinitions(resource)方法,这个方法显然就是加载bean配置文件的方法。接下来跟踪查看,源码如下:
1     @Override
2     public int loadBeanDefinitions(Resource resource) throws BeanDefinitionStoreException {
3         return loadBeanDefinitions(new EncodedResource(resource));
4     }
通过EncodeResource来封装Resource,在调用重载的方法
 1 public int loadBeanDefinitions(EncodedResource encodedResource) throws BeanDefinitionStoreException {
 2         Assert.notNull(encodedResource, "EncodedResource must not be null");
 3         //校验Resource参数
 4         if (logger.isInfoEnabled()) {
 5             logger.info("Loading XML bean definitions from " + encodedResource.getResource());
 6         }
 7
 8         Set<EncodedResource> currentResources = this.resourcesCurrentlyBeingLoaded.get();
 9         if (currentResources == null) {
10             currentResources = new HashSet<>(4);
11             this.resourcesCurrentlyBeingLoaded.set(currentResources);
12         }
13         if (!currentResources.add(encodedResource)) {
14             throw new BeanDefinitionStoreException(
15                     "Detected cyclic loading of " + encodedResource + " - check your import definitions!");
16         }
17         try {
18             //获取Resource的InputSteam流
19             InputStream inputStream = encodedResource.getResource().getInputStream();
20             try {
21                 //通过InputSteam构造InputSource
22                 InputSource inputSource = new InputSource(inputStream);
23                 if (encodedResource.getEncoding() != null) {
24                     inputSource.setEncoding(encodedResource.getEncoding());
25                 }
26                 //最终执行doLoadBeanDefinitions方法
27                 return doLoadBeanDefinitions(inputSource, encodedResource.getResource());
28             }
29             finally {
30                 inputStream.close();
31             }
32         }
33         catch (IOException ex) {
34             throw new BeanDefinitionStoreException(
35                     "IOException parsing XML document from " + encodedResource.getResource(), ex);
36         }
37         finally {
38             currentResources.remove(encodedResource);
39             if (currentResources.isEmpty()) {
40                 this.resourcesCurrentlyBeingLoaded.remove();
41             }
42         }
43     }
这次封装的EncodedResource作用主要是对XML配置文件的编码格式进行处理,然后最终执行了doLoadBeanDefinitions方法
 1     protected int doLoadBeanDefinitions(InputSource inputSource, Resource resource)
 2             throws BeanDefinitionStoreException {
 3         try {
 4             //通过InputSource和Resource得到一个Document对象,然后执行注册bean的方法
 5             Document doc = doLoadDocument(inputSource, resource);
 6             return registerBeanDefinitions(doc, resource);
 7         }
 8         catch (BeanDefinitionStoreException ex) {
 9             throw ex;
10         }
11         catch (SAXParseException ex) {
12             throw new XmlBeanDefinitionStoreException(resource.getDescription(),
13                     "Line " + ex.getLineNumber() + " in XML document from " + resource + " is invalid", ex);
14         }
15         catch (SAXException ex) {
16             throw new XmlBeanDefinitionStoreException(resource.getDescription(),
17                     "XML document from " + resource + " is invalid", ex);
18         }
19         catch (ParserConfigurationException ex) {
20             throw new BeanDefinitionStoreException(resource.getDescription(),
21                     "Parser configuration exception parsing XML from " + resource, ex);
22         }
23         catch (IOException ex) {
24             throw new BeanDefinitionStoreException(resource.getDescription(),
25                     "IOException parsing XML document from " + resource, ex);
26         }
27         catch (Throwable ex) {
28             throw new BeanDefinitionStoreException(resource.getDescription(),
29                     "Unexpected exception parsing XML document from " + resource, ex);
30         }
31     }
该方法只有两行有效逻辑代码,首先是加载XML文件得到一个Document对象,然后根据Document对象来注册Bean信息,一步步来看,先看如何生成Document对象。
1 private DocumentLoader documentLoader = new DefaultDocumentLoader();
2
3 protected Document doLoadDocument(InputSource inputSource, Resource resource) throws Exception {
4         return this.documentLoader.loadDocument(inputSource, getEntityResolver(), this.errorHandler,
5                 getValidationModeForResource(resource), isNamespaceAware());
6     }
调用了DocumentLoader的实例来进行加载,DocumentLoader接口的loadDocument方法
 1 public Document loadDocument(InputSource inputSource, EntityResolver entityResolver,
 2                                  ErrorHandler errorHandler, int validationMode, boolean namespaceAware) throws Exception {
 3
 4         //这里显然是工厂模式+建造者模式,先创建DocumentBuilder工厂,如何得到DocumentBuilder,最终执行parse方法解析xml配置文件得到Document对象
 5         DocumentBuilderFactory factory = createDocumentBuilderFactory(validationMode, namespaceAware);
 6         if (logger.isDebugEnabled()) {
 7             logger.debug("Using JAXP provider [" + factory.getClass().getName() + "]");
 8         }
 9         DocumentBuilder builder = createDocumentBuilder(factory, entityResolver, errorHandler);
10         return builder.parse(inputSource);
11     }
 1 public Document parse(InputSource is) throws SAXException, IOException {
 2         if (is == null) {
 3             throw new IllegalArgumentException(
 4                     DOMMessageFormatter.formatMessage(DOMMessageFormatter.DOM_DOMAIN,
 5                             "jaxp-null-input-source", null));
 6         }
 7         if (fSchemaValidator != null) {
 8             if (fSchemaValidationManager != null) {
 9                 fSchemaValidationManager.reset();
10                 fUnparsedEntityHandler.reset();
11             }
12             resetSchemaValidator();
13         }
14         //上面的代码都是校验,核心是下面的三行,通过DomParser来获取Document对象
15         domParser.parse(is);
16         Document doc = domParser.getDocument();
17         domParser.dropDocumentReferences();
18         return doc;
19     }
解析配置文件得到了Document对象,接下来就是通过Document来注册beanl了。回到XmlBeanDefinitionReader的RegisterBeanDefinitions方法
 1 public int registerBeanDefinitions(Document doc, Resource resource) throws BeanDefinitionStoreException {
 2         //创建BeanDefinitionDocumentReader实例
 3         BeanDefinitionDocumentReader documentReader = createBeanDefinitionDocumentReader();
 4         //统计当前已经加载过的BeanDefinition个数
 5         int countBefore = getRegistry().getBeanDefinitionCount();
 6         //加载及注册bean
 7         documentReader.registerBeanDefinitions(doc, createReaderContext(resource));
 8         //得到本次加载的BeanFinition个数
 9         return getRegistry().getBeanDefinitionCount() - countBefore;
10     }
核心是BeanDefinitionDocumentReader接口的registerBeanDefinitions方法,代码如下:
1 public void registerBeanDefinitions(Document doc, XmlReaderContext readerContext) {
2         this.readerContext = readerContext;
3         logger.debug("Loading bean definitions");
4         Element root = doc.getDocumentElement();
5         doRegisterBeanDefinitions(root);
6     }
首先是获取Document的root,然后将root元素传递给下面的方法继续执行,这里的root元素就是配置文件中的<beans>标签
 1 protected void doRegisterBeanDefinitions(Element root) {
 2         //专门处理解析
 3         BeanDefinitionParserDelegate parent = this.delegate;
 4         this.delegate = createDelegate(getReaderContext(), root, parent);
 5
 6         if (this.delegate.isDefaultNamespace(root)) {
 7             //处理<beans>标签中的profile属性
 8             String profileSpec = root.getAttribute(PROFILE_ATTRIBUTE);
 9             if (StringUtils.hasText(profileSpec)) {
10                 String[] specifiedProfiles = StringUtils.tokenizeToStringArray(
11                         profileSpec, BeanDefinitionParserDelegate.MULTI_VALUE_ATTRIBUTE_DELIMITERS);
12                 if (!getReaderContext().getEnvironment().acceptsProfiles(specifiedProfiles)) {
13                     if (logger.isInfoEnabled()) {
14                         logger.info("Skipped XML bean definition file due to specified profiles [" + profileSpec +
15                                 "] not matching: " + getReaderContext().getResource());
16                     }
17                     return;
18                 }
19             }
20         }
21
22         preProcessXml(root);//代码为空(模板方法设计模式:提供给子类实现,如果需要在bean的解析前后做一些处理的话)
23         parseBeanDefinitions(root, this.delegate);//Bean的解析
24         postProcessXml(root);//代码为空
25
26         this.delegate = parent;
27     }
发现bean的注册方法应该是parseBeanDefinitions方法,继续往下
 1  protected void parseBeanDefinitions(Element root, BeanDefinitionParserDelegate delegate) {
 2         if (delegate.isDefaultNamespace(root)) {
 3             //获取<beans>标签的子节点也就是所有的<bean>标签
 4             NodeList nl = root.getChildNodes();
 5             for (int i = 0; i < nl.getLength(); i++) {
 6                 Node node = nl.item(i);
 7                 if (node instanceof Element) {
 8                     Element ele = (Element) node;
 9                     if (delegate.isDefaultNamespace(ele)) {
10                         //如果是默认命名空间的bean
11                         parseDefaultElement(ele, delegate);
12                     }
13                     else {
14                         //如果是自定义命名空间的bean
15                         delegate.parseCustomElement(ele);
16                     }
17                 }
18             }
19         }
20         else {
21             //自定义命名空间的bean
22             delegate.parseCustomElement(root);
23         }
24     }
这里是逻辑很清楚,获取root下的子节点遍历,判断是否是默认命名空间的元素来分别处理。判断是否是默认命名空间的方式是取Node的namespanceUrl来和默认命名空间的地址进行比较,默认地址为:
public static final String BEANS_NAMESPACE_URI = "http://www.springframework.org/schema/beans";
像<bean id="userService" class="com.test.UserService">这种写法就是默认标签,而如<tx:annotation-driven>这种就是自定义的写法。
总结:本文从BeanFactory的初始化开始,解析XML配置文件,生成Docuemnt对象,解析Document中的标签,按标签的类型来进行区分解析,而两种的解析方式截然不同,接下来就分别解析。