上次成功通过FFmpeg采集摄像头的YUV数据,这次针对上一次的程序进行了改造,使用H264编码采集后的数据。
(传送门) JavaCV FFmpeg采集摄像头YUV数据
采集摄像头数据是一个解码过程,而将采集后的数据进行H264编码则是编码过程,如图:

从上图可以看出,编码过程,数据流是从AVFrame流向AVPacket,而解码过程正好相反,数据流是从AVPacket流向AVFrame。
javacpp-ffmpeg依赖:
<dependency>
    <groupId>org.bytedeco.javacpp-presets</groupId>
    <artifactId>ffmpeg</artifactId>
    <version>${ffmpeg.version}</version>
</dependency>
FFmpeg编码的过程是解码的逆过程,不过主线流程是类似的,如下图:
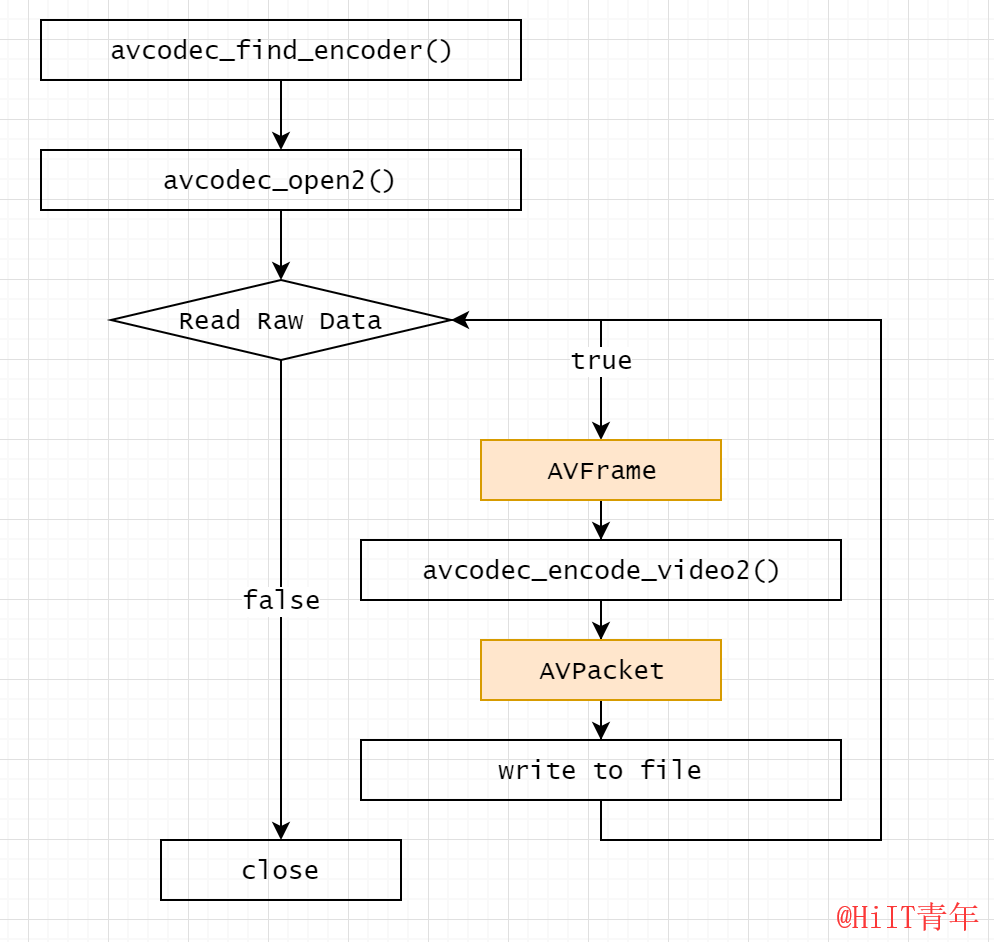
基本上主要的步骤都是:
- 查找编码/解码器
- 打开编码/解码器
- 进行编码/解码
在FFmpeg的demo流程中其实还有创建流avformat_new_stream(),写入头部信息avformat_write_header()和尾部信息av_write_trailer()等操作,这里只是将YUV数据编码成H264裸流,所以可以暂时不需要考虑这些操作。
将采集视频流数据进行H264编码的整体流程主要有以下几个步骤:
- 采集视频帧
- 将视频帧转化为YUV420P格式
- 构建H264编码器
- 对视频帧进行编码
采集视频帧
采集视频流中的视频帧在上一次采集YUV数据的时候已经实现了,主要是从AVFormatContext中用av_read_frame()读取视频数据并进行解码(avcodec_decode_video2()),实现代码如下:
public AVFrame grab() throws FFmpegException {
    if (av_read_frame(pFormatCtx, pkt) >= 0 && pkt.stream_index() == videoIdx) {
        ret = avcodec_decode_video2(pCodecCtx, pFrame, got, pkt);
        if (ret < 0) {
            throw new FFmpegException(ret, "avcodec_decode_video2 解码失败");
        }
        if (got[0] != 0) {
            return videoConverter.scale(pFrame);
        }
        av_packet_unref(pkt);
    }
    return null;
}
这样通过grab()方法就可以获取到视频流中的视频帧了。
将视频帧转化为YUV420P格式
在进行H264编码之前一定要确保视频帧是YUV420P格式的,所以必须对采集到的视频帧做一次转化,用到的是FFmpeg的SwsContext组件,下面的VideoConverter是对SwsContext封装的组件,内部实现了AVFrame的填充及SwsContext的初始化,使用方式如下:
// 1. 创建VideoConverter,指定转化格式为AV_PIX_FMT_YUV420P
videoConverter = VideoConverter.create(videoWidth, videoHeight, pCodecCtx.pix_fmt(),
    videoWidth, videoHeight, AV_PIX_FMT_YUV420P);
// 2. 对视频帧进行转化
videoConverter.scale(pFrame);
VideoConvert的scale方式,实际上也是调用了SwsContext的scale方法:
sws_scale(swsContext, new PointerPointer<>(pFrame), pFrame.linesize(),
    0, srcSliceH, new PointerPointer<>(avFrame), avFrame.linesize());
构建H264编码器
进行H264编码之前需要构建H264编码器,根据上面的流程图利用avcodec_find_encoder()和avcodec_alloc_context3()实现编码器的创建和参数配置,最后用avcodec_open()打开编码器,完整的初始化代码如下:
public static VideoH264Encoder create(int width, int height, int fps, Map<String, String> opts)
        throws FFmpegException {
    VideoH264Encoder h = new VideoH264Encoder();
    // 查找H264编码器
    h.pCodec = avcodec_find_encoder(AV_CODEC_ID_H264);
    if (h.pCodec == null) {
        throw new FFmpegException("初始化 AV_CODEC_ID_H264 编码器失败");
    }
    // 初始化编码器信息
    h.pCodecCtx = avcodec_alloc_context3(h.pCodec);
    h.pCodecCtx.codec_id(AV_CODEC_ID_H264);
    h.pCodecCtx.codec_type(AVMEDIA_TYPE_VIDEO);
    h.pCodecCtx.pix_fmt(AV_PIX_FMT_YUV420P);
    h.pCodecCtx.width(width);
    h.pCodecCtx.height(height);
    h.pCodecCtx.time_base().num(1);
    h.pCodecCtx.time_base().den(fps);
    // 其他参数设置
    AVDictionary dictionary = new AVDictionary();
    opts.forEach((k, v) -> {
        avutil.av_dict_set(dictionary, k, v, 0);
    });
    h.ret = avcodec_open2(h.pCodecCtx, h.pCodec, dictionary);
    if (h.ret < 0) {
        throw new FFmpegException(h.ret, "avcodec_open2 编码器打开失败");
    }
    h.pkt = new AVPacket();
    return h;
}
参数说明
width:视频的宽度
height:视频的高度
fps:视频的帧率
opts:编码器的其他参数设置
对视频帧进行编码
编码器构建完成后就可以对视频帧进行编码了,入参为AVFrame,出参为byte[](这里也可以是AVPacket,由于需要将H264裸流写入文件,这里直接返回byte数组)
public byte[] encode(AVFrame avFrame) throws FFmpegException {
    if (avFrame == null) {
        return null;
    }
    byte[] bf = null;
    try {
        avFrame.format(pCodecCtx.pix_fmt());
        avFrame.width(pCodecCtx.width());
        avFrame.height(pCodecCtx.height());
        ret = avcodec_encode_video2(pCodecCtx, pkt, avFrame, got);
        if (ret < 0) {
            throw new FFmpegException(ret, "avcodec_encode_video2 编码失败");
        }
        if (got[0] != 0) {
            bf = new byte[pkt.size()];
            pkt.data().get(bf);
        }
        av_packet_unref(pkt);
    } catch (Exception e) {
        throw new FFmpegException(e.getMessage());
    }
    return bf;
}
最后只需要调整一下上一次的主程序,将读取YUV数据的部分,调整为将AVFrame丢进编码器,拉取byte数组即可。
public static void main(String[] args) throws FFmpegException, IOException, InterruptedException {
    int fps = 25;
    avdevice_register_all();
    av_register_all();

    VideoGrabber g = new VideoGrabber();
    g.open("Integrated Camera");
    VideoH264Encoder encoder = VideoH264Encoder.create(g.getVideoWidth(), g.getVideoHeight(), fps);
    OutputStream fos = new FileOutputStream("yuv420p.h264");
    for (int i = 0; i < 200; i++) {
        AVFrame avFrame = g.grab();
        byte[] buf = encoder.encode(avFrame);
        if (buf != null) {
            fos.write(buf);
        }
        Thread.sleep(1000 / fps);
    }
    fos.flush();
    fos.close();

    encoder.release();
    g.close();
}
最终采集效果(H264裸流)可以用VLC播放:
这里对比一下,同样的200帧YUV数据和H264数据的大小,相差还是很大的。

=========================================================
H264编码源码可关注公众号 “HiIT青年” 发送 “ffmpeg-h264” 获取。

关注公众号,阅读更多文章。