一、准备工作
首先整合使用Spring整合MyBatis。
SpringBoot整合MyBatis完后后,我们需要在pom.xml中添加缓存相关的依赖。
<!-- cache -->
        <dependency>
            <groupId>org.springframework.boot</groupId>
            <artifactId>spring-boot-starter-cache</artifactId>
        </dependency>
完整pom.xml
<?xml version="1.0" encoding="UTF-8"?>
<project xmlns="http://maven.apache.org/POM/4.0.0" xmlns:xsi="http://www.w3.org/2001/XMLSchema-instance"
         xsi:schemaLocation="http://maven.apache.org/POM/4.0.0 https://maven.apache.org/xsd/maven-4.0.0.xsd">
    <modelVersion>4.0.0</modelVersion>
    <parent>
        <groupId>org.springframework.boot</groupId>
        <artifactId>spring-boot-starter-parent</artifactId>
        <version>2.2.4.RELEASE</version>
        <relativePath/> <!-- lookup parent from repository -->
    </parent>
    <groupId>com.spring.boot.example</groupId>
    <artifactId>spring-boot-cache</artifactId>
    <version>0.0.1-SNAPSHOT</version>
    <name>spring-boot-cache</name>
    <description>Demo project for Spring Boot</description>

    <properties>
        <java.version>1.8</java.version>
    </properties>

    <dependencies>

        <!-- web依赖 -->
        <dependency>
            <groupId>org.springframework.boot</groupId>
            <artifactId>spring-boot-starter-web</artifactId>
        </dependency>

        <!--  mybatis -->
        <dependency>
            <groupId>org.mybatis.spring.boot</groupId>
            <artifactId>mybatis-spring-boot-starter</artifactId>
            <version>2.1.1</version>
        </dependency>

        <!-- MySQL驱动-->
        <dependency>
            <groupId>mysql</groupId>
            <artifactId>mysql-connector-java</artifactId>
        </dependency>

        <dependency>
            <groupId>org.springframework.boot</groupId>
            <artifactId>spring-boot-starter-test</artifactId>
            <scope>test</scope>
            <exclusions>
                <exclusion>
                    <groupId>org.junit.vintage</groupId>
                    <artifactId>junit-vintage-engine</artifactId>
                </exclusion>
            </exclusions>
        </dependency>

        <!-- cache -->
        <dependency>
            <groupId>org.springframework.boot</groupId>
            <artifactId>spring-boot-starter-cache</artifactId>
        </dependency>

        <dependency>
            <groupId>junit</groupId>
            <artifactId>junit</artifactId>
            <scope>test</scope>
        </dependency>

    </dependencies>

    <build>
        <plugins>
            <plugin>
                <groupId>org.springframework.boot</groupId>
                <artifactId>spring-boot-maven-plugin</artifactId>
            </plugin>
        </plugins>
    </build>

</project>
二、缓存
2.1简介
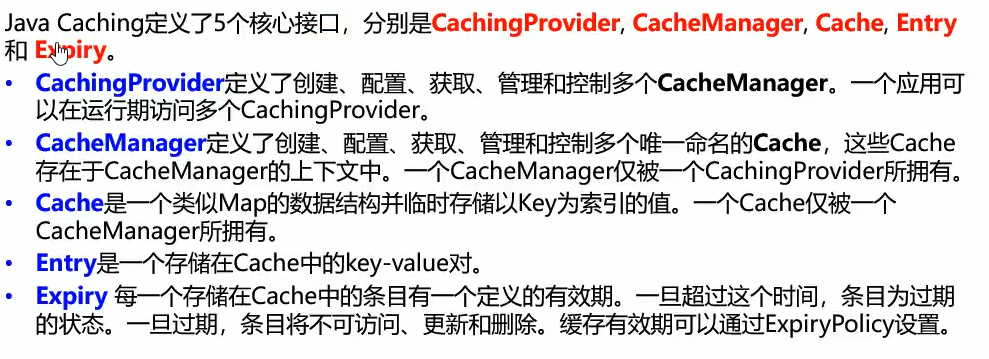
2.2 缓存注解简介

这里我们主要看三个注解。
| 注解 | 描述 | 参数 |
| @Cacheable |
执行前检查是否有缓存,有缓存则直接读取缓存。 没有缓存则执行方法,并缓存该方法的返回值。 |
value:指定当前数据存放位置,value标识cacheManager中具体cache key:cache中entity的key |
| @CacheEvict |
删除缓存,删除时可通过value和key指定需要删除的entity。 也可通过value和allEntites删除该cache(删除该cache下所有enetiy)。 |
value:指定是哪一个缓存,也可使用cacheNames key:指定cache中entity的key |
| @CachePut |
执行方法前不会检查是否有缓存缓存,每次都执行方法,方法结束将返回结果缓存。 可通过value,key指定缓存存放位置。 |
value:指定当前数据存放位置,value标识cacheManager中具体cache key:cache中entity的key |
三、实例
1)主要步骤:
3.1.1:配置好mybatis
3.1.2 springboot启动类添加 @EnableCaching注解开启缓存。
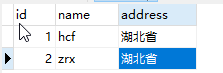
数据库中数据:
接口类及映射文件
package com.spring.boot.example.springboot.cache.mapper;

import com.spring.boot.example.springboot.cache.dao.User;

public interface UserMapper {

    User getUserById(Integer id);
}
UserMapper.xml
<?xml version="1.0" encoding="UTF-8" ?>
<!DOCTYPE mapper
        PUBLIC "-//mybatis.org//DTD Mapper 3.0//EN"
        "http://mybatis.org/dtd/mybatis-3-mapper.dtd">
<!-- 此处与接口类地址对应 -->
<mapper namespace="com.spring.boot.example.springboot.cache.mapper.UserMapper">
    <!-- 此处与接口方法名对应 指定参数类型与返回结果类型-->
    <select id="getUserById" parameterType="java.lang.Integer" resultType="com.spring.boot.example.springboot.cache.dao.User">
        select * from user where id = #{id}
    </select>
</mapper>
Service层,注入配置好的UserMapper.
同时在getUserById上添加了缓存注解,指定了缓存名称是userCache,缓存的key是传入的id。
package com.spring.boot.example.springboot.cache.service;

import com.spring.boot.example.springboot.cache.dao.User;
import com.spring.boot.example.springboot.cache.mapper.UserMapper;
import org.springframework.beans.factory.annotation.Autowired;
import org.springframework.cache.annotation.Cacheable;
import org.springframework.stereotype.Service;

@Service
public class UserService {

    @Autowired
    private UserMapper userMapper;

    @Cacheable(value = "userCache", key = "#id")
    public User getUserById(Integer id){
        System.out.println("没有读取缓存");
        User user = userMapper.getUserById(id);
        return user;
    }

}
Controller层注入UserService
package com.spring.boot.example.springboot.cache.controller;


import com.spring.boot.example.springboot.cache.service.UserService;
import com.spring.boot.example.springboot.cache.dao.User;
import org.springframework.beans.factory.annotation.Autowired;
import org.springframework.stereotype.Controller;
import org.springframework.web.bind.annotation.RequestMapping;
import org.springframework.web.bind.annotation.ResponseBody;

@Controller
public class UserController {

    @Autowired
    private UserService userService;

    @ResponseBody
    @RequestMapping("/getUserById")
    public User getUserById(Integer id){
        long startTime = System.currentTimeMillis();
        User user = userService.getUserById(id);
        long endTime = System.currentTimeMillis();

        System.out.println("耗时:" + (endTime - startTime) + "ms");

        return user;
    }
}
SpringBoot启动类添加@EnableCaching注解开启缓存。
package com.spring.boot.example.springboot.cache;

import org.mybatis.spring.annotation.MapperScan;
import org.springframework.boot.SpringApplication;
import org.springframework.boot.autoconfigure.SpringBootApplication;
import org.springframework.cache.annotation.EnableCaching;

@SpringBootApplication
//mybatis:扫描接口类,生成代理对象
@MapperScan("com.spring.boot.example.springboot.cache.mapper")
//开启缓存
@EnableCaching
public class SpringBootCacheApplication {

    public static void main(String[] args) {
        SpringApplication.run(SpringBootCacheApplication.class, args);
    }

}
我们访问Controller层的方法,看下返回结果和控制台输出。
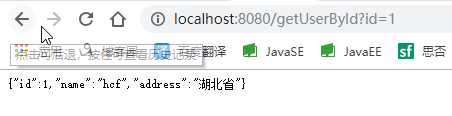
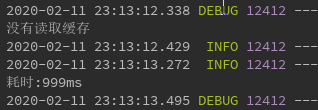
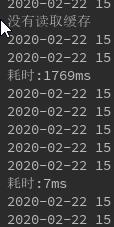
可以看到,第一次查询时没有缓存,直接查的数据库,然后返回,打印了了“没有读取缓存”的字样,耗时999ms。
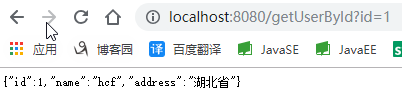
我们再来访问一次
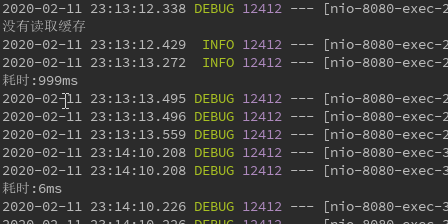
可以看到,第二次进入Service中getUserById方法,发现有缓存就直接读取的缓存,所以没有答应“没有读取缓存”的字样。
而且耗时只有6ms。
我们只配置添加了一个spring-boot-starter-cache的依赖,那缓存数据又存放在哪里在呢?
我们可以在application.properties中添加debug=true. 然后我们再启动项目。

启动过程中会弹出匹配了那些类,我们按下alt+shift+ctrl+N 查找名为SimpleCacheConfiguration的类。
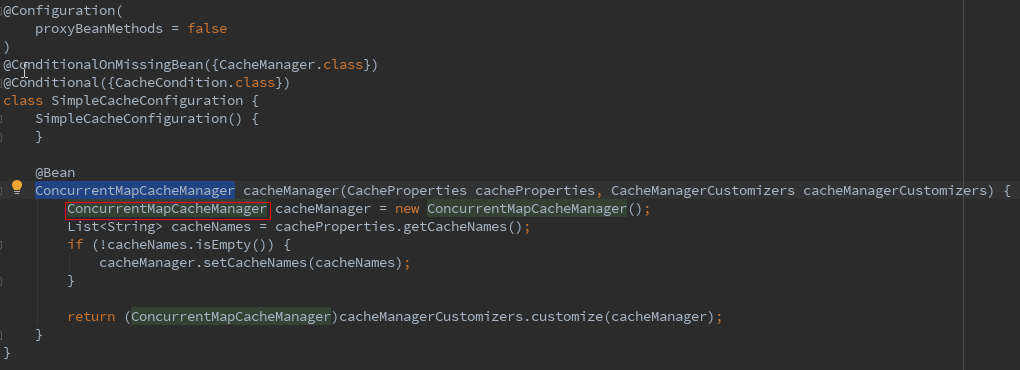
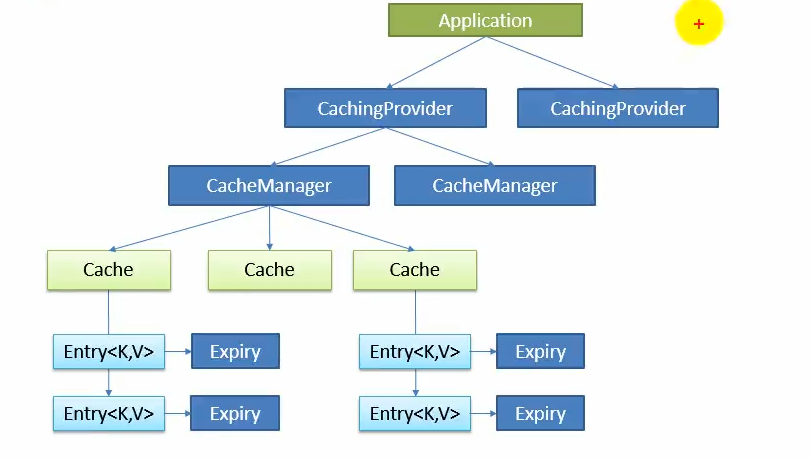
可以看到返回了一个ConcurrentMapCacheManager,结合前面的图,CacheManager管理了多个Cache。
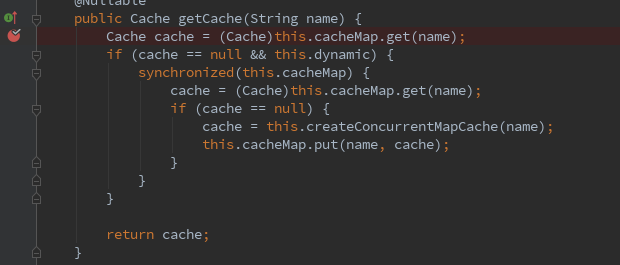
我们点进ConcurrentMapCacheManager看下,在ConcurrentMapCacheManager中我们看到一个方法,getCache,难道就是这个方法获取的缓存吗。
看下逻辑大概就是根据名称从cacheMpa中获取一个缓存,缓存为null就创建一个缓存,放入cacheMap,好像和缓存的逻辑一致。那我们就打个断点看一下。
重启项目,访问Controller方法,先将两个缓存都放入之后,我们在断点则看下cacheMap的值。

可以看到,userCache作为缓存名称,缓存的两个对象(entity)对应的key是我们再注解中指定的#id,值就是方法返回User对象。
默认情况下,缓存是存储在应用内部的map中。
我们再来看一下添加的spring-boot-starter-cache中有什么东西。
spring-boot-starter-cache中主要的依赖。
<dependencies>
    <dependency>
      <groupId>org.springframework.boot</groupId>
      <artifactId>spring-boot-starter</artifactId>
      <version>2.2.4.RELEASE</version>
      <scope>compile</scope>
    </dependency>
    <dependency>
      <groupId>org.springframework</groupId>
      <artifactId>spring-context-support</artifactId>
      <version>5.2.3.RELEASE</version>
      <scope>compile</scope>
    </dependency>
  </dependencies>
可以看到除了依赖了spring-boot-starter之外主要是spring-context-support。包括缓存的注解也是由spring-context-support提供的。
配置了spring-boot-cache-starter只是引入了spring支持的缓存。且缓存数据由存放在应用程序内部。
四、Rides缓存
使用默认的spring-boot-cache-starter缓存数据存放在应用内部,这样是不太好的,平常缓存主要是存放在redis中。下面我们来看下使用redis实现缓存。
在spring-boot中使用redis使用缓存十分简单,只需引入spring-boot-starter-data-redis即可。
spring-boot-redis-starter依赖了spring-context-support,相当于间接包含了spring-boot-cache-start。
之前没有配置redis的情况下,spring-boot自动匹配的SimpleCacheConfig。如果配置了了其他支持缓存的依赖,如redis。
那么spring-boot自动配置时会自动匹配上RedsiCacheConfig

此刻我们看下SimpleCacheConfig是没有匹配上的

我们来看下SprngBoot文档中说的,
如果尚未定义CacheManager类型的bean或名为CacheResolver的CacheResolver(请参阅cachingconfiguer),
则Spring Boot将尝试检测以下提供程序(按指示的顺序):

显然Redsi优先级高于Simple,会匹配上Reids,没有配置其他的则默认使用Simple。
接下来我们看下缓存存储在redis中的情况。还是使用上例。
添加redis依赖,去除之前的spring-cache-starter依赖。
     <dependency>
            <groupId>org.springframework.boot</groupId>
            <artifactId>spring-boot-starter-data-redis</artifactId>
        </dependency>
注:存储的对象是存放在redis中的,对象需要实现序列化接口。
Service层
@Service
public class UserService {

    @Autowired
    private UserMapper userMapper;

    @Cacheable(value = "userCache", key = "#id")
    public User getUserById(Integer id){
        System.out.println("没有读取缓存");
        User user = userMapper.getUserById(id);
        return user;
    }

}
Controller层
@Controller
public class UserController {

    @Autowired
    private UserService userService;

    @ResponseBody
    @RequestMapping("/getUserById")
    public User getUserById(Integer id){
        long startTime = System.currentTimeMillis();
        User user = userService.getUserById(id);
        long endTime = System.currentTimeMillis();

        System.out.println("耗时:" + (endTime - startTime) + "ms");

        return user;

    }
}
运行访问,然后查看redis数据。

可以看到,userCache就是注解中value指定的值,后面跟随的是id。
存储的内容有些奇怪,这时因为默认使用jdk的序列化方法,我们可能希望序列化的内容我们可以看懂。
这时可以自定义CacheManager实现。
添加一个配置类,自定义了cacheManager
@Configuration
public class CacheManagerConfig {


    @Bean
    public CacheManager jsonSerializableRedisCacheManager(RedisConnectionFactory redisConnectionFactory){

        RedisCacheConfiguration config = RedisCacheConfiguration.defaultCacheConfig()
                //设置10秒过期
                .entryTtl(Duration.ofSeconds(10))
                //设置key的序列化方式
                .serializeKeysWith(RedisSerializationContext.SerializationPair.fromSerializer(new StringRedisSerializer()))
                //设置值的序列化方式
                .serializeValuesWith(RedisSerializationContext.SerializationPair.fromSerializer(new GenericJackson2JsonRedisSerializer()));


        RedisCacheManager.RedisCacheManagerBuilder builder =
                RedisCacheManager.RedisCacheManagerBuilder.fromConnectionFactory(redisConnectionFactory);

        //返回构造的cacheManager
        return builder.transactionAware().cacheDefaults(config).build();
    }
}
指定cacheManger为我们定义的cacheManager
  @Cacheable(cacheManager = "jsonSerializableRedisCacheManager",value = "userCache", key = "#id")
    public User getUserById(Integer id){
        System.out.println("没有读取缓存");
        User user = userMapper.getUserById(id);
        return user;
    }
查看缓存的数据

如果超过10秒钟没有读取缓存,缓存将自动删除。
五、缓存注解
@Cacheable主要是看有没有缓存,有缓存则读取缓存,没有缓存则将方法返回值写入缓存。
@CachePut无论是否拥有缓存,都会执行方法,并将返回值写入缓存。
    @CachePut(cacheNames = "userCache",key = "#user.id")
    public User updateUserById(User user){
        System.out.println("into cachePut");
        userMapper.updateUserById(user);
        return user;
    }
使用cacheNames和value效果一样都是指定缓存值。
执行两次该方法

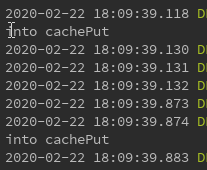
两次方法均进入了,而且将缓存更新了。

@CacheEvit,删除指定的缓存。
@CacheEvict(cacheNames = "userCache", key = "#id")
    public void deleteCache(Integer id){
    }
该方法只删了缓存,没有删除数据库中数据。
先让缓存中有多条数据。


删除缓存名为userCache下id为1的缓存。

有时需要删除缓存下所有缓存,例如删除缓存userCache下所有缓存,userCache::2/3/4
可以指定缓存名,然后指定allEntries=true(默认为false)
    @CacheEvict(cacheNames = "userCache", key = "#id" ,allEntries = true)
    public void deleteCache(Integer id){

    }
我们再执行一次看下缓存情况。


该缓存下所有内容已被删除。
有时需要删除多个缓存,比如删除缓存名为userCache下的缓存,同时删除名为addressCache下的缓存。
有时,需要指定同一类型的多个注释,可以使用@Caching。
@Caching下可以指定 多个同类型的@Cacheable、@CachePut和@CacheEvict注解。

注:其实也可以指定多个不同类型(多个@Cacheable,@CachePut,@CacheEvict同时存在于@Caching中),
但官方文档只说“需要指定同一类型的多个注释时可使用@Caching”,而且多种类型执行情况有些不可控。
建议只使用同一类型,实在需要多种类型,可以多定义几个方法聚合在一起实现。
多个缓存方法不能在内部聚合调用,缓存默认使用proxy,内部调用会导致切面失效。
解决方法:
1、在外部包含多个方法调用
例如缓存service中多个缓存的方法1、2、3.
现在需要聚合123,形成新的方法4,此时不能在service中创建方法4,然后再调用123。此时是内部调用会导致切面失效,缓存无法生效。
可以在controller中注入service,在controller中创建方法4,使用注入的service调用123.
2、使用aspectj。
具体可参阅:https://www.bbsmax.com/A/kvJ3L6895g/
例如:删除名为userCache、addressCache下所有缓存,
  @Caching(
            evict = {
                    @CacheEvict(cacheNames = "userCache", allEntries = true),
                    @CacheEvict(cacheNames = "addressCache", allEntries = true)
            }
    )
    public void deleteCache(Integer id){

    }
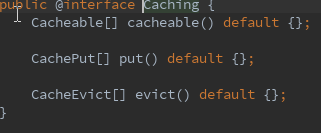
@Caching中可指定cacheable,put,evict。