以DHCP+DNS模式管理服务器IP地址和主机名。服务器上架前,以其MAC地址为依据,在DHCP中配置主机保留并分配主机名。DHCP结合TFTP提供的PXE服务,提供PXE引导Linux内核和启动镜像,通过自动应答文件来实现操作系统的自动安装和配置。

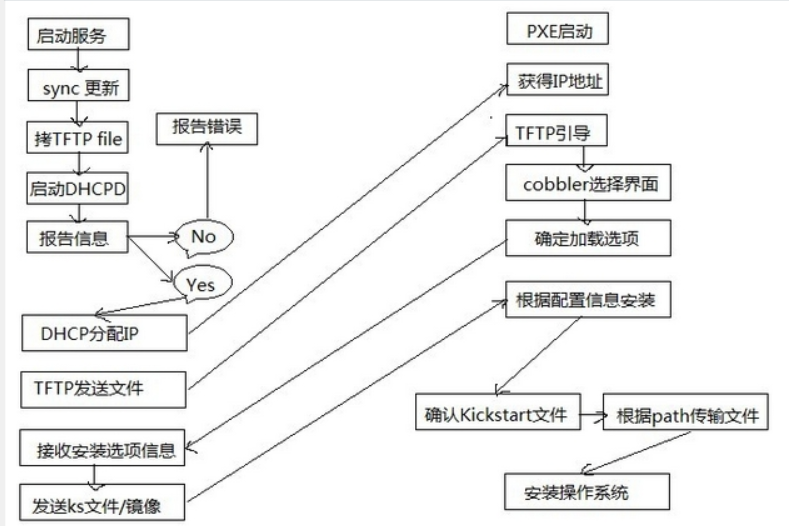
基本过程
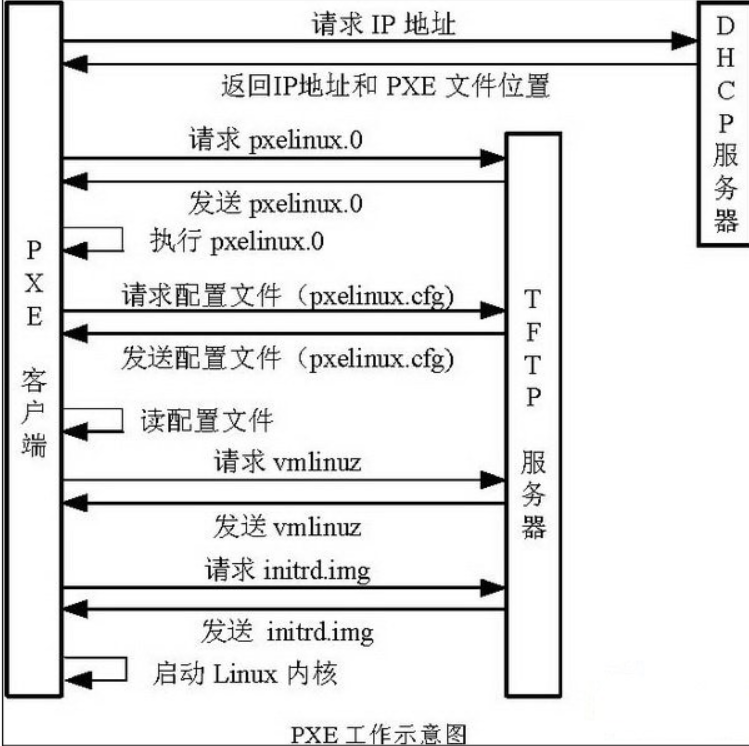
1)、 PXE Client 从自己的PXE网卡启动,向本网络中的DHCP服务器索取IP;
2)、DHCP 服务器返回分配给客户机的IP * 以及PXE文件的放置位置(该文件一般是放在一台TFTP服务器上) ;
3)、PXE Client 向本网络中的TFTP服务器索取pxelinux.0 文件;
4)、PXE Client 取得pxelinux.0 文件后之执行该文件;
5)、 根据pxelinux.0 的执行结果,通过TFTP服务器加载内核和文件系统 ;
6)、 进入安装画面, 此时可以通过选择HTTP、FTP、NFS 方式之一进行安装;
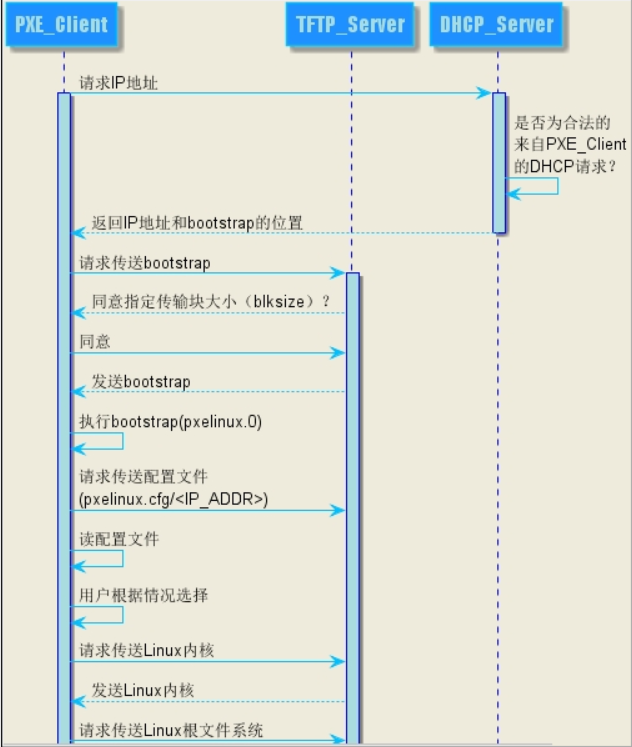
① PXE 客户端发送UDP广播请求
PXE 客户端从自己的PXE网卡启动,通过PXE BootROM(自启动芯片)会以UDP(简单用户数据报协议)发送一个广播请求,向本网络中的DHCP服务器索取IP。
② DHCP服务器提供信息
DHCP服务器收到客户端的请求,验证是否来至合法的PXE 客户端的请求,验证通过它将给客户端一个“提供”响应,这个“提供”响应中包含了为客户端分配的IP地址、pxelinux启动程序(TFTP)位置,以及配置文件所在位置。
③ PXE客户端请求下载启动文件
客户端收到服务器的“回应”后,会回应一个帧,以请求传送启动所需文件。这些启动文件包括:pxelinux.0、pxelinux.cfg/default、vmlinuz、initrd.img等文件。
④ TETP服务器响应客户端请求并传送文件
当服务器收到客户端的请求后,他们之间之后将有更多的信息在客户端与服务器之间作应答, 用以决定启动参数。BootROM由TFTP通讯协议从tftp服务器 下载启动安装程序所必须的文件(pxelinux.0、pxelinux.cfg/default)。default文件下载完成后,会根据该文件中定义的引导顺序,启动Linux安装程序的引导内核。
⑤ 请求下载自动应答文件
客户端通过pxelinux.cfg/default文件成功的引导Linux安装内核后,安装程序首先必须确定你通过什么安装介质来安装linux,如果是通过网络安装(NFS, FTP, HTTP),则会在这个时候初始化网络,并定位安装源位置。接着会读取default文件中指定的自动应答文件ks.cfg所在位置,根据该位置请求下载该文件。
⑥ 客户端安装操作系统
将ks.cfg文件下载回来后,通过该文件找到http镜像,并按照该文件的配置请求下载安装过程需要的软件包。
http镜像和客户端建立连接后,将开始传输软件包,客户端将开始安装操作系统
1)
安装Tftp服务 tftp-server tftp
cat /etc/xinetd.d/tftp
service tftp
{
socket_type = dgram
protocol = udp
wait = yes
user = root
server = /usr/sbin/in.tftpd
server_args = -s /var/lib/tftpboot
disable = no #需修改
per_source = 11
cps = 100 2
flags = IPv4
}
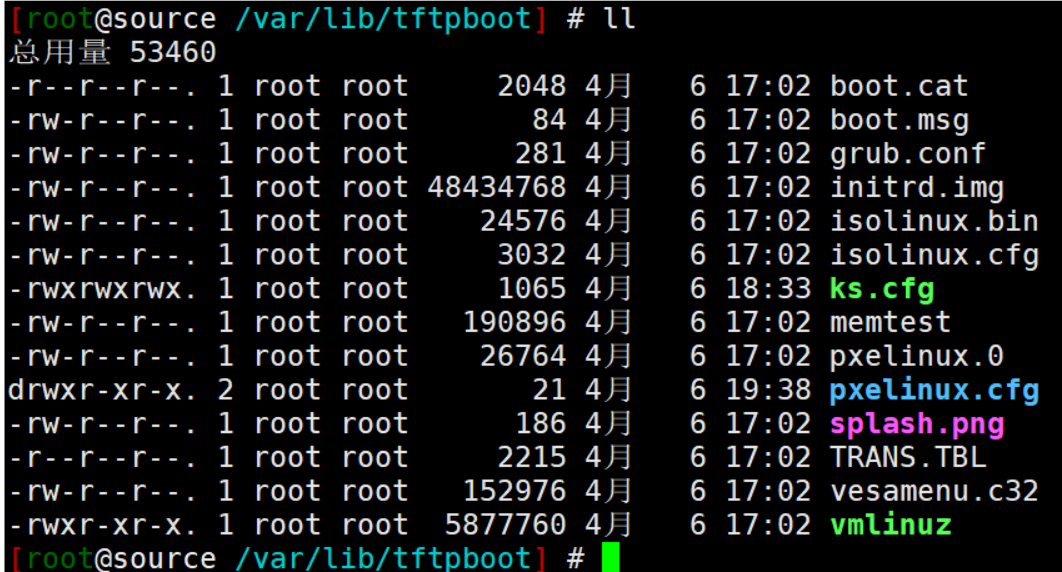
• 引导文件 - pxelinux.0
• 内核文件:vmlinuz initrd.img
• 引导菜单:isolinux.cfg 改名生成 /var/lib/tftpboot/pxelinux.cfg/default
1.拷贝文件到/var/lib/tftpboot 目录
yum -y install syslinux
cp -rf /usr/share/syslinux/* /var/lib/tftpboot # 需要pxelinux.0
2.导入内核及菜单文件(可从光盘镜ISO像中拷贝)
内核文件:vmlinuz initrd.img
引导菜单配置文件:isolinux.cfg--→ pxelinux.cfg/default
系统自带的两种窗口模块之一:vesamenu.c32 (必须)
窗口提示信息文件:boot.msg(可选)
窗口背景图片:splash.png(可选)
从光盘镜像( isolinux )中拷贝 到tftp根目录中
创建pxelinux.cfg目录并拷贝 isolinux.cfg 为default 修改
可以创建多个label 以便有多个选择
模仿光盘启动配置文件默认选择本地启动,超时设置大一些
[root@source /var/lib/tftpboot] # cat  pxelinux.cfg/default
default vesamenu.c32
timeout 600


menu title  #### PXE Boot  Menu  ####

label  1

menu label ^Install CentOS 7 x64
menu   default
kernel vmlinuz
append initrd=initrd.img  ip=dhcp   inst.ks=ftp://192.168.36.1/pub/ks.cfg
defualt文件 指定 系统自动安装的ks路径
label 3menu label ^3) Install CentOS 7 x64 with Local Repo using VNC
kernel centos7/vmlinuz
append initrd=centos7/initrd.img method=ftp://192.168.100.1/pub (devfs=nomount inst.vnc inst.vncpassword=password)特别指定的选项
cobbler 启动菜单
DEFAULT menu
PROMPT 0
MENU TITLE Cobbler |  auto   os    installtion
TIMEOUT 200
TOTALTIMEOUT 6000
ONTIMEOUT local

LABEL local
        MENU LABEL (local)
        MENU DEFAULT
        LOCALBOOT -1

LABEL Centos7.2-x86_64
        kernel /images/Centos7.2-x86_64/vmlinuz
        MENU LABEL Centos7.2-x86_64
        append initrd=/images/Centos7.2-x86_64/initrd.img ksdevice=bootif lang=  kssendmac text  ks=http://127.0.0.1/cblr/svc/op/ks/profile/Centos7.2-x86_64
        ipappend 2


MENU end
2)dhcp 配置 dhcp
subnet 192.168.36.0 netmask 255.255.255.0 {
range 192.168.36.100 192.168.36.120;
option routers 192.168.36.1;
default-lease-time 600;
max-lease-time 7200;
next-server 192.168.36.1; #pxelinux.0的位置
filename "pxelinux.0" ;
}
在多网卡的情况下绑定网卡启动DHCP服务
cat /usr/lib/systemd/system/dhcpd.service
[Service]Type=notifyExecStart=/usr/sbin/dhcpd -f -cf /etc/dhcp/dhcpd.conf -user dhcpd -group dhcpd --no-pid eno33554984
3)安装vsftpd
为了将光盘系统拷贝进去
拷贝ks.cfg 到ftp根目录中,由 system-config-kickstart 生成
url --url=" " 指定了系统所在目录
[root@source /var/ftp/pub] # cat  ks.cfg
#platform=x86, AMD64, or Intel EM64T
#version=DEVEL
# Install OS instead of upgrade
install
# Keyboard layouts
keyboard 'us'
# Root password
rootpw --iscrypted $1$Xn4pvDTh$GfSGHsPCHomsp88ZRR6/H/
# Use network installation
url --url="ftp://192.168.36.1/pub"
# System language
lang en_US
# Firewall configuration
firewall --disabled
# System authorization information
auth  --useshadow  --passalgo=sha512
# Use text mode install
text
# SELinux configuration
selinux --disabled
# Do not configure the X Window System
skipx

# Network information
network  --bootproto=dhcp --device=eth0
# Reboot after installation
reboot
# System timezone
timezone Africa/Abidjan
# System bootloader configuration
bootloader --location=mbr
# Partition clearing information
clearpart --all --initlabel
# Disk partitioning information
part /boot --fstype="xfs" --size=2048
part / --fstype="xfs" --grow --size=1
(anaconda-ks.cfg)
Kickstart 文件( ksvalidator)进行验证
system-config-kickstart 图形配置生成
通过光盘自动安装
https://www.cnblogs.com/liwei0526vip/p/6416225.html
pxe
https://www.cnblogs.com/liwei0526vip/p/6386718.html
cobbler
Cobbler/Cobblerd
add extend repo
wget -O /etc/yum.repos.d/CentOS-Base.repo http://mirrors.aliyun.com/repo/Centos-7.repo
wget -O /etc/yum.repos.d/epel.repo http://mirrors.aliyun.com/repo/epel-7.repo
需要epel 及yum 源
yum install cobbler cobbler-web dhcp tftp-server pykickstart httpd xinetd -y
systemctl start httpd
systemctl start xinetd
systemctl start tftp
systemctl start cobblerd
执行cobbler check
生成加密密码
openssl passwd -1
需要修改的配置
sed -i 's%^server: 127.0.0.1%server: 192.168.0.238%g' /etc/cobbler/settings # 本机ip
sed -i 's%^next_server: 127.0.0.1%next_server: 192.168.0.238%g' /etc/cobbler/settings #本机ip
sed -i 's%manage_dhcp: 0%manage_dhcp: 1%g' /etc/cobbler/settings #接管dhcp
sed -i 's%^default_password_crypted.*%default_password_crypted: "$1$V0M16k3j$XMyrGlBjyCk1q.MZxQlBl."%g' /etc/cobbler/settings
修改dhcp.templates子网信息
cobbler check
cobbler get-loaders
{下载的是 pxelinux.0 menu.c32 菜单等 /var/lib/cobbler/loaders/}
cobbler sync 同步
挂载光盘,导入镜像
cobbler import --path=/mnt --name=Centos-7.2 --arch=x86_64 (安装源)
cobbler list
导入ks.cfg文件到/var/lib/cobbler/kickstarts
查看详细信息: cobbler repo (安装源,ks.cfg)
写完 ks 文件之后,先通过 validateks 测试一下有没有语法错误
cobbler validateks
通过下面这个命令查看 ks 文件,发现一些逻辑上的问题
cobbler system getks --name=test
cobbler profile edit --name Centos-7.2-x86_64 --kickstart=/var/lib/cobbler/kickstarts/ks.cfg # 编辑profile,ks.cfg
添加系统参数
cobbler profile edit --name Centos-7.2-x86_64 --kopts='net.ifnames=0 biosdevname=0'
添加yum源
cobbler profile edit --name=Centos-7.3-x86_64 --repos="Centos-7.3-x86_64-os Centos-7.3-x86_64-updates Centos-7.3-x86_64-extras Centos-7-epel-x86_64 Centos-7.3-x86_64-cloud-l Centos-7.3-x86_64-gfs zabbix3.0-Centos7"
cobbler profile report
cobbler sync
################
定制选择安装系统时显示的网址
cat /etc/cobbler/pxe/pxedefault.template
DEFAULT menu
PROMPT 0
MENU TITLE Cobbler | 系统自动化部署
TIMEOUT 200
TOTALTIMEOUT 6000
ONTIMEOUT $pxe_timeout_profile
LABEL local
MENU LABEL (local)
MENU DEFAULT
LOCALBOOT -1
$pxe_menu_items
MENU end
[root@localhost cobbler]# cobbler sync # 同步之后就可以看到效果了
############
根据MAC安装系统
cobbler system add
--name=linux-web01
--mac=00:0C:29:3B:03:9B
--profile=Centos-7.2-x86_64
--ip-address=10.0.0.200
--subnet=255.255.255.0
--gateway=10.0.0.2
--interface=eth0
--static=1
--hostname=linux-web01
--name-servers="10.0.0.2"
--kickstart=/var/lib/cobbler/kickstarts/Centos7.2-x86_64.cfg
system add # 添加定制系统
name # 定制系统名称
mac # mac地址
profile #指定profile
ip-address # 指定IP地址
subnet # 指定子网掩码
gateway # 指定网关
interface # 指定网卡,eth0上面配置已经修改,centos7默认网卡名称不是eth0
static # 1表示启用静态IP
hostname # 定义hostname
name-server # dns服务器
kickstart # 指定ks文件
¥¥¥¥¥¥¥¥¥¥
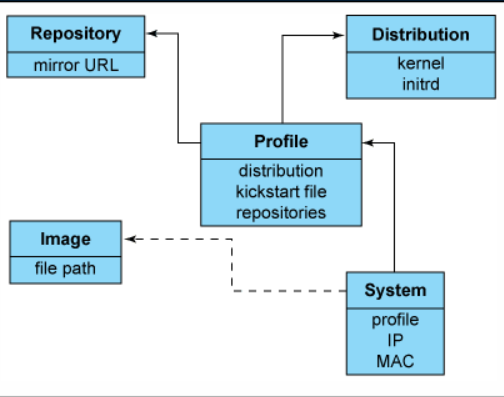
对象类型
Distros(发行版):表示一个操作系统,它承载了内核和initrd的信息,以及内核生成参数等其他数据
Profile(配置文件):包含一个发行版、一个kickstart文件以及可能的存储库,还包含更多特定的内核参数等其他数据
Systems(系统):表示要配给的额机器。它包含一个配置文件或一个景象,还包含IP和MAC地址、电源管理(地址、凭据、类型)、(网卡绑定、设置valn等)
Repository(镜像):保存一个yum或rsync存储库的镜像信息
Image(存储库):可替换一个包含不属于此类比的额文件的发行版对象(例如,无法分为内核和initrd的对象)。
重要目录及对象关系
/var/www/cobbler/ks_mirror 存放操作系统镜像
/var/www/cobbler/repo_mirror 存放仓库镜像
/var/lib/cobbler/kickstarts 存放kickstarts文件
/var/lib/cobbler/loaders 存放启动时需要的文件
/var/lib/cobbler/snippets 存放脚本
/etc/cobbler 存放cobbler的配置文
配置
cobbler 还有需求:
启动后优化脚本
yum源
根据MAC地址自动配置IP地址。
创建本地yum 源
配置文件目录:
/etc/cobbler
/etc/cobbler/settings : cobbler 主配置文件
/etc/cobbler/iso/: iso模板配置文件
/etc/cobbler/pxe: pxe模板文件
/etc/cobbler/power: 电源配置文件
/etc/cobbler/user.conf: web服务授权配置文件
/etc/cobbler/users.digest: web访问的用户名密码配置文件
/etc/cobbler/dhcp.template : dhcp服务器的的配置末班
/etc/cobbler/dnsmasq.template : dns服务器的配置模板
/etc/cobbler/tftpd.template : tftp服务的配置模板
/etc/cobbler/modules.conf : 模块的配置文件
数据目录:
/var/lib/cobbler/config/: 用于存放distros,system,profiles 等信 息配置文件
/var/lib/cobbler/triggers/: 用于存放用户定义的cobbler命令
/var/lib/cobbler/kickstart/: 默认存放kickstart文件
/var/lib/cobbler/loaders/: 存放各种引导程序 镜像目录
/var/www/cobbler/ks_mirror/: 导入的发行版系统的所有数据
/var/www/cobbler/images/ : 导入发行版的kernel和initrd镜像用于 远程网络启动
/var/www/cobbler/repo_mirror/: yum 仓库存储目录
日志目录:
/var/log/cobbler/installing: 客户端安装日志
/var/log/cobbler/cobbler.log : cobbler日志
常用命令
cobbler commands介绍
cobbler check 核对当前设置是否有问题
cobbler list 列出所有的cobbler元素
cobbler report 列出元素的详细信息
cobbler sync 同步配置到数据目录,更改配置最好都要执行下
cobbler reposync 同步yum仓库
cobbler distro 查看导入的发行版系统信息
cobbler system 查看添加的系统信息
cobbler profile 查看配置信息
一
/etc/cobbler/settings中重要的参数设置
需要做的修改
default_password_crypted: "$1$gEc7ilpP$pg5iSOj/mlxTxEslhRvyp/"
manage_dhcp:1
manage_tftpd:1
pxe_just_once:1
next_server:< tftp服务器的 IP 地址>
server: <cobbler 服务器的IP>
配置cobbler--DHCP
1,vim /etc/cobbler/settings # 修改settings中参数,由cobbler控制dhcp
manage_dhcp: 1
2,vim /etc/cobbler/dhcp.template
修改配置文件后须重启服务且sync同步配置
systemctl restart cobblerd.service
cobbler sync
环境检查报错解决
改/etc/cobbler/settings文件中的server > cobbler ip或主机名
改/etc/cobbler/settings文件中的next_server 为提供PXE的主机ip
可访问互联网时,执行cobbler get-loaders否则复制
/usr/share/syslinux/{pxelinux.0,memu.c32}等文件至/var/lib/cobbler/loaders/目录中
执行“openssl passwd -1 生成密码,并用其替换/etc/cobbler/settings文件中
default_password_crypted参数的值
openssl passwd -1
-1 Use the MD5 based BSD password algorithm 1.
##################################
课件
下载启动菜单
联网:cobbler get-loaders
不联网:cp /usr/share/syslinux/{pxelinux.0,menu.c32} /var/lib/tftpboot
管理distro
cobbler import --name=centos-7.5-x86_64 --path=/media/cdrom --arch=x86_64
管理profile
cobbler profile add --name=centos-7.5 --distro=centos-7.5-x86_64 --kickstart= /var/lib/cobbler/kickstarts/centos7_x86_64.cfg
查看profiles
cobbler profile list
同步cobbler配置
cobbler sync
########################
二
挂载光盘镜像导入
cobbler import --path=/mnt --name=Centos-7.2 --arch=x86_64 # cobbler导入镜像
--path 镜像路径
--name 为安装源定义一个名字
--arch 指定安装源是32位、64位、ia64, 目前支持的选项有: x86│x86_64│ia64
安装源的唯一标示就是根据name参数来定义,本例导入成功后,安装源的唯一标示就是:CentOS-7.1-x86_64,如果重复,系统会提示导入失败
查看
cobbler list
三
导入 kickstarts
/var/lib/cobbler/kickstarts
查看信息 cobbler report
使用cobbler validataks 验证
cobbler system getks --name=test
cobbler profile list
指定ks文件
cobbler profile edit --name Centos-7.2-x86_64 --kickstart=/var/lib/cobbler/kickstarts/Centos7.2-x86_64.cfg # 编辑profile,修改ks文件为我们刚刚上传的Centos7.2-x86_64.cfg
cobbler profile edit --name Centos-7.2-x86_64 --kopts='net.ifnames=0 biosdevname=0'
同步cobbler
cobbler sync
开启服务
httpd
tftp
dchp
xinetd
cobblerd
koan实现重新安装系统
在客户端安装koan(要配置好源) epel 源配置
查看cobbler上的配置文件
koan --server=serverIP --list=profiles
重新安装系统
koan --replace-self --server=10.0.0.101 --profile=webserver1
ks.cfg 配置模板
Centos-7.3-x86_64.cfg
Kickstart Configurator by BrandynX
platform=x86, AMD64, or Intel EM64T
System language
lang en_US
System keyboard
keyboard us
Install OS instead of upgrade
install
Use text mode install
text
Sytem timezone
timezone Asia/Shanghai
Use NFS installation Media
url --url=$tree
Root password
rootpw --iscrypted $default_password_crypted
Network information
$SNIPPET('network_config')
network --bootproto=dhcp --device=eth0 --onboot=on
System authorization infomation
auth --useshadow --enablemd5
Firewall configuration
firewall --disabled
SELinux configuration
selinux --disabled
Reboot after installation
reboot
System bootloader configuration
bootloader --location=mbr
Clear the Master Boot Record
zerombr
Partition clearing information
clearpart --all --initlabel
Disk partitioning information
part /boot --fstype xfs --size 1024 --ondisk sda
Oracle:part swap --size 16384 --ondisk sda
part swap --size 2048 --ondisk sda
part / --fstype xfs --size 1 --grow --ondisk sda
Do not configure XWindows
skipx
%pre
$SNIPPET('log_ks_pre')
$SNIPPET('kickstart_start')
$SNIPPET('pre_install_network_config')
Enable installation monitoring
$SNIPPET('pre_anamon')
%end
Package install information
%packages
@base
@core
@fonts
@performance tools
%end
%post
$yum_config_stanza
wget -O /tmp/c7_op_script.tar.gz http://192.168.0.238/c7_op_script.tar.gz
cd /tmp && tar xzf c7_op_script.tar.gz
chmod +x -R /tmp/c7_op_script/*
cd /tmp/c7_op_script/sys_optimiz && /bin/sh -x centos7_optimiz.sh
%end
将优化脚本放置网站,直接下载执行
[root@localhost ~]# cat  anaconda-ks.cfg
#platform=86, AMD64, or Intel EM64T

#version=DEVEL
# System authorization information
auth --useshadow  --passalgo=sha512
# Install OS instead of upgrade
install
# Use network installation
url --url="http://192.168.36.73/cobbler/ks_mirror/Centos-7.3-x86_64/"
# Use graphical install
graphical
# Firewall configuration
firewall --enabled
firstboot --disable
ignoredisk --only-use=sda
# Keyboard layouts
# old format: keyboard us
# new format:
keyboard --vckeymap=us --xlayouts='us'
# System language
lang en_US.UTF-8

# Network information
network  --bootproto=dhcp --device=eth0 --activate
network  --hostname=localhost.localdomain
# Halt after installation
halt
# Root password
rootpw --iscrypted $1$J7vTcYGq$uQYp8XPJVDuside2VcR9W.
# SELinux configuration
selinux --disabled
# System services
services --enabled="chronyd"
# Do not configure the X Window System
skipx
# System timezone
timezone Asia/Shanghai
# System bootloader configuration
bootloader --append="net.ifnames=0 biosdevname=0 crashkernel=auto" --location=mbr --boot-drive=sda
# Partition clearing information
clearpart --none --initlabel
# Disk partitioning information
part /boot --fstype="xfs" --ondisk=sda --size=953
part pv.352 --fstype="lvmpv" --ondisk=sda --size=19526
volgroup centos --pesize=4096 pv.352
logvol /  --fstype="xfs" --size=9536 --name=root --vgname=centos
logvol swap  --fstype="swap" --size=953 --name=swap --vgname=centos
logvol /data  --fstype="xfs" --size=9022 --name=data --vgname=centos

%packages
@^minimal
@core
chrony
kexec-tools

%end

%addon com_redhat_kdump --enable --reserve-mb='auto'

%end
[root@localhost ~]# cat  original-ks.cfg
#platform=x86, AMD64, or Intel EM64T
#version=DEVEL
# Install OS instead of upgrade
install
# Keyboard layouts
keyboard 'us'
# Root password
rootpw --iscrypted $1$J7vTcYGq$uQYp8XPJVDuside2VcR9W.
# Use network installation
url --url="http://192.168.36.73/cobbler/ks_mirror/Centos-7.3-x86_64/"
# System language
lang en_US
# System authorization information
auth  --useshadow  --passalgo=sha512
# Use graphical install
graphical
# SELinux configuration
selinux --disabled
# Do not configure the X Window System
skipx

# Firewall configuration
firewall --enabled
# Network information
network  --bootproto=dhcp --device=eth0
# Halt after installation
halt
# System timezone
timezone Asia/Shanghai
# System bootloader configuration
bootloader --append="net.ifnames=0  biosdevname=0" --location=mbr
# Partition clearing information
clearpart --all --initlabel
# Disk partitioning information
part /boot --fstype="xfs" --size=1024
part / --fstype="xfs" --size=20480
part swap --fstype="swap"  --size=1024
part /data --fstype="xfs"   --grow   --size=1
https://www.cnblogs.com/lynk/p/10480685.html
https://www.cnblogs.com/linuxliu/p/7668048.html
https://blog.51cto.com/bigboss/2060414
https://blog.csdn.net/liuyanwuyu/article/details/80630275
