JSR 303 规范了bean validation, Hibernate validator实现了JSR 303所有的规范, 同时也是最常用的validator 工具包.
使用 Hibernate validator 可以大大简化数据验证工作. 对于 Web 项目, 通常前端需要做一些输入验证, 完善的前端验证能给用户很好的使用体验, 但仅有前端验证还是不够的, 后端必须也有相应的验证, 因为前端验证是很容易跳过去的.
有两个数据验证的做法:
方式1. Pojo 上加检查规则, Controller 师徒函数Pojo形参前加上 @Validated 来触发检查动作.
方式2. 在 bean 类(通常是 Service 类) 上加 @Validated注解, 在bean类的方法的形参前增加检查规则, 然后在controller方法中, 通过调用该bean方法将触发检查动作.
===================================
方式1
===================================
使用 Hibernate validator 的步骤:
1. 在 Pojo 类的字段上, 加上 Hibernate validator 注解
2. 在Controller 函数的形参前加上 @Valid 或 @Validated 注解, 触发一次validation.
3. 在每个 @Valid 或 @Validated 注解参数后, 紧跟一个 BindingResult 类型的参数. 如果没有提供对应的 BindingResult 参数, Spring MVC 将抛出异常.
4. 在Controller 函数中, 通过 BindingResult 类型的参数获取检验的结果.
--------------------------------------------------------------------
Pojo validation 规则注解
--------------------------------------------------------------------
参考: https://blog.csdn.net/danielzhou888/article/details/74740817
| @Null | 被注释的元素必须为 null | |
| @NotNull | 被注释的元素必须不为 null | |
| @NotBlank | 检查约束字符串是不是Null还有被Trim的长度是否大于0,只对字符串,且会去掉前后空格. | |
| @NotEmpty | 检查约束元素不能为NULL或者是EMPTY. | |
| @AssertTrue | 被注释的元素必须为 true | |
| @AssertFalse | 被注释的元素必须为 false | |
| @Min(value) | 被注释的元素必须是一个数字,其值必须大于等于指定的最小值 | |
| @Max(value) | 被注释的元素必须是一个数字,其值必须小于等于指定的最大值 | |
| @DecimalMin(value) | 被注释的元素必须是一个数字,其值必须大于等于指定的最小值 | |
| @DecimalMax(value) | 被注释的元素必须是一个数字,其值必须小于等于指定的最大值 | |
| @Size(max, min) | 注释的元素的长度必须在指定的范围内, 支持字符串和集合 | |
| @Length(min=, max=) | 被注释的字符串的大小必须在指定的范围内 | |
| 被注释的元素必须是电子邮箱地址 | ||
| @Digits (integer, fraction) | 被注释的元素必须是一个数字,其值必须在可接受的范围内 | |
| @Range(min=, max=) | 被注释的元素必须在合适的范围内 | |
| @Past | 被注释的元素必须是一个过去的日期 | |
| @Future | 被注释的元素必须是一个将来的日期 | |
| @Pattern(value) | 被注释的元素必须符合指定的正则表达式 | |
| @URL(protocol=, host=, port=, regexp=, flags=) |
被注释的字符串必须是一个有效的url | |
| @CreditCardNumber | 被注释的字符串必须通过Luhn校验算法, 银行卡,信用卡等号码一般都用Luhn 计算合法性 |
|
--------------------------------------------------------------------
@Valid 和 @Validated 注解
--------------------------------------------------------------------
@Valid 和 @Validated 都用来触发一次校验, @Valid 是 JSR 303规范的注解, @Validated 是Spring 加强版的注解, 加强的地方有:
1. @Validated 可以设定条件group, 即可以设定校验的条件.
比如对于 Book 类中 bookId 是自增id, 在新增 Book 时候要求为 null, 在更新时要求不能是 null. 在实际编码中, 通常使用几个空的interface 作为 group 参数.
2. @Validated 支持组序列, 该特性用的较少, 参考 https://blog.csdn.net/wangpeng047/article/details/41726299
所以, 推荐使用 @Validated 注解.
===================================
方式2
===================================
在 bean 类(通常是 Service 类) 上加 @Validated注解, 在bean类的方法的形参前增加检查规则, 然后在controller方法中, 通过调用该bean方法将触发检查动作. 如果检查结果失败, 将抛出 ConstraintViolationException 异常.
Service
@Validated
public class SomeService {

    @Length(min = 3, max = 5)
    public String createUser(@NotBlank @Email String email,
                             @NotBlank String username,
                             @NotBlank String password) {
        return username;
    }
}


@RestController
@RequestMapping("/")
public class SomeController {
    @Autowired
    SomeService someService;

    @GetMapping("/")
    @RequestMapping("/")
    public hello(){
        someService.createUser("email","username","password");
        return "Hello";
    }
}
====================================
自定义校验规则
====================================
Hibernate invalidator提供的验证规则应该满足大多数情形, 如果愿意, 我们也可以自定义自己的验证规则, 自定义一个校验规则需要定义一个注解和一个校验类, 比如要新增一个加班时长的校验规则.
使用的代码示例:
@WorkOverTime(max=2)
Integer workOverTime;
@WorkOverTime 注解定义的写法:
直接写一个注解语法还是挺难的, 可修改一个已有规则的代码, 比如 @Email. 修改调整的地方有:
1. 在 @interface WorkOverTime 代码中, 设定 @Constraint 参数, @Constraint(validatedBy = { WorkOverTimeValidator.class })
2. 增加 max 属性, 示例代码如下:
int max() default 5;
WorkOverTimeValidator 类的写法:
WorkOverTimeValidator 类应该实现 ConstraintValidator 接口, 该接口是泛型接口.
class WorkOverTimeValidator implements ConstraintValidator<WorkOverTime, Integer>{
}
====================================
示例代码
====================================
----------------------------------
pom.xml
----------------------------------
<dependency>
    <groupId>org.hibernate.validator</groupId>
    <artifactId>hibernate-validator</artifactId>
</dependency>
----------------------------------
validation group 接口
----------------------------------
定义三个 validation 分组 group 接口, 用来区分新增/更新/删除操作.
interface AddEntity {
}

interface UpdateEntity {
}

interface DeleteEntity {
}
----------------------------------
POJO 类
----------------------------------
public class Book {
    @Null(message = "bookId should be null when add", groups = { AddEntity.class })
    @NotNull(message = "bookId should be not null when update and delete", groups = { UpdateEntity.class, DeleteEntity.class })
    private Integer bookId;

    private String author;

    public Integer getBookId() {
        return bookId;
    }

    public void setBookId(Integer bookId) {
        this.bookId = bookId;
    }

    public String getAuthor() {
        return author;
    }

    public void setAuthor(String author) {
        this.author = author;
    }

}
----------------------------------
Controller 类
----------------------------------
@RestController
@RequestMapping("/bookApi")
class BookController {

    // 新增操作
    // Book 参数要加上 @RequestBody
    // book 参数加上 @Validated 验证指令
    @PostMapping("/books")
    public Book addBook(@Validated({ AddEntity.class }) @RequestBody Book book, BindingResult bookBinding) {
        if (bookBinding.hasErrors()) {
            List<ObjectError> errors = bookBinding.getAllErrors();
            errors.stream()
                    .map(e -> e.getObjectName() + "," + e.getDefaultMessage())
                    .forEach(System.out::println);
            return null;
        }
        book.setBookId(100);
        return book;
    }

    // 更新操作
    @PutMapping("/books/{bookId}")
    public Book updateBook(@Validated({ UpdateEntity.class }) @RequestBody Book book, BindingResult bookBinding) {
        if (bookBinding.hasErrors()) {
            List<ObjectError> errors = bookBinding.getAllErrors();
            errors.stream()
                    .map(e -> e.getObjectName() + "," + e.getDefaultMessage())
                    .forEach(System.out::println);
            return null;
        }
        return book;
    }

    // list all 操作
    @GetMapping("/books")
    public List<Book> listBooks() {
        List<Book> books = new ArrayList<Book>();
        Book book;
        book = new Book();
        book.setBookId(20);
        books.add(book);
        return books;
    }
}
====================================
演示截图
====================================
1. Post 请求 http://localhost:8080/bookApi/books, 输入的 Book对象包含 bookId, 输入截图

服务器端报错截图:

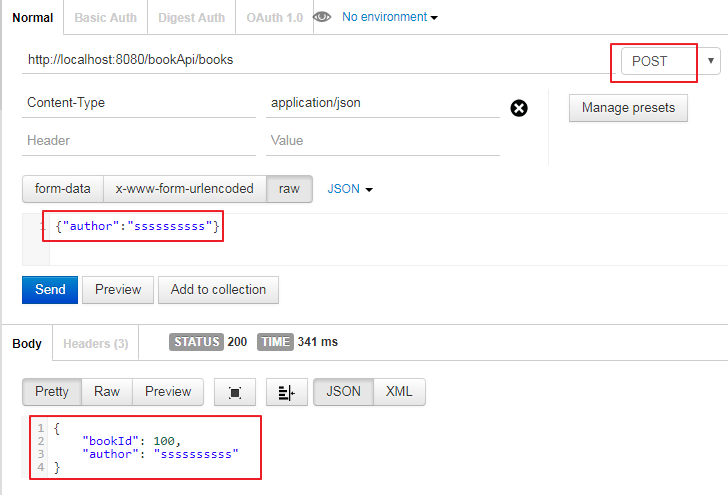
1. Post 请求 http://localhost:8080/bookApi/books, 输入的 Book对象不包含 bookId, 验证通过.
====================================
参考
====================================
主要参考李家智的书 <<Spring Boot 2精髓>>