Tkinter Canvas
觉得有用的话,欢迎一起讨论相互学习~


演示效果
创建windows
window = tk.Tk()
window.title('my window')
window.geometry('500x500')
循环刷新窗口
window.mainloop() # 不断刷新主窗口
创建Canvas
- canvas = tk.Canvas(window, bg='blue', height=100, width=200)
- 主画布
- image_file = tk.PhotoImage(file='ins.gif')
image = canvas.create_image(10, 10, anchor='nw', image=image_file)- 加载图片,设置图片路径,放在画布中,anchor参数控制锚点-即图片相对于哪个位置进行摆放,锚点参数如下图所示,(10,10)表示相对于锚点的坐标。
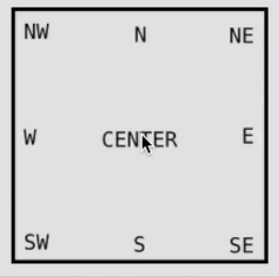
- 加载图片,设置图片路径,放在画布中,anchor参数控制锚点-即图片相对于哪个位置进行摆放,锚点参数如下图所示,(10,10)表示相对于锚点的坐标。
- x0, y0, x1, y1= 50, 50, 80, 80 # 设定图形位置坐标
line = canvas.create_line(x0, y0, x1, y1) # 画线
oval = canvas.create_oval(x0, y0, x1, y1, fill='red') # 画圆,并将圆形填充为红色
arc = canvas.create_arc(x0+30, y0+30, x1+30, y1+30, start=0, extent=180) # 画扇形,并且从0度打开,180度结束
rect = canvas.create_rectangle(100, 30, 100+20, 30+20) # 正方形和长方形
canvas.pack() # 注意,在末尾要将整个对象pack到窗口中。
动作moveit function
- def moveit():
canvas.move(rect, 0, 2) # 表示将正方形横轴不变,纵轴向下移动2个单位,因为原点从左上角开始,因此+2是纵坐标向下移动的意思 - b = tk.Button(window, text='move', command=moveit).pack() # 将button关联到moveit函数中