一.Spring发展史
- 2002年Rod Johnson这个人发布了一篇文章,叫<Expert One-on-One J2EE Design And Development>,因为有了这篇文章,很多人才有了一些感悟,才产生了后面的Spring
- 2003年有了Spring,当时只有IOC,AOP两大特性
- 经过了这么多年,后面有了Spring Data,Spring Boot,Spring Cloud,Spring Framework,Spring Social等
二.IOC:控制反转(DI:依赖注入)
1.搭建Spring环境
- 下载jar包:http://maven.springframework.org/release/org/springframework/spring/(下载4版本就可以), Spring-framework-4.3.9.RELEASE-dist.zip
- 下载好的jar包一个jar一般有三个文件(.jar是.class文件 -javadoc.jar是说明文档 -sources.jar是.java文件(源代码))
- 开发spring至少需要使用的jar(5个 + 1个)
- spring-aop.jar 开发AOP特性时需要的jar
- spring-beans.jar 处理Bean的jar <bean>
- spring-context.jar 处理Spring上下文的jar <context>
- spring-core.jar Spring核心的jar
- spring-expression.jar Spring表达式(与EL/JSTL类似)
- 三方提供的日志jar(百度查:commons-logging.jar mvn,1.1.1版本就可以):commons-logging.jar
2.编写配置文件(为了编写时有一些提示,自动生成一些配置信息,需要一些插件的支持,当然,也可以手动的copy上去)
- 方式一:增加sts插件: 可以给eclipse增加支持spring的插件:spring tool suite (https://spring.io/tools3/sts/all/) 下载与eclipse版本相关的版本。Eclipse中点击 -> Help -> Install New Software -> Add - > 根据下载好的.zip文件或者解压出来的文件夹或者更新网站进行下载插件
- 方式二:直接下载sts工具(相当于一个eclipse,就是说eclipse里集成了sts插件):https://spring.io/tools3/sts/all/
3.开发Spring程序(IOC)
- 导入以上的6个jar包:ring-aop.jar,spring-beans.jar,spring-context.jar,spring-core.jar,spring-expression.jar,commons-logging.jar
- 创建applicationContext.xml配置文件:右键创建Spring Bean Configuration File文件
<?xml version="1.0" encoding="UTF-8"?> <beans xmlns="http://www.springframework.org/schema/beans" xmlns:xsi="http://www.w3.org/2001/XMLSchema-instance" xsi:schemaLocation="http://www.springframework.org/schema/beans http://www.springframework.org/schema/beans/spring-beans.xsd"> <!-- 该文件中产生的所有对象,被Spring放入了一个称之为Spring IOC容器的地方 --> <!-- id:唯一标示符,class:指定类型 --> <bean id="student" class="cn.chuanqi.entity.Student"> <!-- property:该class所代表的类的属性 name:属性名 value:属性值 --> <property name="stuNo" value="1"></property> <property name="stuName" value="张三"></property> <property name="stuAge" value="18"></property> </bean> </beans> - 创建Student实体类
package cn.chuanqi.entity; public class Student { private Integer stuNo; private String stuName; private Integer stuAge; public Integer getStuNo() { return stuNo; } public void setStuNo(Integer stuNo) { this.stuNo = stuNo; } public String getStuName() { return stuName; } public void setStuName(String stuName) { this.stuName = stuName; } public Integer getStuAge() { return stuAge; } public void setStuAge(Integer stuAge) { this.stuAge = stuAge; } @Override public String toString() { return this.stuNo + "-" + this.stuName + "-" + this.stuAge; } } - 创建Test类
package cn.chuanqi.test; import org.springframework.context.ApplicationContext; import org.springframework.context.support.ClassPathXmlApplicationContext; import cn.chuanqi.entity.Student; public class Test { public static void main(String[] args) { //创建Spring上下文对象 ApplicationContext context = new ClassPathXmlApplicationContext("applicationContext.xml"); //执行从Spring IOC容器中获取一个id为student的对象 Student student = (Student) context.getBean("student"); System.out.println(student); } } - 可以发现,Spring的IOC容器帮我们new了对象,并且给对象赋了值
4.Spring发展史
- 原始的创建对象方法:Student student = new Student(); student.setXx(); -> 简单工厂 -> IOC(超级工厂)
- IOC(控制反转)也可以称之为DI(依赖注入),在有一次Spring大会上,大家觉得原始的创建对象,设置属性值到IOC容器中拿的这种反转概念模糊,所以改为DI,当然到现在为止叫IOC和DI都没有错
- IOC(控制反转): 将创建对象、属性值的方式进行了反转、从new、setXx()反转为了从Spring IOC容器getBean()
- DI(依赖注入): 将属性值注入给了属性,将属性注入给了bean,将bean注入给了IOC容器
- 总结:IOC/DI,无论要什么对象,都可以直接去Spring IOC容器中获取,而不需要自己操作(new / setXx()),因此之后的IOC分为2步: 第1步:先给Spring IOC中存放对象并且赋值,第二步:拿
5.DI(依赖注入)
- 创建applicationContext.xml配置文件
<?xml version="1.0" encoding="UTF-8"?> <beans xmlns="http://www.springframework.org/schema/beans" xmlns:xsi="http://www.w3.org/2001/XMLSchema-instance" xsi:schemaLocation="http://www.springframework.org/schema/beans http://www.springframework.org/schema/beans/spring-beans.xsd"> <bean id="teacher" class="cn.chuanqi.entity.Teacher"> <property name="name" value="张三"></property> <property name="age" value="26"></property> </bean> <bean id="course" class="cn.chuanqi.entity.Course"> <property name="courseName" value="Java"></property> <property name="courseHour" value="8"></property> <property name="teacher" ref="teacher"></property> </bean> </beans> - 创建Teacher实体类
package cn.chuanqi.entity; public class Teacher { private String name; private String age; public String getName() { return name; } public void setName(String name) { this.name = name; } public String getAge() { return age; } public void setAge(String age) { this.age = age; } } - 创建Course实体类
package cn.chuanqi.entity; public class Course { private String courseName; //课程名称 private int courseHour; //课时 private Teacher teacher; //授课老师,依赖于Teacher注入 public String getCourseName() { return courseName; } public void setCourseName(String courseName) { this.courseName = courseName; } public int getCourseHour() { return courseHour; } public void setCourseHour(int courseHour) { this.courseHour = courseHour; } public Teacher getTeacher() { return teacher; } public void setTeacher(Teacher teacher) { this.teacher = teacher; } @Override public String toString() { return this.getCourseName() + "-" + this.getTeacher().getName() + "-" + this.getTeacher().getAge() + "-" + this.getCourseHour(); } } - 创建Test类
package cn.chuanqi.test; import org.springframework.context.ApplicationContext; import org.springframework.context.support.ClassPathXmlApplicationContext; import cn.chuanqi.entity.Course; public class Test { public static void main(String[] args) { ApplicationContext context = new ClassPathXmlApplicationContext("applicationContext.xml"); Course course = (Course) context.getBean("course"); System.out.println(course); } } - IOC容器赋值:如果是简单类型(8个基本数据类型+String),也叫字面值,用value;如果是对象类型,用ref
6.依赖注入3种方式
- set注入:通过setXx()方法赋值
- 认使用的是set方法()
- 依赖注入底层是通过反射实现的
- .xml配置文件中使用<property></property>标签
- 构造器注入:通过构造方法赋值
- .xml配置文件中使用<constructor-arg></constructor-arg>标签

- 需要注意:如果<constructor-arg></constructor-arg>的顺序与构造方法参数的顺序不一致,则需要通过type(参数类型)或者index(参数索引,从0开始)或者name(参数名称)指定顺序,推荐写名字,见名知意

- .xml配置文件中使用<constructor-arg></constructor-arg>标签
- p命名空间注入注意:在构造器注入的时候,无论是String/int/short/long,在赋值时都是value = “值”,字符串形式赋值的。因此建议此种情况需要配合name/type进行区分
- 引入p命名空间:xmlns:p=http://springframework.org/schema/p

-
简单类型: p:属性名=“属性值”

-
引用类型:p:属性名-ref = “引用的id”

-
注意多个p赋值的时候,中间要留有空格
- 引入p命名空间:xmlns:p=http://springframework.org/schema/p
- 示例
- 注入各种集合数据类型:数组(array),List,Set,Map,Properties
- 演示
- 创建applicationContext.xml配置文件
<?xml version="1.0" encoding="UTF-8"?>
<beans xmlns="http://www.springframework.org/schema/beans"
    xmlns:xsi="http://www.w3.org/2001/XMLSchema-instance"
    xsi:schemaLocation="http://www.springframework.org/schema/beans http://www.springframework.org/schema/beans/spring-beans.xsd">

<bean id="allCollectionType" class="cn.chuanqi.entity.AllCollectionType">
                <!-- list -->
                <property name="listElement">
                    <list>
                        <value>足球1</value>
                        <value>篮球1</value>
                        <value>羽毛球1</value>
                    </list>
                </property>

                <!-- array -->
                <property name="arrayElement">
                    <array>
                        <value>足球2</value>
                        <value>篮球2</value>
                        <value>羽毛球2</value>
                    </array>
                </property>

                <!-- set -->
                <property name="setElement">
                    <set>
                        <value>足球3</value>
                        <value>篮球3</value>
                        <value>羽毛球3</value>
                    </set>
                </property>

                <!-- map -->
                <property name="mapElement">
                    <map>
                        <entry>
                            <key>
                                <value>football</value>
                            </key>
                            <value>足球4</value>
                        </entry>
                        <entry>
                            <key>
                                <value>basketball</value>
                            </key>
                            <value>篮球4</value>
                        </entry>
                        <entry>
                            <key>
                                <value>badminton</value>
                            </key>
                            <value>羽毛球4</value>
                        </entry>
                    </map>
                </property>

                <!-- Properties -->
                <property name="propsElement">
                    <props>
                        <prop key="football">足球5</prop>
                        <prop key="basketball">篮球5</prop>
                        <prop key="badminton">羽毛球5</prop>
                    </props>
                </property>
            </bean>

</beans>
- 创建AllCollectionType实体类
package cn.chuanqi.entity;

import java.util.List;
import java.util.Map;
import java.util.Properties;
import java.util.Set;

public class AllCollectionType {
    private List<String> listElement;
    private String[] arrayElement;
    private Set<String> setElement;
    private Map<String, String> mapElement;
    private Properties propsElement;
                public List<String> getListElement() {
                    return listElement;
                }
                public void setListElement(List<String> listElement) {
                    this.listElement = listElement;
                }
                public String[] getArrayElement() {
                    return arrayElement;
                }
                public void setArrayElement(String[] arrayElement) {
                    this.arrayElement = arrayElement;
                }
                public Set<String> getSetElement() {
                    return setElement;
                }
                public void setSetElement(Set<String> setElement) {
                    this.setElement = setElement;
    }
                public Map<String, String> getMapElement() {
                    return mapElement;
                }
                public void setMapElement(Map<String, String> mapElement) {
                    this.mapElement = mapElement;
                }
                public Properties getPropsElement() {
                    return propsElement;
                }
                public void setPropsElement(Properties propsElement) {
                    this.propsElement = propsElement;
                }
                @Override
                public String toString() {
                    String strContent = "";
                    for (String str : arrayElement) {
                    strContent += str + ",";
                }
return "listElement:" + this.listElement + "
arrayElement:" + strContent + "
setElement:" + this.setElement + "
mapElement:" + this.mapElement + "
propsElement:" + this.propsElement;
            }
}
- 创建Test类
package cn.chuanqi.test;

import org.springframework.context.ApplicationContext;

public class Test {
                public static void main(String[] args) {
ApplicationContext context = new ClassPathXmlApplicationContext("applicationContext.xml");
AllCollectionType allCollectionType = (AllCollectionType) context.getBean("allCollectionType");
                    System.out.println(allCollectionType);
                }
}
-
数组(array),Set,List都各自有自己的标签<set>,<list>,<array>,但是也可以混着用
- 创建applicationContext.xml配置文件
- 一些细节
- value与<value>注入方式的区别
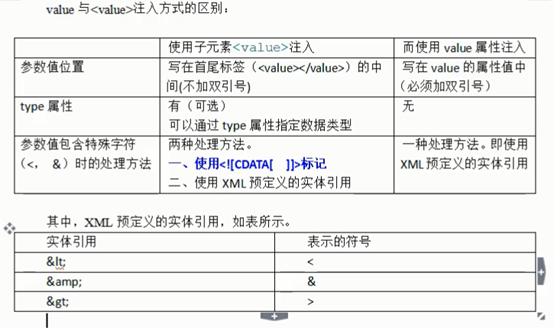
-
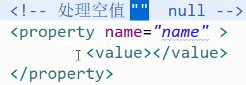
给对象类型赋值null,注意没有<value>

-
给对象类型赋值“”有两种方式

-
在IOC中定义Bean的前提:该Bean的类必须提供了无参构造
- value与<value>注入方式的区别
7.第四种注入方式->自动装配(只试用于ref类型):约定优于配置
- autowire = “byName” : Course类中有一个ref属性teahcer(属性名),并且该IOC容器中恰好有一个bean的id也是teacher。ByName本质是byId

- byType:根据类型 ,其他bean的类型(class)是否与该Course类的ref属性类型一致。(此种方式,必须满足:当前OC容器中只能有一个Bean满足条件,如果没有找到不会报错,如果有两个相同的ref属性类型,后台报错)

- constructor:其他bean的类型(class)是否与该Course类的构造方法参数的类型一致。此种方式的本质就是byType

- no:不启用自动注入,只是用ref进行装配注入
- default:实际上是会优先执行constructor然后是byType
- 全局自动装配:可以在头文件中,一次性将该IOC容器的所有bean,统一设置成自动装配。另外子标签可以覆盖全局性

- 自动装配虽然可以减少代码量,但是会降低可读性,时候时需要谨慎
8.使用注解定义Bean:通过注解的形式将bean以及相应的属性值放入IOC容器
- 引入命名空间
- 配置扫描器,扫描base-package包下的类,查找这些类是否有注解,比如@Component(“studentDao”),如果有,则将该类加入Spring IOC容器中

- 如果要扫描多个包,用逗号分割


-
@Component范围非常大,Servlet,Service,Dao都可以用。(可以用于注册所有bean)
-
Dao层注解:@Repository (主要用于注册dao层的bean) - Service层注解:@Service (主要用于注册服务层的bean)
- Servlet层注解:@Controller (主要用于注册控制层的bean)
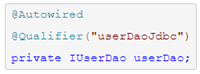
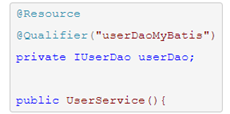
- @Resource:java的注解,默认以byName的方式去匹配与属性名相同的bean的id,如果没有找到就会以byType的方式查找,如果byType查找到多个的话,使用@Qualifier注解(spring注解)指定某个具体名称的bean
-
@Autowired:spring注解,默认是以byType的方式去匹配与属性名相同的bean的id,如果没有找到,就通过byName的方式去查找