1. 修改nginx配置文件
[root@web01 conf]# egrep -v "#|^$" nginx.conf.default >nginx.conf[root@web01 conf]# cat nginx.confworker_processes 1;events {worker_connections 1024;}http {include mime.types;default_type application/octet-stream;sendfile on;keepalive_timeout 65;server {listen 80;server_name www.etiantian.org;location / {root /html/www;index index.html index.htm;}error_page 500 502 503 504 /50x.html;location = /50x.html {root html;}}}
2. 创建站点目录
[root@web01 conf]# mkdir -p ../html/www/[root@web01 conf]# mkdir -p ../html/bbs/[root@web01 conf]# mkdir -p ../html/blog/[root@web01 conf]# echo "www.etiantian.org" > ../html/www/index.html[root@web01 conf]# echo "bbs.etiantian.org" > ../html/bbs/index.html[root@web01 conf]# echo "blog.etiantian.org" > ../html/blog/index.html或者shell循环创建for n in www blog bbsdomkdir -p ../heml/$n;echo "${n}.etiantian.org" > ../heml/$n/index.html;cat ../html/$n/index.html;done
3. 为LINUX客户端和Windows客户端添加解析地址
linux :
[root@web01 conf]# echo "10.0.0.8 www.etiantian.org" >>/etc/hosts
Windows:
C:WindowsSystem32driversetc
4. 测试客户端显示状态
linux :
[root@web01 blog]# curl www.etiantian.orgwww.etiantian.org[root@web01 blog]# curl bbs.etiantian.orgbbs.etiantian.org[root@web01 blog]# curl blog.etiantian.orgblog.etiantian.org
Windows:
开始---运行----CMD,ping www.etiantian.org,来自10.0.0.8的回复或者在浏览器内输入网址,显示内容为www.etiantian.org。
web站点优化:
创建站点存放目录
[root@web01 nginx]# mkdir -p /conf/extra
主配置与各个虚拟主机配置分离
[root@web01 nginx]# sed -n '10,17p' conf/nginx.conf >extra/www.conf
[root@web01 nginx]# sed -n '18,25p' conf/nginx.conf >extra/bbs.conf
[root@web01 nginx]# sed -n '26,33p' conf/nginx.conf >extra/blog.conf
增加状态配置文件[root@web01 conf]#cat>>/application/nginx/conf/nginx.conf<<EOF
##statusserver {listen 80;server_name status.etiantian.org;location / {stub_status on;access_log off;}}
EOF
为主配置文件引入虚拟主机各配置
[root@web01 nginx]# sed -i '10 i include extra/www.conf; include extra/bbs.conf; include extra/blog.conf; include extra/status.conf;' conf/nginx.conf
[root@web01 extra]# ll-rw-r--r-- 1 root root 185 Aug 11 10:21 bbs.conf-rw-r--r-- 1 root root 187 Aug 11 10:21 blog.conf-rw-r--r-- 1 root root 182 Aug 11 10:34 status.conf-rw-r--r-- 1 root root 182 Aug 11 10:21 www.conf[root@web01 conf]# tree extra/extra/├── bbs.conf├── blog.conf├── status.conf└── www.conf
主配置文件最终配置参数[root@web01 nginx]# cat -n conf/nginx.conf1 worker_processes 1;2 events {3 worker_connections 1024;4 }5 http {6 include mime.types;7 default_type application/octet-stream;8 sendfile on;9 keepalive_timeout 65;10 include extra/www.conf;11 include extra/bbs.conf;12 include blog.conf;13 include status.conf;14 }语法检查并平滑启动nginx[root@web01 nginx]# /application/nginx/sbin/nginx -tnginx: the configuration file /application/nginx-1.6.3//conf/nginx.conf syntax is oknginx: configuration file /application/nginx-1.6.3//conf/nginx.conf test is successful[root@web01 nginx]# /application/nginx/sbin/nginx -s reload测试结果及注释

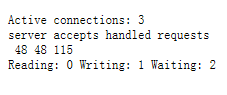
第一个server代表 Nginx共处理了48个连接
第二个caaepts代表Nginx共创建了48次握手
请求丢失数=(连接数-握手数)
reading : 读取客户端header信息数
writing :返回给客户端header信息数
waiting : 等候下一次请求指令的驻留连接
keepalive的开启状态,waiting值 = active-(reading+writing)