1 Redis Java客户端的使用
Redis的Java客户端: Jedis,Redisson,Lettuce
Jedis : java的客户端,提供了比较全面的redis命令支持
Redisson : 在基础上进行封装,直接提供了分布式锁,栈队列等功能 ;和Jedis相比,功能较为简单,不支持字符串操作,不支持排序、事务、管道、分区等Redis特性。Redisson主要是促进使用者对Redis的关注分离,从而让使用者能够将精力更集中地放在处理业务逻辑上。
Lettuce : 基于Netty构建的线程安全的高级Reds客户端,用于线程安全同步,异步和响应使用,支持集群,Sentinel,管道和编码器
 <!-- https://mvnrepository.com/artifact/redis.clients/jedis -->
            <dependency>
                <groupId>redis.clients</groupId>
                <artifactId>jedis</artifactId>
                <version>3.0.1</version>
            </dependency>

            <!-- https://mvnrepository.com/artifact/org.redisson/redisson -->
            <dependency>
                <groupId>org.redisson</groupId>
                <artifactId>redisson</artifactId>
                <version>3.10.6</version>
            </dependency>

            <!-- bloomFilter -->
            <!-- https://mvnrepository.com/artifact/com.google.guava/guava -->
            <dependency>
                <groupId>com.google.guava</groupId>
                <artifactId>guava</artifactId>
                <version>23.0</version>
            </dependency>
Jedis 单点连接
当是单点服务时,Java 连接Redis的客户端:
  Jedis jedis = null;

        try {
           jedis = new Jedis("192.168.237.130", 6379);
           jedis.hset("hashzz", "k1", "v1");
        } catch (Exception e) {
            System.out.println(e);
            e.printStackTrace();
        } finally {
            if (null != jedis) {
                jedis.disconnect();
            }
        }
或者
        JedisPool pool = null;
        try {
            pool = new JedisPool("192.168.237.130", 6379);
            pool.getResource().hset("hashzz", "k2", "v2");
        } catch (Exception e) {
            System.out.println(e);
            e.printStackTrace();
        } finally {
            if (null != pool) {
                pool.close();
            }
        }
Jedis sentinel连接哨兵集群
 // sentinel 哨兵
        // sentinel.conf 中配置的master名称
        String masterName = "mymaster";
        // sentinel 集群环境
        Set<String> sentinelIps = new HashSet<>();
        sentinelIps.add("192.168.237.129:26370");
        sentinelIps.add("192.168.237.130:26370");
        JedisSentinelPool sentinelPool = null;

        Jedis jedis = null;

        try {
            sentinelPool = new JedisSentinelPool(masterName, sentinelIps);
            jedis = sentinelPool.getResource();

            for (int i = 0; i< 10; i++) {
                jedis.lpush("javaRedisClientList" + jedis.getClient().getHost(), new Integer(i).toString());
            }

        } catch (Exception e) {
            System.out.println(e);
            e.printStackTrace();
        } finally {
            if (jedis != null) {
                jedis.disconnect();
            }
            if (sentinelPool != null) {
                sentinelPool.close();
            }
        }
Jedis sentinel源码分析
- 首先查看
JedisSentinelPool的构造方法,最终都会进入如下构造方法
  public JedisSentinelPool(String masterName, Set<String> sentinels,
      final GenericObjectPoolConfig poolConfig, final int connectionTimeout, final int soTimeout,
      final String password, final int database, final String clientName) {
    this.poolConfig = poolConfig;
    this.connectionTimeout = connectionTimeout;
    this.soTimeout = soTimeout;
    this.password = password;
    this.database = database;
    this.clientName = clientName;
    // 初始化sentinel监听列表, 并返回当前master节点
    HostAndPort master = initSentinels(sentinels, masterName);
    // 初始化
    initPool(master);
  }
initSentinels()方法
private HostAndPort initSentinels(Set<String> sentinels, final String masterName) {

    HostAndPort master = null;
    boolean sentinelAvailable = false;

    log.info("Trying to find master from available Sentinels...");
    // 首先遍历sentinel哨兵节点
    for (String sentinel : sentinels) {
      final HostAndPort hap = HostAndPort.parseString(sentinel);

      log.debug("Connecting to Sentinel {}", hap);

      Jedis jedis = null;
      try {
        jedis = new Jedis(hap);
        // 从当前哨兵节点获取当前master
        List<String> masterAddr = jedis.sentinelGetMasterAddrByName(masterName);

        // connected to sentinel...
        sentinelAvailable = true;

        if (masterAddr == null || masterAddr.size() != 2) {
          log.warn("Can not get master addr, master name: {}. Sentinel: {}", masterName, hap);
          continue;
        }

        master = toHostAndPort(masterAddr);
        log.debug("Found Redis master at {}", master);
        // 找到master,跳出循环
        break;
      } catch (JedisException e) {
        // resolves #1036, it should handle JedisException there's another chance
        // of raising JedisDataException
        log.warn(
          "Cannot get master address from sentinel running @ {}. Reason: {}. Trying next one.", hap,
          e.toString());
      } finally {
        if (jedis != null) {
          jedis.close();
        }
      }
    }

    if (master == null) {
      // 从哨兵列表中不能获取master
      if (sentinelAvailable) {
        // 哨兵是可用的,则可能是master有问题
        // can connect to sentinel, but master name seems to not
        // monitored
        throw new JedisException("Can connect to sentinel, but " + masterName
            + " seems to be not monitored...");
      } else {
       //  所有哨兵可能都宕机不可用
        throw new JedisConnectionException("All sentinels down, cannot determine where is "
            + masterName + " master is running...");
      }
    }

    // 进行到这里,master和sentinel都是可用的
    log.info("Redis master running at " + master + ", starting Sentinel listeners...");

    for (String sentinel : sentinels) {
     // 为每个sentinel启动一个后台线程监听
      final HostAndPort hap = HostAndPort.parseString(sentinel);
      MasterListener masterListener = new MasterListener(masterName, hap.getHost(), hap.getPort());
      // whether MasterListener threads are alive or not, process can be stopped
      masterListener.setDaemon(true);
      masterListeners.add(masterListener);
      masterListener.start();
    }

    return master;
  }
- 内部类 MasterListener
 protected class MasterListener extends Thread {

    protected String masterName;
    protected String host;
    protected int port;
    protected long subscribeRetryWaitTimeMillis = 5000;
    protected volatile Jedis j;
    protected AtomicBoolean running = new AtomicBoolean(false);

    protected MasterListener() {
    }

    public MasterListener(String masterName, String host, int port) {
      super(String.format("MasterListener-%s-[%s:%d]", masterName, host, port));
      this.masterName = masterName;
      this.host = host;
      this.port = port;
    }

    public MasterListener(String masterName, String host, int port,
        long subscribeRetryWaitTimeMillis) {
      this(masterName, host, port);
      this.subscribeRetryWaitTimeMillis = subscribeRetryWaitTimeMillis;
    }

    @Override
    public void run() {

      running.set(true);

      while (running.get()) {

        j = new Jedis(host, port);

        try {
          // double check that it is not being shutdown
          if (!running.get()) {
            break;
          }

          /*
           * Added code for active refresh
           */
          // 根据哨兵sentinel连接获取当前master
          List<String> masterAddr = j.sentinelGetMasterAddrByName(masterName);
          if (masterAddr == null || masterAddr.size() != 2) {
            log.warn("Can not get master addr, master name: {}. Sentinel: {}:{}.",masterName,host,port);
          }else{
              initPool(toHostAndPort(masterAddr));
          }
          // 基于redis 频道发布订阅(channel pub/sub)实现的java内部master选举的监听
          j.subscribe(new JedisPubSub() {
            @Override
            public void onMessage(String channel, String message) {
              log.debug("Sentinel {}:{} published: {}.", host, port, message);
              // 订阅的频道发来消息
              String[] switchMasterMsg = message.split(" ");

              if (switchMasterMsg.length > 3) {

                if (masterName.equals(switchMasterMsg[0])) {
                  // 收到的消息 第一节数据 是 sentinel.conf 内配置的 master名称
                  // 根据订阅到的新的master信息, 重新初始化 master
                  initPool(toHostAndPort(Arrays.asList(switchMasterMsg[3], switchMasterMsg[4])));
                } else {
                  log.debug(
                    "Ignoring message on +switch-master for master name {}, our master name is {}",
                    switchMasterMsg[0], masterName);
                }

              } else {
                log.error(
                  "Invalid message received on Sentinel {}:{} on channel +switch-master: {}", host,
                  port, message);
              }
            }
          // 订阅选举频道 :  +switch-master
          }, "+switch-master");

        } catch (JedisException e) {

          if (running.get()) {
            log.error("Lost connection to Sentinel at {}:{}. Sleeping 5000ms and retrying.", host,
              port, e);
            try {
              Thread.sleep(subscribeRetryWaitTimeMillis);
            } catch (InterruptedException e1) {
              log.error("Sleep interrupted: ", e1);
            }
          } else {
            log.debug("Unsubscribing from Sentinel at {}:{}", host, port);
          }
        } finally {
          j.close();
        }
      }
    }

    public void shutdown() {
      try {
        log.debug("Shutting down listener on {}:{}", host, port);
        running.set(false);
        // This isn't good, the Jedis object is not thread safe
        if (j != null) {
          j.disconnect();
        }
      } catch (Exception e) {
        log.error("Caught exception while shutting down: ", e);
      }
    }
  }
可见Java Jedis连接Redis集群是基于哨兵集群的监听,首先传入哨兵的地址,根据哨兵信息及哨兵的内部通信得到当前的master连接redis客户端,然后后台为每个哨兵分配线程,线程内基于redis channel pub/sub来设立监听,如果有新的master选举,java内部订阅到消息之后重新对master进行初始化。
Jedis Cluster分片环境连接
JedisCluster cluster = null;

        try {
            Set<HostAndPort> clusterIps = new HashSet();
            clusterIps.add(new HostAndPort("192.168.237.129", 7000));
            clusterIps.add(new HostAndPort("192.168.237.129", 7001));
            cluster = new JedisCluster(clusterIps);

            cluster.set("k1", "v1");
        } catch (Exception e) {
            System.out.println(e.toString());
            e.printStackTrace();
        } finally {
            cluster.close();
        }
Jedis Cluster源码分析
首先new JedisCluster(clusterIps)构造方法作为入口,会进入BinaryJedisCluster(..)构造方法
  public BinaryJedisCluster(Set<HostAndPort> jedisClusterNode, int timeout, int maxAttempts,
      final GenericObjectPoolConfig poolConfig) {
    this.connectionHandler = new JedisSlotBasedConnectionHandler(jedisClusterNode, poolConfig,
        timeout);
    this.maxAttempts = maxAttempts;
  }
继续new JedisSlotBasedConnectionHandler(...)构造方法,会进入JedisClusterConnectionHandler(...)构造方法
  public JedisClusterConnectionHandler(Set<HostAndPort> nodes,
          final GenericObjectPoolConfig poolConfig, int connectionTimeout, int soTimeout, String password, String clientName) {
    this.cache = new JedisClusterInfoCache(poolConfig, connectionTimeout, soTimeout, password, clientName);
    initializeSlotsCache(nodes, poolConfig, connectionTimeout, soTimeout, password, clientName);
}
initializeSlotsCache(..)方法
  for (HostAndPort hostAndPort : startNodes) {
      // 遍历传入的node节点
      Jedis jedis = null;
      try {
        jedis = new Jedis(hostAndPort.getHost(), hostAndPort.getPort(), connectionTimeout, soTimeout);
        if (password != null) {
          jedis.auth(password);
        }
        if (clientName != null) {
          jedis.clientSetname(clientName);
        }
        cache.discoverClusterNodesAndSlots(jedis);
        break;
      } catch (JedisConnectionException e) {
        // try next nodes
      } finally {
        if (jedis != null) {
          jedis.close();
        }
      }
    }
核心discoverClusterNodesAndSlots(..)方法
  private final Map<String, JedisPool> nodes = new HashMap<String, JedisPool>();
  private final Map<Integer, JedisPool> slots = new HashMap<Integer, JedisPool>();
  private final ReentrantReadWriteLock rwl = new ReentrantReadWriteLock();
  private final Lock r = rwl.readLock();
  private final Lock w = rwl.writeLock();
  ...
 public void discoverClusterNodesAndSlots(Jedis jedis) {
   //重入读写锁的读锁加锁
    w.lock();

    try {
      reset();

      /*
    redis 127.0.0.1:6379> cluster slots
1) 1) (integer) 0
   2) (integer) 4095
   3) 1) "127.0.0.1"
      2) (integer) 7000
   4) 1) "127.0.0.1"
      2) (integer) 7004
2) 1) (integer) 12288
   2) (integer) 16383
   3) 1) "127.0.0.1"
      2) (integer) 7003
   4) 1) "127.0.0.1"
      2) (integer) 7007
      */
      // jedis.clusterSlots(); 内部执行  `cluster slots`命令,返回一个数组,数组每个对象为 [hash slot的起始结束编号, master节点ip+port, slave节点ip+port]
      List<Object> slots = jedis.clusterSlots();

      for (Object slotInfoObj : slots) {
        List<Object> slotInfo = (List<Object>) slotInfoObj;

        if (slotInfo.size() <= MASTER_NODE_INDEX) {
          continue;
        }
        // 取数组元素的第一二个节点,即hash slot的起始末尾,得出该区间所有槽节点
        List<Integer> slotNums = getAssignedSlotArray(slotInfo);

        // hostInfos
        int size = slotInfo.size();
        for (int i = MASTER_NODE_INDEX; i < size; i++) {
           // 取数组元素的第三及以后的数据,即master+slave的ip.port信息
          List<Object> hostInfos = (List<Object>) slotInfo.get(i);
          if (hostInfos.size() <= 0) {
            continue;
          }

          HostAndPort targetNode = generateHostAndPort(hostInfos);
          // 将master/slave节点信息维护于内存nodes 中
          setupNodeIfNotExist(targetNode);
          if (i == MASTER_NODE_INDEX) {
            // 如果是master节点下标位置,将前面得出的所有hash槽节点位置与master节点的关系维护与内存slots中
            assignSlotsToNode(slotNums, targetNode);
          }
        }
      }
    } finally {
      w.unlock();
    }
  }
'getAssignedSlotArray()'方法
  private List<Integer> getAssignedSlotArray(List<Object> slotInfo) {
    List<Integer> slotNums = new ArrayList<Integer>();
    // 遍历 cluster slots命令返回节点信息; 根据每个节点对应hash 槽的起始开始位置,初始化为该区间内全部槽节点数组
    for (int slot = ((Long) slotInfo.get(0)).intValue(); slot <= ((Long) slotInfo.get(1))
        .intValue(); slot++) {
      slotNums.add(slot);
    }
    return slotNums;
  }
setupNodeIfNotExist()方法
private final Map<String, JedisPool> nodes = new HashMap<String, JedisPool>();
...
  public JedisPool setupNodeIfNotExist(HostAndPort node) {
    w.lock();
    try {
      String nodeKey = getNodeKey(node);
      JedisPool existingPool = nodes.get(nodeKey);
      if (existingPool != null) return existingPool;
      // 针对内存nodes Map中不存在的节点,初始化该节点,并加入内存中
      JedisPool nodePool = new JedisPool(poolConfig, node.getHost(), node.getPort(),
          connectionTimeout, soTimeout, password, 0, clientName, false, null, null, null);
      nodes.put(nodeKey, nodePool);
      return nodePool;
    } finally {
      w.unlock();
    }
  }
assignSlotsToNode()方法
  public void assignSlotsToNode(List<Integer> targetSlots, HostAndPort targetNode) {
    w.lock();
    try {
      JedisPool targetPool = setupNodeIfNotExist(targetNode);
      for (Integer slot : targetSlots) {
        //将之前遍历得出的所有hash槽与redis节点绑定,关系维护于map中
        slots.put(slot, targetPool);
      }
    } finally {
      w.unlock();
    }
  }
此时new JedisCluster(clusterIps)构造方法完成之后,已将Cluster环境的所有hash slot(16384个)对应应该存储于的master节点的映射关系维护于内存中,且将不同分区master节点信息以 key为 ip:port形式,value为节点的JedisPool 信息维护于内存nodes中;
之后执行插入命令cluster.set("k1", "v1");时
  public String set(final String key, final String value) {
    return new JedisClusterCommand<String>(connectionHandler, maxAttempts) {
      @Override
      public String execute(Jedis connection) {
        return connection.set(key, value);
      }
    }.run(key);
  }
先执行run方法
  public T run(String key) {
    //  JedisClusterCRC16算法, 将key根据 hash slot算法得到值与16383取与,得出对应slot值
    return runWithRetries(JedisClusterCRC16.getSlot(key), this.maxAttempts, false, null);
  }
runWithRetries(...)内部
private T runWithRetries(final int slot, int attempts, boolean tryRandomNode, JedisRedirectionException redirect) {
    if (attempts <= 0) {
      throw new JedisClusterMaxAttemptsException("No more cluster attempts left.");
    }

    Jedis connection = null;
    try {

      if (redirect != null) {
        connection = this.connectionHandler.getConnectionFromNode(redirect.getTargetNode());
        if (redirect instanceof JedisAskDataException) {
          // TODO: Pipeline asking with the original command to make it faster....
          connection.asking();
        }
      } else {
        if (tryRandomNode) {
          connection = connectionHandler.getConnection();
        } else {
          //因为我们执行set方法,传入的 tryRandomNode为false, redirect为空,会执行此逻辑
          connection = connectionHandler.getConnectionFromSlot(slot);
        }
      }
   ...
核心逻辑connectionHandler.getConnectionFromSlot(slot)
  public Jedis getConnectionFromSlot(int slot) {
     // 从cache内存中找出hash slot节点对应的redis 数据库连接信息,返回 执行 connection.set(key, value);在对应分片节点插入数据
    JedisPool connectionPool = cache.getSlotPool(slot);
    if (connectionPool != null) {
      // It can't guaranteed to get valid connection because of node
      // assignment
      return connectionPool.getResource();
    } else {
      renewSlotCache(); //It's abnormal situation for cluster mode, that we have just nothing for slot, try to rediscover state
      connectionPool = cache.getSlotPool(slot);
      if (connectionPool != null) {
        return connectionPool.getResource();
      } else {
        //no choice, fallback to new connection to random node
        return getConnection();
      }
    }
  }
总结Jedis连接Cluster原理如下:
1. 首先JedisCluster构造方法执行cluster slots命令,得到16384个hash slot槽及对应master与slave节点信息;
然后遍历这些数据,将master,slave信息以key为ip:port形式,value为JedisPool的形式维护于内存nodes中;
之后将0 - 18383个hash slot槽对应的JedisPool维护于内存slots中;
2.之后set方法执行插入数据时,先将key根据CRC16算法得出0-16383内的槽节点,然后从第一步构造方法内维护的关系中找出所要存储数据对应的JedisPool节点,执行对应插入命令。
2 基于Redis实现分布式锁
Jedis 实现分布式锁
Jedis实现的分布式锁其实是依据 setnx 命令,在锁竞争的允许等待时间内,自旋执行 setnx,如果成功表示获得锁成功,如果插入失败表示锁被占用,重新插入;在释放锁时 判断key对应value是否是创建锁时为key赋值的value,如果相同则删除对应的key,操作需要在事物中进行或者使用lua脚本来保证原子性。
DistributedLock
import redis.clients.jedis.Jedis;
import redis.clients.jedis.Transaction;

import java.util.Date;
import java.util.UUID;
import java.util.concurrent.TimeUnit;

/**
 * @Author eddy.shen
 * @Date 2019/4/24 20:56
 **/
public class DistributedLock {

    /**
     * 分布式锁: 不同进程之间的锁竞争, 基于公共的共享资源或者中间件来实现:
     *  实现途径: 数据库,  zookeeper 有序节点, redis setnx
     *
     *  本例,基于 redis setnx 和 expire 实现分布式锁
     */

    private String initLockKey(String lockName) {
        return "Lock :" + lockName;
    }

    /**
     * 获得锁
     * @param lockName  锁的名称
     * @param waitTimeout  获得锁的等待时间
     * @param lockTimeout  持有锁的过期时间
     * @return
     */
    public String acquireLock(String lockName, long waitTimeout, long lockTimeout) {

        // 唯一标识, 用于区分获得锁和释放锁的是同一用户
        String identifier = UUID.randomUUID().toString();
        String lockKey = initLockKey(lockName);
        int lockExpire = (int) (lockTimeout/1000);

        Jedis jedis = null;

        try {

            jedis = JedisConnectionUtil.getJedis();

            long end = System.currentTimeMillis() + waitTimeout;

            System.out.println(Thread.currentThread().getName() + " 开始抢夺锁 " + new Date());

            while (System.currentTimeMillis() < end) {
                // 在超时时间范围内轮训
                Long nx = jedis.setnx(lockKey, identifier);
                //System.out.println(Thread.currentThread().getName() + " 开始抢夺锁,结果 " + nx + ";  " + new Date());
                if (nx == 1) {
                    // 创建成功, 表示获得锁
                    // 设置超时时间
                    jedis.expire(lockKey, lockExpire);
                    return identifier;
                }

                if (jedis.ttl(lockKey) == -1) {
                    // 如果没有获得锁, 且锁没有设置超时时间
                    jedis.expire(lockKey, lockExpire);
                }

                // 休眠100ms,避免不必要的重试
                TimeUnit.MILLISECONDS.sleep(100);

            }


        } catch (Exception e) {
            System.out.println(e);
            e.printStackTrace();
        } finally {
            if (null != jedis) {
                jedis.close();
            }
        }
        System.out.println(Thread.currentThread().getName() + " 抢夺锁超时" + new Date());
        return null;

    }

    /**
     * lua脚本释放锁: lua脚本内执行redis会保证原子性,不用担心事物操作
     * @param lockName
     * @param identifier
     * @return
     */
    public boolean releaseLockBylua(String lockName, String identifier) {

        Jedis jedis = null;

        try {

            jedis = JedisConnectionUtil.getJedis();
            String lockKey = initLockKey(lockName);

            String luaScript = "if redis.call("get", KEYS[1])==ARGV[1] then " +
                    " return redis.call("del", KEYS[1])" +
                    " else return 0 end";

            Long rs = (Long)jedis.eval(luaScript, 1, lockKey, identifier);
            System.out.println(identifier + " 释放锁结果 " + rs + " " + jedis.get(lockKey));
            if (rs > 0) {
                return true;
            }
            return false;

        } catch (Exception e) {
            System.out.println(e.toString());
            e.printStackTrace();
        } finally {
            jedis.close();
        }
        return false;
    }

    /**
     * 释放锁
     * @param lockName 锁的名称
     * @param identifier 锁的标识
     * @return
     */

    public boolean releaseLock(String lockName, String identifier) {

        Boolean isRelease = false;
        String lockKey = initLockKey(lockName);

        Jedis jedis = null;

        try {

            jedis = JedisConnectionUtil.getJedis();

            while (true) {
                // watch : 一般是和事务一起使用,当对某个key进行watch后如果其他的客户端对这个key进行了更改,那么本次事务会被取消,事务的exec会返回null
                jedis.watch(lockKey);
                // 判断是否为同一把锁
                if (identifier.equals(jedis.get(lockKey))) {
                    Transaction transaction = jedis.multi();
                    transaction.del(lockKey);
                    if (transaction.exec().isEmpty()) {
                        // 删除失败,重试
                        continue;
                    }
                    isRelease = true;
                } else {
                    // TODO 不是当前线程持有的锁, 异常提示
                }
                jedis.unwatch();
                break;

            }

            /*
            // 获得锁,释放锁,  不考虑事物
            if (jedis.get(lockKey) == identifier) {
                // 释放的锁没有到期 并且 锁标识和创建时一样, 是获得锁时创建的锁
                jedis.del(lockKey);
            }
            */


        } catch (Exception e) {

        } finally {
            if (null != jedis) {
                jedis.close();
            }
        }

        return isRelease;

    }


}
JedisConnectionUtil
import redis.clients.jedis.Jedis;
import redis.clients.jedis.JedisPool;
import redis.clients.jedis.JedisPoolConfig;

/**
 * @Author eddy.shen
 * @Date 2019/4/24 21:21
 **/
public class JedisConnectionUtil {

    private static JedisPool jedisPool = null;

    static {
        JedisPoolConfig config = new JedisPoolConfig();
        // 客户端最大连接数
        config.setMaxTotal(100);
        jedisPool = new JedisPool(config, "192.168.237.128", 6379);
    }

    public static Jedis getJedis() {

        return jedisPool.getResource();
    }


}
DistributedLockTest
import java.util.concurrent.TimeUnit;

/**
 * @Author eddy.shen
 * @Date 2019/4/24 21:54
 **/
public class DistributedLockTest extends Thread {

    @Override
    public void run() {

        String lockName = "order";
        DistributedLock lock = new DistributedLock();

        String identifier = lock.acquireLock(lockName, 30000, 5000);

        if (null != identifier) {
            System.out.println(Thread.currentThread().getName() + " 获得锁成功!! " + identifier);

            try {
                TimeUnit.SECONDS.sleep(1);
//                boolean isRelease = lock.releaseLock(lockName, identifier);
                boolean isRelease = lock.releaseLockBylua(lockName, identifier);
                if (isRelease) {
                    System.out.println(Thread.currentThread().getName() + " 释放锁成功--- " + identifier);
                }

            } catch (InterruptedException e) {
                e.printStackTrace();
            }

        }

    }

    public static void main(String[] args) {

        for (int i = 0; i < 10; i++) {

            new Thread(new DistributedLockTest(), "thread " + i).start();

        }

    }


}
Redisson 的分布式锁
RedissonLock 使用
package com.smallShen.redis.cpt004JavaUse.redisson;

import org.redisson.Redisson;
import org.redisson.api.RLock;
import org.redisson.api.RedissonClient;
import org.redisson.config.Config;

import java.util.Date;
import java.util.concurrent.TimeUnit;

/**
 * @Author eddy.shen
 * @Date 2019/4/25 21:04
 **/
public class RedissonLock implements Runnable{


    @Override
    public void run() {

        Config config = new Config();
        config//.useClusterServers()
               .useSingleServer().setAddress("redis://192.168.237.128:6379");

        RedissonClient redissonClient = Redisson.create(config);

        RLock lock = redissonClient.getLock("LockA");

        try {
            lock.tryLock(10, 3, TimeUnit.SECONDS);
            System.out.println(Thread.currentThread().getName() + " 获得锁 do something " + new Date());
            TimeUnit.SECONDS.sleep(1);
            System.out.println(Thread.currentThread().getName() + " 释放锁 " + new Date());

        } catch (InterruptedException e) {
            e.printStackTrace();
        } finally {
            lock.unlock();
            redissonClient.shutdown();
        }

    }

    public static void main(String[] args) {

        for (int i = 0; i < 10; i ++) {

            new Thread(new RedissonLock(), "thread " + i).start();

        }

    }


}
Redisson Lock实现原理分析
1.以lock.tryLock(..)为入口
 @Override
    public boolean tryLock(long waitTime, long leaseTime, TimeUnit unit) throws InterruptedException {
        long time = unit.toMillis(waitTime);
        long current = System.currentTimeMillis();
        long threadId = Thread.currentThread().getId();
        // 首先会试图抢夺锁, 转入之后的2,3,4步逻辑
        Long ttl = tryAcquire(leaseTime, unit, threadId);
        // lock acquired
        if (ttl == null) {
           // ttl为空,说明抢夺锁成功,返回true
            return true;
        }

        time -= System.currentTimeMillis() - current;
        if (time <= 0) {
            // 判断等待时间结束,抢夺锁失败
            acquireFailed(threadId);
            return false;
        }

        current = System.currentTimeMillis();
        RFuture<RedissonLockEntry> subscribeFuture = subscribe(threadId);
        if (!await(subscribeFuture, time, TimeUnit.MILLISECONDS)) {
            if (!subscribeFuture.cancel(false)) {
                subscribeFuture.onComplete((res, e) -> {
                    if (e == null) {
                        unsubscribe(subscribeFuture, threadId);
                    }
                });
            }
            acquireFailed(threadId);
            return false;
        }

        try {
            time -= System.currentTimeMillis() - current;
            if (time <= 0) {
                acquireFailed(threadId);
                return false;
            }

            while (true) {
                long currentTime = System.currentTimeMillis();
                ttl = tryAcquire(leaseTime, unit, threadId);
                // lock acquired
                if (ttl == null) {
                    return true;
                }

                time -= System.currentTimeMillis() - currentTime;
                if (time <= 0) {
                    acquireFailed(threadId);
                    return false;
                }

                // waiting for message
                currentTime = System.currentTimeMillis();
                if (ttl >= 0 && ttl < time) {
                    // 当等待时间大于当前正在使用锁的key的过期时间,
                    // 使用JUC包的Semaphore,内部仍是基于 AQS 判断不能获得锁,将当前线程挂起ttl秒,  LockSupport.parkNanos(this, nanosTimeout);
                    getEntry(threadId).getLatch().tryAcquire(ttl, TimeUnit.MILLISECONDS);
                } else {
                    getEntry(threadId).getLatch().tryAcquire(time, TimeUnit.MILLISECONDS);
                }
                // ttl时间过后, 线程唤醒,继续 while循环,执行抢夺锁逻辑
                time -= System.currentTimeMillis() - currentTime;
                if (time <= 0) {
                    acquireFailed(threadId);
                    return false;
                }
            }
        } finally {
            unsubscribe(subscribeFuture, threadId);
        }
//        return get(tryLockAsync(waitTime, leaseTime, unit));
    }
2.tryAcquire(leaseTime, unit, threadId); 抢夺锁逻辑
  private Long tryAcquire(long leaseTime, TimeUnit unit, long threadId) {
        return get(tryAcquireAsync(leaseTime, unit, threadId));
    }
3.tryLockInnerAsync(leaseTime, unit, threadId, RedisCommands.EVAL_LONG);
    private <T> RFuture<Long> tryAcquireAsync(long leaseTime, TimeUnit unit, long threadId) {
        if (leaseTime != -1) {
            // 设置了锁的过期时间,走次逻辑
            return tryLockInnerAsync(leaseTime, unit, threadId, RedisCommands.EVAL_LONG);
        }
        ....
4.tryLockInnerAsync(..)最终的实现逻辑
  <T> RFuture<T> tryLockInnerAsync(long leaseTime, TimeUnit unit, long threadId, RedisStrictCommand<T> command) {
        internalLockLeaseTime = unit.toMillis(leaseTime);
        // 使用lua脚本保证原子性
        return commandExecutor.evalWriteAsync(getName(), LongCodec.INSTANCE, command,
                  "if (redis.call('exists', KEYS[1]) == 0) then " +   // 首先判断对应key值是否存在
                      "redis.call('hset', KEYS[1], ARGV[2], 1); " +  // 不存在说明当前锁可以使用, 调用hash命令 hset, 设置 key - map [ threadId, 重入锁次数1]
                      "redis.call('pexpire', KEYS[1], ARGV[1]); " + // 设置key的过期时间
                      "return nil; " +                                                 // 返回空,所有抢夺锁成功
                  "end; " +
                  "if (redis.call('hexists', KEYS[1], ARGV[2]) == 1) then " +  // 逻辑能执行到这里,说明key存在,当前锁在使用, 使用 key + thredId判断是否是当前线程在持有锁
                      "redis.call('hincrby', KEYS[1], ARGV[2], 1); " +  // 如果抢夺锁的线程和当前正在使用锁的线程是同一个, 说明是重入锁,hincrby命令原子的值+1
                      "redis.call('pexpire', KEYS[1], ARGV[1]); " + // 设置过期时间
                      "return nil; " +   // 返回空,表示抢夺锁成功
                  "end; " +
                  "return redis.call('pttl', KEYS[1]);",  // 执行到这里,说明锁被占用,返回当前锁的过期时间
                    Collections.<Object>singletonList(getName()), internalLockLeaseTime, getLockName(threadId));
    }
3 Redis的管道模式
package com.smallShen.redis.cpt004JavaUse.jedis;

import redis.clients.jedis.Jedis;
import redis.clients.jedis.Pipeline;

/**
 * @Author eddy.shen
 * @Date 2019/4/28 20:13
 * 管道模式
 **/
public class PipelineDemo {

    public static void main(String[] args) {

        Jedis jedis = JedisConnectionUtil.getJedis();

        Pipeline pipeline = jedis.pipelined();

        pipeline.set("aa", "1");
        pipeline.set("bb", "222");
        pipeline.set("cc", "33");
        // 执行同步, 一次IO请求发送全部命令, 减少网络通信
        pipeline.sync();

    }


}
4 Redis应用中的问题
Redis的缓存与数据一致性
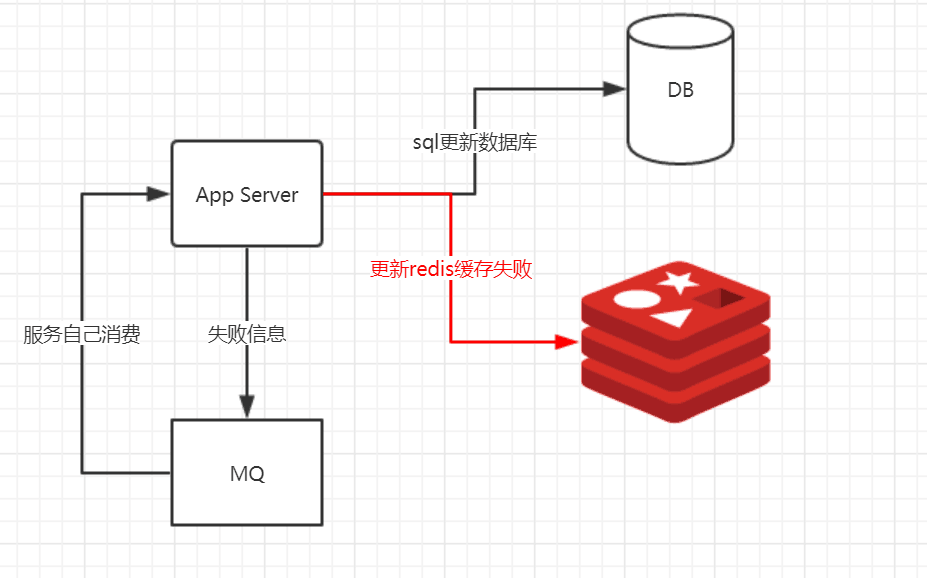
Redis经常被用过当做高速缓存,存放热点数据;一般在服务启动会从DB初始化数据至内存中,然后取数据先从内存中取,取不到再查找数据库;
如果此时执行更改操作,就会涉及到 1 先更新缓存在更新数据库 2先更新数据库再更新缓存的问题;这两个更新步骤不在同一个事物中,也会有数据库更新成功,redis更新不成功这种分布式事物的问题。
a. 更新缓存还是让缓存失效
1. 当修改数据库数据也需要更新缓存时,判断更新缓存的逻辑或者代价,如果逻辑简单代价很小可以直接更新缓存;
2. 如果更新缓存需要调用很多接口,代价很大,可以直接让缓存key失效,下次读数据从DB加载,重新放入内存;
b. 先更新数据库还是先更新缓存
由于更新数据库和更新缓存两个步骤不能保证原子性,会出现临时不一致的情况,不过要保证最终数据一致性;至于先更新哪个可以根据实际业务需求来定;
c. 最终一致性的实现方案
上面提到的两个步骤,比如我们先更新数据库,执行成功了,然后更新Redis缓存,执行失败了,此时可以将失败信息放入MQ中间件里,让服务消费这些消息,保证最终一致性。
缓存雪崩与缓存穿透
缓存雪崩
当Redis缓存的数据设置了过期时间,在同一时间内缓存数据全部失效,或者缓存服务器宕机导致数据请求全部转为DB层,DB同一时间访问请求压力瞬间增大导致崩溃。缓存失效导致的雪崩效应对底层系统的冲击是很大的。
解决方案:
a. 当缓存中取不到数据,转为从DB取数据时,加锁串行化来执行,保证了数据库层面压力不会暴增,不过缺点是性能太低;
b. 设置redis key的失效时间时,分散在不同时间段,降低缓存失效的重叠时间;
c. 如果是服务宕机引起,可以采用高可用集群哨兵方案,也可以采用多级缓存,redis加Memcache来缓存数据;
缓存穿透
缓存穿透指查询一个根本不存在的key,缓存和数据源都不会命中,如果这个key不存入缓存,可能会使后端数据库压力增大,而且很多后端数据库不具备高并发,很可能导致宕机;
解决方案:
a. 为key设置一定的规则,不符合规则的key过滤掉;
b. 将查询到值为null的key也缓存起来,value设置为一个特殊的字符,前端取到数据判断为特殊字符则认为null;
5 布隆过滤器
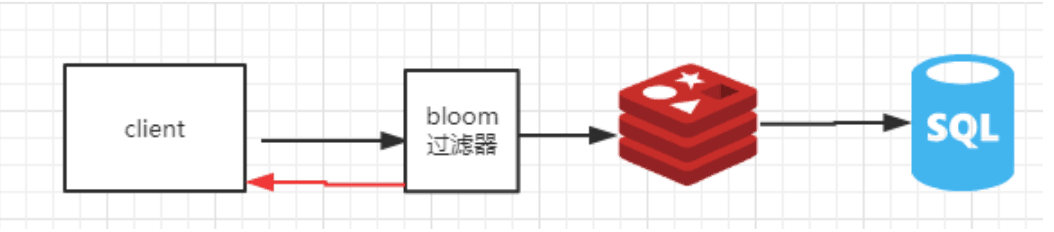
布隆过滤器是Burton Howard Bloom在1970年提出来的,一种空间效率极高的概率型算法和数据结构,主要用来判断一个元素是否在集合中存在。因为他是一个概率型的算法,所以会存在一定的误差,如果传入一个值去布隆过滤器中检索,可能会出现检测存在的结果但是实际上可能是不存在的,但是肯定不会出现实际上不存在然后反馈存在的结果。因此,Bloom Filter不适合那些“零错误”的应用场合。而在能容忍低错误率的应用场合下,Bloom Filter通过极少的错误换取了存储空间的极大节省。
Bloom Filter原理
可以看做基于bitmap位图 加 多个hash算法来实现的
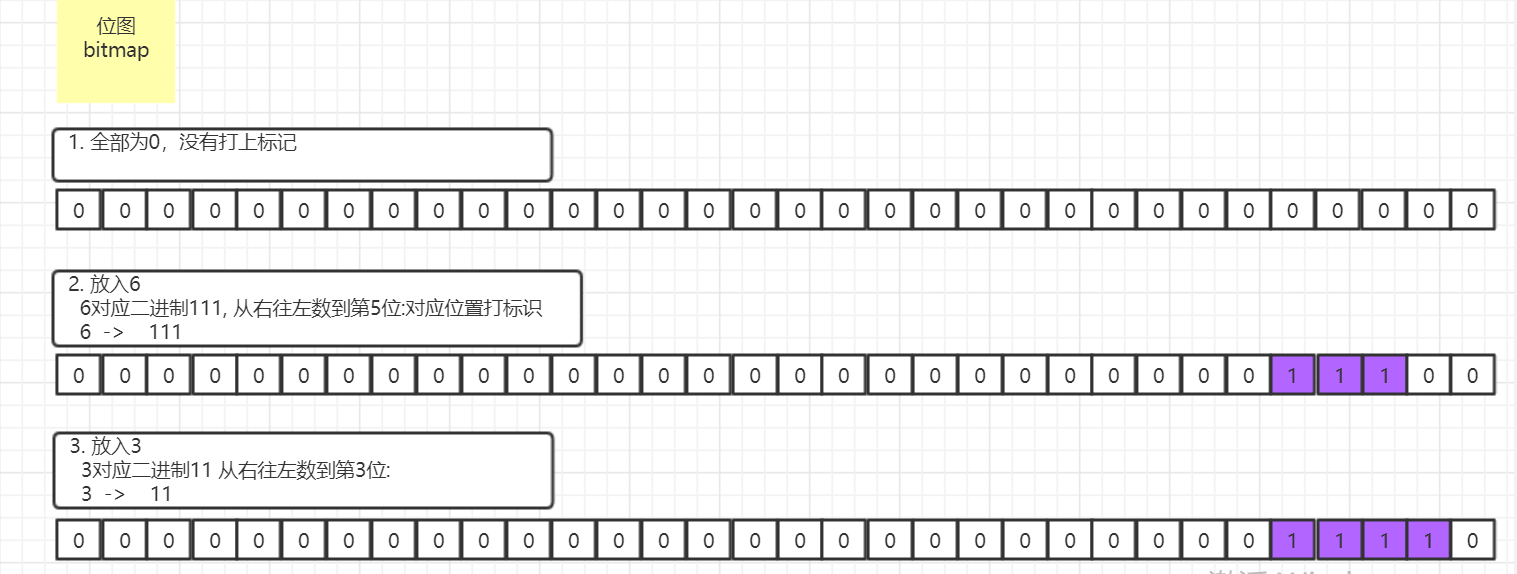
bitmap
所谓的Bit-map就是用一个bit位来标记某个元素对应的Value,通过Bit为单位来存储数据,可以大大节省存储空间.所以我们可以通过一个int型的整数的32比特位(int -> 4byte字节 -> 32bit比特位)来存储32个10进制的数字,那么这样所带来的好处是内存占用少、效率很高(不需要比较和位移)比如我们要存储5(101)、3(11)四个数字,那么我们申请int型的内存空间,会有32个比特位。这四个数字的二进制分别对应从右往左开始数,比如第一个数字是5,对应的二进制数据是101, 那么从右往左数到第5位,把对应的二进制数据存储到32个比特位上。
第一个5就是 00000000000000000000000000101000
输入3时候 00000000000000000000000000001100
原理
以40亿数据为案例,假设这40亿数据为某邮件服务器的黑名单数据,邮件服务需要根据邮箱地址来判断当前邮箱是否属于垃圾邮件。原理如下:
假设集合里面有3个元素{x, y, z},哈希函数的个数为3。首先将位数组进行初始化,将里面每个位都设置位0。对于集合里面的每一个元素,将元素依次通过3个hash函数进行映射,每次映射都会产生一个哈希值,这个值对应位数组上面的一个点,然后将位数组对应的位置标记为1。查询W元素是否存在集合中的时候,同样的方法将W通过哈希映射到位数组上的3个点。如果3个点的其中有一个点不为1,则可以判断该元素一定不存在集合中。反之,如果3个点都为1,则该元素可能存在集合中。
这种根据点位是否被打了标记来判断是否存在,会有一定的误判率,判断使用的hash函数越多,误判率会越小,不过所占用内存相应越大;
简单应用
   <!-- https://mvnrepository.com/artifact/com.google.guava/guava -->
            <dependency>
                <groupId>com.google.guava</groupId>
                <artifactId>guava</artifactId>
                <version>23.0</version>
            </dependency>
        // 存储 1000000数据, 误差率 0.0001*100 = 0.01%
        BloomFilter bloomFilter = BloomFilter.create(Funnels.stringFunnel(Charset.defaultCharset()),
               1000000, 0.0001);

        bloomFilter.put("eddy.shen");

        Boolean flag = bloomFilter.mightContain("eddy.shen");

        System.out.println(flag);