我的电脑系统是windows10,windows具有用户友好的界面,但不适合用来搭建开发环境,所以本篇文章介绍的方法是:使用windows中的vscode打造远程服务器centos系统上的go语言开发环境。
1.windows10下载并安装好vscode编辑器(安装时,将复选框全部勾上)
下载地址:https://code.visualstudio.com/
2.vscode上安装Remote Development插件
第一步:按下快捷键Ctrl+Shift+X,进入插件管理页面,搜索并安装插件Remote Development
第二步:windows上安装openssh客户端,这里提供一个使用powershell安装的方法
首先,以管理员身份打开powershell
然后,输入命令在线查询可获取的安装包 Get-WindowsCapability -Online | ? Name -like 'OpenSSH*'
如果状态显示NotPresent的话,可以使用命令进行安装,命令为Add-WindowsCapability -Online -Name OpenSSH.Client~~~~0.0.1.0
提示:随着 Windows 10 2018 年 4 月更新的发布,OpenSSH 客户端已正式推出并在 Windows 10 中默认安装。
第三步:准备一台centos虚拟机或者ubuntu虚拟机,确保虚拟机上的ssh server服务已经开启,并允许远程连接。比如我准备的是centos7虚拟机,IP地址为192.168.247.133
第四步:按下快捷键ctrl+shift+p 搜索Remote-SSH:Settings,在打开的页面中,点击Edit in settings.json,在其中添加"remote.SSH.showLoginTerminal": true,
第五步:点击左下角的绿色图标,选择Remote-SSH:Connect to Host 然后点击 Configure SSH Hosts 然后选择点第一个config,默认应该是一个空白的文件,在其中添加如下的配置:
Host Centos7.5
    HostName 192.168.247.133
    Port 22
    User root
备注:其中Host后面的名称,可以随便命名,HostName后面的IP地址是准备的虚拟机IP地址,Port后跟的是ssh server服务监听的端口号,默认是22,User后跟的是远程连接的用户名,我这里使用超级用户连接。
第六步:点击vscode左边栏的远程连接图标,点击配置好的远程虚拟机名称旁边的那个按钮,然后输入密码登陆到远程服务器上
3.在远程虚拟机上安装go语言编译器
第一步:浏览器打开https://studygolang.com/dl找一个最新的安装包,复制下载链接
第二步:在虚拟机上使用wget下载安装包
wget https://studygolang.com/dl/golang/go1.13.4.linux-amd64.tar.gz
第三步:将安装包解压到合适的目录下
tar -xzf go1.13.4.linux-amd64.tar.gz -C /usr/local/
第四步:添加环境变量
echo 'export PATH=$PATH:/usr/local/go/bin' >> /etc/profile
source /etc/profile
第五步:配置GOPATH和GOROOT环境变量
mkdir /Golang/
echo 'export GOROOT=/usr/local/go' >> /etc/profile
echo 'export GOPATH=/Golang' >> /etc/profile
source /etc/profile
echo $GOPATH
echo $GOROOT
第六步:创建一个Go项目目录
mkdir $GOPATH/LUAGO
4.在vscode中安装go插件
第一步:按下快捷键Ctrl+Shift+X,进入插件管理页面,搜索并安装插件go
第二步:安装完第一步中的插件go之后,vscode还会自动安装一些与go相关的扩展依赖包,但这些依赖包会由于墙的原因而下载失败,导致扩展依赖包安装失败。
所以,我们要手动下载这些依赖包,将这些依赖包放到$GOROOT/src目录下:
mkdir -p $GOROOT/src/golang.org/x/
cd $GOROOT/src/golang.org/x/
git clone https://github.com/golang/tools.git
cd $GOROOT/src
cp -r golang.org vendor/
mkdir -p $GOROOT/src/github.com/mdempsky
cd $GOROOT/src/github.com/mdempsky
git clone https://github.com/mdempsky/gocode.git
go install github.com/mdempsky/gocode
给一下我处理其它依赖包的过程:
mkdir -p $GOROOT/src/github.com/ramya-rao-a
cd $GOROOT/src/github.com/ramya-rao-a
git clone https://github.com/ramya-rao-a/go-outline.git
$GOROOT/src
go install github.com/ramya-rao-a/go-outline
mkdir -p $GOROOT/src/github.com/acroca
cd $GOROOT/src/github.com/acroca
git clone https://github.com/acroca/go-symbols.git
$GOROOT/src
go install github.com/acroca/go-symbols
mkdir -p $GOROOT/src/github.com/pkg
cd $GOROOT/src/github.com/pkg
git clone https://github.com/pkg/errors.git
mkdir -p $GOROOT/src/github.com/karrick
cd $GOROOT/src/github.com/karrick
git clone https://github.com/karrick/godirwalk.git
cp $GOROOT/src/github.com/karrick $GOROOT/src/vendor/github.com/ -r
mkdir -p $GOROOT/src/github.com/uudashr
cd $GOROOT/src/github.com/uudashr
git clone https://github.com/uudashr/gopkgs.git
cp $GOROOT/src/github.com/uudashr $GOROOT/src/vendor/github.com/ -r
go install github.com/uudashr/gopkgs/cmd/gopkgs
mkdir -p $GOROOT/src/9fans.net
cd $GOROOT/src/9fans.net
git clone https://github.com/9fans/go.git
mkdir -p $GOROOT/src/vendor/9fans.net
cp -r $GOROOT/src/9fans.net/go $GOROOT/src/vendor/9fans.net/
mkdir -p $GOROOT/src/github.com/rogpeppe
cd $GOROOT/src/github.com/rogpeppe
git clone https://github.com/rogpeppe/godef.git
cp $GOROOT/src/github.com/rogpeppe $GOROOT/src/vendor/github.com/ -r
go install github.com/rogpeppe/godef
mkdir $GOROOT/src/github.com/lukehoban/
cd $GOROOT/src/github.com/lukehoban/
git clone https://github.com/lukehoban/go-outline.git
go install github.com/lukehoban/go-outline
mkdir -p $GOROOT/src/github.com/golang
cd $GOROOT/src/github.com/golang
git clone https://github.com/golang/lint.git
mkdir $GOROOT/src/vendor/github.com/golang
cp -r $GOROOT/src/github.com/golang/lint $GOROOT/src/vendor/github.com/golang
cp -r $GOROOT/src/github.com/golang/lint $GOROOT/src/golang.org/x
cp -r $GOROOT/src/github.com/golang/lint $GOROOT/src/vendor/golang.org/x
go install github.com/golang/lint/golint
mkdir -p $GOROOT/src/github.com/lukehoban
cd $GOROOT/src/github.com/lukehoban
git clone https://github.com/lukehoban/go-find-references.git
git clone https://github.com/lukehoban/ident.git
go install github.com/lukehoban/go-find-references
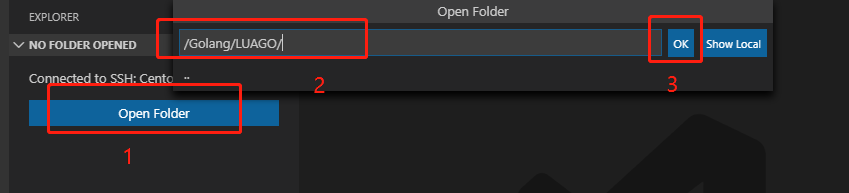
5.在vscode中打开远程服务器中的Go项目目录
6.运行项目代码
首先:点击Terminal ,点击New Terminal
然后:切换到要运行的代码目录
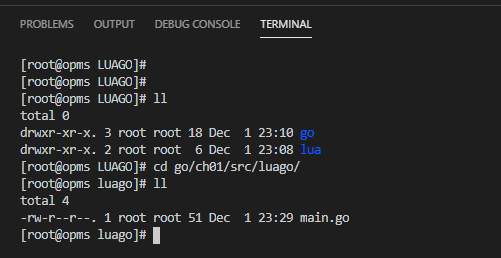
最后:使用go run运行代码

7.关掉golint对变量风格的提示
点击左下角的齿轮图标,点击Settings,点击任意一个Edit in settings.json就可以打开settings.json配置文件了,在开头加上:
"go.lintFlags": ["--disable=varcheck"],
如下图即可关闭掉变量下的波浪线提示:
