1、nova相关操作命令
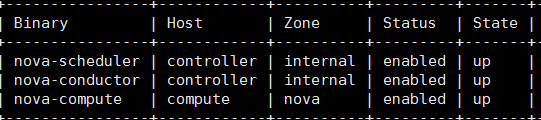
# openstack compute service list
# nova service-list 查看nova服务的状态 (输出内容与上一条指令基本一致)
# nova hypervisor-list 查看计算节点是否存活

# nova list --all-t | grep Shutdown 列出关机的虚拟机
# nova list 查看当前节点的虚机 (# openstack server list)
2、版本相关命令
# openstack --version
openstack 3.18.1
# nova-manage version
19.1.0-1.el7 (19为s版)
3、租户、用户、角色操作命令
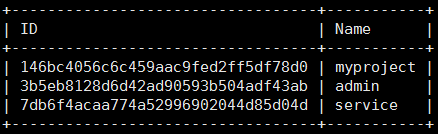
# openstack project list # 项目列表
(一个租户tenant就是一个项目。在创建一个用户时必须首先为该用户分配一个租户,否则将无法创建此用户,所以首先要创建租户。)
#openstack project create --description 'demo project ' demo #创建项目
#openstack project set ID --disable/enable/ #设置项目id禁用或开机自启
#openstack project delete ID #删除项目
# openstack user list # 用户列表
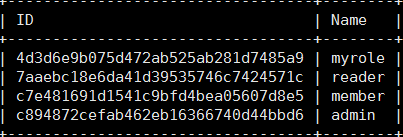
#openstack role list # 角色列表
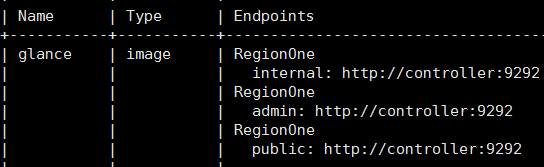
# openstack catalog list 列出各个组件的endpoint的三个url
3、glance 相关命令
# openstack image list 列出镜像

# openstack image show centos77 描述一个指定的镜像
# openstack image delete IMAGE 删除
# openstack image set IMAGE 更新镜像
# openstack image create "cirros-threepart-kernel" --disk-format aki --container-format aki --public --file ~/images/cirros-0.3.5-x86_64-kernel 上传内核镜像
#openstack image create "cirros-threepart-ramdisk" --disk-format ari --container-format ari --public --file ~/images/cirros-0.3.5-x86_64-initramfs 上传RAM镜像
# openstack image create "cirros-threepart" --disk-format ami --container-format ami --public --property kernel_id=$KID-property ramdisk_id=$RID --file ~/images/cirros-0.3.5-x86_64-rootfs.img 上传第三方镜像
# openstack image create "ubantu" --file bionic-server-cloudimg-amd64.img --disk-format qcow2 --container-format bare --public 测试通过
# glance image-create --name "centos7.8" --file CentOS-7-x86_64-GenericCloud-1811.qcow2 --disk-format qcow2 --container-format bare --visibility public --progress 显示进度
#openstack image create "cirros-raw" --disk-format raw --container-format bare --public --file ~/images/cirros-0.3.5-x86_64-disk.img 注册raw镜像
4、neutron网络相关


# openstack port list 查看端口情况

5、消息队列命令
6、cinder 相关命令
7、登录dashboard
http://controll  ip/dashboard/project/
用户和密码在 admin-openrc 中可以查看
8、定制化脚本修改镜像初始密码
#!/bin/sh
passwd ubuntu<<EOF
1234##
1234##
EOF
sed -i 's/PasswordAuthentication no/PasswordAuthentication yes/g' /etc/ssh/sshd_config
service sshd restart