IP地址和端口号
端口号是用两个字节(16位的二进制数)表示的,它的取值范围是0~65535,其中,0~1023之间的端口号用于一些知名的网络服务和应用,
用户的普通应用程序需要使用1024以上的端口号,从而避免端口号被另外一个应用或服务所占用。
InetAddress
常用方法
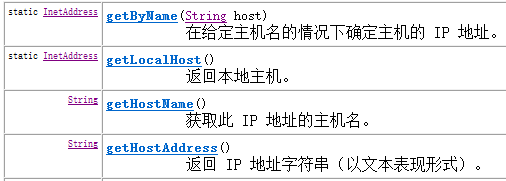
代码演示:
1     public static void main(String[] args) throws UnknownHostException {
2         //InetAddress inet=InetAddress.getLocalHost();
3         //主机名+ip地址
4         InetAddress inet=InetAddress.getByName("DESKTOP-KCD8G34");
5         System.out.println(inet);
6         String host=inet.getHostName();
7         String ip=inet.getHostAddress();
8         System.out.println(host+"..."+ip);
9     }
UDP通信
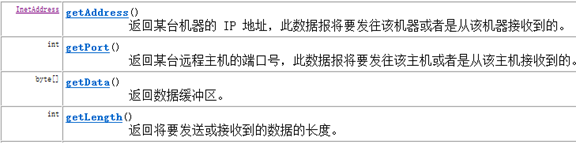
DatagramPacket


DatagramSocket


UDP网络程序
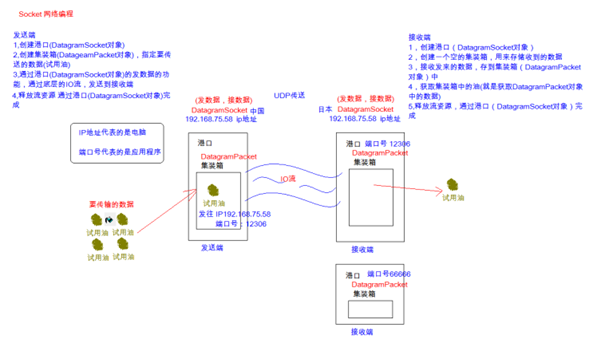
代码演示:
 1 //发送端
 2 public class UDPSend {
 3     public static void main(String[] args) throws IOException {
 4         //1.打包
 5         //明确数据
 6         byte[] bytes="你好吗".getBytes();
 7         //明确目的地的IP地址
 8         InetAddress inet=InetAddress.getByName("127.0.0.1");
 9         //装包
10         DatagramPacket dp=new DatagramPacket(bytes, bytes.length,inet,8888);
11         //2.创建快递公司
12         DatagramSocket ds=new DatagramSocket();
13         //3.发送
14         ds.send(dp);
15         //4.释放资源
16         ds.close();
17     }
18
19 }
 1 //接收端
 2 public class UDPReceive {
 3     public static void main(String[] args) throws IOException {
 4         //明确端口号
 5         DatagramSocket ds=new DatagramSocket(8888);
 6         //创建接收数据的字节数组
 7         byte[] bytes=new byte[1024];
 8         //创建接收的数据包
 9         DatagramPacket dp=new DatagramPacket(bytes, bytes.length);
10         //接收
11         ds.receive(dp);
12         //获取接收包上的数据
13         int length=dp.getLength();
14         String ip=dp.getAddress().getHostAddress();
15         int port=dp.getPort();
16         System.out.println("ip地址为:"+ip+"端口号为:"+port+"发送的内容为:"+new String(bytes,0,length));
17         //释放资源
18         ds.close();
19     }
20
21 }
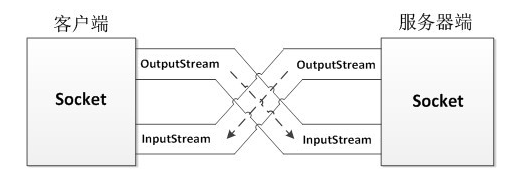
TCP通信
一个是ServerSocket类,用于表示服务器端,一个是Socket类,用于表示客户端。
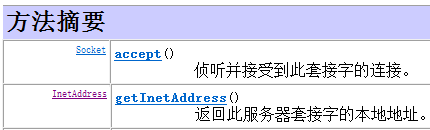
ServerSocket

Socket


|
方法声明 |
功能描述 |
|
int getPort() |
该方法返回一个int类型对象,该对象是Socket对象与服务器端连接的端口号 |
|
InetAddress getLocalAddress() |
该方法用于获取Socket对象绑定的本地IP地址,并将IP地址封装成InetAddress类型的对象返回 |
|
void close() |
该方法用于关闭Socket连接,结束本次通信。在关闭socket之前,应将与socket相关的所有的输入/输出流全部关闭,这是因为一个良好的程序应该在执行完毕时释放所有的资源 |
|
InputStream getInputStream() |
该方法返回一个InputStream类型的输入流对象,如果该对象是由服务器端的Socket返回,就用于读取客户端发送的数据,反之,用于读取服务器端发送的数据 |
|
OutputStream getOutputStream() |
该方法返回一个OutputStream类型的输出流对象,如果该对象是由服务器端的Socket返回,就用于向客户端发送数据,反之,用于向服务器端发送数据 |
图解:
代码演示:
 1 //发送端
 2 public class UDPSend {
 3     public static void main(String[] args) throws IOException {
 4         //1.打包
 5         //明确数据
 6         Scanner sc=new Scanner(System.in);
 7         //明确目的地的IP地址
 8         InetAddress inet=InetAddress.getByName("192.168.1.171");
 9         //2.创建快递公司
10         DatagramSocket ds=new DatagramSocket();
11         while(true){
12             String mes=sc.next();
13             byte[] bytes=mes.getBytes();
14             //装包
15             DatagramPacket dp=new DatagramPacket(bytes, bytes.length,inet,6666);
16             //3.发送
17             ds.send(dp);
18         }
19         //4.释放资源
20         //ds.close();
21
22     }
 1 //接收端
 2 public class UDPReceive {
 3     public static void main(String[] args) throws IOException {
 4         //明确端口号
 5         DatagramSocket ds=new DatagramSocket(8888);
 6         //创建接收数据的字节数组
 7         byte[] bytes=new byte[1024];
 8         //创建接收的数据包
 9         while(true){
10             DatagramPacket dp=new DatagramPacket(bytes, bytes.length);
11             //接收
12             ds.receive(dp);
13             //获取接收包上的数据
14             int length=dp.getLength();//明确发送的字节长度
15             String ip=dp.getAddress().getHostAddress();
16             int port=dp.getPort();
17             System.out.println("ip地址为:"+ip+"端口号为:"+port+"发送的内容为:"
18                                             +new String(bytes,0,length));
19         }
20 }
 1 //服务器端
 2 public class TCPServer {
 3     public static void main(String[] args) throws IOException {
 4         //创建服务器套接字
 5         ServerSocket server=new ServerSocket(7777);
 6         //调用accept方法与客户端创建链接
 7         Socket socket=server.accept();
 8         InputStream in=socket.getInputStream();
 9         byte[] bytes=new byte[1024];
10         int len=in.read(bytes);
11         System.out.println(new String(bytes,0,len));
12         //服务器给客户端回复
13         OutputStream out=socket.getOutputStream();
14         out.write("收到!over!".getBytes());
15
16         server.close();
17     }
 1 //客户端
 2 public class TCPCLient {
 3     public static void main(String[] args) throws IOException {
 4         //1.创建Socket对象,连接服务器
 5         Socket socket=new Socket("127.0.0.1",7777);
 6         //2.通过客户端套接字对象Socket对象中的获取字节输出流的方法
 7         OutputStream out=socket.getOutputStream();
 8         //3.将数据写向服务器
 9         out.write("服务器你好".getBytes());
10         //接收服务器端的回复
11         InputStream in=socket.getInputStream();
12         byte[] bytes=new byte[1024];
13         int len=in.read(bytes);
14         System.out.println(new String(bytes, 0, len));
15         //释放资源
16         socket.close();
17     }
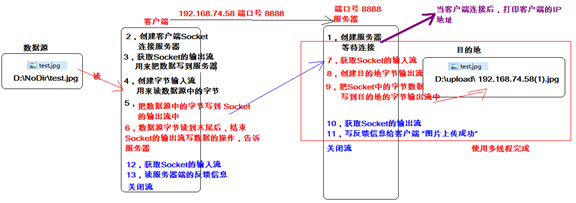
文件上传案例

代码演示:
 1 public class TCPServer {
 2     public static void main(String[] args) throws IOException {
 3         ServerSocket server=new ServerSocket(5555);
 4         Socket socket=server.accept();
 5         //明确数据源
 6         InputStream in=socket.getInputStream();
 7         //明确目的地
 8         File file=new File("x:\upload");
 9         if(!file.exists()){
10             file.mkdirs();
11         }
12         //域名+毫秒值
13         String filename="oracle"+System.currentTimeMillis()+".jpg";
14         FileOutputStream fos=new FileOutputStream(file+File.separator+filename);
15         //复制
16         int len=0;
17         byte[] bytes=new  byte[1024];
18         while((len=in.read(bytes))!=-1){
19             fos.write(bytes,0,len);
20         }
21
22         //回复客户端
23         OutputStream out=socket.getOutputStream();
24         out.write("上传成功!".getBytes());
25         //释放资源
26         server.close();
27         fos.close();
28     }
29 }
 1 public class TCPClinet {
 2     public static void main(String[] args) throws IOException {
 3         Socket socket=new Socket("192.168.1.171",7000);
 4         OutputStream out=socket.getOutputStream();
 5         //明确数据源
 6         FileInputStream fis=new FileInputStream("x:\test\img1.jpg");
 7         int len=0;
 8         byte[] bytes=new byte[1024];
 9         //文件复制
10         while((len=fis.read(bytes))!=-1){
11             out.write(bytes,0,len);
12         }
13         //告诉服务器端不要在读了到末尾了
14         socket.shutdownOutput();
15         //服务器端回复
16         InputStream in=socket.getInputStream();
17         len=in.read(bytes);
18         System.out.println(new String(bytes, 0, len));
19         //释放资源
20         fis.close();
21         socket.close();
22     }
23
24 }
文件上传案例多线程版本
代码演示:
1 public class Demo {
2     public static void main(String[] args) throws IOException {
3         ServerSocket server=new ServerSocket(6000);
4         while(true){
5             Socket socket=server.accept();
6             new Thread(new Upload(socket)).start();
7         }
8     }
9 }
 1 public class Upload implements Runnable{
 2     private Socket socket;
 3     public Upload(Socket socket){
 4         this.socket=socket;
 5     }
 6     public void run() {
 7         //明确数据源
 8         FileOutputStream fos=null;
 9         try {
10             InputStream in= socket.getInputStream();
11             //明确目的地
12             File file=new File("x:\upload");
13             if(!file.exists()){
14                 file.mkdirs();
15             }
16             //域名+毫秒值
17             String filename="oracle"+System.currentTimeMillis()+".jpg";
18             fos=new FileOutputStream(file+File.separator+filename);
19             //复制
20             int len=0;
21             byte[] bytes=new  byte[1024];
22             while((len=in.read(bytes))!=-1){
23                 fos.write(bytes,0,len);
24             }
25             //回复客户端
26             OutputStream out=socket.getOutputStream();
27             out.write("上传成功!".getBytes());
28         } catch (IOException e) {
29             e.printStackTrace();
30         }finally{
31             //释放资源
32             try {
33                 fos.close();
34             } catch (IOException e) {
35                 e.printStackTrace();
36             }
37         }
38     }
39 }