1.注解的概念
注解是一种能被添加到java代码中的元数据,类、方法、变量、参数和包都可以用注解来修饰。用来定义一个类、属性或一些方法,以便程序能被捕译处理。 相当于一个说明文件,告诉应用程序某个被注解的类或属性是什么,要怎么处理。注解对于它所修饰的代码并没有直接的影响。
2.注解的使用范围
1)为编译器提供信息:注解能被编译器检测到错误或抑制警告。
2)编译时和部署时的处理: 软件工具能处理注解信息从而生成代码,XML文件等等。
3)运行时的处理:有些注解在运行时能被检测到。
3.自定义注解的步骤
第一步:定义注解
第二步:配置注解
第三步:解析注解
4.注解的基本语法
4.1最基本的注解定义
package com.example.demo.config;

public @interface MyAnnotation {
    public String name();
    int age();
    String sex() default "女";
}
在自定义注解中,其实现部分只能定义注解类型元素!
说明:
a.访问修饰符必须为public,不写默认为public;
b.该元素的类型只能是基本数据类型、String、Class、枚举类型、注解类型以及一维数组;
c.该元素的名称一般定义为名词,如果注解中只有一个元素,名字起为value最好;
d.()不是定义方法参数的地方,也不能在括号中定义任何参数,仅仅只是一个特殊的语法;
e.default代表默认值,值必须定义的类型一致;
f.如果没有默认值,代表后续使用注解时必须给该类型元素赋值。
4.2常用的元注解
元注解:专门修饰注解的注解。
4.2.1@Target
@Target是专门用来限定某个自定义注解能够被应用在哪些Java元素上面的。其注解的源码如下:
@Documented
@Retention(RetentionPolicy.RUNTIME)
@Target(ElementType.ANNOTATION_TYPE)
public @interface Target {
    /**
     * Returns an array of the kinds of elements an annotation type
     * can be applied to.
     * @return an array of the kinds of elements an annotation type
     * can be applied to
     */
    ElementType[] value();
}
从源码可以看出它使用一个枚举类型元素,接下来看这个枚举类型的源码:
public enum ElementType {
    /** Class, interface (including annotation type), or enum declaration */
    TYPE,

    /** Field declaration (includes enum constants) */
    FIELD,

    /** Method declaration */
    METHOD,

    /** Formal parameter declaration */
    PARAMETER,

    /** Constructor declaration */
    CONSTRUCTOR,

    /** Local variable declaration */
    LOCAL_VARIABLE,

    /** Annotation type declaration */
    ANNOTATION_TYPE,

    /** Package declaration */
    PACKAGE,

    /**
     * Type parameter declaration
     *
     * @since 1.8
     */
    TYPE_PARAMETER,

    /**
     * Use of a type
     *
     * @since 1.8
     */
    TYPE_USE
}
因此,我们可以在使用@Target时指定注解的使用范围,示例如下:
//@MyAnnotation被限定只能使用在类、接口或方法上面
@Target(value = {ElementType.METHOD,ElementType.TYPE})
public @interface MyAnnotation {
    public String name();
    int age();
    String sex() default "女";
}
4.2.2@Retention
@Retention注解,用来修饰自定义注解的生命力。
a.如果一个注解被定义为RetentionPolicy.SOURCE,则它将被限定在Java源文件中,那么这个注解即不会参与编译也不会在运行期起任何作用,这个注解就和一个注释是一样的效果,只能被阅读Java文件的人看到;
b.如果一个注解被定义为RetentionPolicy.CLASS,则它将被编译到Class文件中,那么编译器可以在编译时根据注解做一些处理动作,但是运行时JVM(Java虚拟机)会忽略它,我们在运行期也不能读取到,是默认的;
c.如果一个注解被定义为RetentionPolicy.RUNTIME,那么这个注解可以在运行期的加载阶段被加载到Class对象中。那么在程序运行阶段,我们可以通过反射得到这个注解,并通过判断是否有这个注解或这个注解中属性的值,从而执行不同的程序代码段。我们实际开发中的自定义注解几乎都是使用的RetentionPolicy.RUNTIME。
@Retention注解源码如下:
@Documented
@Retention(RetentionPolicy.RUNTIME)
@Target(ElementType.ANNOTATION_TYPE)
public @interface Retention {
    /**
     * Returns the retention policy.
     * @return the retention policy
     */
    RetentionPolicy value();
}
里面也是一个枚举类型元素,其源码如下:
public enum RetentionPolicy {
    /**
     * Annotations are to be discarded by the compiler.
     */
    SOURCE,

    /**
     * Annotations are to be recorded in the class file by the compiler
     * but need not be retained by the VM at run time.  This is the default
     * behavior.
     */
    CLASS,

    /**
     * Annotations are to be recorded in the class file by the compiler and
     * retained by the VM at run time, so they may be read reflectively.
     *
     * @see java.lang.reflect.AnnotatedElement
     */
    RUNTIME
}
使用此注解修饰自定义注解生命力的示例如下:
//设置注解的生命力在运行期
@Retention(RetentionPolicy.RUNTIME)
public @interface MyAnnotation {
    public String name();
    int age();
    String sex() default "女";
}
4.2.3@Documented
@Documented注解,是被用来指定自定义注解是否能随着被定义的java文件生成到JavaDoc文档当中。源码如下:
@Documented
@Retention(RetentionPolicy.RUNTIME)
@Target(ElementType.ANNOTATION_TYPE)
public @interface Documented {
}
4.2.4@Inherited
@Inherited注解,是指定某个自定义注解如果写在了父类的声明部分,那么子类(继承关系)的声明部分也能自动拥有该注解。该注解只对@Target被定义为ElementType.TYPE的自定义注解起作用。
5.自定义注解举例
第一步:自定义的注解如下
package com.example.demo.config;

import java.lang.annotation.*;

@Target(value={ElementType.METHOD})
@Retention(RetentionPolicy.RUNTIME)
@Documented
public @interface MyAnnotation {
    public String name();
    int age();
    String sex() default "女";
    String[] hobby();
}
第二步:创建一个类,新建方法使用该注解
package com.example.demo.controller;

import com.example.demo.config.MyAnnotation;

public class UserController {

    @MyAnnotation(name = "张三",age = 18,hobby = {"跑步,打游戏"})
    public String get(){
        return "Hello Annotation";
    }
}
第三步:利用反射获取注解。创建一个类,代码如下:
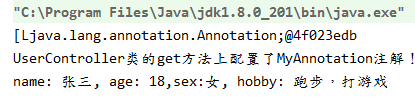
package com.example.demo.test;

import com.example.demo.config.MyAnnotation;

import java.lang.annotation.Annotation;
import java.lang.reflect.Method;

public class Test {
    public static void main(String[] args) {
        try {
            //获取Class对象
            Class mylass = Class.forName("com.example.demo.controller.UserController");
            //获得该对象身上配置的所有的注解
            Annotation[] annotations = mylass.getAnnotations();
            System.out.println(annotations.toString());
            //获取里面的一个方法
            Method method = mylass.getMethod("get");
            //判断该元素上是否配置有某个指定的注解
            if(method.isAnnotationPresent(MyAnnotation.class)){
                System.out.println("UserController类的get方法上配置了MyAnnotation注解!");
                //获取该元素上指定类型的注解
                MyAnnotation myAnnotation = method.getAnnotation(MyAnnotation.class);
                System.out.println("name: " + myAnnotation.name() + ", age: " + myAnnotation.age()
                        + ",sex:"+myAnnotation.sex()+", hobby: " + myAnnotation.hobby()[0]);
            }else{
                System.out.println("UserController类的get方法上没有配置MyAnnotation注解!");
            }
        } catch (Exception e) {
            e.printStackTrace();
        }

    }
}
打印结果如下:
如果要获得的注解是配置在方法上的,从Method对象上获取;如果是配置在属性上,就需要从该属性对应的Field对象上去获取,如果是配置在类型上,需要从Class对象上去获取。
6.注解的特殊语法
特殊的语法是基于5的,这里就直接讲述特殊的定义和使用。
1)如果注解没有注解类型元素,那么在使用注解时可省略(),直接写为:@注解名。
定义如下:
@Target(value={ElementType.METHOD})
@Retention(RetentionPolicy.RUNTIME)
@Documented
public @interface MyAnnotation {
}
使用如下:
public class UserController {

    @MyAnnotation
    public String get(){
        return "Hello Annotation";
    }
}
2)如果注解只有一个注解类型元素,且命名为value,那么在使用注解时可直接写为:@注解名(注解值)。
定义如下:
@Target(value={ElementType.METHOD})
@Retention(RetentionPolicy.RUNTIME)
@Documented
public @interface MyAnnotation {
    String value();
}
使用如下:
public class UserController {

    @MyAnnotation("hello")
    public String get(){
        return "Hello Annotation";
    }
}
3)如果注解中的某个注解类型元素是一个数组类型,在使用时又出现只需要填入一个值的情况,那么在使用注解时可直接写为:@注解名(类型名 = 类型值),和标准的@注解名(类型名 = {类型值})等效!
定义如下:
@Target(value={ElementType.METHOD})
@Retention(RetentionPolicy.RUNTIME)
@Documented
public @interface MyAnnotation {
    String[] arr();
}
使用如下:
public class UserController {

    @MyAnnotation(arr = "hello")
    public String get(){
        return "Hello Annotation";
    }
}
4)如果注解的@Target定义为Element.PACKAGE,那么这个注解是配置在package-info.java中的,而不能直接在某个类的package代码上面配置。
7.在项目中使用自定义的注解
源代码:https://github.com/zhongyushi-git/annotation-demo.git
7.1环境搭建
1)新建一个SpringBoot的项目,导入jar座标
 <dependency>
            <groupId>org.springframework.boot</groupId>
            <artifactId>spring-boot-starter-web</artifactId>
        </dependency>
        <dependency>
            <groupId>org.springframework.boot</groupId>
            <artifactId>spring-boot-starter-aop</artifactId>
        </dependency>
        <dependency>
            <groupId>org.mybatis.spring.boot</groupId>
            <artifactId>mybatis-spring-boot-starter</artifactId>
            <version>1.3.2</version>
        </dependency>
        <dependency>
            <groupId>org.springframework.boot</groupId>
            <artifactId>spring-boot-starter-jdbc</artifactId>
        </dependency>
        <dependency>
            <groupId>mysql</groupId>
            <artifactId>mysql-connector-java</artifactId>
            <scope>runtime</scope>
        </dependency>
        <dependency>
            <groupId>com.alibaba</groupId>
            <artifactId>druid</artifactId>
            <version>1.1.9</version>
        </dependency>
        <dependency>
            <groupId>org.projectlombok</groupId>
            <artifactId>lombok</artifactId>
            <version>1.18.8</version>
        </dependency>
2)配置application.yml
#数据源配置
spring:
  datasource:
    #使用阿里巴巴的druid
    type: com.alibaba.druid.pool.DruidDataSource
    #配置数据库的路径和用户名密码
    url: jdbc:mysql://127.0.0.1:3306/annotation?useUnicode=true&characterEncoding=UTF-8&serverTimezone=CTT&zeroDateTimeBehavior=convertToNull&useSSL=false&allowMultiQueries=true
    username: root
    password: 123456


mybatis:
  mapperLocations: classpath*:mapper/*Mapper.xml

#开启日志打印
logging:
  level:
    com.zys.training: debug
3)执行sql脚本
create database annotation;
use annotation;
CREATE TABLE `systemlog`  (
  `id` varchar(200) CHARACTER SET utf8 COLLATE utf8_general_ci NOT NULL COMMENT '日志主键',
  `title` varchar(200) CHARACTER SET utf8 COLLATE utf8_general_ci NULL DEFAULT NULL COMMENT '标题',
  `describe` varchar(200) CHARACTER SET utf8 COLLATE utf8_general_ci NULL DEFAULT NULL COMMENT '模块描述',
  `create_time` datetime NULL DEFAULT NULL COMMENT '记录时间',
  `method` varchar(200) CHARACTER SET utf8 COLLATE utf8_general_ci NULL DEFAULT NULL COMMENT '调用方法',
  `error` longtext CHARACTER SET utf8 COLLATE utf8_general_ci NULL COMMENT '错误信息',
  PRIMARY KEY (`id`) USING BTREE
) ENGINE = InnoDB CHARACTER SET = utf8 COLLATE = utf8_general_ci ROW_FORMAT = Compact;
7.2创建日志的MVC
1)创建日志类
package com.zys.springboot.annotationdemo.entity;


import lombok.Getter;
import lombok.Setter;
import lombok.ToString;

import java.util.Date;

@Getter
@Setter
@ToString
public class SystemLog {
    private String id;
    private String title;
    private String describe;
    private Date create_time;
    private String method;
    private String error;
}
2)创建service
package com.zys.springboot.annotationdemo.service;

import com.zys.springboot.annotationdemo.entity.SystemLog;

public interface SystemLogService {
    int createLog(SystemLog log);
}
3)创建impl
package com.zys.springboot.annotationdemo.service.impl;

import com.zys.springboot.annotationdemo.dao.SystemLogDao;
import com.zys.springboot.annotationdemo.entity.SystemLog;
import com.zys.springboot.annotationdemo.service.SystemLogService;
import org.springframework.beans.factory.annotation.Autowired;
import org.springframework.stereotype.Service;

@Service
public class SystemLogServiceImpl implements SystemLogService {
    @Autowired
    private SystemLogDao systemLogDao;
    @Override
    public int createLog(SystemLog log) {
        return systemLogDao.createLog(log);
    }
}
4)创建dao
package com.zys.springboot.annotationdemo.dao;

import com.zys.springboot.annotationdemo.entity.SystemLog;
import org.apache.ibatis.annotations.Mapper;

@Mapper
public interface SystemLogDao {
    int createLog(SystemLog log);
}
5)创建mapper
在resources目录下新建mapper目录,然后创建文件SystemLogMapper.xml
<?xml version="1.0" encoding="uTF-8" ?>
<!DOCTYPE mapper PUBLIC "-//mybatis.org//DTD Mapper 3.0//EN"
        "http://mybatis.org/dtd/mybatis-3-mapper.dtd">
<mapper namespace="com.zys.springboot.annotationdemo.dao.SystemLogDao">
    <!--插入系统日志-->
    <insert id="createLog" parameterType="com.zys.springboot.annotationdemo.entity.SystemLog">
        insert into systemLog values(#{id},#{title},#{describe},sysdate(),#{method},#{error})
    </insert>

</mapper>
7.3自定义注解
1)创建注解
package com.zys.springboot.annotationdemo.config;

import java.lang.annotation.*;

/**
 * 自定义日志注解
 */

@Target(ElementType.METHOD)
@Retention(RetentionPolicy.RUNTIME)
@Documented
public @interface Log {
    String title() default "";//模块名称
    String describe() default "";//描述
}
2)创建aop切面
package com.zys.springboot.annotationdemo.config;

import com.zys.springboot.annotationdemo.entity.SystemLog;
import com.zys.springboot.annotationdemo.service.SystemLogService;
import org.aspectj.lang.JoinPoint;
import org.aspectj.lang.Signature;
import org.aspectj.lang.annotation.AfterReturning;
import org.aspectj.lang.annotation.AfterThrowing;
import org.aspectj.lang.annotation.Aspect;
import org.aspectj.lang.annotation.Pointcut;
import org.aspectj.lang.reflect.MethodSignature;
import org.slf4j.Logger;
import org.slf4j.LoggerFactory;
import org.springframework.beans.factory.annotation.Autowired;
import org.springframework.stereotype.Component;

import java.lang.reflect.Method;
import java.util.UUID;

@Aspect
@Component("logAspect")
public class LogAspect {
    @Autowired
    private SystemLogService logService;

    private static final Logger log = LoggerFactory.getLogger(LogAspect.class);

    // 配置织入点
    @Pointcut("@annotation(com.zys.springboot.annotationdemo.config.Log)")
    public void logPointCut() {
    }

    /**
     * 前置通知 用于拦截操作,在方法返回后执行
     *
     * @param joinPoint 切点
     */
    @AfterReturning(pointcut = "logPointCut()")
    public void doBefore(JoinPoint joinPoint) {
        handleLog(joinPoint, null);
    }

    /**
     * 拦截异常操作,有异常时执行
     *
     * @param joinPoint
     * @param e
     */
    @AfterThrowing(value = "logPointCut()", throwing = "e")
    public void doAfter(JoinPoint joinPoint, Exception e) {
        handleLog(joinPoint, e);
    }

    private void handleLog(JoinPoint joinPoint, Exception e) {
        MethodSignature signature = (MethodSignature) joinPoint.getSignature();
        SystemLog systemLog = new SystemLog();
        //获取方法名
        String functionName = signature.getDeclaringTypeName() + "." + signature.getName() + "()";
        //获取注解对象
        Log annotation = signature.getMethod().getAnnotation(Log.class);
        if (annotation != null) {
            systemLog.setId(UUID.randomUUID().toString().replace("-", ""));
            systemLog.setMethod(functionName);
            //获取注解中对方法的描述信息
            systemLog.setTitle(annotation.title());
            systemLog.setDescribe(annotation.describe());
            if (e != null) {
                String err = e.getMessage();
                if (err != null && err.length() > 4000) {
                    err = err.substring(0, 4000);
                }
                systemLog.setError(err);
            }
        }
        //记录到数据库
        logService.createLog(systemLog);
    }

    /**
     * 是否存在注解,如果存在就获取
     */
    private static Log getAnnotationLog(JoinPoint joinPoint) throws Exception {
        Signature signature = joinPoint.getSignature();
        MethodSignature methodSignature = (MethodSignature) signature;
        Method method = methodSignature.getMethod();
        if (method != null) {
            return method.getAnnotation(Log.class);
        }
        return null;
    }

}
7.4创建测试接口
在controller包下创建UserController类,用于测试注解。
package com.zys.springboot.annotationdemo.controller;

import com.zys.springboot.annotationdemo.config.Log;
import org.springframework.web.bind.annotation.GetMapping;
import org.springframework.web.bind.annotation.RestController;

@RestController
public class UserController {

    //使用日志注解
    @Log(title = "用户模块",describe = "获取用户列表")
    @GetMapping("/get")
    public String get(){
        return "Hello word!";
    }

    @Log(title = "用户模块",describe = "测试接口")
    @GetMapping("/test")
    public String test(){
        return "Hello Test!";
    }

}
7.5测试
启动项目,访问http://localhost:8080/get,然后查询数据库,发现日志已经记录了,如下图,同理访问http://localhost:8080/test。
