http://blog.csdn.net/p106786860/article/details/54566620
一、树莓派3简介
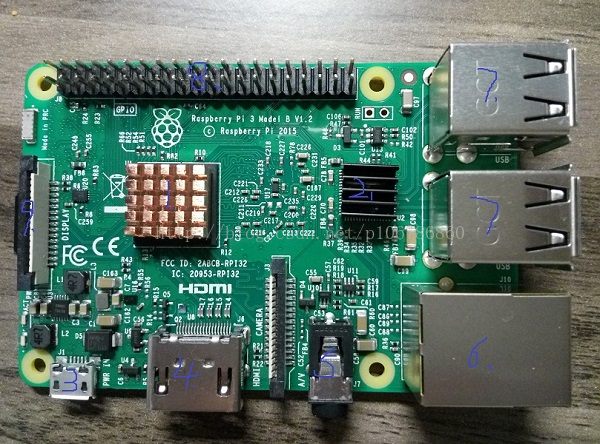
官方推荐的开发板有Intel Edison、NXP Pico i.MX6UL和Raspberry Pi 3(树莓派3)。树莓派是世界上最流行的单板计算机,3 Model B是最新的版本,我们后面就使用它给大家介绍Android Things。它提供了如下配置:
1.一个双核64位ARM Cortext-A53 1.2GHz CPU(512M的内存,在背面);
2.400 MHz GPU;
3.电源接口;
4.HDMI和DSI视频接口;
5.音频接口;
6.有线、无线网络和蓝牙4.1模块;
7.4个USB 2.0接口;
8.40-针GPIO连接器用于连接外设;
9.SD卡存储(在侧边);
二、系统安装
1.准备你的硬件设备,如:1-树莓派3开发板,2-电源线,3-HDMI转接线(连接显示器),4-SD卡等和5-网线;
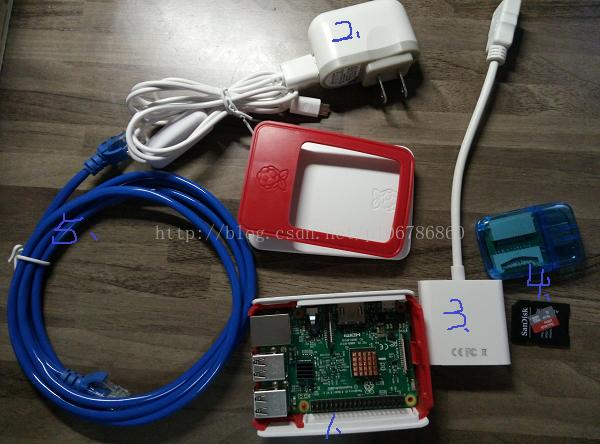
广告时间咯:经过我们小伙伴的不懈努力和精心筹备,容重推出了我们的首款产品树莓派套装—专为Android Things打造(链接可以直接点击进入噢)。
2.在你的电脑上插入8G或者更大的SD卡;3.下载你的开发板(以树莓派3为例)对应的系统镜像(https://developer.android.com/things/preview/download.html),并解压img文件;
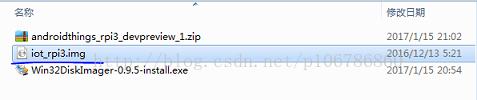
4.下载你使用的操作系统对应的(以Windows7为例)Win32DiskImager,并安装(https://sourceforge.net/projects/win32diskimager/);
5.以管理员用户启动Win32DiskImager,选择解压的ImageFile,选择插入的SD卡磁盘,点击Write等待写入完毕;
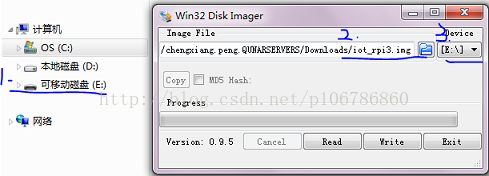
注意:千万小心!!如果选择的磁盘不是SD卡,会损坏该磁盘中的数据;
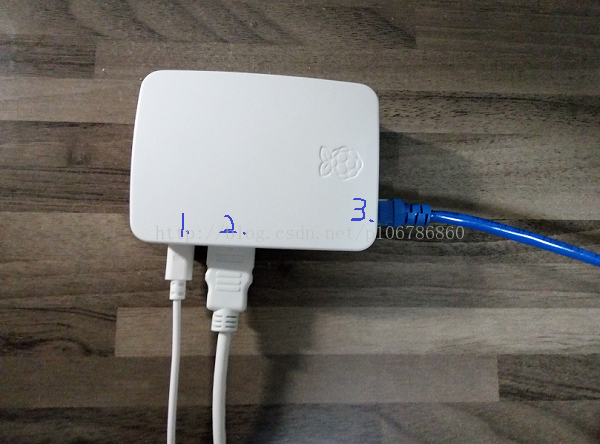
6.将你的SD卡插入到开发板中,连接开发板的1-电源、2-HDMI转接线和3-网线;
7.打开电源,显示器就会输出相关启动信息,启动成功后显示如下;

8.使用adb tools通过ip(通过路由器可查看)连接开发板安装的Androoid Things系统(显示WiFi和网络连接ip);
- C:Userschengxiang.peng.QUNARSERVERS>adb connect 192.168.1.101:5555
- connected to 192.168.1.101:5555
- C:Userschengxiang.peng.QUNARSERVERS>adb devices
- List of devices attached
- 192.168.1.101:5555 device
官方强烈建议我们连接网络,这会使得你的设备上传崩溃报告和获取更新。下面我们就看看如何使用Wi-Fi进行连接;
1.发送一个Intent给Wi-Fi Service来连接Wi-Fi;
- C:Userschengxiang.peng.QUNARSERVERS>adb shell am startservice -n com.google.wifisetup/.WifiSetupService -a WifiSetupService.Connect -e ssid MERCURY_5CD00C-e passphrase 30x30x30xx
- Starting service: Intent { act=WifiSetupService.Connect cmp=com.google.wifisetup/.WifiSetupService (has extras) }
提示1:C:Userschengxiang.peng.QUNARSERVERS>adb shell am startservice -n com.google.wifisetup.WifiSetupService -a WifiSetupService.Connect -e ssid MERCURY_5CD00C -e p assphrase 30x30x30xx
... ...
Error: Bad component name: com.google.wifisetup.WifiSetupService
处理1:我们实践的是Windows系统,命令中的转义不能省去;
2.通过查看logcat日志确认是否连接成功(你也可以通过显示器查看WiFi信息是否连接成功 );
- C:Userschengxiang.peng.QUNARSERVERS>adb logcat | findstr "Wifi"
- ... ...
- //网络连接成功
- 01-01 00:13:56.412 1254 1254 V WifiWatcher: Network state changed to CONNECTED
- 01-01 00:13:56.414 1254 1254 V WifiWatcher: SSID changed: "MERCURY_5CD00C"
- 01-01 00:13:56.415 1254 1270 I WifiConfigurator: Successfully connected to MERCURY_5CD00C
- 01-01 00:13:56.484 408 456 D WifiNetworkAgent: NetworkAgent: Received signal strength thresholds: []
- .... ...
- //保存连接历史,下次启动自动连接
- 01-01 00:14:08.190 408 1299 D WifiNetworkHistory: saving network history: "MERCURY_5CD00C"WPA_PSK gw: 00:25:86:5c:d0:0c Network Selection-status: NETWORK_SELECTION_ENABLED ephemeral=false choice:null link:0 status:2 nid:0 hasEverConnected: true
- 01-01 00:14:08.190 408 1299 V WifiNetworkHistory: writeKnownNetworkHistory write config "MERCURY_5CD00C"WPA_PSK
- ... ...
- 0:25:86:5c:d0:0c is in blacklist.
- C:Userschengxiang.peng.QUNARSERVERS>adb shell ping www.baidu.com
- PING www.baidu.com (111.13.100.91) 56(84) bytes of data.
- 64 bytes from 111.13.100.91: icmp_seq=1 ttl=52 time=5.99 ms
- 64 bytes from 111.13.100.91: icmp_seq=2 ttl=52 time=5.72 ms
下面的引脚图,描述了树莓派3开发板提供的可用引脚的名称和位置,在后面的章节中我们会通过指定的引脚名获取对应引脚的连接: