写了连续几天的面向过程的程序, 感觉非常不爽, 到处全局的函数和变量, 暂不说程序不好维护(数据被修改), 写一点业务就被框架程序给埋没了。 我现在更关心的时我的业务,不想将我的业务逻辑与框架的代码捆到一块去, 我要面向对象,我要封装,我要把业务与框架代码隔离。
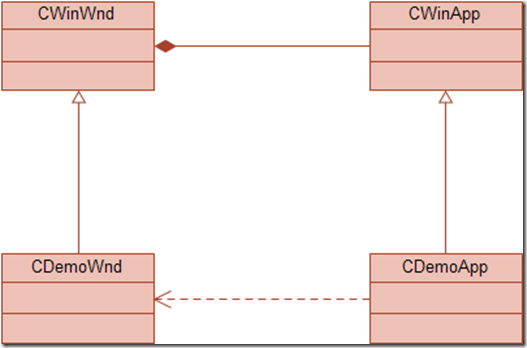
封装的结构以及使用模仿MFC风格(当然比起MFC有太多的距离),目前仅将窗体与消息循环分开,消息映射以及可能创建别的模式窗体还不支持同时也给业务隔离划的分还不够清淅,这些我将在后期的学习中不断完善,现简化版本的MFC风格,更为我自己的DUI框架做技术支撑,哦, 走题了. 我们看一下类结构图
程序结构很比较简单,我们简要的说明下: CWinWnd 与 CWinApp为实现对Win32程序结构的封装, CDemoWnd 用来处理用户UI逻辑以及业务交互,CDemoApp实现程序的入口.
1 . 先看一段入口代码
BOOL WINAPI _tWinMain(HINSTANCE hInstance, HINSTANCE hPreInstance, LPTSTR szCmdLine, INT nShowCmd)
{
CDemoApp theApp;
theApp.Run();
return TRUE;
}
{
CDemoApp theApp;
theApp.Run();
return TRUE;
}
2. Win32 程序结构封装:
CWinWnd - 将窗体有关的逻辑封装到一起
class CWinWnd
{
public:
CWinWnd(void);
virtual ~CWinWnd(void);
public:
void ShowWindow(int nShowCmd);
void CenterWindow();
void DestroyWindow();
bool IsValid();
protected:
HWND Create(const TCHAR* szWndName, DWORD dwStyle, int x, int y, int cx, int cy, HWND hParent);
LRESULT FinalWndProc(HWND hwnd, UINT nMsg, WPARAM wParam, LPARAM lParam);
private:
bool _RegisterWindowClass();
static
LRESULT CALLBACK _WndProc(HWND hwnd, UINT nMsg, WPARAM wParam, LPARAM lParam);
protected:
virtual DWORD GetClassStyle() const;
virtual const TCHAR* GetClassName() const = 0;
virtual LRESULT WndProc(HWND hWnd, UINT nMsg, WPARAM wParam, LPARAM lParam) = 0;
protected:
HINSTANCE m_hInstance;
HWND m_hWnd;
private:
TCHAR m_szClassName[MAX_PATH];
DWORD m_dwClsStyle;
};
CWinAPP – 实现消息循环以及与窗体的关联
class CWinApp
{
public:
CWinApp(void);
virtual ~CWinApp(void);
public:
void Run();
protected:
virtual bool InitInstance();
virtual void ExitInstance();
protected:
CWinWnd* m_pMainWnd;
};
{
public:
CWinApp(void);
virtual ~CWinApp(void);
public:
void Run();
protected:
virtual bool InitInstance();
virtual void ExitInstance();
protected:
CWinWnd* m_pMainWnd;
};
3. 框架类的使用
class CDemoWnd : public CWinWnd
{
public:
CDemoWnd(void);
~CDemoWnd(void);
protected:
LRESULT WndProc(HWND hWnd, UINT nMsg, WPARAM wParam, LPARAM lParam);
const TCHAR* GetClassName() const;
};
{
public:
CDemoWnd(void);
~CDemoWnd(void);
protected:
LRESULT WndProc(HWND hWnd, UINT nMsg, WPARAM wParam, LPARAM lParam);
const TCHAR* GetClassName() const;
};
class CDemoApp : public CWinApp
{
public:
CDemoApp(void);
~CDemoApp(void);
protected:
bool InitInstance();
private:
};
{
public:
CDemoApp(void);
~CDemoApp(void);
protected:
bool InitInstance();
private:
};
4. 看看消息转发核心 - 消息处理对于一个函数只有一个,但窗体有多个,如果将消息发分给可个窗体自己处理呢? 这里使用了一点小技巧:窗体过程通常用静态函数实现,而静态函数没有
this指针, 窗体创建将类对象传入,窗体过程函数在处理创建消息时读取类对象指针并设置到窗体数据中从而实现窗体与对应的类绑定。
HWND CWinWnd::Create(const TCHAR* szWndName, DWORD dwStyle, int x, int y, int cx, int cy, HWND hParent)
{
if (NULL != GetClassName() && _RegisterWindowClass())
{
m_hWnd = ::CreateWindow(GetClassName(), szWndName, dwStyle, x, y, cx, cy, hParent, NULL, m_hInstance, this);
}
return m_hWnd;
}
{
if (NULL != GetClassName() && _RegisterWindowClass())
{
m_hWnd = ::CreateWindow(GetClassName(), szWndName, dwStyle, x, y, cx, cy, hParent, NULL, m_hInstance, this);
}
return m_hWnd;
}
LRESULT CALLBACK CWinWnd::_WndProc(HWND hWnd, UINT nMsg, WPARAM wParam, LPARAM lParam)
{
CWinWnd* pThis = NULL;
if (WM_NCCREATE == nMsg)
{
CWinWnd* pThis = reinterpret_cast<CWinWnd*>(reinterpret_cast<LPCREATESTRUCT>(lParam)->lpCreateParams);
assert(NULL != pThis);
if (NULL != pThis)
{
pThis->m_hWnd = hWnd;
SetWindowLongPtr(pThis->m_hWnd, GWLP_USERDATA, reinterpret_cast<LPARAM>(pThis));
}
} else {
pThis = reinterpret_cast<CWinWnd*>(GetWindowLongPtr(hWnd, GWLP_USERDATA));
if(WM_NCDESTROY == nMsg && pThis != NULL )
{
::SetWindowLongPtr(pThis->m_hWnd, GWLP_USERDATA, 0L);
pThis->m_hWnd = NULL;
}
}
if (NULL != pThis)
{
if (pThis->WndProc(hWnd, nMsg, wParam, lParam))
{
return 1;
}
}
return ::DefWindowProc(hWnd, nMsg, wParam, lParam);
}
