Nginx是一个高性能的web服务器和反向代理服务器,也可以作为邮件代理服务器
反向代理(Reverse Proxy) 方式是指以代理服务器来接受internet上的连接请求,然后将请求转发给内部网络上的服务器,并将从服务器上得到的结果返回给internet
上请求连接的客户端,此时代理服务器对外就表现为一个反向代理服务器。
正向代理类似一个跳板机,代理访问外部资源。 比如我是一个用户,我访问不了某网站,但是我能访问一个代理服务器,这个代理服务器他能访问那个我不能访问的网站,于是
我先连上代理服务器,告诉他我需要访问那个网站的内容,代理服务器去取回来,然后返回给我。
2.Nginx是由俄罗斯人代用c 语言编写的,它的特点是占有内存少,兵法处理能力强,以高性能,低系统资源消耗而闻名,Nginx官方测试为5万并发请求。
Nginx 的并发处理能力在同类型的web 服务器中表现极好
下载安装Nginx(http://nginx.org/en/download.html)

只装Nginx
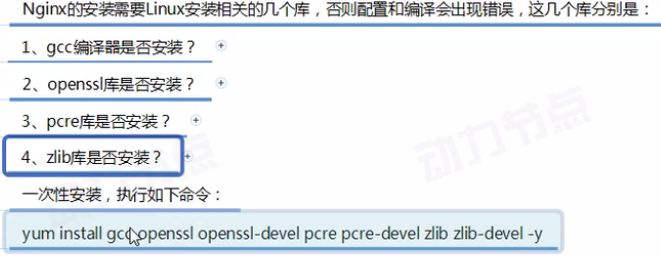
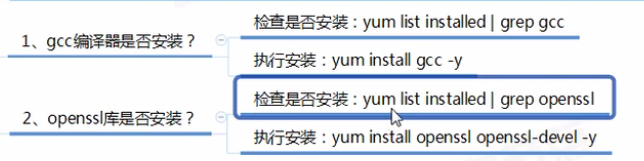
安装前准备 需要安装的库


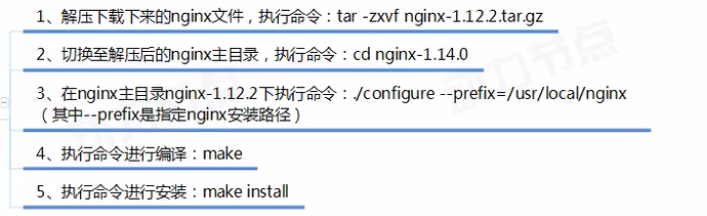
正式安装Nginx
rz :上传文件;
sz: 下载文件;
如果出现了它 -bash: rz: command not found
解决方法:
yum -y install lrzsz 进行下载安装。
此时,若当前登录的不是 root 用户 ,会报错,需要切换到 root用户,
切换到 root 用户命令: su
回车,然后输入root 密码,回车即可
使用xshell确实很方便,解决了很多的问题
[root@localhost ~]# ll
total 1716
-rw-------. 1 root root    2929 Nov 16 14:21 anaconda-ks.cfg
-rw-r--r--. 1 root root      92 Apr  8 06:21 dump.rdb
-rw-r--r--. 1 root root    2944 Nov 16 06:28 initial-setup-ks.cfg
drwxr-xr-x. 2 root root       6 Apr 20 03:34 NginxSoft
-rw-------. 1 root root    2058 Nov 16 14:21 original-ks.cfg
drwxrwxr-x. 6 root root    4096 Apr  8 06:18 redis-4.0.8
-rw-r--r--. 1 root root 1729973 Feb  2  2018 redis-4.0.8.tar.gz
-rw-r--r--. 1 root root      45 Apr 11 00:51 sentinel.cof
[root@localhost ~]# rz

[root@localhost ~]# cd NginxSoft
[root@localhost NginxSoft]# rz

[root@localhost NginxSoft]# ll
total 992
-rw-r--r--. 1 root root 1015384 Apr 20 03:12 nginx-1.14.2.tar.gz
[root@localhost NginxSoft]# tar -zxvf nginx-1.14.2.tar.gz
total 992
drwxr-xr-x. 8 zhulina zhulina 158 Dec 4 06:52 nginx-1.14.2
-rw-r--r--. 1 root root 1015384 Apr 20 03:12 nginx-1.14.2.tar.gz
解压完成
错误演示[root@localhost nginx-1.14.2]# ./configure --prefix=/usr/local/nginx //在指定文件夹下配置nginx
因为我usr写成了user所以当我执行make 时就没有执行
但是现在写对了。也能正常启动make 了。
[root@localhost ~]# cd /usr/local
[root@localhost local]# ll
total 4
drwxr-xr-x. 2 root root 4096 Apr 11 05:29 bin
drwxr-xr-x. 2 root root    6 Nov  5  2016 etc
drwxr-xr-x. 2 root root    6 Nov  5  2016 games
drwxr-xr-x. 2 root root    6 Nov  5  2016 include
drwxr-xr-x. 2 root root    6 Nov  5  2016 lib
drwxr-xr-x. 2 root root    6 Nov  5  2016 lib64
drwxr-xr-x. 2 root root    6 Nov  5  2016 libexec
drwxr-xr-x. 6 root root   54 Apr 20 05:35 nginx
drwxr-xr-x. 4 root root   28 Apr  8 05:38 redis
drwxr-xr-x. 2 root root    6 Nov  5  2016 sbin
drwxr-xr-x. 5 root root   49 Nov 16 13:53 share
drwxr-xr-x. 2 root root    6 Nov  5  2016 src
现在就已经安装好了。我现在也太喜欢Linux开发了。
启动Nginx
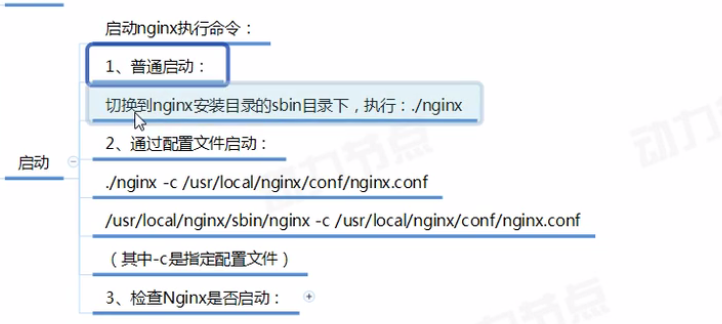
一般采用这种方式启动
/usr/local/nginx/sbin/nginx -c /usr/local/nginx/conf/nginx.conf
[root@localhost sbin]# ps -ef|grep nginx
root      11890      1  0 05:44 ?        00:00:00 nginx: master process /usr/local/nginx/sbin/nginx -c /usr/local/nginx/conf/nginx.conf
nobody    11891  11890  0 05:44 ?        00:00:00 nginx: worker process
root      11909  11732  0 05:45 pts/2    00:00:00 grep --color=auto nginx

Nginx的关闭
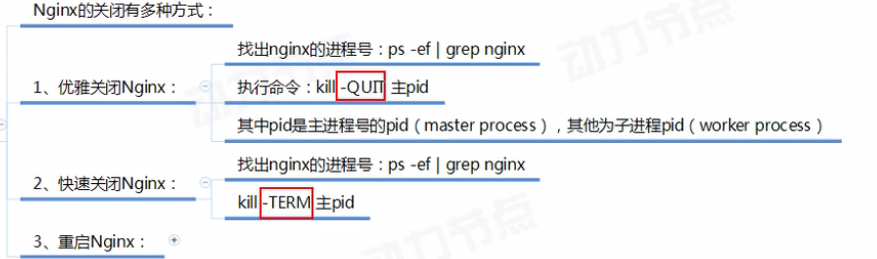
1.优雅的关闭
[root@localhost sbin]# ps -ef|grep nginx
root      11890      1  0 05:44 ?        00:00:00 nginx: master process /usr/local/nginx/sbin/nginx -c /usr/local/nginx/conf/nginx.conf
nobody    11891  11890  0 05:44 ?        00:00:00 nginx: worker process
root      11909  11732  0 05:45 pts/2    00:00:00 grep --color=auto nginx
[root@localhost sbin]# kill -QUIT 11890
[root@localhost sbin]# ps -ef|grep nginx
root      11967  11732  0 05:51 pts/2    00:00:00 grep --color=auto nginx
2.快速关闭
kill -TERM 11890
3.重启
[root@localhost sbin]# ./nginx -s reload

[root@localhost sbin]# /usr/local/nginx/sbin/nginx -c /usr/local/nginx/conf/nginx.conf -t
nginx: the configuration file /usr/local/nginx/conf/nginx.conf syntax is ok
nginx: configuration file /usr/local/nginx/conf/nginx.conf test is successful

[root@localhost sbin]# ./nginx -v
nginx version: nginx/1.14.2
[root@localhost sbin]# ./nginx -V
nginx version: nginx/1.14.2
built by gcc 4.8.5 20150623 (Red Hat 4.8.5-36) (GCC)
configure arguments: --prefix=/usr/local/nginx
配置文件的重要性 nginx,conf
这个命令是可以一行一行的查看配置文件,回车键是往下走
[root@localhost conf]# more nginx.conf
配置文件详解
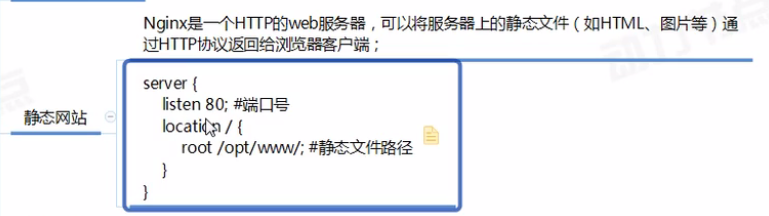
#user nobody; #配置worker 进程运行用户 worker_processes 1; #配置工作进程数目,根据硬件调整,通常等于cpu数量或者2倍于cpu数量 #error_log logs/error.log; #配置全局错误日志及类型,【debug|info|notice|warn|error|crit|】默认是error #error_log logs/error.log notice; #error_log logs/error.log info; #pid logs/nginx.pid; #配置进程pid文件 #配置工作模式和连接数 events { worker_connections 1024; #配置每个worker进程连接数上限,Nginx支持的总连接数等于worker_processor * worker_connections } #配置http服务器,利用他的反向代理功能提供负均衡支持 http { include mime.types; #配置Nginx支持哪些多媒体类型可以在conf/mime.types 查看支持哪些度媒体类型 default_type application/octet-stream; #默认文件类型 #配置日志格式 #log_format main '$remote_addr - $remote_user [$time_local] "$request" ' # '$status $body_bytes_sent "$http_referer" ' # '"$http_user_agent" "$http_x_forwarded_for"'; #配置access.log日志及存放路径,并使用上面定义的main 日志格式 #access_log logs/access.log main; sendfile on; #开启高效文件传输模式 #tcp_nopush on; #防止网络阻塞 #keepalive_timeout 0; keepalive_timeout 65;#长连接超时时间单位是秒 #gzip on; #开启gzip压缩输出
#配置虚拟主机 server { listen 80; #配置监听端口 server_name localhost; #配置服务名 #charset koi8-r; #配置字符集 #access_log logs/host.access.log main; #配置本虚拟主机的访问日志
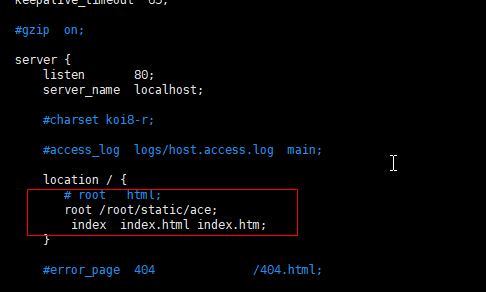
#默认的/的请求,当访问路径中有/,会被该localhost访问到并进行处理 location / { root html; #root 是配置服务器的默认网站根目录位置,默认为nginx 安装主目录下的html目录 index index.html index.htm; #配置首页文件的名称 } #error_page 404 /404.html; #配置404页面 # redirect server error pages to the static page /50x.html # error_page 500 502 503 504 /50x.html; #配置50x错误页面
#精确匹配 location = /50x.html { root html; } #PHP脚本请求全部转发到apache 处理 # proxy the PHP scripts to Apache listening on 127.0.0.1:80 # #location ~ .php$ { # proxy_pass http://127.0.0.1; #} #PHP脚本请求全部转发到FastCGI # pass the PHP scripts to FastCGI server listening on 127.0.0.1:9000 # #location ~ .php$ { # root html; # fastcgi_pass 127.0.0.1:9000; # fastcgi_index index.php; # fastcgi_param SCRIPT_FILENAME /scripts$fastcgi_script_name; # include fastcgi_params; #} #禁止访问.htaccess文件 # deny access to .htaccess files, if Apache's document root # concurs with nginx's one # #location ~ /.ht { # deny all; #} } # another virtual host using mix of IP-, name-, and port-based configuration # #server { # listen 8000; # listen somename:8080; # server_name somename alias another.alias; # location / { # root html; # index index.html index.htm; # } #} #配置https服务 # HTTPS server # #server { # listen 443 ssl; # server_name localhost; # ssl_certificate cert.pem; # ssl_certificate_key cert.key; # ssl_session_cache shared:SSL:1m; # ssl_session_timeout 5m; # ssl_ciphers HIGH:!aNULL:!MD5; # ssl_prefer_server_ciphers on; # location / { # root html; # index index.html index.htm; # } #} }
在这里补充一个小插曲使用 xftp
连接的时候

我再修改nginx.conf的配置文件的时候出现了
-bash: vim: command not found
i. 那么如何安裝 vim 呢?
输入rpm -qa|grep vim 命令, 如果 vim 已经正确安裝,会返回下面的三行代码:
root@server1 [~]# rpm -qa|grep vimvim-enhanced-7.0.109-7.el5vim-minimal-7.0.109-7.el5vim-common-7.0.109-7.el5如果少了其中的某一条,比如 vim-enhanced 的,就用命令 yum -y install vim-enhanced 来安裝:
yum -y install vim-enhanced如果上面的三条一条都沒有返回, 可以直接用 yum -y install vim* 命令
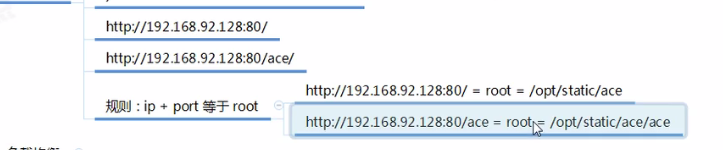
yum -y install vim*当我们想要以 http://192.168.124.55:80/ 启动访问网页
首先修改配置文件
保存退出后,需要重启一下nginx
[root@localhost conf]# ps -ef|grep nginx
root      5552     1  0 22:04 ?        00:00:00 nginx: master process /usr/local/nginx/sbin/nginx -c /usr/local/nginx/conf/nginx.conf
nobody    5553  5552  0 22:04 ?        00:00:00 nginx: worker process
root      5694  2972  0 22:20 pts/0    00:00:00 grep --color=auto nginx
[root@localhost conf]# kill -QUIT 5552
[root@localhost conf]# ps -ef|grep nginx
root      5697  2972  0 22:22 pts/0    00:00:00 grep --color=auto nginx
[root@localhost conf]# /usr/local/nginx/sbin/nginx -c /usr/local/nginx/conf/nginx.conf -t  //测试配置是不是正确
nginx: the configuration file /usr/local/nginx/conf/nginx.conf syntax is ok
nginx: configuration file /usr/local/nginx/conf/nginx.conf test is successful

[root@localhost conf]# /usr/local/nginx/sbin/nginx -c /usr/local/nginx/conf/nginx.conf
[root@localhost conf]# ps -ef|grep nginx
root      5701     1  0 22:22 ?        00:00:00 nginx: master process /usr/local/nginx/sbin/nginx -c /usr/local/nginx/conf/nginx.conf
nobody    5702  5701  0 22:22 ?        00:00:00 nginx: worker process
root      5704  2972  0 22:22 pts/0    00:00:00 grep --color=auto nginx
遇到一个问题,配置文件也配置了,但是就是访问不了网页
然后查找相关资料,顺便也了解了一下防火墙的代理 iptables
(http://www.zsythink.net/archives/1199) 讲的内容很是详细
先查看是否安装了iptables
[root@localhost ~]# rpm -qa|grep iptables
iptables-1.4.21-16.el7.x86_64
安装iptables
[root@localhost ~]# yum install iptables
[root@localhost ~]# systemctl start firewalld.service
[root@localhost ~]# firewall-cmd --zone=public --add-port=80/tcp --permanent
success
[root@localhost ~]# firewall-cmd --reload
success
[root@localhost ~]# firewall-cmd --zone=public --query-port=80/tcp
yes
查看linux的iptables配置
[root@test ~]# iptables -nv -L #-L是--list的简写,作用是列出规则
2、直接查看iptables的配置文档[root@test~]# more /etc/sysconfig/iptables
在新安装的Linux系统中,防火墙默认是被禁掉的,一般也没有配置过任何防火墙的策略,所有不存在/etc/sysconfig/iptables文件。
systemctl stop firewalld
[root@localhost ~]# yum install iptables-services
[root@localhost ~]# systemctl enable iptables
Created symlink from /etc/systemd/system/basic.target.wants/iptables.service to /usr/lib/systemd/system/iptables.service.
在centos下, 无法使用命令lsof, 出现以下信息:
# lsof -i:3690
-bash: lsof: command not found
2. 解决方法
我们可以通过yum来安装:
# yum install lsof
3. lsof 的常用几个命令
lsof -i:(端口号)
如,
lsof -i:3306 (3306默认是mysql服务端的端口)
lsof -i:3690 (3690默认是svn服务端的端口)
==========================================================
-bash: wget: command not found
yum -y install wget

yum install net-tools
Linux防火墙的开启与关闭
CentOS7

[root@localhost ~]# cat /etc/redhat-release
CentOS Linux release 7.2.1511 (Core)

1.关闭firewall

[root@localhost ~]# systemctl stop firewalld.service            //停止firewall
[root@localhost ~]# systemctl disable firewalld.service        //禁止firewall开机启动

2.安装iptables

[root@localhost ~]# yum install iptables-services            //安装

[root@localhost ~]# systemctl restart iptables.service #重启防火墙使配置生效

[root@localhost ~]# systemctl enable iptables.service #设置防火墙开机启动

[root@localhost ~]# systemctl disable iptables.service #禁止防火墙开机启动


CentOS6


[root@localhost ~]# service iptable status      ---查看防火墙状态

[root@localhost ~]#servcie iptables stop           --临时关闭防火墙

[root@localhost ~]#service iptables start          --临时启动防火墙

[root@localhost ~]#service iptables restart          --重启防火墙

[root@localhost ~]#chkconfig iptables off          --永久关闭防火墙

[root@localhost ~]#chkconfig iptables on          --永久开启防火墙
蓝色部分是我为了解决Nginx访问不到指定页面所做的尝试,但是依然不行啊,还是不能访问到页面啊。
具体参考()
nginx页面不能访问 nginx页面不能访问 检查服务端服务是否启动成功 在服务端使用wget和curl测试下返回的是否正常 浏览器wget或者curl等软件访问不了Ngixn页面 1. 检查服务端服务是否启动成功 [root@shizhan02 html]# ps -ef |grep nginx #查看nginx服务是否启动 root 1609 1 0 16:46 ? 00:00:00 nginx: master process nginx nginx 1610 1609 0 16:46 ? 00:00:00 nginx: worker process root 1898 1593 0 18:09 pts/0 00:00:00 grep nginx [root@shizhan02 html]# lsof -i :80 #检查80端口是否在监听状态 COMMAND PID USER FD TYPE DEVICE SIZE/OFF NODE NAME nginx 1609 root 6u IPv4 11948 0t0 TCP *:http (LISTEN) nginx 1610 nginx 6u IPv4 11948 0t0 TCP *:http (LISTEN) [root@shizhan02 html]# netstat -lnt |grep 80 tcp 0 0 0.0.0.0:80 0.0.0.0:* LISTEN 2.在服务端使用wget和curl测试下返回的是否正常 [root@shizhan02 html]# wget 127.0.0.1 --2017-11-20 18:16:58-- http://127.0.0.1/ Connecting to 127.0.0.1:80... connected. HTTP request sent, awaiting response... 200 OK #返回值200表示链接正常 Length: 612 [text/html] Saving to: “index.html.2” 100%[===============================================================>] 612 --.-K/s in 0s 2017-11-20 18:16:58 (279 MB/s) - “index.html.2” saved [612/612] [root@shizhan02 html]# curl 127.0.0.1 #返回页面的值表示正常。 <!DOCTYPE html> <html> <head> <title>Welcome to nginx!</title> <style> body { 35em; margin: 0 auto; font-family: Tahoma, Verdana, Arial, sans-serif; } </style> </head> <body> <h1>Welcome to nginx!</h1> <p>If you see this page, the nginx web server is successfully installed and working. Further configuration is required.</p> <p>For online documentation and support please refer to <a href="http://nginx.org/">nginx.org</a>.<br/> Commercial support is available at <a href="http://nginx.com/">nginx.com</a>.</p> <p><em>Thank you for using nginx.</em></p> </body> </html> 以上是检测Nginx在服务端安装及浏览是否正常。 3.浏览器,wget或者curl等软件访问不了Ngixn页面。 1. 关闭SEliun ``` [root@shizhan02 html]# getenforce #查看iptables状态,是否为关闭,以下为关闭状 态, Disabled [root@shizhan02 html]# vim /etc/selinux/config #永久关闭iptalbes SELINUX=disabled #需要将此行更改为disabled SELINUXTYPE=targeted [root@shizhan02 html]# setenforce 0 #临时关闭iptables的方法,如果临时能够访问 了,那么久使用下面的方法添加80端口在iptables的配置文件上 setenforce: SELinux is disabled [root@shizhan02 html]# service iptables status #检查iptables Table: filter Chain INPUT (policy ACCEPT) num target prot opt source destination Chain FORWARD (policy ACCEPT) num target prot opt source destination Chain OUTPUT (policy ACCEPT) num target prot opt source destination 问题不是出在nginx上,而是出在iptable上,在iptable上添加80端口 Linux代码 收藏代码 #vi /etc/sysconfig/iptables //在倒数第二行加入80端口 -A RH-Firewall-1-INPUT -m state --state NEW -m tcp -p tcp --dport 80 -j ACCEPT //重启iptables #/etc/init.d/iptables restart 再通过ip访问 ok~ 没问题了 ``` 2. 通过本地客服端测试 第一步:在客服端ping服务端的ip,我这里的的服务端为192.168.1.202 ``` [root@shizhan02 html]# ping 192.168.1.202 PING 192.168.1.202 (192.168.1.202) 56(84) bytes of data. 64 bytes from 192.168.1.202: icmp_seq=1 ttl=64 time=0.014 ms 64 bytes from 192.168.1.202: icmp_seq=2 ttl=64 time=0.024 ms ^C --- 192.168.1.202 ping statistics --- 2 packets transmitted, 2 received, 0% packet loss, time 1814ms rtt min/avg/max/mdev = 0.014/0.019/0.024/0.005 ms #提示按ctrl+c结束 ``` 第二步:在客户端上telnet服务端ip,端口 ``` [root@shizhan02 html]# telnet 192.168.1.202 #返回如下信息表示链接成功 Trying 192.168.1.202... telnet: connect to address 192.168.1.202: Connection refused ``` 第三步:在客服端使用wget或者curl命令检测。 ``` [root@shizhan02 html]# curl -i 192.168.1.202 HTTP/1.1 200 OK Server: nginx/1.13.6 Date: Mon, 20 Nov 2017 10:42:31 GMT Content-Type: text/html Content-Length: 612 Last-Modified: Mon, 20 Nov 2017 08:08:26 GMT Connection: keep-alive ETag: "5a128d7a-264" Accept-Ranges: bytes <!DOCTYPE html> <html> <head> <title>Welcome to nginx!</title> <style> body { 35em; margin: 0 auto; font-family: Tahoma, Verdana, Arial, sans-serif; } </style> </head> <body> <h1>Welcome to nginx!</h1> <p>If you see this page, the nginx web server is successfully installed and working. Further configuration is required.</p> <p>For online documentation and support please refer to <a href="http://nginx.org/">nginx.org</a>.<br/> Commercial support is available at <a href="http://nginx.com/">nginx.com</a>.</p> <p><em>Thank you for using nginx.</em></p> </body> </html> ``` 3. 在浏览器访问输入如下的内容,服务器ip. http://192.168.1.202/ 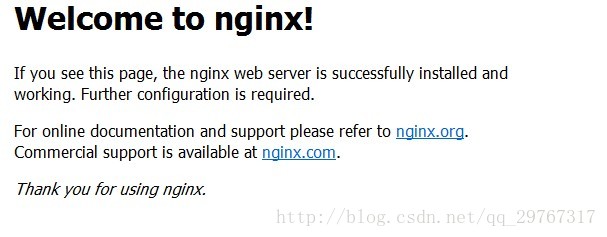 这里有一个小小的坑,希望大家注意一下,使用浏览器输入ip访问的时候,注意清空一下缓存,或者重新打开一下浏览器,有可能让你一 --------------------- 作者:竹叶根 原文:https://blog.csdn.net/qq_29767317/article/details/78579800
不行啊,还是访问不了网上的方法都试过了。还是不能访问。
先记录一下笔记,我找个高手来帮我一下吧
、
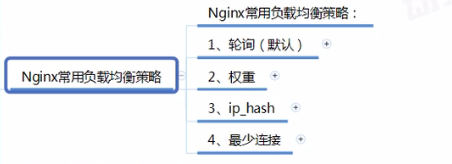
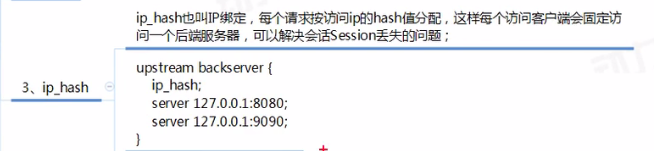
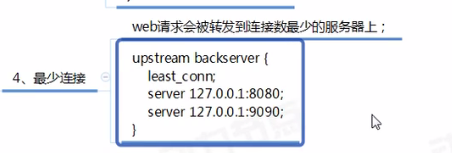
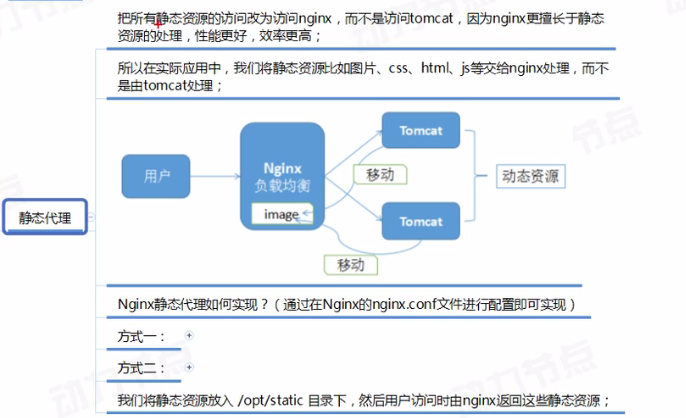
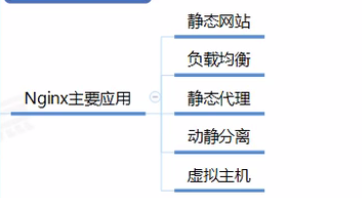
Nginx实现负载均衡